Hi all! After laziness and time, I am writing this post. Without opening America, I will say that the quality of spare parts is “excellent”.
One fine morning the glove compartment opened with a characteristic click, a special effect was also present...
The glove compartment closed without problems, but it cannot be opened again. Come on, google drive2, find the repair kit there. I pick up the phone and call the nearest parts stores. Repair kit from 50 rubles for 2 rods and 2 handles, in another store 1 rod and 1 handle 12 rubles. I bought option 2 for 12 rubles, BUT the wrong color, i.e. black. And my plastic is not black at all. I looked in other stores: the result is the same, shit from one place for everyone...
People are divided into 2 types: - Buy (okay, when you have money and what to buy) - I will do it myself. (default is good)
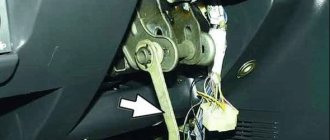
To remove the glove compartment from the car, you will have to suffer. Here's a typical way to remove a good glove box. But we have a new entrance: there is no access to the internal screws, the door does not open. You can foolishly pull something and break it, or you can try with a minimal break. In the images in the post above, the sequence is as follows: 1) Unscrew the socket under the glove box, opening access to the hinges. 2) open the door slightly, revealing the working support 3) remove the white boards from the hinges 4) unscrew the side screws holding the lid latches. (it’s difficult to remove the right one, the same side no longer opens) 5) carefully remove the door and unscrew the 2 internal screws.
We've finished dancing.
And then we glue what came off with superglue. (the price of glue is not important, the main thing is to glue it, the price is 42 rubles for 6 tubes) Then I secured it with a triple screw and secured it with a nut. It's important to correct this, but not to pull too hard.
AutoNews / Reviews / Tests
How to Open the Glovebox of a VAZ 2114
How to open the glove compartment of a VAZ 2114 in case of breakdown
In cars of the "ten" family, obstacles often arise with the storage compartment, so now we will see how to open the storage compartment of a VAZ 2114 and what to do if its handles are broken. The need to remove this part of the torpedo may arise without a broken handle.
So, during the autumn preparation of the car for the winter season, difficulties may arise with the car’s heating system (antifreeze leaks, difficulties with the heater tap, etc.). Any actions related to the complete (partial) disassembly of the “fourteenth” torpedo involve working with the “pocket” of the car and a reasonable question: “how to remove the glove compartment on a VAZ 2114?”
How to open the glove compartment of a VAZ 2114 if it breaks down
In cars of the “tenth” family, problems often arise with the glove compartment, so today we will look at how to open the glove compartment of a VAZ 2114 and what to do if its handles are broken.
The need to remove this part of the torpedo may arise without the handle being broken. So, during the autumn preparation of the car for the winter season, problems may arise with the heating system of the car (antifreeze leakage, problems with the heater faucet, etc.). Any action related to the complete (partial) dismantling of the “fourteenth” torpedo implies working with the “pocket” of the car and a reasonable question: “how to remove the glove compartment on a VAZ 2114?”
Forethought as a reliable method of getting rid of unforeseen problems
In this article, we have presented the most effective ways to open a mailbox without a key without picking the lock. They are suitable for common constipation. If a new modern lock has been installed on the box, it is almost impossible to open it using the methods described above.
If you are just waiting for correspondence that interests you, you can wait for the postman. They usually run in the morning or evening. You can also leave a note in the mailbox asking for mail to be dropped off at a neighbor's mailbox if you have made arrangements with them in advance to use their cell phone.
To completely avoid such problems and not have to look for ways to open a mailbox lock, it is recommended to keep a spare key or a copy of it in a desk drawer or closet. So even if you lose the primary key, you will always have another one that can be multiplied later.
Removing the glove compartment
Provided that the glove compartment lid mechanism is working properly, removing it will not take much time.
The algorithm of actions is as follows:
- We close the glove compartment and crawl under the bottom of the dashboard, where we see two screws.
- They secure the lower part of the glove compartment to the front panel housing, so unscrew them and remove the cover that hides the mechanism.
- Now it's the turn of the two top bolts (open the cover and look up, you won't miss them).
- After this, carefully pull the lid - the entire structure of the glove compartment will pliably slide out into your hands.
- To complete the complete disassembly, all that remains is to unscrew the 2 bolts at the edges and remove the two stoppers. The former are located at the junction of the cover with the fixing metal strips, and the latter are at the junction of the cover and the body.
- The mechanism is completely disassembled and you can see the lock structure; if not (this happens, depending on the glove compartment model), you need to unscrew 2 additional screws that are located on the inside of the lid.
IMPORTANT! When reassembling, be sure to attach the cover and screw in all the necessary bolts. If you first install the body, and only then decide to attach the roof, you will not be able to do without the suffering associated with the left bolt - the torpedo will not allow you to get there.
Dismantling
1. Remove the top trim of the control panel
CAR INTERIOR DETAILS, REPAIR WORK, Upper control panel trim - driver's side.
2. Remove the lower control panel trim.
CAR INTERIOR, REPAIR WORK, Lower control panel trim on passenger side.
3. Remove the 2 Torx screws that secure the glove box to the bottom of the control panel.
4. Open the glove compartment.
5. Remove the 5 Torx screws that secure the glove box.
6. Disconnect the connector block from the glove box lamp.
7. Disconnect the cable from the glove box lock.
8. If installed in a vehicle: Remove the 2 Torx screws that secure the CD changer to the glove box.
9. If installed in a vehicle: Remove the CD changer from the glove box and disconnect the cable terminal and both connecting blocks. Remove the CD changer.
10. Remove the glove box assembly.
NOTE. Do not perform further disassembly if a component is removed only for ease of access.
11. Remove the fuse puller.
12. Remove the clips from the glove box.
13. Remove the fuse box cover.
14. Remove the backlight cover.
15. Remove the 2 screws that secure the lock to the glove box.
16. Remove the lock plate and lock from the glove box.
If the lock is broken
Models of the “tenth” series all suffer from broken handles. It is not known for certain why it breaks; take it as a design feature. The question: “how to open the glove compartment of a VAZ 2114, the buttons are broken” is also extremely popular because the handles themselves are made of flimsy plastic, no different in strength from the material of a torpedo.
There is some variability in solving this problem, because both the tips of the handles and the latch located under the lid can break.
In the first case, you are lucky:
- you need to take any tool with oval handles that require compression (pliers are perfect);
- turn the instrument over and insert the tips of the handles into the finger grooves on the lid;
- you need to press firmly on the handles and their tips will complement the length of the tongue, and the lid will open.
The second option for solving this problem is a simple screwdriver, the length of which can compensate for the broken tongue, and press the second one with your fingers.
If your internal latch is broken, then things will be much worse:
- first you need to open one handle and pull the open edge towards you so that it does not close;
- then use a thin screwdriver (preferably a knife) to slowly push the closed guide inside the lid.
ADVICE! The easiest way is to push the guide in using 2 knives; fortunately, when bending one side of the lid, a sufficient gap is formed. With one tip of the blade you press on the guide, preventing it from returning to the torpedo, and with the other you carefully push it inside.
Design and operation diagram of the interior heater of the VAZ 2114
During the cold season, the interior of the VAZ 2114 car is heated using a heater or stove. The basis of the stove is the radiator. Using a system of air ducts and dampers, the heat from it is directed to different areas of the cabin. This creates a microclimate that prevents the glass from freezing and provides comfortable conditions for the driver.
The stove in a VAZ 2114 car works on a fairly simple principle.
The heater operation scheme is quite simple. The heat source is a running engine, for cooling of which a special liquid is used - antifreeze. When the antifreeze moves in a vicious circle, heat is transferred from the hot motor to the cooling zones. There are two such zones in a passenger car - these are the radiators of the engine cooling system and the heater. Hot antifreeze transfers heat to cold air, which circulates through the radiator honeycombs using fans. Thus, the antifreeze cools down and returns to the engine, where it heats up again. This process must be continuous while the engine is running.
Step-by-step instructions for removing and installing the stove
The heat exchanger of the VAZ 2114 car is located in an extremely inconvenient place. Therefore, when removing and installing it, you will have to do a fairly large amount of disassembly and assembly operations.
The VAZ 2114 heater is equipped with air ducts, ventilation nozzles and levers for regulating the warm air flow
Tools and consumables
To work you will need the following tools:
- Phillips and slotted screwdrivers with short and long handles (screwdriver);
- set of wrenches;
- container and rubber hose for draining coolant;
- rags, a piece of oilcloth.
Procedure for replacement
In order to remove the heater radiator of a VAZ 2114 car, you should perform the following operations:
- First, drain the antifreeze on a cold engine.
- Then unscrew the screw located behind the plastic plug.
Remove the glove compartment on a VAZ 2114 car
Remove the glove compartment. First, unfasten and detach the bottom half. Then remove the cover along with the light bulb. Unscrew the screws securing the upper part and, with slight pressure and rotation, lower it down. In total, you will need to unscrew six screws.
Unscrew the screws securing the instrument panel
Unscrew the two upper and two lower self-tapping screws securing the instrument panel.
This is how the lower steering column cover is removed
Remove the lower protective cover from the steering column. To do this, remove three self-tapping screws and three screws from below.
Pull the plug out of the cigarette lighter socket.
Disconnect the connectors of the radio pads and pull it out
Disconnect the connectors of the pads from the car radio and remove it from the slide.
Unscrew the screws securing the plastic console
On both sides, unscrew the screws securing the plastic console.
Unscrew the two self-tapping screws securing the console
Pull out the flags that regulate the position of the damper and remove the heater fan mode switch.
Detaching the plastic console from the panel
Be sure to use a marker or notches to mark the disconnected terminals from the buttons on the console
Disconnect the console from the panel.
Disconnect the ashtray light connector.
Unscrew the two screws from the diagnostic connector
Unscrew the two screws from the diagnostic connector and carefully completely disconnect the console.
Carefully remove the console
Carefully remove the console and set it aside.
Unscrew the two screws securing the metal base
Unscrew the two screws securing the metal base to the floor - one on the left and the other on the right side of the bracket.
Unscrew the four screws securing the dashboard
Unscrew the four self-tapping screws securing the front panel (“dashboard”) - two each to the left and right of the center of the console mounting.
Unscrew the two large screws securing the metal structure
First remove two large screws, then two smaller screws that secure the iron structure.
Remove the metal structure and pull out the ECU
Pull the electronic control unit out from under the console.
To access the heater radiator, lift the left side of the dashboard
To access the heating radiator, lift the left side of the dashboard using a jack.
In case antifreeze spills, place an oilcloth under the hoses and rags on it.
Unscrew the clamps connecting the radiator to the engine cooling system from the hoses.
Unscrew the clamps from the hoses connecting the radiator to the engine cooling system.
- Remove the rubber tubes from the heat exchanger pipes.
- Drain the coolant from the radiator into a prepared container.
Removing a faulty radiator from its socket
To avoid the formation of an air lock in the cooling system, remove the hose from the throttle body
Video: replacing the radiator of a VAZ 2114 stove
During the operation of a car, situations arise that any car enthusiast can resolve independently. Replacing a stove radiator is precisely this type of operation. As you can see from the article, doing this yourself is quite simple. The main thing is that after removing and installing the radiator, you do not have any unnecessary parts left, and all screws and clamps are tightly tightened. Good luck on the roads!
Design and reasons for replacing the stove radiator
The VAZ 2114 stove radiator has a simple but durable design. Its core consists of two rows of aluminum tubes and transverse thin metal plates that form a honeycomb. This ensures heat accumulation in the core. The ends of the tubes are flared in end plates and sealed with special materials. This ensures a tight fit of the mating surfaces. Three plastic tanks are welded to the ends of the core. Two tanks on one side are connected to the cooling system, and the third - on the opposite side - circulates antifreeze in the radiator.
The service life of the heater radiator is noticeably less than the service life of the car. Usually tubes, pipes, tanks begin to leak, or the core becomes clogged. For the VAZ 2114, heater radiators manufactured by DAAZ, Luzar, Pramo, Fenox, etc. are suitable, each of which has its own advantages and disadvantages.
Heater valve malfunctions: replacement and necessary tools
In addition to replacing the radiator, the VAZ 2114 sometimes requires the installation of a new heater tap. Most often, replacement is carried out due to the fact that the faucet has become “stuck” or due to the appearance of a leak. In both cases it needs to be replaced. For motorists, a leak will be a more unpleasant incident, since its elimination may not be limited to replacing one element. If the driver does not notice the leak in time, antifreeze can flood the entire interior of the VAZ 2114. It is not so difficult to identify it:
- The appearance of wet marks on the floor in the car (the radiator may also be the cause);
- There is a smell of coolant inside the car.
If one of these points is present, then it is necessary to immediately inspect the heating system of the VAZ 2114 and change the part, as well as check the radiator. To do this, you need a flashlight; a visual check of the heater tap and the interior floor will be enough. The cause of a coolant leak may be cracks in the pipes or pipes of the heating radiator. To replace the faucet, you should have on hand:
- new heater radiator faucet for VAZ 2114. It is best to take the ceramic version;
- penetrating fluid WD-40;
- metal brush;
- a set of wrenches - there must be both socket and ring wrenches;
- a set of screwdrivers – flat and Phillips;
- silicone sealant;
- empty coolant container;
- lift or inspection pit.
Choosing a new heater radiator
New cars of the VAZ family are equipped with heat exchangers from the Dimitrovgrad Automotive Component Plant. Their production uses technology from the French company VALEO (SOFICA).
The original heater radiator produced by DAAZ has small honeycombs
When purchasing a new radiator, the first things to consider are:
- frequency of installation of transverse plates;
- strength and rigidity of the plates;
- the presence of plastic swirlers in round aluminum tubes.
DAAZ radiators differ from their analogues in their tiny honeycombs, in which the transverse plates are located at a very small distance from each other. Due to this, the air remains in contact with the core for a long time and heats up more. The high rigidity of the plates does not allow them to deform under light impacts.
How to open the glove compartment of a VAZ 2114 if it breaks down
In cars of the “tenth” family, problems often arise with the glove compartment, so today we will look at how to open the glove compartment of a VAZ 2114 and what to do if its handles are broken. The need to remove this part of the torpedo may arise without the handle being broken.
So, during the autumn preparation of the car for the winter season, problems may arise with the heating system of the car (antifreeze leakage, problems with the heater faucet, etc.). Any action related to the complete (partial) dismantling of the “fourteenth” torpedo implies working with the “pocket” of the car and a reasonable question: “how to remove the glove compartment on a VAZ 2114?”
In conclusion
Now you understand how to disassemble the glove box on a VAZ 2114 and what to do if it breaks. The main thing to remember is that if the handles do not fit the guides, turning them 90 degrees from the center of the lid and putting them on in a hooked motion will make the job much easier.
Below see the technical characteristics of the VAZ 2114, the glove compartment is broken, how to open it. Express your opinion about the car in the article reviews.
Answer from car owner Vseslav: The cost of acquisition and operation is unrealistically low! Yes, compared to the cheaper VAZ 2105! There are many times fewer breakdowns and breakdowns than imported cars. And in terms of comfort and controllability, especially after investing 60,000 rubles in tuning the engine, chassis and brakes, it is quite comparable to a Mercedes. Only there is no air conditioning. My stove in winter will give an advantage in terms of warmth in the interior of any imported car. There are absolutely no irreparable defects, like on the VAZ 21099.
Posted by admin: at the request of Decim
Category: The most useful tips for driving a car
Description: The dimensions are as follows: length - 3517, width - 1100, height - 1208 mm. Wheelbase - 2124 mm. Ground clearance - 184 mm. The car is equipped with a hybrid power unit. The 4-cylinder engine is equipped with a system that ensures the engine's power output. There are 4 valves per cylinder. The diameter of one cylinder is 71 mm, the piston stroke is 79 mm. The crankshaft accelerates to 4000 rpm. Maximum torque is maintained up to 4000 rpm.
Release date: March 17, 2022
Laughter in the topic: - I woke up... I looked: something is wrong... Also “Something is wrong” I woke up and finished: - I want coffee! I want coffee!
Removing the glove compartment
Provided that the glove compartment lid mechanism is working properly, removing it will not take much time.
The algorithm of actions is as follows:
- We close the glove compartment and crawl under the bottom of the dashboard, where we see two screws.
- Now it's the turn of the two top bolts (open the cover and look up, you won't miss them).
- After this, carefully pull the lid - the entire structure of the glove compartment will pliably slide out into your hands.
- To complete the complete disassembly, all that remains is to unscrew the 2 bolts at the edges and remove the two stoppers. The former are located at the junction of the cover with the fixing metal strips, and the latter are at the junction of the cover and the body.
- The mechanism is completely disassembled and you can see the lock structure; if not (this happens, depending on the glove compartment model), you need to unscrew 2 additional screws that are located on the inside of the lid.
They secure the lower part of the glove compartment to the front panel housing, so unscrew them and remove the cover that hides the mechanism.
IMPORTANT! When reassembling, be sure to attach the cover and screw in all the necessary bolts. If you first install the body, and only then decide to attach the roof, you will not be able to do without the suffering associated with the left bolt - the torpedo will not allow you to get there.
Lada Kalina Hatchback DANGER made in Russia! › Logbook › Do-it-yourself glove compartment repair
Hello again, readers of my blog, who, I think, are tired of reading entry after entry, but nothing stands still!
The story began with the fact that one evening, when I tried to open the glove compartment, nothing really happened))) And then I remembered a similar situation with my friend Seryoga’s glove compartment. The next day I turned to him for help on this issue. Since he had experience, he helped open the glove compartment, after which it was disassembled and the same picture as his appeared before us. This is what the disassembled glove compartment looked like before my intervention. Only the right linkage was removed. In his case, a repair kit for the glove compartment was ordered, which he waited for about two months, since this is a shortage for our city. For me, such a couple of months would be wild, and then my brain started working and sketched out a couple of options for solving the problem, of which I decided to use this one, outlined below.
I took a 3-piece bolt long enough to replace the damaged plastic rod. Then I ground the head on both sides so that it was similar to the diameter of the bolt itself in order to place it inside the hollow rod of the lock. Further, everything will be clear to you from the photographs. I will only add that on the standard lock spring I counted 16 turns, of which I cut 7 from each of the two springs, for smoother operation of the lock, which is very noticeable when opening and closing, in comparison with the drain, and then I generously lubricated everything to get rid of from unnecessary sounds (grinding/friction), smooth running and wear resistance
On the left, the left one itself, is a whole rod with a whole protrusion for gripping one of the two lock buttons, and on the right, of course, is the right rod, from which this protrusion has broken off
The rod from the right rod has already been sawed off here
In place of the sawn rod, a hole was made corresponding to the diameter of the selected bolt
I slightly (fractions of a millimeter) widened the channel with a drill according to the cutter principle in order to place the bolt completely inside for fastening
This is what the unfolded assembly principle looks like
Actually, Bol himself in profile
The same bolt in the front
Comparison of the assembled rod with the left one (whole)
If the lock is broken
Models of the “tenth” series all suffer from broken handles. It is not known for certain why it breaks; take it as a design feature. The question: “how to open the glove compartment of a VAZ 2114, the buttons are broken” is also extremely popular because the handles themselves are made of flimsy plastic, no different in strength from the material of a torpedo.
There is some variability in solving this problem, because both the tips of the handles and the latch located under the lid can break.
In the first case, you are lucky:
The second option for solving this problem is a simple screwdriver, the length of which can compensate for the broken tongue, and press the second one with your fingers.
If your internal latch is broken, then things will be much worse:
- first you need to open one handle and pull the open edge towards you so that it does not close;
- then use a thin screwdriver (preferably a knife) to slowly push the closed guide inside the lid.
ADVICE! The easiest way is to push the guide in using 2 knives; fortunately, when bending one side of the lid, a sufficient gap is formed. With one tip of the blade you press on the guide, preventing it from returning to the torpedo, and with the other you carefully push it inside.
Feel like a burglar
Of course, digging into the lock of your own mailbox is not very pleasant, but you can imagine yourself in the role of a burglar.
The first way to extract the correspondence you are interested in does not involve the use of any tools. If the box is not deep, and the magazine or newspaper is quite voluminous, then you can pull it out by hand, carefully inserting your fingers through the slot.
The second way to open a mailbox lock involves making a key. To do this, take a strong, thin, flat plate - for example, it could be a thin knife. Insert it into the slot where the locking mechanism is installed. Use a kind of lever to press the tongue slightly. If you are persistent and willing, you can move it aside and open the door. This method has a significant drawback - with strong pressure, you can easily damage not only the lock, but also the door.
A safer, but time-consuming way to open a mailbox lock is to use a master key. This method of opening a lock without keys is most effective against old postal locks. The functions of a master key can be performed by a variety of objects:
- hairpin;
- thin wire;
- small nail scissors;
- knitting needle, etc.
Carefully insert the product you have chosen as a master key into the keyhole and try to turn it in the direction of unlocking the lock. Take a closer look at how the castle behaves. If you feel like you can unlock it, you're doing everything right. If all else fails, pick up another item or try harder.
Glove box repair kit
The price of this package is 60-100 rubles, which is much cheaper by almost 1000 for a new lid, but the problem is that it is very rarely found in stores. Its kit consists of two pairs of guides and handles, but the spring is not included in the kit, so if it breaks, you will have to look for a “makeshift replacement”. The repair of the VAZ 2114 glove compartment itself does not take much time; the parts are not fixed by anything other than the design of the grooves, so replacing them will not be difficult.
When you are done with the replacement, proceed to assembly and do not forget about the above tips.
Removing the upper glove compartment on the europanel
#1 SkyMix
- Users
- 60 messages
- City: Krasnoyarsk
- Car: VAZ 21083i 8V CAMARO
The eyes are afraid. and sometimes your hands too!
- Top
#2 Puma
cougar with camera
- City: 99rus
- Auto: 21150i, 11196
The dashboard cover needs to be removed
Z.Y. I really want to remove it.
Post edited by Puma: 01 February 2008 - 09:08
- Top
#3 DRFT
- City: 199Rus
- Interests: Automotive design
- Car: AWD 2.9L
Post edited by DRFT: 14 October 2007 - 17:35
- Top
#4 SkyMix
- City: Krasnoyarsk
- Car: VAZ 21083i 8V CAMARO
The eyes are afraid. and sometimes your hands too!
- Top
#5 Puma
cougar with camera
- City: 99rus
- Auto: 21150i, 11196
- Top
#6 IgorFS
- City: 199rus
- Interests: styling
- Car: VAZ 211540
this is no longer new. on new Samaras there is nothing even there... everything is smooth/solid and flush, so to speak)