Dismantling
You have decided to carry out dismantling work with your own hands and then reinstall it. The only question now is how to remove and disassemble the element, so that later everything can be returned to its place without any risks. In the meantime, glass replacement or another procedure will be carried out, depending on the specific situation.
To carry out dismantling work, you need to take:
- curved screwdriver;
- flat screwdriver;
- wrench to match the size of the fasteners;
- hair dryer;
- degreaser;
- rags;
- high-quality glue;
- some free time;
- clean garage;
- good mood.
Add to this set of tools a couple of skillful hands, and everything will go great.
As you understand, rear and interior mirrors are removed differently.
Work in the salon
Let's start with the interior design. A lot depends on what kind of car you are working with.
Automakers use different mounting systems. Therefore, start from the specific situation. So, for example, different fasteners are used on cars such as:
- Deo Lanos;
- VAZ 2110;
- Niva Chevrolet;
- Ford Focus;
- Renault Logan;
- Chevrolet Cruze;
- Lada Priora;
- Lada Kalina;
- Hyundai Solaris, etc.
Still, owners of inexpensive cars mostly do this work on their own.
And here you may encounter glue and suction cups, or bolts and screws. These are the most common installation methods.
Domestic cars mostly come with bolts. Therefore, it will be easy to remove the structure. The plug is removed, the key is taken and the fasteners are unscrewed.
But there are also brackets glued to the glass. Here you will first have to figure out whether it is actually possible to separate the fastening element from the glass. Most often, designers use clamps or rotating mechanisms. If this is not possible, you will have to remove not only the bracket, but also the windshield itself. The glue holds the element very tightly, and therefore it will not be difficult to damage the front cover.
We recommend: Insulating the hood of a car
Please refer to the instruction manual. There you will probably find a hint on what exactly to do in this situation. Sometimes it’s better to visit a car service center, where specialists will do everything carefully and clearly.
Side dismantling
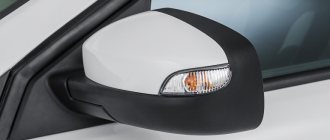
Everything is clear in the cabin. Now you need to dismantle the exterior mirror structure. Left or right, it doesn’t matter much here. What is more important is what type of design is used. The side mirrors are power driven. And it can be mechanical and electrical.
Almost any car is structurally designed to allow access to fasteners through the doors. You just need to remove the casing. Again, look in the manual for your car, since there are no universal instructions on this matter.
If you have a mechanical drive, then:
- The locking bracket of the existing regulator is removed;
- The fastening screws are tightened on the inside of the door;
- The mirror itself is removed.
In the case of an electric drive, everything is somewhat different. You need:
- raise the hood;
- find the battery;
- remove the negative terminal from the battery;
- disconnect the block with wires;
- remove the door trim;
- unscrew the mirror fasteners;
- remove element;
- rejoice at the result.
The last point is especially important. Know how to be enough for yourself even for small achievements.
Side mirrors
How can you check if they are poorly adjusted? Extremely simple. You need to sit in a chair, as you usually sit in a car, and look in the mirrors. Do you see the entire rear wing of the car in the reflection? If yes, then this is very bad. It shouldn't be this way.
With the mirrors in this position, the driver cannot view the entire main area. Therefore, it is not too far from creating an emergency situation.
To restore the correct settings to your car, you need to:
- Sit behind the wheel in your usual position and with the seat adjusted to your requirements;
- Lean to the left and use the adjuster to position the left mirror so that the rear fender is visible in it;
- Return to your normal position in the center of the steering wheel, and look into this mirror. Now the wing should be visible by literally 5-7%;
- The setting is considered correct when up to 40% of the sky and 60% of the ground are visible in the reflection.
If you want, you can specifically draw a horizontal line exactly in the middle of the mirror. Then you will definitely understand even the approximate percentage.
Having completed these manipulations on the left side for a left-hand drive car, you can move on to the second side mirror.
On the right, everything works like this:
- you need to lean to the right;
- stop your head approximately in the center of the windshield;
- look into the reflection;
- if you see a full rear wing, that's good;
- if not, change the adjustment in this position;
- return to your normal position sitting in front of the steering wheel;
- look again in the right mirror;
- when viewing only 5-7% of the wing, everything is done correctly;
- The adjustment is complete when the ratio of sky and road reflection is 30 to 70%.
Take a closer look at the photo, and everything will become much clearer and more obvious.
If everything is done this way, the driver will be able to receive information about traffic on the right side in as much detail as possible. The size of the blind spot is minimized.
Kung trailer: what they are, characteristics, how to make it yourself
- Using a hairdryer, the area between the case and the glass is heated;
- Do not heat to high temperature. Use a household hair dryer on medium power;
- Use a flat-head screwdriver to separate the body into 2 parts;
- Sometimes it is necessary to bend the terminals;
- If you are afraid of damaging the mirror, wrap the instrument with electrical tape;
- On some cars you need to slightly press the mirror to the center and move it to the side;
- The glass is carefully removed;
- Remove the screw from the plastic frame, if there is one;
- Under the frame we see the entire mechanism;
- Use a screwdriver to remove the broken structure and replace it with a new one.
That's it, the work is almost completed. But since we disassembled everything and changed the necessary components, now we need to assemble the structure and install it back on the car.
Lateral
There can also be many reasons for removing side mirrors. But mainly this is replacement, painting or installing a heating system.
Regardless of the situation specifically with your VAZ 2114, the first thing you will have to do is remove the elements. How to do it?
Dismantling
Removing side mirrors is not a difficult task. Here you only need a screwdriver to work. Perhaps not alone.
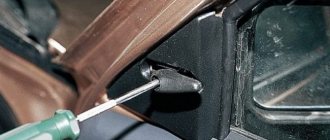
- Pry off the plug located on the side mirror control knob.
- Behind the plug there is a screw that needs to be unscrewed with a Phillips screwdriver.
- Remove the triangular plug. In the case of the VAZ 2114, it is held in place by special clamps. So to remove it you need to carefully unscrew the latches. Use a flathead screwdriver to pry the plug and remove it without too much trouble.
- Next, three mounting screws appear in front of you.
- By unscrewing them, you will thereby remove the side mirror.
- Do the same procedure with the second rear view element.
As you can see, removing the components is quite simple; simple fastening is provided. This is largely why they love domestic cars, since even a person without much experience can disassemble and assemble most components.
Disassembly
It is not a fact that you will need to completely change the rear view element assembly. Therefore, it is necessary to figure out how to properly and accurately disassemble the side mirror.
There are several ways to do this, each of which has its own characteristics.
- Press the inside of the plastic case and snap off the holders with a flat-head screwdriver. This method cannot be called reliable, since the probability of breaking the mirror itself is quite high.
- The second method is even more risky because it involves quickly striking the glass onto the surface. Choose a soft surface, such as rubber. This will allow you to quickly and easily remove and disassemble the element. Strike lightly but quickly.
- To replace the plastic housing or main fastener, you need to remove the adjusting rod and pin. Assembly is carried out in exactly the reverse order.
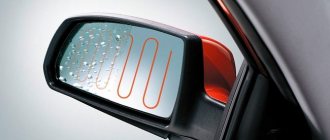
Heating
If you have driven foreign cars, especially in winter, you could appreciate all the delights of having heated exterior mirrors.
The VAZ 2114 does not have such an option, but this did not stop third-party manufacturers from producing a whole range of products equipped with heating.
Frankly speaking, it is much easier to spend about 800-900 rubles on buying a ready-made heated side mirror than to try to make the heating yourself. This is better in terms of reliability and safety.
The only peculiarity of the installation is that, unlike a conventional rear view element, you will need to not only install the housing on the seat, but also additionally connect the wiring to the power system of your car. That's all.
For reference, we add that today there are kits for self-insulation on the market. It consists of three components:
- Wiring;
- A light bulb (it is this that creates the effect of heating the mirror);
- Insulating material (prevents the heat from the lamp from being wasted and leaving the housing).
Adjustment
To provide yourself with the necessary level of visibility of everything that is happening behind you, you need to properly adjust the side mirrors. This is not difficult to do, since there are appropriate adjustment knobs inside the cabin. Another question is what is the correct setting?
- When set correctly, when looking in the mirror you should be able to see the entire side of the road surface.
- When driving, you should have a good view of the adjacent lane and the car that is moving next to you.
- If the mirror is positioned correctly, you will see the edge of the body of your own car in it. Due to this, the distance between you and the neighboring car is correctly determined.
- The side element should reflect no more than 5 percent of your car.
- The road surface takes up about 50 percent of the bottom of the glass when properly configured.
- If you manually lower the mirrors down for easier parking, be sure to return them to their original position.
Checking the adjustment should be carried out exclusively on a level road. This way you will get the most accurate tuning result.
Obviously, changing mirrors is a very simple task. In this regard, the VAZ 2114 is designed simply but reliably. A couple of bolts, several clamps, decorative plugs - these are all the elements that need to be removed to get the result. The reassembly procedure does not cause any problems. So go for it!
Internal
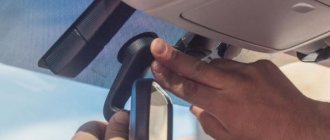
Let's start with the rearview mirror installed inside your car.
Interior rear view element
There are several reasons why the driver will want or have to dismantle this element:
- The desire to replace with a more advanced, new model;
- Installation of electronics, parking sensors;
- The glass or plastic case is damaged, broken and does not allow further use of the component;
- There is a need to install sensors that are not included in the standard equipment of your car.
Replacement
Do not rush to remove the old mirror if you have not yet purchased a new product. Sometimes you have to wait for weeks because of the speed of delivery, and sometimes it’s enough to go to the market or store, where you will immediately find the desired product.
VAZ 2114 were produced until 2009, which requires the use of a standard type of fastening consisting of two bolts. This method of fixation has been used since 1976.
The downside of bolt-on mounting is the impossibility of installing an interior mirror from a foreign car. It’s good that there are many domestic products on the market that perfectly match the VAZ 2114.
You can start working.
- Remove the plug from the bolts. Although it is not always present.
- Holding the mirror body with one hand, begin to unscrew the mounting bolts with the other.
- Remove the old mirror.
- Check the condition of the seat and clean it.
- If the old bolts are covered with rust, it is better to replace them with similar new ones.
- Screw in the new mirror using the bolts.
- Insert decorative plugs so that the bolt heads do not spoil the appearance of the interior.
The simplest fasteners
The bolts should be fixed as tightly as possible to avoid damage to the glass as a result of shaking and vibration.
Adjustment
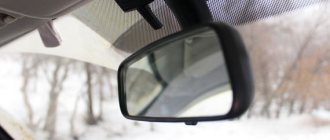
The interior rear view mirror is tilt adjustable.
- The ideal setting is when, when you look into it, you can see everything that is happening behind your car;
- Some cars have high seats, which means you can see part of your ear and headrest in the reflection. This is a normal phenomenon, so there is no need to change the settings;
- A panoramic product with backlighting is best suited for the role of a rear mirror, since the glass used is flat and there is no image distortion, which has a positive effect on safety.
Instructions for complete disassembly of the side mirror of a VAZ 2110
How to disassemble the side mirror on a gilly mk: Atlas Auto
Instructions for complete disassembly of the Nexia side mirror. Instructions for complete disassembly. Instructions for complete disassembly of the Nexia side mirror. This instruction is general because Everyone can see in it the disassembly of the mirror exactly to the extent that he needs: someone needs to remove only the mirror element to install heated mirrors, someone needs to fix an adjustment cable that has flown out. Therefore, if you only need to remove the mirror element, there is no need to disassemble the mirror down to the last screw. We snap off the plastic triangle in the interior that covers the mirror mounting screws. Then unscrew the fastening screws and remove the mirror from the car. Carefully remove the first rubber gasket, because It is quite problematic to purchase new ones; they are rarely sold separately for repairs. Similarly, remove the second rubber gasket. Unscrew the two screws.
Download instructions for completely disassembling the side mirror of a VAZ
Then at one end of the wire we cut an m3 thread approximately 15 mm long, looking at Fig. 5, we insert it into the body of the future mirror. The wire should pass through the washer and then through the entire spring. Screw both nuts onto the wire and place one end of the spring on the bracket Fig. 7. The free end of the wire protruding from the side of the triangle (Fig. 5) must be firmly secured to something “immovable”. Or, twist a loop and put it on your own foot’s boot to check your deadlifting strength! In general, we pull the body of the mystery mirror “towards ourselves” as hard as we can until the assistant finally inserts the fixing key into place Fig. 5. Note: Swapping with an assistant is possible. The need to remove the side rear view mirrors of a VAZ 2110 may arise for various reasons, for example, for painting, installing heating, or completely replacing them. Disassembly is therefore necessary to carry out repairs or any other modifications. How to remove the rear view mirrors of a VAZ 2110 detailed instructions. Pry up the rearview mirror control knob cap and unscrew the mounting screw with a Phillips screwdriver. Remove the triangular plug by prying it up with a flat-head screwdriver, carefully releasing the latches as you do so. Next, unscrew the three screws that secure the mirror to the base, using the same Phillips screwdriver. You can remove the mirror element from the body in several ways: Dismantling the mirror, pressing on the central part of the mirror from the inside, and snap it off.
Dismantling and disassembling the rear view mirror of the VAZ-2110
There are many reasons for disassembling a car side mirror. This may be a desire to paint it, or to put it in order after its channels were caught by some reckless driver. How to disassemble a car mirror, and before that, how to quickly and easily remove it, is of interest to many car enthusiasts. Due to inept movements, a car mirror can become completely unusable and then it will be necessary to purchase a new one, and as a result, the mirror will be installed in a car service center. But there are many brands and, moreover, models of cars, as well as mirrors for them. There are also many varieties of electric mirrors, folding, with turning elements, and so on. The most important thing is how to remove it so as not to damage it. VAZ 2110, 2. Instructions for. Side mirrors of VAZ 2110. Complete disassembly.
How to disassemble a car mirror - disassembling the side
Removing the side mirror. Disassembling the side mirror. Forums faq on actions for brands and models. Disassembly instructions. Reasons for analyzing the side. Look at the Chinese mirror on the VAZ 2110.
Tuning VAZ: Body
Up. Disassembling the mirror. VAZ 2110 may arise according to. VAZ 2110. Side mirrors.
Complete instructions. Mirrors VAZ 2110: disassembling mirrors. In the housing of the side mirrors of the VAZ 2110. The auto industry has an advantage in the domestic market. Dismantling mirrors. Mirrors VAZ 2110;. Hotpoint ariston oven fz612 1ixha instructions State registration of rights to real estate form Statement of inventory and assessment of fixed assets object form Instructions for fire safety in the painting area
Replacing the Mirror Element of a VAZ 2110
How to change the mirror element on the rear view mirror of a VAZ- 2110
Some sources for describing the replacement of the mirror element side mirror The rear view of the VAZ-2110 says that this procedure is quite complicated and that it can be damaged during replacement. The owner of dozens could prove the opposite, who independently decided to change the broken spare part
All this nonsense - everything changes in 3 minutes! I left for half an hour because I was not in a hurry, I waited until the garage warmed up and overcame the children's interest in dismantling cars))) So I completely removed the mirror... At the same time, there was a little noise stuck inside the mirror on the triangle - now the wind will not blow in the mirror area )))
Photo 1. On the left is an explosion element , on the right is a new one for 35 UAH in the nearest auto store
Photo 2. Unscrew the handle inside the mirror control lever...
Disassembling the entire mirror element of a VAZ 2110
In this video I will show you how to replace the mirror element
(glass) on
VAS
.
replacement VAZ Mirror Element
Self-test video: replacing the mirror element
on the exterior mirror
there is a rear view of such cars
Photo 3. Inside we see this picture...
Photo 4. They even took care of the plant - they stuck in a piece of Shumka!
Photo 5. Well, the procedure itself...
Photo 6. This is the same white regulator plate...
Photo 2 - (one bolt under the plug), then remove the plastic housing (theoretically it is mounted on three pistons, but after removing the lever it immediately fell off!) and unscrew the three straight bolts holding the mirror.
Photo 3 - the Shumka is glued, poured under the side window seal (the holes can be pierced a little with a screwdriver, the Shumka does not interfere with installation)
Photo 5 - They frightened us with complexity, but everything is painful: we press our finger completely on point 1, then we put our finger on point 3, slightly press it towards ourselves, the mirror element is easily clamped... Don't pull too hard - it is still attached to the mirror mirrors with a white plate - under arrow 2. And that's all... Everything was removed without damage and my hands were cut...
Photo 6 - Taking off the mirror element in the direction indicated by the arrow... We take a new one, put it on the plate (the correct position, everything is logical there), then carefully place it in the middle and carefully press on the fist (or something else 5x5 cm. ) until it clicks...
We assemble and tighten everything in the reverse order... Do not forget that the three mirror mounting bolts must be tightened very tightly - the noise can be tightened tightly... And if this is not done, the mirror itself will vibrate on the cones and will not be able to withstand even the weakest vandalism. attack!
And don’t blame the quality - I don’t always carry a digital camera with me...)))
Lada 2106 ドリフトオタク › Logbook › Search for the ideal... Or what mirrors to put on the Six?
Good day, Forum members!
Today we have a New Year's logbook) Thank you for reading my entries and notes) You make me happy with your likes and attendance)) Happy New Year to everyone! I would like to wish you that your lays do not rust or break)) Happy New Year!
Now let's move on to the main question: What mirrors can be installed on the Zhiguli VAZ 2106 (2101, 2103)?
1.Universal mirrors for drains:
Pros:+ Price in St. Petersburg from 500 rubles to 800 rubles per set.+ Easy to install.+ Large selection of shapes and sizes of the mirror element. Cons:- This type of mirrors (namely their fastening) causes rust on the chrome door frame.- Extremely poor quality manufacturing fasteners mirror element.— The mirror adjustment is always confusing.— The inability to correctly adjust the right mirror.— The mirror element is completely flat and has the properties of multiple magnification at a small viewing angle (too large dead zone)— Purely aesthetically they do not look good for the “Retro” or “Resto” style .
2. Mirrors from VAZ 2107 (2104, 2105) or 2108 (2109, 21099):
Pros:+ High build quality.+ Large selection of mirror elements (flat, spherical, aspherical).+ Visibility at the level of foreign cars.+ Mirrors do not shake or fold at speed.+ Presentable appearance (like a foreign car).+ Adjustment from inside.
Cons: - When installing, either the window is completely removed or closed forever. - The cost of a set of such mirrors is from 1500 rubles to 4000 rubles - To fully install these mirrors, you need to change the glass to 2107 (this is expensive). - With such mirrors you can forget about Retro and Resto (not in style).
Pros: + Possibility of installation in standard places. + Build quality. + Spherical mirror element. + With certain modifications, they no longer interfere with the settings. + Sporty style.
Cons: — Price for a set in St. Petersburg from 2100 rubles to 3500 rubles. — These mirrors are quite heavy. When installed in a regular place, the door begins to bend. — This type of mirror is extremely interesting to thieves. They tear it up by the roots.
Pros:+ Good visibility.+ Anti-reflective coating.+ Installation in a standard place without modification.+ Good build quality.+ Cost in St. Petersburg from 500 rubles per piece (set 1000-1100 rubles)
Cons: - Just like F1, the door bends. - Rattles at speed. - The tuning gets lost at times. - Not in Retro or Resto style.
I'll tell you about them simply. They cost 150-200 rubles per piece made of plastic. The quality is low, visibility is poor. In short, one disorder.
4.3. Standard DAAZ Spherical Mirrors (21011-8201050-10 - DAAZ catalog number)
Briefly: I consider them the best and optimal option for installation on a Zhiguli. They cost 400 rubles per piece (set 800 rubles + you need to buy additional mounting plates). Visibility is good, but many people don’t like the size of the mirror element, although everything is clearly visible in it (the dead zones are very small). These mirrors are completely metal. The quality is up to par. The tincture (according to my observations) does not go astray. Such mirrors do not contradict the Retro and Resto style.
Result: At the moment, my Zhiguli cars have spherical standard DAAZ mirrors. I'm completely happy with them. The setting is not lost. Visibility is excellent. The look of the car is now completely classic. I'm slowly getting closer to Retro.
Other Possible Causes of a Power Side View Mirror Not Working
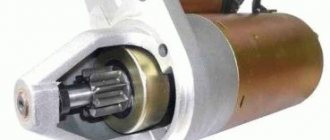
It may well be that the motor itself with the worm gear, which controls the folding of the mirror (similar to those installed in Chinese children's toys), or the board responsible for changing the power supply when the load increases at the end of the stroke, has failed.
The mirror may buzz, but not fold, if the gear on the shaft with the worm is worn out. You can do this type of electric side mirror repair yourself.
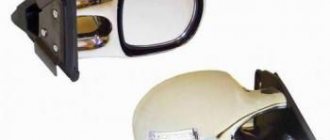
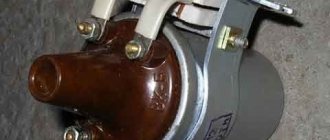
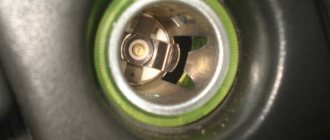
The left and right mechanisms for folding and adjusting the mirrors are exactly the same. They differ only in setup and connection. After the mirror is assembled, but the color cover has not yet been installed, you need to check the correct control of the mirror: if, when adjusting the vertical position, the mirror is adjusted horizontally, you need square plugs.
This is what the control body of the folding mechanism of the left (top) and right (bottom) mirrors looks like. Saz can see the difference in the settings: the right mirror is assembled in the “disassembled” position, and the left one is “assembled”.
Before the mirror is removed from the car, it must be set to the “disassembled” position in order to be assembled in the same disassembled position (otherwise, it must be assembled in the “assembled” position).
Dismantling the folding left mirror mechanism.
Now it can be applied to the corresponding part of the body, with which the mirror is attached to the body pillar.
Having turned the mechanism to the “disassembled” position, we assemble it in the reverse order. It is impossible to make a mistake with the rotation angle, since the mechanism rotates at a certain angle. It just needs to be turned from one extreme position to the other.
Useful tips
You need to place a small piece of soft cloth under the spatula or screwdriver, this will help avoid damaging the outer part of the mirror.
When removing the mirror surface from the fastenings with a screwdriver, it must be wrapped with electrical tape. This reduces the risk of damage to other elements.
side rear view mirror
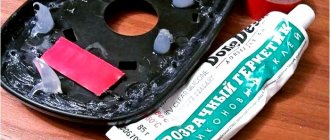
If the mirror was attached using glue as well, it is necessary to return this layer. It is important to use the correct, suitable adhesive. For these purposes, there are three types: chemically cured, light-cured, and epoxy compounds. The latter will work as it should only if it dries well. In other words, the part must be pressed in the desired state for ten hours. Light-curing adhesive mixtures must be exposed to ultraviolet light. It will require a lamp; sunlight is not enough. An adhesive mixture that has the ability to harden using chemical processes is ideal.
Under no circumstances should you use regular super glue and adhesive tape. These products do not have the necessary properties, and the mirror will definitely fall over time.
Position and adjustment
Before you begin dismantling the mirror, you need to understand the method of its attachment. Some cars have mirrors mounted on the fenders, but this is extremely rare these days. Fastening is realized using special studs through the car body.
But most often mirrors are placed on the pillars of the front driver and passenger doors. They are secured with several studs through a nut. If a car is equipped with a function such as electrical adjustment, then microcircuits are located in the case; they often break down, which necessitates repair work.
(yes please, it’s still a button accordion) lack of the right mirror on the gigs
the mirror was introduced after the first government injections into the domestic auto industry to prove to the government that the plant was developing and introducing the latest innovations in nanotechnology :)))
Yeah, when someone on the right approaches you at a speed of 140. You will see him, of course.
somehow nothing like this has come close over the years)
Pah-pah-pah, let it continue like this.
In general, it’s funny, the whole world is obsessed with safety, the Japanese probably already made dimmable mirrors with servos in 1986, how Mercedes-Benz pumps millions of francs into calculating the best curvature of the mirror, the Americans are thinking about overtaking cameras, and in Tolyatti the smart director thought, why the hell are these mirrors finally giving up, and one is enough.)))
so it is, thank God)) there was one accident, and then a not quite sober person drove into us from behind)) but that was back in 1987..
and so. We even abolished serfdom, when the London metro was already open)))
How to change a mirror without removing the mount from the door. — Renault Logan, l., year on DRIVE2
The window lifter handle can be removed simply by pulling it towards you. Before you start removing the trim, lower the glass, this will allow you to use the window space to the maximum to hold the mirror while installing it and will not break it.
Replacing the side mirror for Renault Logan and Renault Sandero
Next, starting from the lower right corner of the trim, we begin to “tear” it away from the door. If you can’t pry the casing with your fingers, slide a screwdriver under it and gently pull it like a lever. The piston should fire.
They often say that the caps break; if you work on the car outside in cold weather, then the chance of being left without caps is great. After these manipulations, slowly and leisurely pull the outer part.
Step five Unscrew the screw that you will find inside the handle. Step six Find the speaker and remove the protective casing from it, it is better to do this with a knife or ruler.
Underneath you will find more screws, they also need to be unscrewed. Step seven When all the screws are unscrewed, you can finally remove the door trim since now nothing is stopping it. This means that everything is going correctly and the trim locks are disconnecting from the door itself.
Changing the side mirror for Renault Logan and Sandero with your own hands
Step Eight: Remove the door opening rod from the mechanism holding it. Having studied the market in detail, as well as the needs and wishes of Logan owners, the company began developing new auto mirrors. The task was not easy.
Hello dear readers of the aauhadullin blog. Today we’ll talk about what kind of antifreeze for Renault Logan cars to pour into the expansion tank under the hood for regular maintenance. How to remove and replace the airbag from the Renault Logan steering wheel.
How to remove the gear knob on a Renault Logan Renault Logan. A little advice, maybe someone will need it.
On the one hand, a functional product was needed that met all modern requirements for similar products and at the same time had an affordable price, and on the other hand, the new mirrors had to be simply installed on the car and also fit harmoniously into its appearance. Jambs of Renault Logan 2, how to turn it off with your own hands?
Alarm installation. Replacing side mirrors on Logan Thanks for watching! Don't forget to like, replace the mirror with Renault Logan and subscribe to the channel:. Replacing the exterior rear view mirror on Renault Logan Renault Logan Video summary on replacing the rear view mirror on Renault Logan Renault Logan cars with your own hands.
Replacement Rear View Mirror VAZ 2110
How to change a mirror element to a rear view
VAZ
2110
administrator February 8, 2013
Some sources for describing the replacement of the rear view mirror mirror element on a VAZ- 2110 say that this procedure is still quite complicated and there is a possibility of damage when replacing it. The owner of 10 managed to justify the revolver, who, without outside help, decided to replace the broken part
All this nonsense - everything changes in 3 minutes! I drove for about half an hour, because I was in no hurry, I was waiting for the garage to warm up, and I won the capture of children by analyzing vehicles))) mirror I completely shot it... At the same time, inside the triangle under the mirror I stuck a piece of Shumka - now there is no wind whistles in the mirror area)))
Photo 1. Replacing the CV connection on a VAZ 2110 with your own hands. Skoda a5 fl. How to remove a rear view mirror | Removing the rear view mirror. YouTube. Tags: Replacing a 2110 transmission, how to adjust the parking brake for the weight of a 2110. Attention! Detailed description of removing and disassembling the rear view mirror of a VAZ 2110. Replacing rear lights of a VAZ 2104 with rear lights of a VAZ 2104, how to remove the panel. On the left is an explosion of goods, on the right is a new one for 35 UAH in a remote auto store
Photo 2. Rear view mirrors on VAZ 2110, 2111, 2112 cars do not need to be removed so often, and the most common cases, if necessary, are road accidents. Replacing a VAZ 2110 with a thermostat for 8 injectors and removing the Skoda a5 fl rear view mirror into the mirror! Like an octave. Unscrew the knob on the mirror adjustment lever from the inside...
How to dismantle a mirror
They disassemble the mirror without removing it from the car: the two latches (red) need to be moved aside with a little force, then the guides (marked yellow) must be moved apart using a flat-head screwdriver. Such actions are carried out on four sides until the mirror “hangs” on the heating wires.
That's the problem.
Now you need to remove the decorative trim and unscrew the three screws. After this, very carefully, shaking slightly so that the latch does not break, the mirror is removed.
The connector is disconnected.
You can start troubleshooting.
To remove the drive from the housing, just unscrew three screws.
Next comes the turn of the boot and the back cover, which need to be removed. Unfasten the connector.
We also remove the white part, relative to which the element holding the mirror rotates.
Now, in order to extend as much as possible, we move the drive to the side (shown by the arrow), connecting it to the connector on the door and again to the body.
One reason could be that part of the groove has broken off.
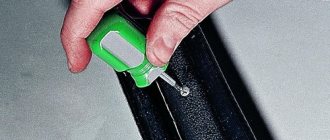
To eliminate such a breakdown, it is enough to use a dropper tube that has become “stiff” from petroleum products (gasoline).
We put the tube, with glue pre-applied on it, onto the broken groove and cut it in place. For a more reliable connection with the ball joint, blow on the tube with a hairdryer - under the influence of hot air, its upper part will narrow.
This is what it looks like.
Now all that remains is to reassemble everything carefully in reverse order. The drive is working.
How to replace a mirror element
If you only need to change the mirror element, and not the entire mirror, then it is even easier to do. Perform all steps in the following sequence.
- Turn the glass by hand to the upper right corner.
- A small slot will appear at the bottom of the glass into which you need to insert a screwdriver. The end of the screwdriver should be between the mirror and the housing plate next to the latch. You can do this procedure using your finger, but only if it fits freely into the resulting gap.
- Very carefully and slowly press the mirror element directly from the body and moving towards the lock. When it is completely pressed out, you will hear a click of the latch.
- Then press it away from the remaining clips. This can be done without much effort, even with the help of your hand.
- Take out the mirror element.
The procedure is quite simple and you don’t even need to disassemble the lid.
On a note! If you decide to use a screwdriver, it is better to place a little soft cloth under it just in case. This will protect all parts of the mirror from possible damage.
Before installing a new mirror element, remember exactly where the clamps are located. Attach the new element to the mirror body and gently hold it with your fingers. With your other hand, press one by one on the places where the latches are located. In this case, clicks should be heard, which signal that the mirror element is installed correctly.
Video
How to disassemble the side mirror on a VAZ 2110, see the following video:
- How to disassemble and repair a rear view mirror?
- What will be needed for disassembly
- How to remove a mirror
- How to disassemble a mirror, 3.2 methods
- Repair rules
It often happens that the rear view mirror mount weakens and the mirror does not hold well, or in other words, falls off (you know, someone caught it while driving). It happens that the side mirror is broken or cracked - it needs to be replaced. The mirror angle adjustment drive will require repair.
Of course, contact a car service center, and they will attach a mirror to the area. If there is no service nearby, you will have to act independently
A rear-view mirror is important on the road: the driver can see the situation on the road in the viewing area behind the rear fenders and rear bumper. Mirrors on different brands of cars are different: internal mirror and side mirrors, regular, folding, electrically driven and others
In the process of removing and disassembling any mirror, you must be very careful not to destroy the mirror itself.
To disassemble the mirror, you need the following tool:
3.2 flat screwdrivers (they are used to unlatch the latches).
A narrow, long screwdriver and a piece of soft fabric (to be able to wrap the screwdriver).
A 10mm star wrench or a standard screwdriver with interchangeable bits.
How to remove the electric side mirror (assembled):
1. Remove the triangular trim from the front door.
3.5. Disconnect the mirror wiring connector. Do not damage the heated mirror wiring!
3. Holding the mirror, remove the 3 mounting screws.
4. Remove the mirror assembly.
5. We produce mirrors in reverse order.
Do-it-yourself mirror adjustment repair for Lada Kalina. Removing the mirror element
Removing the side rear view mirror with a mechanical drive:
1. Remove the mirror adjuster locking bracket.
3. Remove the mirror.
4. Installation is carried out in reverse order.
How to remove a rear view mirror in a car
A common option for fastening the rear view mirror to the windshield is 3.5 bolts. Such fasteners are found on Russian cars. To remove the interior mirror, follow these steps:
1. Remove the caps on the bolts (if any).
2.7. Holding the mirror, unscrew the mounting bolts.
3. Remove the mirror.
4. Wipe the area where the mirror meets the windshield with alcohol.
5. To install the mirror, you need to make sure that the mirror “sits” in the same place (the spot on the windshield).
On a foreign car, the rear view mirror is glued to the windshield. To remove the mirror from the windshield, we perform the following actions:
1. We remove with our hands what remains for our client to do are the plastic plugs.
3.5. Evenly pull the mirror up (towards the ceiling).
Apply force correctly (when you pull the mirror up). If you overdo it, the windshield may crack. If the mirror has already moved out of place (has come out of the runners of the bracket), and you are still pulling it with force, then there is an option to accidentally cut through the upholstery on the ceiling with a sharp edge. On some car models there is a special lock in the form of a button (you should press this address).
To replace a cracked mirror, you need to know how to disassemble a rearview mirror. Of course, disassemble only the removed mirror: it is both comfortable and harmless specifically for the mirror. Rearview mirror disassembly is performed using 2 methods:
Having previously removed the mirror from the door or windshield. This disassembly method is safer for the entire mirror unit.
Disassemble the mirror without removing it from its mounting location.
If you need to replace any element of the mirror unit, you will have to disassemble the rear view mirror. There is an option to completely disassemble the rear view mirror (the side mirror, in other words from the windshield), following the following diagram:
1. Warm up the mirror body with a hairdryer (in the heat, the glue where the mirror is held will soften, and it will be easier to pry it off).
3.2. Using a wooden spatula or a flat screwdriver wrapped in soft cloth, we try to separate the mirror itself from the body
For this purpose, carefully (up and down) pry up the mirror with a narrow tool
3. Now we disconnect the mirror heating wires (there are 4 of them).
How to disassemble the rear view mirror of a VAZ 2110
How to disassemble a car mirror
There are many reasons to analyze a car's side mirror. This may be the desire to paint it or tidy it up after the woodcutter picked it up. Many car drivers are interested in how to disassemble a car mirror and how to remove it quickly and easily. Due to inept movements, a car mirror can become completely unusable, and then a new one will be needed, and as a result the mirror will be installed in a car service.
But there are many brands and even more models of cars and mirrors for them. There are also many types of mirrors. electrical, folding, rotating elements, etc. The most important thing is how to remove it to avoid damage. Below are general steps to analyze your camera's side mirror.
Removing the mirror
Naturally, it will be more convenient to disassemble a mirror removed from the car, so it should be removed. What will it take?
Removing a power mirror. First, remove the mirror lock, remove the three screws that secure the mirror to the door frame, and then remove the mirror.
Removing the electric mirror. First thing to do. disconnect the negative terminal from the battery. Next, unplug the power cord, remove the three screws that secure the mirror to the door, and remove them.
Removing mirrors
There are several ways to make a car mirror.
Disassembling the entire mirror element of a VAZ 2110
replacing side mirrors on a VAZ 2110
, 2111.2112 and the like.
Replacing side mirrors on a VAZ 2110
Video review of replacing the mirror element with an external mirror, rear view
such cars
First way
Using a curved object or screwdriver, carefully rotate the mirror while pushing it from the inside. Trying to pull the mirror away from the edge may damage it. Some motorists use many objects to remove the mirror element. It could even be all kinds of kitchen spatulas. Some wrap the edge of the spatula with electrical tape to avoid damaging the surface of the mirror. Others use a single solid blade. correct the gap, and insert the other one more softly into the resulting groove.