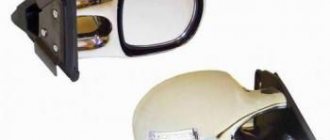
Side rear view mirrors and interior mirrors are mandatory installations on any car. At the same time, the side mirrors protrude somewhat relative to the body, as a result of which they often break due to minor accidents.
Also, the side mirror can be heated, electrically adjusted, etc. During operation, such solutions fail, which requires replacement or repair of the side mirror.
In such a situation, a side mirror will be required:
- remove from the car (the fastenings are unscrewed);
- remove the mirror element and disassemble the housing;
- replace or repair damaged elements.
It is important to know how to remove the side mirror, as well as how to disassemble the side mirror correctly. Read more in our article.
How to disassemble a side mirror
First you need to decide on the make of the car and its design of the mirror. Then inspect the visible damage and read the repair instructions. In approximately half of the cases, side mirror malfunctions consist of a broken housing and broken glass. Although different cars will require a different approach to replacing a mirror, one thing is similar for them. If the mirror is cracked, you need to pull out the burdock with the mirror from the holding hinged bracket, which ensures mobility, and then replace it with a new one. The main thing during installation is not to overdo it! The mirror is very fragile, so it is better to perform the procedure at positive temperatures; in winter in a heated garage or in a service station.
Removing the mirror device from the car
How to disassemble a side mirror? First you need to remove the mirror from the car, and only then start disassembling it. If the device is equipped with a mechanical drive, then at the initial stage it is necessary to remove the bracket that acts as a stopper. It is located on the adjusting mechanism.
Then we unscrew several screws that secure it to the car body, and then remove it. If it is a power mirror, you will first need to remove the terminals from the battery. After this, we disconnect the contacts going to the device drive, and also unscrew a couple of screws and remove the mirror from the body.
Position and adjustment
5 accurate rear view cameras for a car from AliExpress
Before you begin dismantling the mirror, you need to understand the method of attaching it. Some cars have mirrors mounted on the fenders, but this is extremely rare these days. Fastening is realized using special studs through the car body.
But most often mirrors are placed on the pillars of the front driver and passenger doors. They are secured with several studs through a nut. If a car is equipped with a function such as electrical adjustment, then microcircuits are located in the case; they often break down, which necessitates repair work.
How to secure and how to glue a new one
Useful tips for car enthusiastsAdjusting rear view mirrors
If you successfully dismantled the mirror without the help of others, then returning it back will not be difficult. Usually, all actions are performed in reverse order.
But you should pay special attention to the selection of glue, because not everyone is suitable for this process
Glue selection
There are three types of compositions for gluing mirrors:
- chemically cured;
- light-curing;
- epoxy-based compositions.
A composition with resins will work perfectly only in this case if you let it dry properly. This usually takes from 10 hours to a day. In this case, the part must be pressed tightly at all times. This approach is not very comfortable, because such products are not used in everyday life.
Replacing the mirror element on the exterior rear view mirror of Kalinas, Grants and Prioras
Video review on how to independently replace the mirror element on the external rear view
such cars
Replacing the side rear view mirror 96545750 General motors for a Chevrolet Lacetti
Light-curing consistencies operate when exposed to special ultraviolet lamps. This is one of the most common methods in production. But, if you are not the happy owner of a lamp, you should not receive such a composition. Sunlight, especially when diffused, is not able to have a sufficient effect.
For these reasons, chemically cured compounds are more popular. A special hardener starts the polymerization process. Typically, they consist of the glue itself and an aerosol activator, although one-component compositions are also found.
Please note that certain materials cannot be used to glue the mirror. The adhesive component of both materials has such a composition that when used on glass or metal, it will not be able to harden one hundred percent.
High air temperature inside the cabin or heating of the glass from sunlight will soften it, and the mirror will fall off. You can use household adhesives only in this case if the mirror fell off quite suddenly, and now you urgently need to get to a car service center
The adhesive component of both materials has such a composition that when used on glass or metal, it will not be able to harden one hundred percent. High air temperature inside the cabin or heating of the glass from sunlight will soften it, and the mirror will fall off. You can use household adhesives only in this case if the mirror fell off quite suddenly, and now you urgently need to get to a car service center.
I tried it with superglue three times. I confirm: it doesn’t last more than a week.
How to stick to windshield
Having selected the appropriate glue, you can begin returning the rear view mirror to its rightful place. Choose a warm day for this or install a heater in the garage: the air temperature should be between 20 and 25 ° C.
- Clean the holder platform from any old glue residue.
- Lightly sand the surface of the holder to improve the adhesion effect.
- In the same way, sand the area of the windshield in the adhesive area.
- Degrease the holder and glass area.
- Apply a thin layer of glue to the holder.
- Spray a special activator onto the part where the part is attached.
- Place the adhesive side of the part onto the glass. Try to follow the trail left from the previous time.
- Press the mirror firmly against the glass and hold for the time indicated on the package.
- After making sure that the part is firmly in place, clean the mirror from any remaining activator and glue around the holder.
- Reinstall the windshield (if you removed it) according to the owner's manual.
Ready! If you strictly followed all the instructions, the mirror looks as if it was installed at the factory or at least in a car repair shop.
Be as careful and attentive as possible! It is impossible to move a crookedly glued mirror, so you will have to start the whole process from the beginning.
How to install on bracket
If during dismantling you did not separate the bracket platform from the glass, it will be even easier to assemble it. To do this, find a fixing element: it may be a screw or latch. Then connect the bracket leg to the platform.
There are also special fasteners that are not glued to the glass, but are installed on the ceiling or other elements of the car, for example, on sun visors.
Repair or replace
So, why is it better to repair a broken side rear view mirror rather than buy a new one:
Side mirror mounting diagram
- Original spare parts are very expensive. Of course, if your car is a product of the domestic automobile industry, then there is no need to worry, but owners of foreign cars will be in for a little shock. In addition, mirrors are often sold in twos, which means the amount will double.
- If your car was manufactured abroad or is simply considered a rare model, then you could wait months for a new side view mirror to arrive. The fact is that these parts are not the most popular, so they are usually sold to order.
- If you decide to buy a new spare part, you will need to spend a lot of time on this. First, you will go shopping in search of a mirror, then you need to go to a service station for a replacement. This can also be supplemented by selecting a suitable paint tone and finding a place where you can paint it correctly.
How to disassemble a car's side mirror
Communities Car cosmetics detailing, tests, tips Blog Glue for gluing the rear view mirror to the windshield.
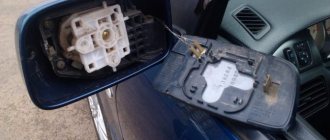
Disassembling the side mirror involves removing the mirror element itself, which is located in a plastic case. This is necessary if the mirror element is broken, you need to repaint the plastic element or perform some other manipulations with these parts separately from each other.
The mirror element is secured in the mirror body using several plastic latches, which are located on its reverse side. Most often there are about 8 such latches, 2-3 on each side. We recommend proceeding as follows to remove the mirror from the housing without damaging any of the elements:
Since the latches are plastic, it makes sense to warm them up a little so that they are more flexible to deformation. To do this, you can use a regular household hair dryer.
Direct it onto the glass for 3-4 minutes, preferably distributing the heat evenly along all edges of the mirror. Important: Do not use a hair dryer for this work, since its temperature may exceed the melting point of plastic, as a result of which the mounts and side mirror housings are deformed and damaged; When the latches have become softer, you can proceed directly to the process of removing the mirror. To do this, we recommend taking plastic spatulas (which are often used in mobile equipment repair services)
If you don’t have such a spatula, you can use a regular flat-head screwdriver, but before doing this, it is advisable to wrap the metal part with electrical tape so as not to accidentally scratch the mirror and body. Also get a small piece of soft fabric; After this, place a soft piece of cloth on the plastic part of the body in the place where you will insert the spatulas or screwdrivers. After this, insert the tool, thereby moving the mirror; Next, carefully pull the improvised lever from a screwdriver or spatula to remove the mirror element from the plastic mount or mounts; Having freed one side from the fastenings, do similar actions with the others; After this, carefully remove the mirror, but note that it may still be attached to something, for example, glue, or there may be wires going to it. Disconnect everything unnecessary and remove the mirror element, at which point the process of disassembling the side mirror can be considered complete.
Depending on the car model and the mirror used, the space under the mirror element may be empty or filled with various components. Their dismantling, if necessary, should not cause difficulties.
(419 votes, average: 4.54 out of 5)
Disassembly procedure
Once the structure has been removed, disassembly can begin. If it is required, of course. Perhaps you have found a new mirror whose price suits you completely. Then you can skip this point.
If it is necessary to disassemble an element, we start from whether it is internal or external.
The interior mirror is disassembled as follows:
- there is a place where the glass and the body are connected;
- spin is inserted;
- pressed with little force;
- a gap appears;
- use a mediator to pass along the entire length of the gap;
- the body is divided into 2 parts;
- the mirror is removed;
- everything else is located underneath it;
- We carry out the necessary work.
You may also need to disassemble the car side mirror. It doesn't matter whether it's left or right.
The task here is to remove the reflective element. Be prepared for the fact that the instructions below will not fit your specific car. There are cars on which everything is not quite like that. Sorry here, the guide is not universal.
But it is the following scheme that is suitable for most cars.
- Using a hairdryer, the area between the case and the glass is heated;
- Do not heat to high temperature. Use a household hair dryer on medium power;
- Use a flat-head screwdriver to separate the body into 2 parts;
- Sometimes it is necessary to bend the terminals;
- If you are afraid of damaging the mirror, wrap the instrument with electrical tape;
- On some cars you need to slightly press the mirror to the center and move it to the side;
- The glass is carefully removed;
- Remove the screw from the plastic frame, if there is one;
- Under the frame we see the entire mechanism;
- Use a screwdriver to remove the broken structure and replace it with a new one.
That's it, the work is almost completed. But since we disassembled everything and changed the necessary components, now we need to assemble the structure and install it back on the car.
How to disassemble the outside rear view mirror
Often, the possibility of self-repair is available on budget cars; this applies to both foreign cars and domestic cars. The first step is to remove the mirror from the door pillar. This is done quite simply. First, the studs are unscrewed and the wiring harness is disconnected from the block. Now we can move the mirror to a more convenient place.
It is often quite difficult to remove the mirror element from the housing. But it's always possible. To do this, we will need a hair dryer, which we will use to heat the plastic case. It must be heated over the entire area and evenly. Only after this will it be possible to dismantle the mirror element. The fixing adhesive that holds the mirror in place when heated becomes weakened. Many motorists try to disassemble when cold, but there is no need to do this, since in the process you can break something that is still intact.
How to replace a side mirror
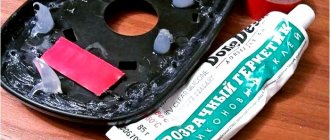
We remove the glass holder from the hinge of the protective casing, and then, using a thin chisel or flat screwdriver, we pick out the remains of the previous, original mirror. If necessary, the surface is smoothed with sandpaper and degreased with alcohol or acetone. Now the new mirror needs to be glued in. The best glue option is Poxipol, and it’s silver, as it holds much better than transparent glue. Carefully apply glue to the burdock fastening mold, starting from the center and finishing about one centimeter from the edge - to prevent the possibility of the glue creeping out and leaking. We wait a while for the glue to polymerize. The final stage is to carefully insert the burdock with the mirror into the hinge mount.
How to secure and how to glue a new one
If you have successfully dismantled the mirror yourself, then returning it back will not be difficult. As a rule, all actions are performed in reverse order.
But you should pay special attention to the selection of glue, since not everyone is suitable for this process. it is necessary to choose the right adhesive for attaching the mirror to the windshield
it is necessary to choose the right adhesive for attaching the mirror to the windshield
Glue selection
There are three types of compositions for gluing mirrors:
- chemically cured;
- light-curing;
- compositions based on epoxy resin.
A composition with resins will work well only if it is allowed to dry properly. This usually takes from 10 hours to a day. In this case, the part must be pressed tightly at all times. This approach is not very convenient, so such products are not used in everyday life.
Light-curing mixtures operate when exposed to special ultraviolet lamps. This is one of the most common methods in production. However, if you are not the happy owner of a lamp, you should not purchase such a composition. Sunlight, especially diffused light, is not able to have a sufficient effect.
For these reasons, chemically cured compounds are the most popular. A special hardener starts the polymerization process. As a rule, they consist of the glue itself and an aerosol activator, although one-component compositions are also found.
Please note that some materials cannot be used to glue the mirror
- household superglue;
- double-sided adhesive tape.
The adhesive component of both materials has such a composition that when used on glass or metal, it will not be able to harden completely. High air temperature inside the cabin or heating of the glass from sunlight will soften it and the mirror will fall off. You can use household adhesives only if the mirror fell completely unexpectedly, and now you need to urgently get to a car service center.
I tried it with superglue three times. I confirm: it doesn’t last more than a week.
How to stick to windshield
Having selected the appropriate glue, you can begin returning the rear view mirror to its rightful place. Choose a warm day for this or install a heater in the garage: the air temperature should be between 20 and 25 ° C.
process of applying glue to the holder platform
- Clean the holder platform of any old adhesive residue.
- Lightly sand the surface of the holder to improve the adhesion effect.
- In the same way, sand the area of the windshield where it is glued.
- Degrease the holder and glass area.
- Apply a thin layer of glue to the holder.
- Spray a special activator onto the place where the part is attached.
- Place the adhesive side of the part onto the glass. Try to follow the trail left from the previous time.
- Press the mirror firmly against the glass and hold for the time indicated on the package.
- After making sure that the part is firmly in place, clean the mirror from any remaining activator and glue around the holder.
- Reinstall the windshield (if you removed it) according to the owner's manual.
Ready! If you followed all the instructions carefully, the mirror looks like it was installed at the factory or at least in a car repair shop.
Be extremely careful and attentive! A crookedly glued mirror cannot be moved, so you will have to start the whole process all over again.
How to install on bracket
If during dismantling you did not separate the bracket platform from the glass, it will be even easier to assemble it. To do this, find a fixing element: it may be a screw or a latch. After this, connect the bracket leg to the platform.
There are also special brackets that are not glued to the glass, but are installed on the ceiling or other elements of the car, for example, on sun visors.
Installation of mirrors with additional functions
Modern devices not only reflect, but also have a number of additional functions. You can equip them with heating, or even install a camera with a monitor.
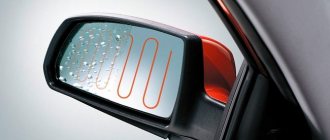
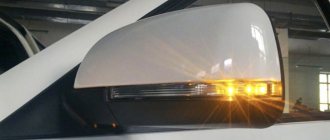
Heated
The heating function is very convenient for external side mirrors, since thanks to it they will not fog up in high humidity and will not become covered with a crust of ice in frosty weather.
The heating element in the mirrors will help prevent fogging and icing
The heating device consists of the following parts:
- a heating element;
- wiring for a 12V system;
There are both separate heaters and mirrors themselves with a built-in element on sale. Both are quite easy to install. To do this, you must perform the following steps.
- Remove the door trim.
- Remove the side mirrors according to the instructions.
- Thread the wires through the side of the door and out to the outside mirrors.
- Remove the reflective element after preheating the junction with the body.
- Remove the screw and remove the frame (if equipped).
- Pull the wires through the frame body, strip the ends and install the connectors.
- Put the frame back in place and route the wires through it.
- Connect the wires to the contacts of the heating element and install it.
- Put the mirror back in place and put the entire structure back together.
- Connect the part of the wire that is located inside the passenger compartment to the heated rear window relay.
- Check the functionality of the mechanism.
Now, in bad weather, you don’t have to get out of the car and clean the mirror yourself. This is a very convenient feature, especially considering the low price of the equipment.
Video: installation process of a mirror with a heater
With monitor
Monitors are a common feature in modern high-end cars. As a rule, they are installed on the control panel and display information about the car, an image from a DVR or camera.
Article on the topic: Step-by-step scheme for obtaining a driver’s license after deprivation
a rear view mirror equipped with a monitor will show the entire space behind the car
If you cannot afford a car with such equipment, but you like the idea of a monitor in the cabin, pay attention to special rear-view mirrors with a monitor.
The most difficult thing in installing the structure is correctly laying the wiring and connecting the power. As a rule, wires are attached to the mirror: negative black (-12V), positive red (+12V), blue for connecting the signal source, as well as RCA connectors, which in everyday life are called tulips.
The mirror is equipped with a set of necessary wires
As a rule, monitors have three connectors, one of which is responsible for power, and the other two for receiving signals. In this case, you can connect both the front and rear cameras. By default, video from the front camera will be displayed on the screen. But when receiving a signal from the rear, the monitor will automatically switch.
The colors of wires and plugs may vary depending on the mirror model.
Route the wires along the floor or ceiling. Choose the best option taking into account the characteristics of your car model.
The mirror itself, as a rule, has special mounts that allow it to be installed directly on top of the factory one. If desired, the monitor function can be turned off, and then you will be left with a regular mirror, but, unfortunately, with a slightly worse reflectivity.
Video: DIY monitor and rear view camera installation
With a camera
Installing a monitor usually makes sense when you plan to display camera images on it. Conventional mirrors have blind spots, so the camera allows you to significantly expand your view of the area behind the car. In addition, using such equipment is very convenient when parking.
The rear view camera films the situation behind the car and sends a signal to the monitor
It is best to purchase a camera and a mirror with a monitor as a set: this will simplify your task when connecting.
According to the mounting method, all cameras can be divided into several types:
- mounted;
- built-in;
- on the bracket.
Mounted cameras are the most popular because they are smaller in size and do not require serious manipulations with the body or other elements of the car. They are usually installed above the number plate. There it is quite invisible, so you don’t have to worry about it being stolen.
All cameras have special parking lines that are displayed on the monitor. Using them you can calculate the angle, estimate the parameters of the machine and understand the distance to the displayed object. At first it may seem unusual, but with experience you will acquire all the necessary skills.
Front and rear cameras have different optical systems and are therefore not interchangeable.
The camera comes with all the necessary wiring to connect to the monitor. These include the excitation wire, which activates the operation of the monitors with a current with a positive charge, as well as the power wire.
The principle of the signal is as follows: when you switch to reverse gear, current is supplied to the camera, which, in turn, sends a signal to turn on the screen in the mirror. As soon as reversing is stopped, the image automatically disappears.
In order for the camera to work, stretch the wires from the back to the front of the car and connect them according to the instructions. If you purchased a monitor and camera as a set, this will not be particularly difficult: just connect the necessary plugs and wires according to their charge (plus to plus, and minus to minus).
How to remove a rear view mirror
Mirrors of this type are designed to study the situation on the road behind the car. They can be divided into two categories:
- salon - installed inside the car;
- side - located on both sides on the front door pillars.
The interior mirror is located inside the car
side mirrors are located on both sides of the car
It seems that it could be easier than dismantling the mirror? In fact, this is not so easy to do, and the principle of dismantling can vary significantly between different brands and models. We will tell you about the most universal methods of removing, disassembling and installing internal and external ones. However, if any of the methods described here do not work for you, check your machine's owner's manual. Today, many automobile companies make all such processes much easier: perhaps, instead of unscrewing bolts and bending terminals, you only need to press a small button or pedal.
Required Tools
In order to remove the mirror, you do not need any specific or hard-to-reach tools. As a rule, everything you need can be found in any motorist’s garage.
- a set of screwdrivers (most likely, only figured and flat ones will be useful);
- wrench depending on the size of the bolts;
- household hair dryer for removing the mirror element.
Add to this set skillful hands and the desire to do everything efficiently, and you can get down to business.
Salon
Interior mirrors can be installed in a variety of ways depending on the make, model, and year of your vehicle. There are two methods that are used most often.
- Installation into the car ceiling using bolts or self-tapping screws.
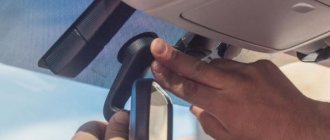
- On the windshield using glue or suction cups.
Thus, on many domestic cars the assistant device is installed using ordinary bolts, which greatly simplifies the dismantling process. To do this, you just need to unscrew the bolts after removing the plug.
in order to remove such a mirror, you just need to unscrew the bolts
The situation can become more complicated if the mirror is mounted on a bracket glued to the glass. First of all, check whether it is possible to separate the bracket itself and the platform glued to the glass. On most cars, they are separated by moving the clamps or turning in a certain direction.
if the mirror is glued to the glass, you need to try to separate the bracket from the holder platform
If this is not possible, you will have to resort to a radical method and remove the bracket along with the windshield. The fact is that the glue holds the elements very firmly, so when you try to separate the mirror, you may accidentally damage the glass.
Before you begin this process, take a look at your vehicle's manual: it should detail the process of removing certain components. Remember that buying a new windshield will cost you a lot.
You most likely will not be able to separate the bracket platform from the mirror on your own, so it is better not to risk it and contact a special salon. Especially if you are dismantling it for future tinting. However, if you decide to do it yourself, be prepared that a trace of glue will remain on the glass.
Side left and right
Side mirrors are divided into two categories:
- with mechanical drive;
- with electric drive.
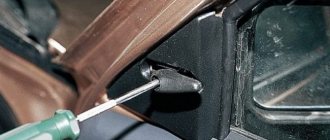
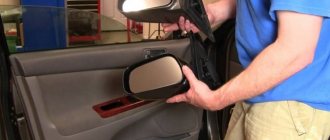
On almost all cars, you will need to remove the door trim to get to the mounting screws. You can find out how to do this on your model in the instruction manual.
This is what a car door looks like with the trim removed
Next, to remove a mechanically driven part, you need to follow a certain procedure.
- Remove the regulator locking bracket.
- Unscrew the fastening screws on the inside of the door.
- Remove the mirror.
Video: dismantling the side mirror
If the mirrors are electric, the procedure will be slightly different.
- Disconnect the negative terminal from the battery.
- Disconnect the block from the wires.
- Unscrew the fastening screws on the inside of the door
- Dismantle.
What is needed to remove the side glass
The first and probably the most important condition is the weather. There is no strict rule on how and where to remove the side windows of a car, on the street or in the garage, as it suits you. But it’s best when it’s sunny and warm outside, or the garage is dry and well lit. Such advice can be heard from experienced car owners, since the interior will remain clean, dry, and the procedure for replacing the side glass will not be so complicated.
They often say that you can’t handle the process of removing the side glass yourself, you need to hire an assistant and you’ll need a lot of tools, but in fact, if you figure it out, you can do everything yourself.
Depending on the type of side glass fastening, divide into movable and fixed. Movable ones include all those that are installed on car doors and hidden under the trim. Fixed side windows are inserts, often behind the rear doors or on the doors themselves, that do not move. It is worst to replace fixed glass, as they require difficult dismantling and equally difficult installation.
To dismantle the side glass you will need a set of tools, at a minimum:
- Phillips and flathead screwdrivers;
- collar with replaceable heads;
- copper string (if the glass is not movable);
- gluing tape or special glue for glass;
- scrapers and chisels;
- fabric gloves.
This is a minimum list of what may be needed to remove the side windows of a car. It is possible that additional tools or assistance may be needed when removing the side window (fixed).
Depending on the condition of the glass and how damaged it is, the method of removing the rear side glass or the front will depend. If the glass is unique and they no longer make it like this, then you can remove it and order a similar one based on the sketch. To do this, you need two people to cut off the base of the fastener using a string and carefully remove the glass.
You may need solvent and other chemicals to remove old glue from the base of the car body.
rushim Blog Replacing the rear view mirror
About five years ago I already had to replace a mirror element that was broken by some boobies. Then the department paid about 600 rubles to the officials and waited a couple of weeks.
But this winter we hit the left mirror five or six times.
That's where so many gremlins came from? At first it didn't hurt to drive. But the last time the mirror element was damaged. And the trim, painted in the color of the body, flew away about five meters. Well at least she survived. It was decided to replace the whole thing - the edging is broken, the element is broken, there is dirt inside, the price “assembled” is not far from the price of the parts.
A colleague bought a new “analog” at a disassembly site in Lyubertsy for 3000. In general, a normal price. We will bet it ourselves, we spent 1600 on candy for the women’s team on March 8th.
According to the literature, the mirror must be removed after removing the door panel trim. The finish makes it difficult to unscrew the two lower bolts. But whoever is not lazy is not me. I unscrewed one screw right under the mirror and kept pulling the trim towards myself. It's a bummer, but I would definitely break something when removing the trim.
Next, we peel off the small skin from above. At the bottom we live the antennae and remove them.
Next, you need to crawl under the mirror element, press somewhere and it will come off. Not our case. Let's tear it off. Much to my sadness, the color-painted overlay had a broken pair of mustaches. So it’s holding, but next time you’ll have to put it on glue.
And here we catch epic, f*cking f*ck, fail, bl. The new mirror is different from the old one. The old one had a pickguard and edging. In the new one it is one monolithic element.
You can assemble the old edging from two parts
Not according to Feng Shui, but we’ll ride with a new pad. She's actually grey. And in two or three weeks it will be indistinguishable in color from the right one)
In addition, the new mirror had a bit short wires. Literally a centimeter was not enough for comfortable installation. I had to pull out what was enough to plug into the connector, and then put it on the slide. I recommend pulling them to their maximum length before installation. One guide on the slide of the brown connector still broke off. I hope it won't rattle. Cost with little blood, no matter)
How to remove a rear view mirror
Mirrors of this type are designed to study the situation on the road behind the car. They can be divided into two categories:
- salon - installed inside the car;
- side - placed on both sides on the front door pillars.
It seems that it could be easier than dismantling the mirror? In fact, this is not so easy to do, and the principle of dismantling can vary significantly between different brands and models. We will tell you about the most universal methods of removal, disassembly and installation of internal and external ones. But, if any of the methods outlined here do not work for you, take a look at the operation department of your own car. Now many auto companies are greatly simplifying all such processes: perhaps, instead of unscrewing bolts and bending terminals, you only need to press a small button or pedal.
Required Tools
In order to remove the mirror, you do not need any special or inaccessible tools. Usually, everything you need can be found in any motorist’s garage.
- a set of screwdrivers (most likely, you will only need a figured and a flat one);
- wrench depending on the size of the bolts;
- household hair dryer for removing the mirror element.
Add to this set experienced hands and the desire to do everything perfectly, and you can get down to business.
Mirror removal process
Salon
Interior mirrors can be installed using different methods depending on the make, model, and year of the vehicle. There are two methods that are used in most cases.
- Installation into the car ceiling using bolts or screws.
- On the windshield using glue or suction cups.
Thus, on many Russian cars the assistant device is installed using ordinary bolts, which greatly simplifies the dismantling process. To do this, you just need to unscrew the bolts, having previously removed the plug.
The situation can become more complicated if the mirror is mounted on a bracket glued to the glass. First, check whether it is possible to separate the bracket itself and the platform glued to the glass. On most cars, they are divided by moving the clamps or turning them in a certain direction.
If there is no such ability, you will have to resort to a constructive method and remove the bracket along with the windshield. The fact is that the glue holds the elements very tightly, so when you try to separate the mirror, you can accidentally destroy the glass.
Before starting this process, take a look at the management of your car: it should carefully describe the process of dismantling certain parts. Remember that buying a new windshield will cost you a lot.
You most likely will not be able to separate the bracket platform from the mirror without the help of others, so it is better not to risk it and contact a special salon. Especially if you are dismantling it for future tinting. But, if you are still planning to do this without the help of others, be prepared that a trace of glue will remain on the glass.
Side left and right
Side mirrors are divided into two categories:
In fact, on all cars, in order to get to the mounting screws, you will need to remove the door trim. You can find out how to do this on your model from the instruction manual.
See:
Next, in order to remove a part with a mechanical drive, you need to perform a certain procedure.
- Remove the regulator locking bracket.
- Unscrew the fastening screws on the inside of the door.
- Remove the mirror.
Basic nuances of automobile glass
Experts can tell a small part of the car's history from car windows. Every car enthusiast knows that any of the car windows has special markings, which indicate many of the car’s data. The markings on the side windows are located closer to the pillars; a special code is indicated, the production date (as a rule, coincides with the date of manufacture of the car), the manufacturer and maybe the serial number of the car frame.
This marking on the side windows, windshield and rear window must match one to one, but if there is even a slight difference in the date or one number, this is the first sign that this glass has been replaced and is not original to the car. The second and more noticeable nuance is the factory tinting. There is a limit that is allowed for factory tinting of side windows; manufacturers take advantage of this opportunity to tint car windows.
Removing the side window is a long and difficult procedure. To do this, you will need to understand and remove the door trim, then understand how the window regulator works and how the glass itself is attached. We will try to describe the procedure in more detail and the nuances when you need to remove the side glass.