Window lifter.RF › Blog › Replacing the rear right electric window on a LADA Priora
Our buyer Ivan Igorevich Fokin from Moscow sent his next photo report on replacing the rear electric window on a LADA Priora car as part of his participation in our promotion.
In our Lada Priora the problem occurred again, only the window regulator on the rear right door broke. It was decided to order a window lifter, but not as an assembly, as last time, but separately the mechanism itself without a gearmotor.
Electric window lift for VAZ-2110 rear right without gearmotor.
Tools: shaped screwdriver, star screwdriver, 10 socket, 22 socket, plastic tool, adhesive tape, electrical tape, scissors.
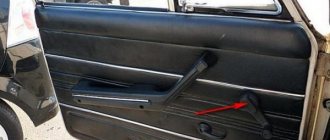
We unscrew the screws from the panels, only 3 pieces - red arrow.
Take a tool for plastic. We use it to pry the panels in the direction as indicated in the photo, and remove them to the side. Again, use this tool to remove the door panel, starting from the lower left corner, moving in a counterclockwise direction, and unfasten the panel clips. Having unfastened the panel with clips, lift it up, the panel is removed.
We remove all the insulation so that it does not interfere.
Unscrew the nuts - red arrow.
We lower the glass a little in order to remove the strip from the door body mounted on the bolts.
Raise the glass to its highest position and secure it with tape.
We remove the engine bolts and racks from their mounted places and pull out the old window regulator through the corner.
After we have pulled out the power window, unscrew the 4 screws and use a 22mm head to unscrew the bolt/nut with a rubber surface, removing the gear motor cover.
We “throw” the gear motor onto the new window lifter and tighten the bolt/nuts, after which we connect it to the chip and check its functionality. As a result, there are 4 screws left that are not used.
In the reverse order, we insert the window regulator and, first of all, install the engine on the bolts with the nuts. Perform subsequent manipulations strictly in reverse order.
Thank you, Ivan Igorevich, for another prepared photo report. We will transfer the promised prize to your mobile phone account.
We check the quality of work
As you can see, this work is not at all difficult, it can be done independently, saving a lot of money on a car service, which will charge you a tidy sum for it.
In addition, since we had to remove the door trim, we can also carry out sound insulation, which in the Lada Kalina is also not at the highest level.
At the end, a small bonus on how to make the power windows work without the ignition.
Tool:
- Medium Phillips screwdriver
- Medium flat screwdriver
- Driver for socket attachment
- Extension for socket bits
- 8mm wrench attachment
- Knob attachment 10 mm
Parts and consumables:
1. Remove the rear door trim as described here.
2. Putting the handle on the shaft, set the glass to the upper position, and then remove the handle. Remove the vibration damping element from the window handle shaft.
3. We fix the glass in the raised position by installing two wooden wedges between the glass and the inner door panel.
4. Using a 8" socket with an extension, unscrew the two bolts securing the glass holder to the guide slide of the window lifter mechanism.
5. Using a socket or an 8 wrench, unscrew the three nuts securing the window lift mechanism.
6. Using a socket or a 10mm wrench, unscrew the three nuts securing the guide of the window lift mechanism.
7. We remove the window lift mechanism through the lower technological hole in the inner door panel.
8. Install the rear door window lift mechanism in the reverse order.
The article is missing:
- High-quality photos of repairs
Today, very often in courtyards you can see the domestic Kalina from AvtoVAZ. People love these cars very much, although they are often criticized for their build quality. As with all foreign and domestic cars, each series has its own problems - for example, the window regulator does not work. “Kalina” is no exception, so it is important to know the causes of such annoying breakdowns, as well as be able to eliminate them.
VAZ (lada) Kalina i 2004 - 2022
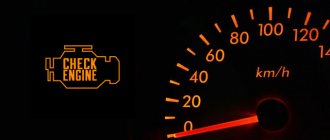
The power window button stopped responding to lowering, both on the driver's and passenger's sides. Right front door. That is, the glass goes up, but there is no reaction when it goes down.
I tried swapping the two top right relays in the fuse box. What else can you see?
- Rear window rolls down tightly, Kalina – 3 answers
- Turn signals do not blink constantly in Kalina - 2 answers
- The car does not start, the relay clicks, VAZ Kalina – 2 answers
- Where is the ground terminal for the power windows and central locking located in Kalina? – 1 answer
- The window regulator does not work on Kalina - 1 answer
Most likely a wiring break. Remove the door trim and disconnect the glass window chip. and check the power supply and mass for lowering. Maybe the motor itself is to blame. But most likely the break is either in the corrugation between the door and the counter. Or even lower, maybe in the threshold, there is ESP wiring. Search
You can replace the button on the right door. It’s better to first check whether the lowering voltage comes from the left button to the right, whether it passes through the right button.
The funny thing is that you end up disassembling and reassembling the engine and that’s it. It feels like when closing the window, an impact occurs and the shaft gradually disengages. I suffered with both the right and left doors.
It is easy to check the serviceability of the button without disassembling the door. With the engine turned off, you press the button and if it is working properly, the light in the instrument panel will dim slightly.
- Are the DTOs the same in Lada Kalina? – 1 answer
- Heater radiator leaking in Lada Kalina - 2 answers
- What adapter for Lada Kalina diagnostics? – 1 answer
- No speed readings on Lada Kalina - 1 answer
- Speedometer does not work in Lada Kalina - 2 answers
- What pressure should be in pirelli 185/60 R14 82H tires? – 2 answers
- Error P0172 in Lada Kalina - 3 answers
- Lada Kalina does not gain momentum - 2 answers
- Lada Kalina heater radiator is leaking - 3 answers
- Is it possible to install a rear beam on Kalina from 2109 or 2110? – 1 answer
The window regulator does not work on Kalina
The car does not start, the relay clicks, VAZ Kalina
New Lada: Brake pads for Lada Kalina: selection of new parts, step-by-step instructions for self-replacement and how to determine the degree of wear
Rear window rolls down tightly, Kalina
Where is the ground terminal for the power windows and central locking located in Kalina?
How to disassemble the grant window lifter button
Hello :) When my driver's window lifter button failed (namely, the window opened and did not close and I had to drive at night, in sub-zero temperatures, with the window wide open) And so, with a frozen beard, I realized that I needed something with this button -do :) Buy a block for 600 rubles. I didn’t want the minimum, so I bought a button for 120 rubles. I immediately ran into the problem of replacing it in the button block, and either there was little information about this on the Internet, or I entered the wrong queries, in general, I never found anything useful. And so at 3 o’clock in the morning, taking a friend and a screwdriver, we decided to dismantle this block, no matter the cost, and replace the button. And we did it :) I don’t claim to be the pioneer in replacing buttons, and I’m not saying that my replacement method is the only correct one, but still, maybe it will help someone :)
The first thing to do is pull out the block itself by prying it off with a screwdriver
2. disconnect the wires from the button. 3. Disassemble both buttons. (The one in the block, and the one we bought) This is necessary because the purchased button has a side we don’t need, which will not fit into the ESP block.
First you need to remove the rocker itself. To do this, pry it with a screwdriver in the location shown.
You will need a flat blade screwdriver.
1. Remove the wire from the “–” terminal of the battery.
2. Pry up the rear edge of the block.
4. Pressing the plastic lock with your finger, disconnect the wire blocks from the buttons. After this, remove the block.
5. Install the parts in the reverse order of removal.
Reference manual for servicing VAZ, LADA 110 cars.
Ignition adjustment 2110. Engine compression for VAZ 2112, immobilizer for VAZ 2111. Valve cover for VAZ 2112, cylinder block gasket for VAZ video. The cost of a generator for a VAZ. replacement of fuses for VAZ 2112, design of the oil receiver for VAZ 2112. oil recommended by the factory for the box of VAZ 2112. replacement of the water pump (pump) for VAZ 2112. Replacement of valve stem seals for VAZ 2110.
How to change a VAZ window regulator 2110
Electronic windows on a VAZ 2110 break down quite occasionally, but such a problem cannot be ruled out. In particular, the problem causes enormous inconvenience in this case, when the mechanism jams when the window is lowered. The problem can be solved by repairing or replacing the window regulator.
Electric windows for VAZ 2110
Many owners of VAZ 2110 seek to save on repairs of various parts of their vehicles. Instead of contacting specialized workshops, they carry out repairs themselves. As for electric windows, it is better to replace them immediately without wasting time on restoration work. In addition, these mechanisms are not very expensive.
In car stores today you can find single kits that are designed specifically for the VAZ 2110 . Unlike standard kits, these kits include only one gear motor, which is enough to replace a broken unit.
The main aspects of repairing and replacing power windows on a VAZ 2105-2106 with your own hands
The VAZ 2106 window lifter has a reliable design, but, like any mechanism, it can fail. The article discusses typical malfunctions of power windows on the “classic” and provides instructions for removal and installation.
- The mechanical window lifter on the VAZ 2106 has a simple design and consists of a control handle, a glass lift transmission system, a cable and three rollers.
- Many drivers install electric windows instead of classic ones.
- They come in two types:
- Cable. The design includes an electric motor with a drum on which the cable is wound, and a gearbox. The upper drum is connected to a conventional window lifter using a spline. With its help the cable is activated.
- Rack and pinion. They use the principle of a steering rack in a car.
To install the electric mechanism, you need to purchase a kit consisting of wires, fasteners, backlit control keys, a decorative plug, and installation instructions (the author of the video is VALENTIN VERNIGORA).
Common faults and solutions
Over time, the window lifting mechanism becomes unusable - it is impossible to raise or lower the glass.
There may be several reasons for a device malfunction:
- cable break;
- foreign objects entering the mechanism;
- gearbox wear.
There is no point in repairing window regulators, since their cost is low; it is easier to buy a new device and replace it.
Device assembly diagram
Electric lifts may have the following faults:
- All power windows do not work: the fuse is blown, there is no connection to ground, the wiring is broken. The repair consists of replacing fuses, restoring ground connections and electrical circuits.
- The lift on one of the doors does not work. The switch is faulty, the reverse current relay is broken, the electric motor is broken, the wiring is broken, the connector is disconnected. Faulty parts should be replaced, the wiring restored, the connector connected.
Removal instructions
To complete the work you will need the following tools:
- Phillips and flathead screwdrivers;
- a set of keys;
- knob;
- extension.
The removal procedure consists of the following steps:
- First of all, you need to remove the casing.
- Next, the glass is lowered as far as possible. Use a Phillips screwdriver to unscrew the bolt holding the clamp.
- After unscrewing the bolt, lower the clamp down.
- Then on the left side of the door, just loosen the roller nut using a wrench.
- The cable is now free and can be removed from the roller.
- Next, unscrew the three nuts holding the window regulator.
- When unscrewing the third bolt, the mechanism should be held from the inside.
- When the window lifting mechanism is free, move it to the side.
- After unscrewing the last nut, you can remove the window regulator from the door.
Next, repair or replacement is carried out. The rear mechanism is installed in the same way.
Installation Features
Installation of a new or repaired window lifter is carried out in the reverse order of removal.
Photo gallery “Installing a window lifter”
1. Installation kit 2. The process of unscrewing the screw and retracting the cable 3. Installation locations for the rollers
To install a power window, follow these steps:
- Dismantle the door, remove the door trim. Next, the electric window lifter is installed using self-tapping screws.
- After installation, you need to check the sliding of the glass.
- Connection to the vehicle's electrical network should be made according to the electrical diagram.
- Next, the door is installed on the car.
- A control button is mounted on the toolbar.
After installation, the electric window lifter must be checked for functionality. You can install a heated rear window.
Loading …
Video “How to change window regulators on a VAZ”
This video demonstrates how to replace a window lifter on a VAZ (car video - Pavel Pavek).
Was this article helpful? The article was useful. Please share the information with your friends.
Photo report on replacing the electric window regulator
So, first of all you need to do the following:
- Remove door trim
- Unscrew the bolts securing the door glass (two on each side)
To ensure that the glass is fixed and does not fall, you should not remove the sealing rubber bands, and you can also additionally lock it in the upper position (or at least with tape, the main thing is that it holds tightly).
After this, disconnect the power plug for the window motor, as shown in the photo below, by pressing the latch slightly up.
Now, using a 10mm socket, you need to unscrew the 11 nuts securing the window regulator trapezoid to the door body.
When you unscrew the last nuts, hold the entire assembly so that it does not dangle inside the door.
Then we push the pins inside and carefully remove the trapezoid assembly with the motor from the door hole. First, we tilt its right side, as shown in the photo below:
We carefully pull it out of the door, and then carry out further actions in the same way with the second bar and the motor.
Now the entire structure has been removed from the car and is as follows.
Replacing the motor
In order to replace the motor itself, first unscrew the three studs:
And after that, you need to use a flat-head screwdriver to unscrew the 4 fastening screws, which are clearly visible below.
Next, we carefully lift the motor with the cover so that the coil does not “unravel” and the cable remains wound, otherwise you can then struggle for a long time with threading it into place.
At first, the coil may remain on the motor, but then we carefully pry it off and install it in its place.
Now you can put the new motor in place by putting it on the reel and placing the housing until it is completely aligned with the housing on the trapezoid.
We can say that we close this entire structure until both parts are tightly connected, and tighten the fastening screws into place. After this, you can install in the reverse order. The price of a new motor assembled with a window lift trapezoid for Kalina is about 1,800 rubles for the original part. Everything can be purchased individually for half the price of the set.
Novel. My comment will most likely no longer be relevant for you, but I want to share the victory I won today, and maybe it will save someone a lot of nerves
Common faults
There are many reasons why the window regulator on Kalina does not work and why the device needs to be replaced, but we will look at the main ones:
- The electric motor brushes are stuck, usually as a result of overheating of the brush elements themselves, which, as a rule, are not resistant to sudden temperature changes. Accordingly, as a result of heating the brushes, the plastic socket may melt. This will also cause the brushes themselves to lose mobility. If the malfunction has just begun to appear, you can knock on the plastic door lining several times to restore the unit’s functionality. However, over time, this method will no longer be able to produce the required result, so intervention in the design of the joint venture will be inevitable.
- The cause of the malfunction, which may require replacement of the joint venture, can also be the ill-conceived electrical circuit installed at production. The contacts themselves are not able to withstand the necessary load that is placed on them. The SP system may fail due to the fact that the electrical circuit is not supplemented with a unloading relay. So in the event of a breakdown, it often happens that the car owner has to repair not only the power windows, but also the control panel itself.
As practice shows, in most cases, repairing a unit is either completely impossible, or can be done, but with great difficulty. Accordingly, the best option would be to install a new joint venture (video author - Emilien Ok).
Check the fuse
Another common cause of problems with the operation of the window lift system is related to the heavy load experienced by the contacts on the common window lift control panel. Since AvtoVAZ specialists did not provide a discharge relay in the electrical circuit, the remote control is unable to withstand these loads. As a result, both the front and rear power windows fail. In this case, the owner will have to fix problems in the remote control.
If the window regulators refuse to perform their functions on all sides at once, then it is recommended to check the integrity of the 30 A fuse. You should look for it under the hood, in the mounting block. If this element is burned out, then a dark place will be visible where there was a short circuit. It would also be a good idea to check the condition of the wire insulation. In this case, you need to look especially carefully at the wires at the transition points from the body to the doors.
Instead of introducing
Window lifters (or, to use a more familiar word, “window lifters”), as the name suggests, are designed to raise/lower windows. The option under consideration refers to the electric window lifter
(although in a number of models only mechanical ones are provided for rear windows), i.e. manipulations with the side windows are carried out using electrical energy. It is convenient and practical, creating additional comfort for the driver and passengers
It is pleasant to note that domestic manufacturers paid due attention to this indicator
{banner_content}
The right front window lifter of the Lada Kalina does not work
The question of why the window regulator does not work is often asked by Lada Kalina owners on specialized forums and service stations. There are many reasons for this phenomenon, due to the low reliability of the design. In some cases, the part can be repaired, but in others, all that remains is to remove the non-working window regulator and replace it with a new device. What can cause the mechanism to fail? How to make a replacement? Let's look at these points in detail.
Causes of malfunction
The main reasons why the window regulator does not work on Lada Kalina cars include:
- Stuck electric motor brushes. Such a malfunction is possible in case of overheating of the brushes, which do not tolerate sudden temperature changes. As a result of such a negative impact, the plastic socket melts, as well as loss of brush mobility. At the first sign of a problem, knock on the plastic door trim. If you delay this, then you won’t be able to correct the situation with little effort—you’ll have to interfere with the design of the product.
- The reason that the window regulator does not work is often the lack of thought through the electrical circuit of the mechanism. The weak link in the chain is the contacts, which cannot withstand the currents passing through them. As a result, the power windows of the Lada Kalina fail due to the lack of a unloading relay. This means that if the mechanism breaks down, repairs to the power windows and control panel may be required.
Practice shows that in most cases, it is not possible to repair the unit, or considerable effort must be made to do so. That's why the best solution is to install new window regulators.
How to remove a window regulator and install a new part
Start work on dismantling the faulty mechanism from the front doors, but to remove the window regulator, free the door from the trim.
To complete the task, do the following:
- Raise the glass to the top point and secure it with tape. It does not matter which window lifter the work will be carried out on - the sequence of work will be the same on any front door.
- Take a ten-size wrench and unscrew the pair of bolts that hold the glass in place. Also unscrew the lock handle screw from the inside.
- Disconnect the electric motor and wiring from the electric motor supply circuit.
- Unscrew the eleven nuts on the mechanism, after which you can remove the window regulator.
Video: Replacing the electric window and motor on the Lada Kalina and Grant
If the video does not show, refresh the page or style=”color:#CC3333″>click here
When performing work on the rear doors, the procedure will be almost identical. Do the following:
- Raise the glass to the top position and secure it according to the principle discussed above.
- Using an eight-socket wrench, unscrew the three nuts that hold the assembly in place.
- Take a ten key, unscrew a couple of screws and three more nuts.
- Remove the assembly through the hole formed at the bottom of the door.
- Remove the rear door window regulator of the Lada Kalina and inspect it.
- If the problem can be corrected without replacement, have the device repaired. If the breakdown is fatal, for example, the window lift motor or gear is broken, then installation of a new mechanism is required.
If the window regulator does not work, start by determining the cause of the breakdown, and then decide on the urgency of repairing the mechanism. If the malfunction is serious, the only solution is to remove the Lada Kalina window regulator for restoration work or a complete replacement.
Design and types of window lifters
Kalina front window lift
Window regulators are a device designed to raise or lower car windows.
At the moment, there are a huge number of options for these devices, but the design, despite the differences in component parts for different models, is similar, it includes:
- grooves that hold the glass by the side edges
- so-called “rails” that ensure the movement of glass
- Seal and damper, glass movement limiters in the up and down direction.
A window regulator of any design consists of two main elements:
- drive unit
- lifting mechanism - transmitting vibrations of the drive movement to the glass, and thereby ensuring its movement.
The drive is divided into two types:
- Mechanical, known to us from Soviet cars, where in order to lower or raise the window, you need to turn the window lifter handle.
- Electric, typical of modern cars, where to move the glass you just need to press the window button. The electric drive consists of a reversible electric motor with a worm-type gearbox.
In addition, window regulators differ depending on the mechanism of glass movement:
Each option has its pros and cons and technical features. All these device options have one thing in common: one day they fail; this problem especially often occurs in a model that is so popular today as the Lada Kalina.
There can be dozens of reasons why power windows malfunction, but the most common are the following:
- The commutator brushes of the electric motor, which is responsible for the glass movement process, freeze. This happens, as a rule, due to overheating of fragile graphite brushes, unstable to sudden temperature fluctuations, and this factor starts a chain reaction: overheating of the brushes begins to melt the nest, which is made of plastic in all Kalinas, and not of the best quality. For this reason, the brushes lose mobility, and the device can only be brought into working condition using a hammer. At the initial stage of the breakdown, it is enough to give a good knock or two on the door trim, but after a couple of weeks, this method stops working, and then you will have to disassemble the window regulator to repair it.
- Another cause of failure, typical of the Lada Kalina, as well as many other VAZ models, is the ill-conceived electrical circuit. The contacts cannot withstand the load placed on them, there is no unloading relay, which is why all the window regulators fail at once, and then it is necessary to repair not only the window regulators themselves, but also the remote control.
When it is impossible or too problematic to repair the device, it is more advisable to replace it with a new one. The following options are suitable for the Lada Kalina:
- electric window lifter Garnet VAZ – 530 rub.
- electric window regulator Ningbo – RUB 1,699
- electric window lift AUTO-GEO – RUB 3,300.
Of course, the price is directly related to quality, but if the budget is limited, then the domestic option is not bad.
Now let's talk about how to install window regulators yourself.
Instructions for removing the cladding on Kalina
The first three operations are performed the same way for all Lada Kalina doors. The exception is the trunk hatches of hatchback and station wagon cars, where the disassembly procedure is much simpler. Here's what to do:
- By hand, unscrew and pull out the cap of the latch designed to lock the door lock from the inside.
- Using a Phillips screwdriver, remove the 4 screws holding the music system speaker.
- Remove the speaker and disconnect the wires from it.
Unscrewing the blocker and acoustics
Tip. The acoustics can be attached either to the door card itself or to the metal door frame. If, after removing the speaker, you observe the first option, then during assembly it is better to redo the fasteners by drilling holes for self-tapping screws. The acoustics should be mounted to the door, not to the upholstery.
Attaching the speaker to the casing is wrong
The further procedure of work differs depending on the location of the door that you are disassembling.
Front passenger door
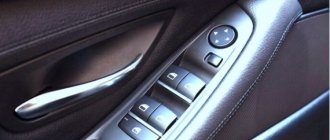
Here the decorative panel is held on by 8 clips, 2 screws securing the internal handle and two self-tapping screws located under the plastic pocket. The algorithm for dismantling it is as follows:
- Using an awl, carefully pry the edge of the plastic plug hiding the screw in the door handle and remove it. Remove the second screw cover in the same way.
- Remove both handle screws.
- Pull the door opening handle towards you, unscrew the fastening screw and remove the lever. After which you will be able to remove the entire handle.
- Unscrew the 2 screws at the bottom of the door card, under the plastic pocket.
- Take a flat head screwdriver and pry the top right corner of the trim panel to disengage the first tab. Grab the casing with your fingers and release the remaining pistons manually.
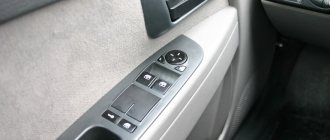
- After separating the panel from the door, disconnect the wires coming from the power window button. To do this, pry the connector tab with a screwdriver and pull the block out of the button block. Dismantling of the cladding has been completed.
Passenger side panel removed
Advice. When prying up the edge of the door card with a flat-head screwdriver, you should place a rag under it so as not to scratch the paintwork on the inside.
Nuances of disassembling the driver's door
On this side, the decorative panel is removed in the same order as on the passenger side. But due to small differences in the design, it is necessary to take into account the following nuances:
- To make the trim easier to remove, you need to remove the plastic panel covering the rear-view mirror adjustment lever;
- the first screw for securing the armrest is located under the plug, and the second is in the recess of the handle;
- the door opening handle is located on top of the armrest and is removed after unscrewing the fastening screw.
The plastic socket for the mirror drive can be easily removed by hand
The panel on the rear view mirror adjustment is removed using a flat screwdriver, which is used to pry it off from below. On vehicles equipped with electrically controlled mirrors, there is no adjustment lever, and instead there is a plug on the panel.
On the driver's side, the screw is hidden in the armrest
Reference. Some drivers unknowingly try to pick out this plug to disconnect the panel. The action is useless, since the element is easily removed by hand, but unsuccessful attempts leave unsightly scratches on it.
Screw securing the lever for opening the door
Rear door trim
Here the upholstery is pressed to the door by 10 plastic clips and 2 screws securing the handle. The disassembly technology is as follows:
- The first step is to remove the mechanical window lifter handle. Use an awl to pry up the plastic half-ring that secures the lever to the axle. Pull it out and remove the handle.
- Pull out the 2 plastic plugs on the door handle and remove the fastening screws. After this, the element will be easily removed.
- Using a flat-head screwdriver, pull out the lower far corner of the decorative panel and snap out the first piston.
- Grab the door card with your hand and remove it, releasing the remaining clips along the contour. The casing has been successfully dismantled.
Scheme for dismantling the decorative panel
Note
Please note that the opening handle lever on Kalina 1 will have to be unscrewed and removed, but on Kalina 2 there is no need to remove it, since it is screwed directly to the door and is in no way connected to the decorative panel
To remove the window lifter handle, you need to pull out the half ring
Otherwise, the upholstery on the doors of the second generation Lada Kalina car is removed in the same way, there are no differences.
Removing the power windows
Let's start with the front mechanisms
Before proceeding with repairs, it is necessary to dismantle the defective device. But in order to remove the window regulator, you will first have to remove the door trim.
So, for work we need:
- key for 10
- molar tape.
Now let's get down to business.
- The first step is to lift the glass all the way and secure it at the highest point with tape.
- Then, using a wrench, remove the two bolts that hold the glass in place (1 in the picture). Also, you need to unscrew the bolt of the inner handle of the lock.
- The next step is to disconnect the device motor and wires (2 in the figure).
- We unscrew all the nuts on the device (there are 11 of them in total) and remove the window regulator (2 in the figure).
The front window lifters have been removed, let's proceed to dismantling the rear ones (if the problem lies in them too).
Here we need:
- two keys, 10 and 8
- masking tape.
- Just as in the case of the front window lifters, raise the glass all the way and secure it with tape.
- Using a size 8 wrench, unscrew the three nuts securing the mechanism.
- Take a 10mm wrench and remove 2 bolts and 3 nuts.
- Now it will be easy to pull the device out through the hole at the bottom of the rear door.
Dismantling has been completed. Carefully examine the condition of the device; if it cannot be repaired, replace it with a new one.
Repair of power windows on VAZ 2110
Today, the domestic “ten” continues to confidently remain in a leading position among the most popular cars in the country. They have already stopped producing them, but this does not stop many people from driving a VAZ 2110.
The car is far from ideal, but it has a lot of positive qualities. One of them is the simplicity of the design, which allows you to perform a whole range of repair work with your own hands.
An example of a successful design that combines good reliability and the possibility of self-repair is window regulators.
Window lifters are devices that serve to move glass on windows and hold it in a given position. Today, the VAZ 2110 is available with quite a variety of window lifts, which differ not only in manufacturer, but also in purpose.
If we take into account the purpose, then devices can be divided into four types:
- For front doors;
- For rear doors;
- For left doors;
- For the right.
It is noteworthy that their design may be different, but they have quite a lot of common nuances.
Any of the listed window regulators includes several main components.
Component
Functions
They are installed on the inside of the door frame. Their function is to hold the glass sheet in a given position
They are mounted inside the door frame in a static position. Act as guides for moving glass up and down
Seal and damper
Products made of soft rubber. They ensure that glass movements are limited downwards and upwards.
The design of any window regulator includes two main components - the drive and the lifting mechanism.
Drives
As in many other cars, in the case of the VAZ 2110 there are two types of drives.
- Electric. A rather complex set of elements, which consists of a drive drum or gear, as well as an electric motor with a worm gear built into it. This design allows you to raise and lower the glass at the touch of a button.
- Mechanical. The most simplified design, which includes several parts, gears and handles. To raise the glass in a VAZ 2110 using a power window lifter, you need to turn the handle clockwise. The drive roller takes on the required physical effort, so lifting is not difficult.
Lifting mechanisms
As for lifting mechanisms, there are several of them. For the VAZ 2110, various options are available.
Mechanism type
Peculiarities
Rack and pinion lift mechanism
It was installed on the VAZ 2107, then switched to the VAZ 2110. The advantages of such a mechanism are its simple repair and operation. But the design is not particularly reliable; for effective operation, the rack and pinion device must be lubricated. Design flaws forced the developers to abandon it
A more advanced system that eliminates the possibility of glass distortions. But the reliability is not the highest. The most attractive option for a cable mechanism is a structure made of galvanized metal. Their cost is 400 rubles
It is also worth paying attention to Metprom devices. Their current price is 300 rubles. Standard VAZ cable lifts will cost 250 rubles
Standard VAZ cable lifts will cost 250 rubles
Lifting lever mechanism
These are the most advanced mechanisms available for the VAZ 2110. Their operation is based on the use of hinges. The design ensures silent operation. However, the mechanism is only available on electric windows
Rack and cable mechanisms are offered complete with electric and mechanical drives, while lever mechanisms are available only with an electric motor.
How to disassemble the grant window lifter button
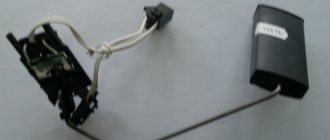
Restoring the power window button
An electric window regulator (ESP) is a car device that allows you to raise and lower the door windows using a button. The ESP consists of a drive mechanism, a lifting mechanism and a control unit.
Like any other systems subject to intensive use, electric windows have an increased service life - about 30 thousand opening/closing cycles.
This resource is sufficient for 10 or more years of uninterrupted operation, however, if handled carelessly and/or under the influence of other negative factors (for example, water ingress), the device may fail much earlier than the stated period.
Most often, problems arise in the mechanical part, that is, some part of the lift itself breaks. In this case, when you press the button, you will hear the sound of a running motor, but the glass will remain in place.
It is worth inspecting the lifting mechanism for damage to the guides along which the glass moves.
Vehicle Maintenance
It is recommended to replace any parts in the car only with original ones. Compliance with this requirement will eliminate subsequent unscheduled repairs. If Kalina's power window button requires servicing, then first you will need to find the necessary tools.
Using 2 small flathead screwdrivers, you need to remove the block from the grooves. Direct replacement is carried out without sudden movements, so as not to break fragile elements. As soon as it becomes possible to get to the wiring, you need to get rid of the plug with equal care. This can be done with little physical effort. A latch is used to disconnect the second plug.
After the glass power supply is removed, it must be inspected. The presence of any mechanical damage indicates the need for mandatory replacement. Even in-depth repairs will not help restore its functionality. Before installing a new unit, another check must be carried out. Its relevance increases when it comes to replacing a relay.
After removing the faulty part, you should manually check all connecting fasteners and wires. Traces of charring or damage are a sign that the Kalina power window button most likely needs to be replaced. If this is not done, then the need for repeated repairs will arise within 2-3 months. This is due to the increased load on the Lada window regulator.
Installation of a working unit occurs strictly in the reverse order. First, carefully connect the wires and 2 plugs. If the window lift button has been manipulated in any way, the reliability of its fixation must be checked manually. If a visual inspection does not reveal any problems, then the Kalina window lifter button is placed in its place.
Once all the wires are connected, the unit is secured using the provided latches. The repair is completed by checking the efficiency of the system.
You need to pay attention to the smoothness of the ride and the absence of the slightest delays. In the future, if the window regulator on Kalina does not work, you can fix the problem yourself. Characteristics of the Kalina electrical package control unit Why does the speed sensor on a Lada Kalina car break down and how to fix it?
Characteristics of the Kalina electrical package control unit Why does the speed sensor on a Lada Kalina car break down and how to fix it?
Sometimes, owners of Lada Kalina are faced with a problem when the power windows do not work. One or both may not work at once. But how to find out the reason why this happens? In fact, there are not many reasons and they are quite easy to eliminate.
The window regulator consists of mechanics and electrics, and therefore the reasons must be sought in these parts. Let's look at where the problem may lie:
Troubleshooting Methods
So, when the window regulator stops working, it is necessary to find and eliminate the cause. Let's look at the whole process and steps step by step:
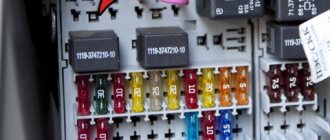
The first thing you need to pay attention to is the fuse. In the block it is marked as F5. You need to take it out and look
If it burns out, it should be replaced with the same one with the appropriate marking. If the fuse is intact, then the problem is in the power supply and you need to look for the problem of a broken wire. We take out the fuse and use a tester to check whether there is voltage in the on-board circuit. To do this, you need to insert the probes into the sockets and see if there is power supply. If not, then you should check the wires, relays, and control unit
You need to take it out and look. If it burns out, it should be replaced with the same one with the appropriate marking. If the fuse is intact, then the problem is in the power supply and you need to look for a broken wire problem. We take out the fuse and use a tester to check whether there is voltage in the on-board circuit. To do this, you need to insert the probes into the sockets and see if there is power supply. If not, then you should check the wires, relays, and control unit.
How to identify and eliminate electrical problems
If you don’t want or have the opportunity to take the Lada Kalina to a car service center, you can diagnose the problem yourself. Checking the breakdown of the ESP should be carried out in the following order (inspection of devices):
- fuse;
- wire integrity;
- relay;
- Control block.
First you need to check the fuse. It is located in the mounting block and needs to be removed and inspected. If the fuse is blown, it should be replaced with a device with the same marking.
If everything is fine with it, then check the wire for integrity. To do this, you need to remove the fuse and check if there is voltage in the on-board circuit. This is done using a special tester: probes are inserted into the sockets and show whether there is power supply. If it is not there, then check the relay and control unit. If everything is in order here, then it’s a matter of mechanics. Again you will need to diagnose the window regulator.
Let's look at the diagram for switching on power windows on the Lada Kalina
Diagram (click to enlarge)
The decoding of the notation looks like this:
2 — ignition switch;
3 — right front door power window switch;
4 — right rear door power window switch;
5 — gear motor for the electric window of the right front door;
6 — gear motor for the electric window of the right rear door;
7 — gear motor for the electric window of the left rear door;
8 — gear motor for the electric window lifter of the left front door;
9 — left rear door power window switch;
10 — left front door power window switch;
11 — relay for turning on electric windows;
A - to power supplies;
B - to the instrument lighting switch;
C - the order of conditional numbering of plugs in the power window blocks.
Is it the motor or the mechanics that is at fault?
If everything in the electrical part is functional, then it is necessary to look for the cause in the mechanical part. To do this, you will have to dismantle and diagnose the window regulator. Let's look at how to remove this node:
- We dismantle the door card.
Door card removed
It is worth inspecting the removed window regulator for damage.
Removing the window motor
The most common malfunction is wear of the roller teeth or breakage of the traction cable. These parts need to be replaced, but often the entire mechanical part of the window regulator is replaced.
Diagnostics of the window lifter trapezoid
Thus, it can be seen that the reasons for the malfunction of the window regulator are quite simple to eliminate. If you find the reason, you can easily repair the unit yourself. On the Lada Kalina there are only a few reasons why the window regulator fails.
guys, this is wrong, open the keys on the door and look at the fit of the plates when the button is turned on
I had such a situation, I contacted repairmen. But after reading the article, it seems to me that I would have solved the problem myself. Thank you.
All descriptions are stupid. We need to be simpler. Usually stops working in the closed position. A common cause is clogged glass seals. You need to turn on the ignition and interior lighting. We press the window lowering button, at this moment the interior lamp should dim slightly. If yes, the electrical is fine, look for the cause in the mechanics. If it doesn't go dark, the reason is electrical, start by checking the fuse and beyond. According to mechanics, insert some card from the outside of the glass into the seal and move it in a circle, pouring water. If it doesn’t work after that, open the door, one presses the lowering button, and the other hits the glass with two palms on both sides of the glass simultaneously downwards, if after several attempts did not work - disassemble the door trim, loosen the electrical fastening bolts. engine window regulator and press the button. If it works, run it several times and tighten the bolts back. If not, replace or repair the window regulator.
That’s exactly how I cured it by disassembling and lubricating the mechanisms!
Mechanical problems
The car owner will have to dismantle the ESP for diagnostics. You can remove it quickly and without much effort using the instructions:
- remove the door card;
- remove the window regulator;
- inspect it for damage;
- remove the motor.
Most often, the malfunction is associated with wear on the roller teeth or a broken traction cable. They will need to be replaced, but it is better to change the entire mechanical part of the device.
If the ESP functions but poorly, for example, it rises jerkily, using additional physical force, then you can try replacing the gear and cleaning the housing from dirt.
The reason why the window lifter does not work on a Lada Kalina car is quite possible to diagnose and correct on your own.
Today, Lada Kalina is one of the most popular modern domestically produced cars. But like any Russian cars, this model has a number of vulnerabilities, in particular, we are talking about electric windows. In this article we will talk about how to install the window lift button and the device itself on the Lada Kalina, as well as what malfunctions are typical for this unit.
The window lifter does not work - do-it-yourself repair of Renault car window lifter buttons
Hello friends! The author of the site blogvp.ru, Vitaly, is in touch. In this post I want to share how you can quite quickly repair the power window control buttons yourself. We will talk about the buttons in the Renault Megane Scenic 2, but similar ones are found in other Renault car models and not only. Therefore, the problem may be common to different cars. The problem manifests itself as follows. The window regulators do not work adequately, you press to raise the window, and they lower it or raise it jerkily, in general they work at random, sheer torture. Just lower the window just a little bit and that’s it! There is no way back, only down... I had to drive home with the window open, in winter. Luckily it wasn't too far. After this incident I decided - I need to do something! My suspicions immediately fell on the control buttons, since it was obvious that they were giving the wrong command.
Ignition system diagram Lada Kalina Lux
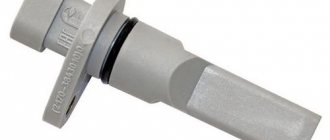
1 — oil pressure warning lamp sensor; 2 — coolant temperature indicator sensor; 3 — additional fuse block; 4 — fuses for the electric fan of the engine cooling system; 5 — electric fuel pump relay; 6 — relay for the electric fan of the engine cooling system; 7 - ignition relay; 8 — relay 2 of the electric fan of the engine cooling system; 9 — relay 3 of the electric fan of the engine cooling system; 10 — electric fan of the engine cooling system; 11 — throttle position sensor; 12 — idle speed regulator; 13 — coolant temperature sensor; 14 — diagnostic block; 15 — ignition system harness block to the instrument panel harness block; 16 — solenoid valve for purge of the adsorber; 17 — speed sensor; 18 — ignition system harness block to instrument panel harness block 2; 19 — mass air flow sensor; 20 — crankshaft position sensor; 21 — oxygen sensor; 22 - controller; 23 — rough road sensor; 24 — diagnostic oxygen sensor; 25 — ignition coil harness block to the ignition system harness block; 26 — ignition coils: 27 — ignition system harness block to the ignition coil harness block; 28 — spark plugs; 29 — nozzles; 30 - resistor; 31 — air conditioning system pressure sensor; 32 — blocks of the ignition system harness and injector wiring harness; 33 - phase sensor; 34 - knock sensor.
Ignition system wiring harness -11184-3724026-10. Ignition coil wiring harness -1118-3724148-00. Injector wiring harness -11184-3724036. A - to the “plus” terminal of the battery.
Some owners of the 2nd generation Lada Kalina encounter problems with the operation of the front or rear power windows (ESP) already during the break-in period of the car. There may be several reasons for this malfunction; all of them are described in this article.