A properly functioning steering mechanism is one of the main conditions for ensuring the safety of any vehicle. If the owner of a Lada Kalina detects suspicious signs of failure of any component components of this unit, then he urgently needs to take effective measures to find and eliminate the malfunction. The main characteristic symptom of problems is knocking. It is clearly audible when driving over bumps or when turning the steering wheel while driving. When the owner determines that the steering rack requires steering rack repair, then he has two options: go to the station to the experts or dare to repair the steering rack on his own. You can make the replacement with your own hands; of course, it is not easy and troublesome, but nevertheless it is possible. Especially if you have a repair kit on hand.
Lada Kalina steering rack resource
The Lada Kalina steering rack has a factory service life of 60-80 thousand kilometers. After this period, the manufacturer recommends checking the condition of the part by visiting an official service center.
When checking the condition of the steering rack, you should pay attention to several factors:
- Lada Kalina, for all its novelty, remains a budget car. For this reason, replacement of the part may be required after 20-40 thousand kilometers. The same rule applies to the electric booster. Statistics show that only 50% of the electrical amplifiers and racks installed on Kalina retain their operational properties over 80 thousand km. mileage
- In some cases, if signs of a part malfunction appear, it is enough to tighten the steering rack. Please note that failure to perform this maintenance may result in serious damage, including damage to the spool and stem.
- Most often, the steering rack fails due to leaky boots that cover the moving elements of the part. Therefore, they should be checked regularly and changed as necessary.
The most reliable are the Mando racks, produced in South Korea and installed on the new Lada Kalina. Since dismantling the part is not difficult, drivers can fix many defects themselves.
Electric amplifier
It is better to regulate this unit in Lada Kalina after disassembling the electric power steering rack. However, there is a method that allows you to perform this action without having to remove the specified mechanism.
- We install the car above the pit to provide access to the front amplifier mount.
- Tighten the clamping nut. If we do it from below, we rotate in the direction of the arrow for an hour, and if we do it from above, of course, the opposite.
- For preventive purposes, we check the integrity of the oil seal. Please note that sharp and frequent rotation of the steering wheel leads to premature wear of this sealing element.
Diagnosis of steering faults
There are several characteristic signs by which you can determine a malfunction of the hydraulic steering rack:
- Increased effort to turn the steering wheel;
- Constant decrease in fluid level in the expansion tank. A lack of power steering fluid can be indicated by leaks under the car, as well as a corresponding notification on the dashboard.
- The appearance of knocking noises when driving. This sign is easy to notice when driving on uneven roads.
- A hum that gets louder when you turn the steering wheel. In some cases, extraneous sound may be accompanied by vibrations.
- Problems with returning the steering wheel to its original position.
Many of the listed “symptoms” are also characteristic of an electric rack. In addition to them, the breakdown of a part with an ESD can lead to the steering wheel biting, its spontaneous rotation and knocking.
If one or more of the listed symptoms appears, you should definitely contact a service center. You can also inspect the rack yourself if there are brake shoes or a hole.
Design features
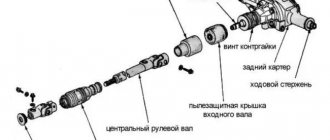
The Lada Kalina guide unit includes:
- electric amplifier;
- rudder column, adjustable for extension and tilt;
- rack with electric power steering with a mechanism for changing the gear ratio;
- rods with swinging tips and levers.
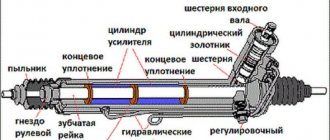
The mechanism is based on a mechanical gearing unit, in which the main active element is a helical gear, in which the pitch of the teeth varies depending on the length of the rack.
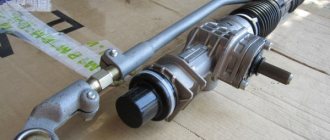
The figure shows the design of the Lada Kalina rack and pinion assembly.
Fixation in the rack-and-pinion pair is carried out using a spring, and a real plastic insert is adapted to reduce friction. The degree of compression of the spring element is adjusted with a nut. The factory distance between the steering shaft and the rack in the LADA Kalina model is 0.1 mm.
If a shock appears inside the assembly, it can be eliminated by adjusting the gap with your own hands. The steering shaft is centered using two bearings, one located in the column bracket and the other inside the power amplifier housing. The bracket connects both to the pedal attachment point, i.e. to its front part, and to the body. Structurally, the bracket together with the pipe forms a hinged connection from a pair of plates. This unit provides a change in rudder position where the range of motion is limited by slots in specified plates.
The specific position of the tube is fixed by a lever, which is connected to a special bushing that performs the adjustment. It screws onto a coupling bolt located directly in the grooves of the plates. When the lever is turned, the bushing rotates synchronously. At this time, the fixation of the plate weakens, and the steering wheel begins to succumb to changing its position. Springs in the center of the bracket and plate pull the tube up, loosening the connection.
Again, the steering of the Lada Kalina has two rods and articulated arms. The design of the stop includes two tips: external and internal. The process of adjusting the length of the rod is carried out by turning the threaded bushing present here. After completing the adjustment manipulations, the position of the tips should be secured with bolts of a special design. The end of the outer rod is connected to the pendulum bracket through a ball joint.
Power steering, powered by an electric drive, changes the degree of gain depending on the speed of movement. When the car is stationary, the power steering delivers maximum torque and the steering wheel turns very easily. As the speed increases, the force on the steering wheel of the Lada Kalina increases, which is facilitated by a decrease in the torque generated by this unit. The mechanism is based on an electric motor, which transmits rotation through a gearbox “hidden” under the column casing. The amplifier is controlled by an electronic unit, which receives impulses from speed sensors, recognizes the force when rotating the steering column shaft, and also reads the number of revolutions of the engine shaft. There is a special indicator on the dashboard that allows you to monitor the operation of the amplifier.
Causes of steering rack failure on Lada Kalina
There are three reasons why the Lada Kalina steering rack most often fails:
- wear of the central tooth or working pair;
- the appearance of corrosion on parts (usually this problem is associated with a worn boot);
- wear of any other element, such as a disc spring.
In many cases, the breakdown occurs due to the fault of the driver. Among the typical mistakes of car owners that lead to the described malfunctions are driving over bumps at high speeds. At the same time, it is not recommended to turn the steering wheel sharply on a cold car or leave it with the wheels turned out in winter.
These and many other factors accelerate wear of parts, which may require expensive repairs or complete replacement of the unit.
You need to pay attention to the smallest details
Possible problems may arise at the stage of dismantling the rack stop nut. The manufacturer of the Lada Kalina car began to twist it too much. Even with maximum effort, it is not always possible to move it in space by 2 or more divisions. In this case, there is no need to make significant physical efforts. It is enough to move it by the allowed number of divisions.
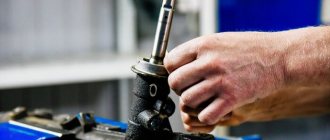
In order to properly repair the steering rack, you need to carefully turn the worm shaft in one direction and then in the other direction.
½ tube of Litol lubricant will help speed up the process. After this, you need to install the new steering rack in its rightful place and secure all the elements. It is recommended that after installation is completed, make 4-5 full turns of the steering wheel in both directions. The absence of knocking or delays indicates the success of the repair. If there are problems, the steering nut needs to be slightly tightened or re-lubricated.
Prompt replacement of worn or broken parts will eliminate the likelihood of further spread of the malfunction. It would not be a bad idea to regularly visit the service station for preventive visits. Timely diagnosis is the key to a long mileage between repairs.
DIY steering rack repair
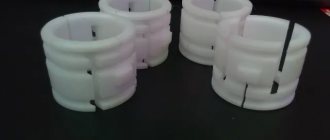
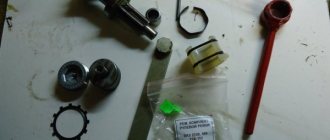
If you refuse to contact a car service and decide to carry out the repairs yourself, you will need a repair kit. In terms of cost, such a set will be cheaper than a new unit. You can find a repair kit for the described Lada Kalina unit using article number 2110-3403090-11. However, you should not buy plastic inserts and bushings separately, since the quality of such parts may vary.
Dismantling and disassembling the part
After purchasing all the necessary materials, you can begin the repair. You should first clean the rack using a high-pressure mechanism: it will remove contamination from all elements without damaging them. You can clean it yourself, but it will take more time.
It is also necessary to make marks for the correct position of the steering shaft relative to the rack axis.
To dismantle the steering rack you need to perform several steps:
- Installing a jack under the front of the car
- Removing the front wheels.
- Disconnecting the EUR from the network
- Unscrewing the bolt securing the steering shaft in the cabin.
- Removing the cotter pins and nuts that secure the tie rods to the steering knuckle.
- Removing the tie rod pins. If they cannot be removed by hand, you should use a pry bar.
- Removing the clamps securing the steering rack.
- Pulling the rack through the wheel arch without removing the steering rods.
At this stage, all that remains is to unscrew the bolts securing the part to the rods. After this, remove the clamps securing the boot. To disassemble the faulty element, you need to unscrew the fastenings of the electric booster and remove the rack housing cover. Now you can begin diagnosing the condition of all elements, replacing the bearings and boot, and installing the unit.
Assembly and installation
Before assembling all parts, it is necessary to coat the rack shaft with lithium grease. The assembly and installation process is carried out in several stages:
- Installation of new bearings.
- Filling lubricant (Litol24) into the crankcase.
- Installation of a part with a preliminary set of marks. The arch is necessary for proper fixation of the steering wheel.
- Installing the stop, plastic ring and spring.
- Fastening the steering rods and installing a new boot.
After the above steps, the rack is inserted back, followed by connecting the splines and the electric booster. The EUR is connected to the network, then the steering knuckles are connected to the steering knuckle. Now the assembly is complete, and you can proceed to adjusting the unit and checking it after repair.
Part tightening
It is easiest to tighten the rack if there is a hole. For such work, you may need a partner - second hands will greatly facilitate the adjustment process. The rack tightening looks like this:
- Installing the car on an overpass, pit or jack.
- Wheel alignment for easy adjustments.
- Measuring the play of the front wheels using a play meter. The gap should not exceed ten degrees.
- Remove the lock nut, then tighten the adjusting nut.
You should periodically check the travel and play of the steering wheel - a partner will help you do this work.
In most cases, it is enough to turn the nut 10-15 degrees to achieve the desired result. If, after completing the work, extraneous sounds or other characteristic signs of a malfunction do not disappear, the unit should be completely replaced.
Also note that after removing the rack, it is necessary to perform a wheel alignment. To ensure that the repair does not affect the driving of the car, you should contact a car service center.
Consequences of untimely troubleshooting
Neglecting the problem can lead to even more unpleasant consequences. Driving the car will become difficult due to the increasing play - the car will begin to “float” when moving. Elements of the part will begin to collapse, which can lead to a wedge in the steering wheel. At the same time, late repairs will be more expensive, since they may require the purchase of a new unit.
The described process may take a long time, but ultimately it can lead to an emergency situation on the road. That is why you should solve the problem in a timely manner - this way you can save time and protect yourself.
At the same time, you should not take on work without experience - it is better to contact specialists who will identify the malfunction and promptly fix it.