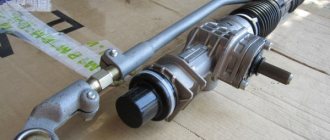
Steering rack bushing for VAZ 2112 (new model 2110) Used for repairing the steering rack of VAZ 2110, 2111, 2112, Bogdan, Lada Kalina, Priora, Granta, Datsun (On-do, Mi-do) cars. The bushing shape has a larger bearing area than a standard bushing. In addition, the sleeve material made of caprolactane (caprolon) has much higher strength and resistance to mechanical stress. If the bushings in the repair kit are enough for 5-10 thousand kilometers, then the caprolon bushing will last the entire service life of the car. It's cheaper than buying a new track. Steering rack repair is also a great way to save money.
Possible sale with assembly (repair of your route). With installation the price is 5000 rubles. 6 month warranty.
There are also nylon bushings for the steering column cardan (steering shaft crosspieces)
Call. If the phone doesn't answer, write a message.
Owners are reminded of the poor quality of the road surface by periodic impacts on the steering rack. Despite systematic repairs and preventative maintenance, hard work days still have a negative impact. Mechanism wear is typical for both domestic and foreign automotive industries. After all, there are no perfectly smooth roads anywhere, some are worse, some are better.
If it is not possible to avoid a breakdown, you should postpone the onset of the breakdown as much as possible. This can be done by strictly observing the technical inspection deadlines. As a general rule, you should maintain a calm and relaxed driving style. A breakdown has occurred and the steering rack bushing has become unusable, so let's read below how to replace it.
In what cases is the steering rack bushing replaced?
The list of cases of replacing steering rack bushings is extensive; there is no point in listing all the points, since not all of them are important. The following are considered universal, “suitable” for any technical means:
- the steering wheel turns rigidly when turning the car;
- the level of hydraulics (fluid) in the power steering expansion tank systematically decreases;
- there is a game in the steering wheel;
- a knocking sound is clearly audible when driving over uneven surfaces;
- The power steering hydraulic pump hums abnormally, makes noise, and in general the sound of operation has changed.
Replacement procedure
Note for the driver: Despite the simplicity of the design and the simple principle of operation of the steering, in order to avoid breakdowns, it is recommended to carry out servicing only in service centers.
There are two possible repair options: replacing the steering rack bushing without removing the rack and with its complete disassembly. In each case, the technician individually makes a decision based on the results of vehicle diagnostics. The design of a technical device also influences the decision-making process. Some car models do not allow repairs without complete disassembly, especially Japanese brands.
If visual diagnosis reveals damage to a part of the body, then complete dismantling is unconditional.
The replacement mechanism is as follows:
- Using a lifting mechanism, the car is raised to a comfortable height.
- The technician unscrews the standard fastenings of the body part, hydraulic hoses, steering ends, and disassembles the rack as a whole.
- Using a stationary vice, the master removes all components, including the steering rack support sleeve.
- Run the seat troubleshooter, clean out the old grease, wash the parts.
- Start reassembling in reverse order, taking into account the installation of new components.
At the end of the work, the mechanism is sent for diagnostics - a high-pressure support to check its functionality. The car is being prepared for delivery to the customer.
Replacing the bushing without removing the steering rack is carried out according to an abbreviated algorithm, but this method has not gained popularity; few people practice it.
Conclusions and recommendations for repairs
Particular attention should be paid to the condition of the support bushing and the worm gear mechanism. Damage to the anthers causes excessive corrosion of the rack, destruction of the gear teeth, destruction of the locking spring and clogging of all parts with dirt.
The parts need to be washed, bearing play checked, and cleaned. Also generously lubricate all mating surfaces. The rack stop and retaining ring must be replaced, as the parts most susceptible to friction and wear.
Types of bushings for installation on the control mechanism
- bronze: the best material available today, however it requires a perfect and uniform cylindrical base. Not all manufacturers provide similar features;
- fluoroplastic: a good anti-friction material, but when systematically exposed to high temperatures it is subject to deformation without recovery;
- caprolon bushing - has average wear resistance and friction strength, but due to its budget cost and appropriate quality, it is in demand on the market. Due to a certain plasticity of the material, parts must be processed with high precision. This is only possible in a factory, which reduces the level of skill;
- polyethylene rephthalate, also known as TEKAPET: this material is used for the manufacture of premium cars due to its high technical characteristics.
The article does not mention an electric drive mechanism. There is essentially no difference when replacing a steering rack bushing or other component. After reading the tips, we decided to try to fix the problem ourselves - try, but be extremely careful and attentive.
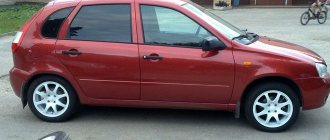
A properly functioning steering mechanism is one of the main conditions for ensuring the safe movement of any vehicle. If the owner of a Lada Kalina detects suspicious signs of failure of any of the components of this unit, he must urgently take effective measures to find and eliminate the malfunction. The main characteristic sign of a malfunction is knocking. It can be clearly heard when driving over uneven surfaces or when turning the steering wheel while driving. When the owner determines that the steering rack requires steering rack repair, he has two options: go to a service station to see a specialist or decide to repair the steering rack himself. You can make a replacement yourself, of course, it is not easy and problematic, but, nevertheless, it can be done. Also, if you have a repair kit on hand.
Description
Steering rack bushings for Lada Kalina
Do you want to forget FOREVER about any problems with the steering rack? We have found a unique solution! Caprolon bushings will allow you to simply and most rationally deal once and for all with the problems of steering rack failure on a Lada Kalina.
The most wear-prone component of the steering rack design is the support bushing. In the vast majority of cases (according to statistics - 95%), the steering rack needs to be replaced due to destruction of the support sleeve.
We offer an amazing alternative to bushing replacement that solves the problem FOREVER! For only 980 rubles!
In most car services where you go with such a problem, they will tell you that a complete replacement of the steering rack is necessary - fiddling with its repair is troublesome, time-consuming and not profitable for the service budget.
How much does a steering rack cost for Kalina Granta (VAZ-2190) and VAZ-2110 cars? - within 4,000 -10,000 rubles, not taking into account the cost of installation work.
Installing a new steering rack will certainly help you forget about all the problems with this unit for a while. After a certain period of time, the situation will repeat itself again, and again there will be a need to buy a new steering rack. Don't you think this is irrational? Then we offer an effective way out of this vicious circle - a bushing made of graphite-filled caprolon. Its installation on the Lada Kalina steering rack will allow you to forget what steering play or extraneous sounds when driving are.
Caprolon is a common material from which bushings and pulleys are made in various mechanical components. Caprolon is a polymer antifriction material, recommended for use in units with high friction. This material has a low degree of wear and a high percentage of resistance to friction when working with metal elements.
What are the advantages of installing a caprolon steering rack bushing?
- The steering rack problem will be solved once and for all.
- Saving money. You are guaranteed to receive savings of 2500-7500 rubles for one replacement of the steering wheel. Multiply this figure by the number of replacements you will make over the entire life of the car. Decent savings, agree!
- Impeccable level of quality. The original bushings wear out quickly because they are made of plastic. The technical characteristics of caprolon and the experience of scientific specialists who worked in conjunction with qualified Lada Kalina repair technicians made it possible to develop a high-quality product that works effectively throughout the entire life of your car.
- Providing excellent vehicle handling, familiar comfort and absolute steering control.
Design features and differences:
- The original version uses ear latches.
- Our bushings are securely fixed in the rack body due to press fits. We consider this fixation to be optimal, taking into account the properties of graphite-filled caprolon.
Our specialists are ready to answer all your questions. Ordering a steering rack bushing for Kalina is available either by phone or using the order form.
We have no doubt about the effectiveness and capabilities of our caprolon bushings! Feedback from dozens of clients gives us confidence that we are on the right track! We invite you to evaluate the advantages of installation and the operating principle of a caprolon steering rack bushing.
We will deliver bushings for the steering rack to any point in Russia, to TK terminals - at our own expense.
Sale of bushings Moscow
Sale of bushings St. Petersburg
More details about delivery conditions are here.
Owners are reminded of the poor quality of the road surface by periodic knocking in the car's steering rack. Despite systematic repairs and preventive maintenance, hard work is still reflected negatively. Mechanism wear is typical for both the domestic and foreign automotive industries. After all, there are no perfectly smooth roads anywhere, some are worse, some are better.
Design features
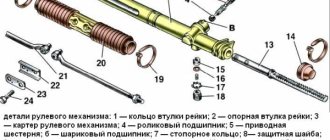
The Lada Kalina guide unit includes:
- electric amplifier;
- rudder column, adjustable for extension and tilt;
- rack with electric power steering with a mechanism for changing the gear ratio;
- rods with swinging tips and levers.
The mechanism is based on a mechanical gearing unit, in which the main active element is a helical gear, in which the pitch of the teeth varies depending on the length of the rack.
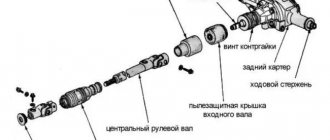
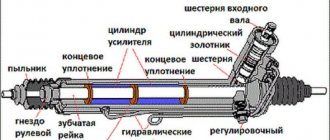
The figure shows the design of the Lada Kalina rack and pinion assembly.
Fixation in the rack-and-pinion pair is carried out using a spring, and a real plastic insert is adapted to reduce friction. The degree of compression of the spring element is adjusted with a nut. The factory distance between the steering shaft and the rack in the LADA Kalina model is 0.1 mm.
If a shock appears inside the assembly, it can be eliminated by adjusting the gap with your own hands. The steering shaft is centered using two bearings, one located in the column bracket and the other inside the power amplifier housing. The bracket connects both to the pedal attachment point, i.e. to its front part, and to the body. Structurally, the bracket together with the pipe forms a hinged connection from a pair of plates. This unit provides a change in rudder position where the range of motion is limited by slots in specified plates.
The specific position of the tube is fixed by a lever, which is connected to a special bushing that performs the adjustment. It screws onto a coupling bolt located directly in the grooves of the plates. When the lever is turned, the bushing rotates synchronously. At this time, the fixation of the plate weakens, and the steering wheel begins to succumb to changing its position. Springs in the center of the bracket and plate pull the tube up, loosening the connection.
Again, the steering of the Lada Kalina has two rods and articulated arms. The design of the stop includes two tips: external and internal. The process of adjusting the length of the rod is carried out by turning the threaded bushing present here. After completing the adjustment manipulations, the position of the tips should be secured with bolts of a special design. The end of the outer rod is connected to the pendulum bracket through a ball joint.
Power steering, powered by an electric drive, changes the degree of gain depending on the speed of movement. When the car is stationary, the power steering delivers maximum torque and the steering wheel turns very easily. As the speed increases, the force on the steering wheel of the Lada Kalina increases, which is facilitated by a decrease in the torque generated by this unit. The mechanism is based on an electric motor, which transmits rotation through a gearbox “hidden” under the column casing. The amplifier is controlled by an electronic unit, which receives impulses from speed sensors, recognizes the force when rotating the steering column shaft, and also reads the number of revolutions of the engine shaft. There is a special indicator on the dashboard that allows you to monitor the operation of the amplifier.
Steering of Lada Granta
It is designed to control the car while driving. Structurally, it consists of the following main elements:
- wheels;
- steering rack;
- drive unit;
- mechanism.
The work of the mechanical part is that the driver acts on the steering wheel, the impulse through the steering mechanism and rack transmits force to the front wheels through the levers, and the car turns in the desired direction. A characteristic feature of a passenger car steering wheel is its smaller diameter (compared to a truck). The design of the mechanism also differs. The steering of the Lada Granta is complemented by an electric booster. The steering wheel can be adjusted in height. Unfortunately, there are no settings for departure.
The steering mechanism of the Lada Granta is rack-and-pinion type, the simplest and most inexpensive option.
The drive is mechanical, structurally consisting of levers, rods and hinges. For more efficient and convenient control, the Lada Granta is equipped with an electric amplifier. This is a complex mechanism that provides force through the use of electricity. An electric power steering, or simply EPS, is used to improve dynamic characteristics and controllability. And, according to some data, it allows you to save fuel by increasing the vehicle’s maneuverability.
Causes of knocking noises and dismantling the rack
The most common cause of detonation is excessive wear on the ball joint of the tip. This malfunction requires prompt replacement of the specified element, since further movements can become dangerous, and everything can be done with your own hands using a special repair kit.
The presence of malfunctions in the mechanism considered here, in addition to shocks, may also respond to steering kickback, which is noticeable to the driver.
It is also possible to bite the LADA Kalina steering wheel in extreme positions. Here, adjusting and repairing the steering rack is an absolute necessity. If after these measurements the expected result is not observed, the only solution is to replace the steering rack assembly. A fairly common cause of detonation is a banal loosening of the bolts on the crankcase of the unit.
The design solutions present in the caterpillar do not allow adjusting and tightening the spring without disassembling the mechanism. But it is possible to replace it yourself using a repair kit.
To remove the binary file, you will need to follow the following sequence of steps.
- We lift the front part of the LADA Kalina car using the available specialized tools.
- We drive the LADA Kalina in the cabin and unscrew the bolt that holds the steering column in the adjusted position.
- Remove both front wheels.
- Unscrew the nuts of the swing arms and pull out the ends.
- Under the hood you will need to remove the battery paired with the platform.
- We take out the heat reflector.
- We unscrew the fasteners that secure the electric power steering rack to the body. Now we calmly remove the knot from the outside.
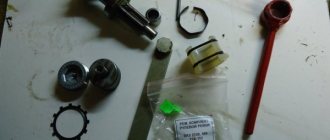
To disassemble the mechanism, you will need to purchase the following set of tools.
- A special key that allows you to adjust the VAZ guide structures.
- A dial indicator with which the gap size will be adjusted.
- Pliers, screwdrivers and wrench sets.
- Puller for hammer, hammer and tie rod end.
- Using a chisel, feeler gauge and brush.
How to adjust the spring and tune the amplifier?
Hedge
The spring requires adjustment due to its natural tendency to stretch over time. Tightening must be done after disconnecting the steering shaft. The promotion does not imply the need to remove the entire mechanism from the car.
Repairing the rack consists of correctly adjusting the gap between the toothed shaft and the rack itself.
- To do this, the stand must be placed in a central position and secured from spontaneous displacement.
- Remove the rubber plug.
- We insert the indicator probe inside the open hole and force it to touch the stop (closed).
- We make turns of the gear shaft, with the help of which we push out the stop. We measure the length of its movement with an indicator; it should be within 0.05 mm.
If the measured value exceeds the set limit, it is corrected by turning the adjusting nut. After completing the procedure, check whether the rack with the electric booster rotates easily in the crankcase by turning the steering wheel all the way in both directions.
Please note that the adjusting nut must be turned with a special wrench. Do not try to tighten this nut too much as this may make it difficult to turn the steering wheel, especially in extreme positions. It is recommended to make adjustments in stages. First, turn the key 20-25 degrees and check the assembly for no shocks when running the rack. If the shot does not disappear, add a rotation angle of about 10-15 degrees and check again. It happens that tightening does not lead to the expected result. This suggests a repair and may require replacing just the steering rack.
Disassembling the steering mechanism
Remove the steering rod support. We insert the bit into the groove of the crankcase pipe mounting nut.
We unscrew the nut, striking the beard (right-hand thread).
. and remove the crankcase pipe.
Use a screwdriver to press out the two clamps of the bushing located inside the pipe.
. and remove the bushing.
Remove the two rubber O-rings from the bushing.
Steering rack bushing (arrows indicate bushing clamps)
.
If it is necessary to replace the nut, use pliers to remove the locking rings. . and remove the retaining ring.. Remove the pipe securing nut.
Remove the rubber plug from the rack stop adjusting nut. Using a scraper, remove the jammed metal in the locking areas of the stop adjusting nut.
Using a special 24mm wrench with an external octagonal head, unscrew the stop nut.
We take out the stop spring. Prying it with a screwdriver.
. remove the sealing ring.
By hitting the crankcase against a wooden block, we knock out the rack stop. Prying it with a screwdriver.
. remove the liner from the stop.
A rubber sealing ring is installed in the groove of the stop.
Remove the rubber ring from the crankcase that seals the hole for the steering mechanism on the front panel.
Remove the boot from the gear shaft.
Use a 6mm hex to unscrew the two screws.
. and remove the crankcase cover.
Remove the separator with the thrust bearing rollers.
Remove the sealing ring of the cover.
We remove the rack from the crankcase.
We press out the gear shaft by holding the shaft in a vice with soft metal jaw linings and pressing the crankcase upward with the mounting blade.
We remove the gear shaft with bearing from the crankcase. We pry it off with a screwdriver..
. remove the bushing retaining ring.
We take out the gear shaft bushing assembled with the support plate.
If it is necessary to replace the needle bearing with a drill d=4 mm, we drill two diametrically located holes in the crankcase so that they extend to the end of the outer ring of the needle bearing.
Through the drilled holes, using a rod of the appropriate diameter, we knock out the outer ring of the bearing from the crankcase.
Using a puller, we press the ball bearing of the gear shaft with the inner ring of the roller thrust bearing.
Use a puller to press the inner ring of the needle bearing off the shaft.
Using a screwdriver, pry and remove the gear shaft oil seal from the crankcase cover. If it is necessary to replace the outer race of the roller thrust bearing.
. Using a scraper, remove the extruded metal in four places and take out the ring. We generously lubricate the bearings, rack and pinion teeth, and the plastic rack bushing with Fiol-1 lubricant. We assemble the steering mechanism in the reverse order. We press the outer ring of the needle bearing into the crankcase using a mandrel of suitable diameter. To seal holes in the crankcase, you can use “fast steel” or “cold welding”. We press the gear shaft with the ball bearing into the crankcase using a piece of pipe of a suitable diameter or a high head, applying force to the outer ring of the bearing. You can press the gear shaft into the crankcase, resting the outer ring of the bearing on the jaws of a vice.
Electric amplifier
It is better to regulate this unit in Lada Kalina after disassembling the electric power steering rack. However, there is a method that allows you to perform this action without having to remove the specified mechanism.
- We install the car above the pit to provide access to the front amplifier mount.
- Tighten the clamping nut. If we do it from below, we rotate in the direction of the arrow for an hour, and if we do it from above, of course, the opposite.
- For preventive purposes, we check the integrity of the oil seal. Please note that sharp and frequent rotation of the steering wheel leads to premature wear of this sealing element.
How to disassemble and repair a rack when jammed?
The repair procedure, for example, replacing a steering rack, begins with disassembling the unit. To perform a number of actions, we purchase a repair kit.
- To disassemble the guide, unscrew the adjusting nut, then remove the thrust bushing. If at the moment we are experiencing difficulties, we use a hammer, with which we apply light blows to the body of the rack and pinion.
- We disassemble the side plugs along with the trunk. Pre-cut plastic fasteners.
- The boot must be replaced with a new one.
- We also use a hammer to remove the shaft from the rack housing.
- Inside the freed crankcase we find a plastic sleeve, which we remove using a screwdriver. We also replace this component with a new analogue (present in the repair kit).
- We clean the internal cavity of the strut housing from old grease. Wash and dry.
- Add new fat. Lubricate the gear pair with particular care.
- We inspect all other rack components and replace them if wear is suspected. Dismantling the steering wheel in Lada Kalina occurs as follows.
1. Disconnect the battery.
2. Turn off the airbags. Loosen the clamps and slide them to the side.
3. Disconnect the two-wire horn connector.
4. Move to the steering axis and in the area where there is an arrow, mark the position (until removal).
5. Loosen the steering wheel nut, but do not unscrew it completely.
6. Take the steering wheel and swing it to the sides to bring it closer to the indicated nut.
7. Now align the wheels and set the steering wheel to a strictly straight position.
8. Remove the pin and insert it into the switch block located directly under the steering wheel. At this stage, the steering wheel rim should be firmly secured.
9. After removing the cables, proceed to removing the steering wheel itself.
10. We check the integrity of all elements.
11. Assembly is carried out using the reverse algorithm.
How to replace silent blocks in steering rods on a VAZ 2110-VAZ 2112?
1. First, remove the steering rod you need, or both at once, to remove them, you will need to unscrew the bolts that attach the rods to the steering rack (How to do this is explained above), then you will have to remove the tie rods from the holes and you can remove the rods (Regarding tips, it is written in the article: “Replacing steering tips on a VAZ”).
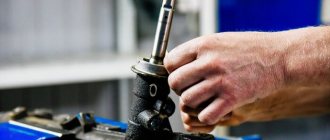
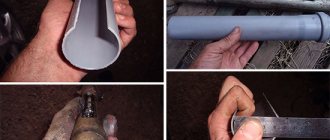
2. After which you will have to use a bolt of the appropriate size, the bolt that secures the wheel (One of the fastening bolts), it will need to be inserted into the hole of the silent block and using a hammer, you will have to hit the bolt several times and it, together with the silent block, will come out , but just keep in mind that you need to hit in such a way that the silent block can be pressed out without problems, that is, putting a rod on the asphalt and hitting the bolt with a hammer simply won’t work, you will have to either look for a vice and knock out the silent block as shown in the photo below, or just a couple of bricks Place it side by side, they will replace the same vice and the silent block will easily come out the third or fourth time (Instead of a bolt, you can use a head of a suitable diameter).
3. To press in a new silent block, lubricant will be needed for them, any long bolt of the same size (So that the silent block fits into the hole), one nut for this bolt and a washer, when you have stocked up with all this, lubricate the inside of the steering rod, where the silent block will be installed (see photo 1) and collecting special. a device made of a bolt, nut and washers (see photo 2), install the silent block in its regular place, while holding the bolt itself with the help of a head and a wrench from turning and at this moment tightening the nut, which will press the silent block into its regular place.
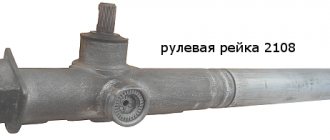
Additional video clip: Watch a video that shows the process of replacing silent blocks on steering rods from a VAZ 2108 car, in these rods the silent blocks are used, but they are changed in exactly the same way as on the tenth family of cars, but only in this video everything is done with a hammer is done, we do not advise you to press the new silent block as shown in the video, because it can be damaged very easily.