Everyone knows the problem of the family of front-wheel drive vases, with its rack and specifically play on the shaft, due to wear of the plastic bushing and plastic lining on the piston, which is adjusted with a nut. On the new VAZ 2110 rack, the internal diameter of the rack body is 40 mm, and the shaft is 26 mm, 08 family, where the rack is different, the sizes are different, like 35 and 26, respectively.
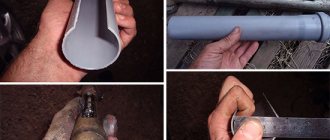
So the point is that it is possible, supposedly by making them from plastic, to make bushings of suitable diameters, but with a large friction support surface. For the right side, a plastic water pipe 41 by 27 is suitable, by cutting it lengthwise with an ordinary metal saw, I will attach a photo later. It’s more difficult on the left side; the lining is made and fluoroplastic is made using a turner, or using a homemade method, I’ll also attach a photo later. The point is, remove the backlash and knocking. Installation is possible without removing the rail itself, but this procedure is temporary; for a complete capital, you will have to remove and reassemble.
Hi all. Today I want to share with you one very useful, in my opinion, life hack on how to effectively eliminate the laxity of the steering rack on the “basins”. The instructions for modifying the steering rack are not mine, the link to the source is at the end of the article.
All owners of front-wheel drive VAZs have noticed that after a certain time an unpleasant play, knocking and laxity appears in the rack, which they want to remove. However, as a rule, no one knows how to eliminate the knocking of the steering rack; everyone either puts up with it, or changes the rack, or “chemically” something. I happened to come across one such “homemade” modification on the open spaces of the “Runet”.
The point of the modification is to increase the strength and thickness of the plastic seal (cracker) along which the steering rack shaft moves. Due to constant loads in the form of impacts and friction, the small plastic bushing located inside the rack fails quite quickly. As a result, the owner has to constantly tighten the rack, but over time the possibility of adjustment ends and the question arises of what to do in this case. There are two ways out, either change the steering rack, or change the plastic cracker, and then again in a circle, tighten and change. As it turned out, there is a third option - try to improve the design and make a homemade, more durable and long-lasting cracker.
Unlike the factory bushing, a homemade plastic bushing fills the working area of the shaft along the entire length, resulting in less wear, and due to the increase in thickness, the work of the rack becomes almost ideal and resembles the work of the rack of a foreign car.
Direct implementation
- First, we disassemble everything, wash it and begin cutting fragments of the required length. A PVC pipe with a diameter of 5 cm will act as a cracker; we will cut it and lay it in four layers. The length of the improvised bushings is 24 cm, so you don’t need to adjust anything, everything is tested from personal experience :).
- In the center of the pipe, it is necessary to remove a strip about 3.5 cm wide. This is necessary so that during installation the cracker can shrink to the shape of the rail.
- When the first fragment is cut out, you can begin installation. We carefully squeeze the cracker and push it inside so that nothing sticks out or sticks out anywhere, since during operation this can create a lot of problems.
4. Cut out the second cracker in the same way. The only nuance, and it needs to be taken into account, is that each new plastic element will shrink more, so the strip that we cut in the center should be wider than the previous one. After cutting, install the second fragment in place. If necessary, carefully trim everything using a sharp knife.
The 3rd and 4th crackers are manufactured and installed in the same way. You should get something similar to the one in the photo. Another important point is to make sure that the edges of the pipe do not protrude into the working window of the rack and do not interfere with the free movement of the steering rods and shaft.
When you install the last fragment, the free play between the housing and the shaft will become exactly what we need, as they say, snugly. For better results, add the required amount of graphite lubricant, change faulty parts (oil seals, tips, etc.), if necessary, and then reassemble in the reverse order.
- I personally and many who repeated this experiment are happy with the result! I hope you will also be able to remove the steering rack knock, and you will not regret the work done. Thank you for reading to the end. I would be grateful if you share this article with your loved ones on social networks using the special buttons located below. Good luck to everyone and see you again at VAZ Repair. Bye!
Checking the steering play
To perform a play test, place the front wheels of your vehicle in a straight-ahead (straight-ahead) position. Take a long-blade slotted screwdriver and tape it to the dashboard with the blade facing the steering wheel. Now carefully turn the steering wheel in one direction and the other until the wheels begin to turn.
When the wheels begin to turn, use chalk or thread to mark the limits of its free play on the steering wheel rim. Measure the distance between the marks and determine the free play of the steering wheel, which should not exceed 15 mm. If the free play of the steering wheel exceeds 15 mm, you need to check the condition of the steering rack, tie rods and ends, front wheel hub bearings and strut swing arms.
After this, sharply jerk the steering wheel from side to side at a small angle. Make sure there is no knocking noise in the steering column universal joints or steering gear. If necessary, tighten loose fasteners or replace faulty parts with new ones.
Dismantling and debugging of the steering rack on a VAZ 2110
It happens that the VAZ 2110 steering rack fails at the most inopportune moment.
Most car enthusiasts assume that eliminating this malfunction is a labor-intensive process that not everyone can do. Contrary to the erroneous belief, tightening the steering rack or completely repairing it is quite simple. This does not require any specific experience and knowledge; you just need to understand a little about the design features of the VAZ 2110 steering rack. If you detect uncharacteristic sounds or tapping sounds while driving over bumpy terrain or uneven sections of the road, you will need to tighten the steering rack yourself. Below we consider in detail how the steering rack is adjusted and repaired.
The nuances of replacing the assembly assembly
In the case of replacing the VAZ-2114 rack assembly with rods, we proceed somewhat differently.
There is no need to unscrew the rods from the rack during the work. But you will have to disconnect the tips from the stand. This operation will not be difficult if you have a puller.
If it is not available, you can use the folk method;
- Unbend and remove the stopper;
- Unscrew the tip nut;
- We take the pry bar and place it between the rod and the protrusion of the stand, to which the tip is attached;
- We use a pry bar to create a pressing force and at the same time apply sharp blows with a hammer to the protrusion (usually 2-3 blows are enough for the tip to “pop out”).
Next, we do everything identical to what was described: unscrew the fastening nuts and the fixing bolt on the column shaft. Afterwards all that remains is to remove the mechanism and replace it with a new one.
After replacement, it will be necessary to adjust the camber/toe angles of the VAZ-2114 steering, even if the rods were not removed. This operation will definitely not be superfluous.
Adjustment, reassembly and replacement for VAZ 2110
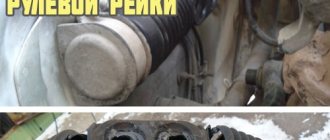
To adjust the steering rack, you must first securely secure it in a vice. To eliminate the possibility of its swinging, it is recommended to use wooden blocks as spacers between the part and the vice. When starting to adjust, you need to grab the rack rods with your hands and move them from side to side. This will help you identify the presence and amount of play. To correct the gap you will need a special faceted wrench. Having inserted it into the opening, you need to turn the key 10-20° counterclockwise.
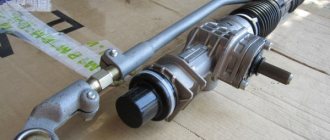
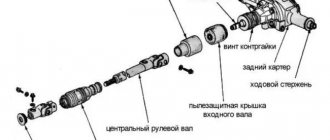
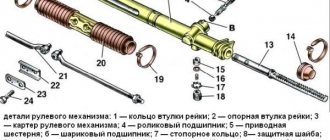
Steering mechanism assembly with drive. 1 – tie rod end; 2 – ball joint of the tip; 3 – rotary lever; 4 – adjusting rod; 5 and 7 – inner tie rod ends; 6 – bolts securing the steering rods to the rack; 8 – steering gear mounting bracket; 9 – steering gear support; 10 – protective cover; 11 – locking plate; 12 – connecting plate; 13 – rubber-metal hinge; 14 – damping rings; 5 – rack support sleeve; 16 – rack; 17 – steering gear housing; 18 – coupling bolt; 19 – elastic coupling flange; 20 – roller bearing; 21 – drive gear; 22 – ball bearing; 23 – retaining ring; 24 – protective washer; 25 – sealing ring; 26 – bearing nut; 27 – intermediate steering shaft; 28 – boot; 29 – protective cap; 30 – sealing ring of the stop; 31 – rack stop; 32 – spring; 33 – stop nut; 34 – retaining ring of the stop nut; 35 – plug; 36 – liner spring; 37 – ball pin insert; 38 – ball pin; 39 – protective cap; A, B – marks on the boot and crankcase; C, D – surfaces on the ball joint and swing arm
While observing the interval, you need to check the amount of play each time until it completely disappears. It is worth considering that excessive tightening is extremely undesirable, since there is a possibility of complicating the rotation of the steering column. Once the adjustment is complete, you will need to tighten the stop nut by tapping the crankcase threads.
This adjustment method is considered official, since it is described in the technical manual for the VAZ 2110. If you have dismantled a part and discovered that it has become unusable, it is advisable to replace it completely. Regardless of whether you are installing a stock part or a new one, assembling the mechanism is the same.
Before installation, you must turn the shaft gear all the way to the right or left using pliers. Then you need to scroll it all the way in the opposite direction. As a result, the flat on the shaft gear should be placed directly along the machine in a vertical position. Now you can install the steering rack in the required sequence. Everything is done in the same way as during disassembly, with exact observance of the reverse order.
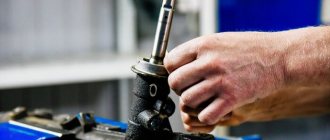
Checking the condition of the tie rod ends
You will need an assistant to perform this test. Take 2 jacks and lift the front of the car. Secure the machine to support stands. If you have a lift at your disposal, use it.
Ask an assistant to grab the wheel and jerk it sharply in a horizontal plane, i.e. pull the rear part of the wheel toward you and the front part away from you. During this, you place your hand on the body of the ball joint of the steering tip and the swing arm and evaluate their mutual movement relative to each other. If you feel the ball joint move freely, replace the tie rod end immediately.
In addition, change the steering tip if, during the inspection, you notice that the ball joint boot is torn.
Method of tightening the rack without dismantling
In order to tighten the steering rack on a VAZ 2110 without dismantling it, you need to find or purchase a special octagonal spanner wrench size 17. As in the previous case, the car needs to be driven onto an overpass or raised with a jack. Make sure the machine is supported securely as you will have to work underneath it.
First of all, you need to dismantle the engine protection. You need to take a screwdriver and establish good lighting in the space under the car. Climb under the car from the back of the subframe and get to the steering mechanism. Find the intersection of the rack and the steering shaft, there you will find a small nut with which you can adjust the mechanism.
It is worth considering that there is also a plug in this place, which has a similar shape. Therefore, before starting work, you need to thoroughly clean this plane of dirt. The nut has an octagonal shape and a special wrench fits it. It is this factor that you should focus on when searching.
When adjusting this part for the first time, you will find a green plastic cap on it, which is installed at the factory when the vehicle is manufactured. It can be easily removed with a screwdriver, the main thing is not to overdo it, since the cap is quite fragile and breaks easily.
After removing the cap, you need to insert a wrench into the octagonal opening and adjust the rack. The nut tightening pattern remains unchanged. Adjustment is carried out according to the same rules as during disassembly. In this case, the tightness of the nut must be calculated based on the force of the knock that occurs when hitting obstacles. There is no need to turn it all the way, it is enough to eliminate the resulting noise.
To check the result of your efforts, you will need to sharply turn the rack in any direction. If there is no knocking or noise, the adjustment has been completed successfully. Now you can put the cap back on. The procedure for adjusting the steering rack on a VAZ 2110 takes no more than 30 minutes. This interval is relevant for situations when the rack is adjusted for the first time. With the necessary experience, the adjustment process takes much less time.
Changing the rack yourself
There are two ways to replace the rack. The method is selected based on why exactly the mechanism is being removed - for replacement or repair.
In the case of installing a new rail, you should first determine its completeness.
They go on sale both assembled with steering rods and without them.
The first replacement option involves pressing out the tips from the steering knuckles, so the work will require a special puller.
Tools and accessories
To carry out the replacement you will need:
- Socket or open-end wrenches for 10, 13, 17, 22 (but better - heads with a knob equipped with a ratchet mechanism);
- Jacks and supports;
- WD-40 product;
- Flat screwdriver;
- Hammer;
- Rags;
- Tip remover (if the rods are also dismantled).
Work technology
Let's look at how to replace the VAZ-2114 steering rack without changing the rods. The technology for carrying out the work is as follows:
- We put the car on a flat area or hole, immobilize it (tighten the handbrake, put wheel chocks under the rear wheels);
- Loosen the wheel bolts;
- Using jacks, we hang up the front of the car, then secure it with props. If you have one jack, first lift one side, put a support, remove the lifting mechanism and go to the other side;
- Remove the front wheels;
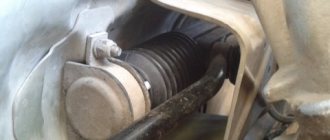
- In the arch on the left side, in the direction of travel of the car, there is a technological hole that can be covered with a lid (not always). We dismantle this cover;
- If there is an absorber, loosen the clamp securing it, pull out the element and move it to the side;
- Using a hammer and a screwdriver, we bend the antennae of the plate, which prevent the bolts securing the rods to the rack from loosening (for ease of work, you can turn the steering wheel to position the rack in a place that is easy to access);
- We unscrew the fastening bolts and pull them out together with the fixing plate;
- We move the rods to the side;
- In the cabin, in front of the front shield, at the bottom we find the junction of the column shaft with the gear shaft of the mechanism. Unscrew the fixing bolt. By moving the steering wheel towards you, we move the connection;
- Using a 13mm socket, unscrew the nuts securing the brackets that secure the mechanism. They should be treated with WD-40 first, as they often rust. Attempts to unscrew without pre-treatment may lead to breakage of the pin;
- Remove the staples;
- We move the mechanism towards the engine so that the gear shaft completely comes out of the hole in the shield;
- We pull out the assembly through the technological hole;
- We push the new mechanism through the hole, correctly place it, fix it and connect it to the column.
Reassembling the steering control is done in the reverse order of removal.
Steering rack damper: advantages
On many foreign-made cars, when hitting ledges or holes, the impact is not transmitted to the steering column. This is achieved thanks to power steering and a steering rack damper. If the first device is found on almost all cars, the second is found only on some models.
The steering rack damper is designed for two-way shock absorption. It is often installed on SUVs and expensive premium cars with rear-wheel drive. The device helps maintain steering position when driving on gravel or overcoming difficult areas.
The VAZ 2110 does not have such a device, but you can purchase it and order installation at a car service center. It is not recommended to do the installation yourself, since the damper must be reliably strengthened and the steering rack must be protected. Otherwise, the steering mechanism will quickly become loose, and you will have to spend a lot of money to restore it.
Installing a damper on a VAZ 2110 provides certain advantages. When traversing uneven terrain, feedback to the steering column is softened by 30 percent. At the same time, the noise level of the suspension is reduced several times. If there is no balancing, when braking at high speed, the vibration of the wheels stops giving feedback to the steering wheel.
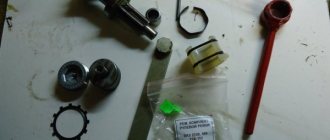
Selection of repair kit
Before starting repair and restoration work, you should decide on the choice of repair kit.
- Minimum set. This set includes the necessary list of fastening and sealing elements: washers, bearings, nuts and fluoroplastic bushings.
- The basic set has bearings and shafts in addition to the minimum set, but its cost can be twice as high as the first option.
Repair of steering rack VAZ 2110, 2112
Neglect of the condition of your iron horse leads to far from pleasant incidents on the road. The car requires not only constant care, but also regular technical inspection to confirm the serviceability of its key components. Timely repair of the VAZ 2110 steering rack and diagnosis of its malfunction is the key to your safety on the road.
The presence of play in the steering mechanism, a dead zone in which the steering wheel turns in its original position, and a characteristic drumming sound transmitted to the steering wheel when moving on uneven surfaces is a clear sign of a breakdown typical of this article.
New or refurbished?
Among car enthusiasts, the question often arises regarding the steering rack - should I purchase a new one for replacement or restore the “original” one? It is impossible to answer unequivocally here.
If the repair was carried out independently and using a high-quality repair kit, then after restoration the rack can serve for quite a long time.
But if you purchase a restored rack or if it is repaired at a service station, there is a high probability that problems will soon arise. After all, it is unknown who, how and with what help carried out the restoration.
As for new units, there are a lot of defective racks on the market.
In general, it is still better to try to repair the rack first, since it is much cheaper. It is worth purchasing a new mechanism only after you have already become convinced that the restoration did not help.
Steering system diagnostics
Suppose you notice an uncharacteristic rattling sound in your car when driving? How do you still understand that it is time to repair the rack? There are not so many diagnostic methods; they are extremely simple and do not require any special sophistication from you:
- 1. Check the steering mechanism at the point where the steering shaft and rack combine. If it gives in to force and a characteristic knock is heard, most likely the problem is the lack of lubrication of the needle bearing;
- 2. The presence of play due to a worn bushing or a banal insufficient tightening of the main components can be concluded by grasping the joint of the steering rod under the hood of your car.
If we have already decided on the need to restore the rack, it’s time to decide on the method of repairing it.
It’s worth immediately making a reservation about repairing the steering rack from a VAZ 2110 with your own hands - the process is very labor-intensive, nervous and thankless. It is recommended to decide what is easier for you: perhaps spend the whole day doing hard and painstaking work, buy a new rail, or pay about 3,000 rubles. for repairs at a service center?
In defense of do-it-yourself repairs, we note that only you yourself are capable of performing the work with due seriousness and responsibility, dictated by the love for your own car. Repairing the VAZ steering rack on your own will be much cheaper, but it is advisable to enlist the help of a friend when reinstalling the rack and pinion mechanism in its place under the hood - doing this alone is absolutely impractical.
Necessary tools and spare parts for self-repair:
Steering rack repair kit for VAZ 2112
The cheapest repair kit for repairing the steering rack from a VAZ 2110 with your own hands will cost around 200-250 rubles. A more complete and universal set of spare parts will cost us about 500 rubles. It is also recommended to definitely replace the central corrugation (its price is approximately 250 rubles).
In total, it turns out to be at least 500 rubles. At the same time, buying a completely new rack and pinion mechanism will cost about 1,100 rubles. The tools we will definitely need are:
- special key 2110, which is a hollow octagon;
- wrench with long handle and octagonal socket 15 mm;
- ratchet with 10 and 13 mm heads;
- a set of metalwork tools;
- mount;
- jack.
And the following materials:
- penetrating lubricant for rusted bolts or kerosene (in the second case you will also need a syringe);
- diesel fuel, gasoline or other means for washing parts;
- Litol-24 lubricant, ideally FIOL.
Should I repair it myself or at a car service?
Repairing Kalina's steering rack is not an easy operation, which is why the car service center charges about 2-3 thousand rubles for it. The removal process, and especially the installation process of the rack, is very labor-intensive; there are several difficult aspects that you need to know about in advance. In particular, connecting the rack to the steering column, when installing the rack on a car, is best done by two people, otherwise you can lose a lot of time and nerves.
In general, if you are not ready to spend the day in the most sophisticated poses, then it is better to immediately fork out the cash and entrust the repair of the rack to car service specialists. It makes sense to simply buy a new rack and replace it at a car service - this is the most expensive, but at the same time the simplest option.
to carry out rack repairs with your own hands only if you are not afraid of complex repairs and enjoy the fact that everything in your car is done to perfection, because no one will take care of your car as well as you can do it yourself. .
Let's start dismantling
If you already have all of the above tools, then it’s time to start the actual work. First, let's open the hood and begin dismantling the associated parts: remove the battery, the platform under it and the air duct.
Removing the steering rack of a VAZ 2110
The steering gear mounting brackets on both sides of the rack securely hold it in place with four bolts. The biggest danger at this stage is the risk of tearing off the bolts, for which we first carefully moisten them with penetrating lubricant or kerosene.
Now unscrew the bolts holding the inner tie rod ends. First, of course, do not forget to remove the locking plate. All that remains is to unscrew the flange bolt securing the rack to the steering wheel inside the cabin, but you should definitely note its relative position to the intermediate steering shaft in order to maintain alignment when the steering wheel is in a straight position.
Symptoms of a problem
Without proper care, such as lubricating bearings and checking play, the steering rack can quickly fail. Signs of malfunction that indicate that the mechanism should already be changed:
- A noticeable knock when driving over bumps, which is transmitted to the steering wheel. If a knocking noise is heard when turning the steering wheel, it is unsafe to drive such a car; it is necessary to urgently diagnose the mechanism.
- Strong play in the steering wheel indicates loose fasteners or wear of the rack-and-pinion joint.
- The effort when turning the wheels has increased.
- You can hear noise from the hydraulic booster (if equipped).
- The cause of the knocking noise may be an insufficiently lubricated bearing or wear of the gear-rack pair. If, when rocking the steering shaft, there is noticeable play at the junction with the rack, repair is necessary. If not, just check and tighten the joints between the bushing and the steering shaft gear.
A powerful vice is used to fasten the rail
Video: How to tighten a loose mechanism
Conclusions and recommendations for repairs
Particular attention should be paid to the condition of the support bushing and the worm gear mechanism. Damage to the anthers causes excessive corrosion of the rack, destruction of the gear teeth, destruction of the locking spring and clogging of all parts with dirt.
The parts need to be washed, bearing play checked, and cleaned. Also generously lubricate all mating surfaces. The rack stop and retaining ring must be replaced, as the parts most susceptible to friction and wear.
Disassembling the steering column
We begin disassembling the control unit by removing the protective casing by cutting the plastic clamps. After this, use a special key of 17 to unscrew the thrust nut, take out the retaining ring, the spring and knock out the rack stop. Next, remove the boot and drive gear seal, remove the lock washer, and then use a 24mm wrench to unscrew the nut securing the ball bearing. We remove the gear. Now that there is nothing holding the rail in the case, we remove it through the right side of the case. We remove the needle bearing of the drive gear from its seat. To do this you will need a special puller. Check the drive gear bearings for play. If present, the bearings will have to be replaced.
The support sleeve must also be replaced. It has a cylindrical shape and is located inside the steering housing. The bushing is removed by prying it off with a screwdriver.
Lada 2110 › Logbook › VAZ 2110 steering rack. Repair and modification.
Dron1977 last online 2 weeks ago
Everyone knows how extraneous noises, knocks, squeaks, etc. can get on your nerves. in vehicle components. I suffered a knock in the steering rack and steering tips for a couple of weeks, until I finally got around to repairing it over the weekend. The question arose whether to rebuild the rack yourself or buy a new one. A new one costs 2,700 rubles, a used rack costs about 1,000 rubles, a repair kit costs 500 and a few kopecks. Naturally, it is better to take parts such as the rack new, if the budget allows, buying a used one is not an option, since the stingy one pays twice, there is a third budget option left, buying a repair kit. Steering lugs and a steering rack repair kit were purchased. The first problem I encountered was that I could not unscrew the tie rod mounting bolts, even with the help of a half-meter pipe placed on the knob. The bolts either stuck or were tightly tightened. I decided not to worry and remove the rack along with the steering rods, since the ends were going to be replaced anyway. About the tie rod ends later, with photos. Using a puller, together with an assistant, I removed both steering tips, loosened the fastening to the steering column, and unscrewed the four nuts securing the rack and took it out through the left mounting window. In front of the car it was hung on supports like “birch logs”. further on we go. As I sorted it out, I don’t think it’s worth writing, everyone knows how it’s done. I will dwell on the unpleasant moment of reassembly. To replace the broken cracker, a new one was installed, lubricated with lithol, but... the rack shaft flatly refused to enter the cracker, although the cracker sat in its place. When measuring the internal diameter of the cracker, the rod showed 24mm, while the diameter of my shaft was 26mm. More than strange, but nevertheless it is a fact. While I was smoking and thinking about what to do on the street, the assistant said that I can’t keep my head warm, everything is fine... the new cracker is no longer new and is no longer a cracker, but pieces of plastic... in short, it broke. The culprit turned out to be the manufacturer of the repair kit, which “makes all kinds of crap.” Common situation? Wow! The assembly stopped, but I came up with a plan to improve the quality of the rack by installing a fluoroplastic bushing there instead of the original cracker. The turner assured me that we would do everything, and in anticipation of tomorrow, to kill the rest of the evening, I began to change the steering ends with the rods removed. Naturally, they were pre-labeled as left and right. I measured the new tips and the old ones. The dimensions turned out to be identical 93 mm. Tenths of mm. doesn't count. I marked the old tips with soft clamps, calculated the number of tightening revolutions, and installed new tips. Having tightened it to the required number of turns (in my case it turned out to be 18 turns), the new tip fell into place, exactly the same as the old one, on both rods. Perhaps in my case I was lucky, but I will still have to go to the alignment, although looking ahead I will say that the car behaves perfectly on the road. The next morning, I had in my hands a fluoroplastic bushing with an internal diameter of 26 mm, almost 6 cm long. I don’t have the exact dimensions, nor do I have a photo of the bushing itself, since they made it locally and pressed the bushing directly into the rail. The bushing fits into the rail very tightly, the shaft moves along the bushing just as tightly, but without excessive force and without any play. The assembly and installation of the rack took place in the reverse order, without any incidents. Now we have the absence of extraneous knocking in the front suspension, steering rack and impacts in the steering wheel when driving at different speeds on roads with different surfaces (tested on a crushed stone road and on a technological road of a coal mine). A few photos, good luck to everyone...
They didn't want to turn away.
Complete lack of lubrication. Or is this normal?
An old cracked cracker.
The shaft teeth are visually in good condition.
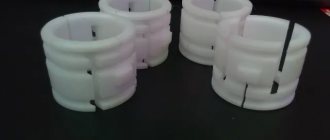
The bushing itself. The other end of the sleeve is split.
A soft clamp as a limiter, with the old tip.
New tip installed.
Like 39 Subscribe
Selecting a replacement unit
The choice of a new unit for the VAZ-2114 should be approached seriously. The main problem is that very often there are defective products on the market that are already faulty or will fail in a very short time.
The best option is to purchase an original unit. The VAZ-2114 uses the same mechanism as the cars of the Samara 1 family (2108, 2109, 21099). Therefore, its catalog number is 2108-3400012, that is, when searching, you can safely ask for a rack for the “Eight” and not worry that it will not fit. The average cost is $100.
You can also buy analogue racks produced by auto parts manufacturers. But here you should pay attention to the manufacturer (it must be well-known), as well as the availability of quality certificates.
Among analog products, we recommend paying attention to steering mechanisms from the following manufacturers:
- Weber CG 2108-0012 (its price starts at $80);
- Pilenga SR-P 1141 (costs $100);
- Trialli CR 108 and CR S 708 (the first comes without rods and lugs and costs about $100, the second has an assembled mechanism, which is why it costs twice as much).
For those who want to slightly modify the steering, you can look for tuning racks. The main difference between them is the lower number of revolutions. They are also positioned by manufacturers as reinforced.
Regarding manufacturers, it is worth looking for products from the Italian company Brembo, the Polish company ATF, or the Russian company SS20.
As for the latter manufacturer, it only produces steering racks for the 10th VAZ family, so after acquisition the mechanism will have to be slightly altered.
But we note that tuning slats will cost much more than the original or conventional analogues. So, for a Brembo unit you will have to pay about $250, for ATF - about $200, and SS20 - approximately $210-220.