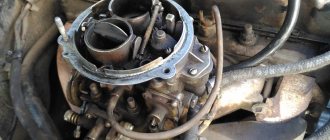
Briefly about the features and structure of the “six” carburetor unit
Before adjusting the carburetor on a VAZ 2106, it doesn’t hurt to know its design features. After 1980, Ozone and Solex began to be installed on Tolyatti cars. The purpose of the unit’s operation is to prepare a combustible mixture before feeding it into the car’s cylinders. Down to the subtleties, this is not a driving school, we will not disassemble the design, it is enough to familiarize yourself with the main components that ensure optimal operation of a carburetor internal combustion engine:
- Fuel dosing system.
- Mechanisms for controlling throttle valves and enriching the mixture.
- Idle system.
- Accelerator pump and econostat.
- Float chamber.
A chamber with a float and a needle valve is responsible for the stability of the fuel level. Next, gasoline, flowing through the spray tube, enters the chamber, where it mixes with air from the inlet pipe. The amount of mixture is adjusted by the throttle valve, which is connected to the accelerator pedal.
Precise adjustment allows you to prepare the correct mixture of gasoline and air in a ratio of 1:15. During long-term operation of the car, the settings get lost and you have to think about how to adjust the carburetor on a VAZ 2106 on your own. The adjustment technology is the same for both Solex and Ozone.
The car won't start
Very often, owners of carburetor cars cannot start the car. There are two reasons for this - either the ignition system is faulty or there are problems with the carburetor. Often the jets, strainer, and other elements become clogged, which can prevent fuel from entering the float chamber.
To solve the problem, clean the channels and jets with special liquids. If there is no gasoline in the float chamber, then wash the strainer and also check the needle valve.
When is adjustment needed?
Adjusting the carburetor unit is no more difficult than adjusting the clutch drive on a VAZ 2107 , since it only involves adjusting the jets. In some cases, they need to be cleaned of resins and other contaminants; the presence of contaminants is felt by power dips in the process of accelerating. Many car owners claim that Ozone carburetors are not a very good option and recommend replacing them with Solex.
However, the signs that the device has begun to prepare an enriched mixture and needs to be adjusted are the same for both types of units:
- Increased fuel consumption.
- Frequent overheating of the motor.
- Black smoke from the exhaust pipe and pops.
- Loss of power.
The preparation of a lean mixture is characterized by the following characteristics:
- Popping sounds in the carburetor.
- Loss of power.
- Engine overheating.
Of course, you don’t always need to immediately grab a screwdriver and turn the adjusting screws - perhaps it’s something else. For example, when the idle speed floats, air may leak through the intake manifold gasket, or there may be a breakdown of the brake booster diaphragm. But even the reasons listed are not all the options, so specific recipes for eliminating certain problems cannot be given. The issue should be addressed comprehensively, taking into account the connection between vehicle systems.
Preliminary stage
Before you properly adjust the carburetor on a VAZ 2106 with your own hands , it is important to carry out a number of work steps:
- Adjust the thermal clearances of the gas distribution mechanism.
- Set the optimal ignition timing.
- Open the air damper completely.
All work on setting up the carburetor unit is carried out on a warm engine. Do not forget that during the process you may need new parts and rubber products, so it is better to purchase a repair kit in advance.
What models are installed on VAZ 2106/2107 cars
All types of carburetor mechanisms equipped with the VAZ 2106/2107 are aimed at reducing fuel consumption and giving the car maximum dynamism. In addition, an important role is played by such an indicator as environmental friendliness. For a decade, AvtoVAZ engineers gave preference to the most environmentally friendly types of carburetors.
Carburetors of three different models were installed on modern VAZ 2106/2107, as well as on cars produced in previous years:
- Manufacturer: Dimitrovgrad Automobile Assembly Plant (or DAAZ). It should be noted that the company produced carburetors under license from Weber. Structurally, these devices were as simple as possible both in operation and in further maintenance. In addition, their main advantage was to provide excellent speed performance for cars of the sixth and seventh models
Setting idle speed
The process involves two screws that set the quantity and quality of the mixture. For high-quality settings, having a gas analyzer will not hurt. Before adjusting the carburetor on a VAZ 2106, you need to know about the restrictive plastic bushings that are pressed onto the adjusting screws. These plugs do not allow you to violate the factory settings. If this factor prevents you from setting XX normally, then you should break them out with a slotted screwdriver.
Idle speed control technology:
- With the air damper open, set the crankshaft speed screw to 800-900 rpm.
- Rotate the quality screw to set the maximum engine speed.
- Using the quantity screw, set the speed on the tachometer to 950-1030 rpm.
- Use the quality screw to set the maximum speed again.
- Repeat these operations until the speed of 950-1030 rpm does not coincide with the maximum speed set using the quality screw.
- After the moment of coincidence, return the quality screw to the position where the engine speed was 800-900 rpm.
If you have a gas analyzer, use a quality screw to achieve a CO concentration in the exhaust gases of 0.5-1.2%. The final position of the screws must be secured with plastic sealant to prevent spontaneous unscrewing.
Do-it-yourself carburetor adjustment
Thanks to the simplicity of the Ozone design, making the necessary adjustments yourself will not cause any difficulties. It is only necessary to properly prepare for adjustment work and carefully follow all requirements and instructions.
Preparatory stage
To make the adjustment quick and efficient, you will need to spend a little time and carefully consider all the nuances of the work. First, you need to prepare a comfortable place for yourself, that is, make sure that nothing or no one will interfere with your work, and that there is enough light and air in the room.
The carburetor should only be adjusted when the engine is cool, otherwise personal injury may occur. It doesn’t hurt to stock up on rags or rags in advance, since some fuel leaks are inevitable during adjustment.
It is important to prepare the necessary tools in advance:
- set of wrenches;
- a Phillips-blade screwdriver;
- a flat blade screwdriver;
- round probe;
- school ruler for measuring distances between nodes.
It is also recommended that you read the information provided in the vehicle’s service book. This document contains individual parameters and recommendations for setting up and adjusting the operation of the carburetor.
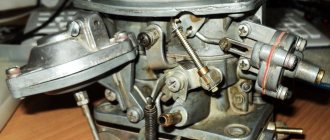
Adjustment of quality and quantity screws
Most problems with Ozone can be solved by simply adjusting the quantity and quality screws. This is the name given to small devices on the carburetor body that correct the operation of the main components of the device.
With the help of quality and quantity screws, most carburetor malfunctions can be eliminated
The procedure takes a little time and is carried out only with the engine completely cooled but turned on:
- Turn the quality screw to maximum, turning it counterclockwise until it stops.
- Set the quantity screw to an even higher number of revolutions - for example, 800 rpm, turning the screw itself counterclockwise.
- Check with the quality screw whether the maximum position for the screw has actually been achieved, that is, turn it half a turn back and forth. If the maximum performance was not achieved the first time, then the settings specified in paragraphs 1 and 2 must be carried out again.
- With the fuel quantity screw set to its maximum settings, you need to turn the quality screw back so that the speed drops to approximately 850–900 rpm.
- If the adjustment is carried out correctly, then in this way it will be possible to achieve optimal carburetor performance in all respects.
Float chamber - making adjustments
Correcting the position of the float in the chamber is necessary for the normal functioning of the carburetor in all operating modes. To work, you will need to make sure that the motor is cool and does not pose a danger to humans. After this you need:
- Remove the cap from the carburetor and place it vertically so that the gasoline supply fitting points upward. In this case, the float itself should hang down, barely touching the needle. If the float is not perpendicular to the valve axis, you will need to straighten it with your hands or pliers. Then return the carburetor cover to its place.
- Use a ruler to measure from the carburetor cap to the float. The optimal indicator is 6–7 mm. If this is not the case, you will need to bend the float tongue in the desired direction.
- Raise the Ozone lid again strictly vertically.
- Move the float as far as possible from the center of the float chamber. The distance between the float and the cover gasket should not be more than 15 mm. If necessary, you need to bend or bend the tongue.
Adjusting the opening of the second chamber
The throttle valve is responsible for the timely opening of the second chamber of the carburetor. Adjusting this unit is as simple as possible:
- Tighten the damper mounting screws.
- Make sure that the device is pressed tightly against the chamber wall.
- If necessary, replace the sealing elements.
Video: general overview of adjustment work
The Ozone carburetor was developed specifically for rear-wheel drive VAZ 2107 models. This mechanism made it possible to create an economical and fast car of the new generation of the Volzhsky Automobile Plant. The main advantage of Ozone is its simplicity of operation cycles and ease of maintenance. However, if you have doubts about the ability to independently adjust the Ozone units, it is better to seek help from specialists.
Adjusting the rods
An equally important stage in the process of adjusting the “six” carburetor is performed through the transitions:
- Remove the air filter and its housing.
- Measure the distance between the central points of the tips, it should be 80 mm .
- To change the length of the rod, release the tip with a screwdriver and unscrew the lock nut with an “8” wrench, and then perform the adjustment by rotating the tip.
- Tighten the fasteners and install the rod in its original place, start the engine and press the gas pedal all the way. If the throttle does not open completely, the damper has a travel reserve.
When asked how to further adjust the carburetor on a VAZ 2106, experts recommend performing a few more simple steps:
- Remove the end of the longitudinal linkage and unscrew the locknut.
- Reduce the length of the rod, secure it and again check the degree of opening of the damper by pressing the gas pedal to the floor. The damper must be completely closed.
- If it is necessary to increase the rod length, you need to loosen the throttle cable.
What do we have after proper adjustment of the carburetor unit of the “six”?
Checking the adjustments of the fuel mixture preparation unit is the same important maintenance step as monitoring the condition of the car battery . An integrated approach to setting up the carburetor guarantees not only a comfortable mode of movement, but also a lot of useful points:
- An increase in power and a confident increase in speed.
- No failures in the operation of the internal combustion engine in the low and medium speed sector.
- Improved dynamic characteristics - the car picks up speed faster and accelerates in a short time.
- Optimal engine response, which is expressed in the responsiveness of the gas pedal.
The listed qualities make it possible to effectively use the combustible mixture, which is necessary both in urban traffic jams and on country roads. Therefore, proper adjustment of the carburetor unit will help the car gain speed in a timely manner and complete the planned maneuver.
A carburetor is a component that prepares the fuel mixture for the engine. Its task is to ensure the correct proportions of mixing air with gasoline. The ideal ratio is: 1 portion of gasoline per 15 portions of air. During operation, the adjustment of the VAZ 2106 carburetor gradually gets lost, which leads to excessive enrichment or depletion of the fuel mixture with gasoline.
How do you know if the carburetor needs adjustment?
If the fuel mixture is excessively enriched with oxygen, the engine will either start poorly or refuse to start at all. Inexperienced motorists at this moment, trying to start the engine again and again, fill the candles. If the mixture is too lean, the engine will run unstably, but the power will also be significantly reduced.
Adjusting the OZONE VAZ-2106 carburetor is necessary if there are difficulties in starting a cold engine. It is also worth doing the tuning if you feel unstable operation of the internal combustion engine at idle, if when you press the gas there are dips in transition or any other modes. Popping noises from the muffler are also an indicator for adjustment.
It is possible to adjust the idle carburetor of the VAZ-2106 and the fuel level in the float chamber. Nothing else can be adjusted. Dynamics and flow are regulated by changing jets.
Symptoms of a problem
If the carburetor begins to produce a rich mixture, you will understand this by the following signs:
- Fuel consumption increases
- Loud exhaust is heard from the muffler and the smoke turns black
If the engine receives a lean mixture, you will understand this by the following sign:
- Loud bangs are heard from under the hood.
In both cases, the engine heats up noticeably more, and its power is also lost.
If you encounter a similar problem, remember that it is a natural consequence of using the carburetor. Any element of the car requires care, regular inspection and maintenance. Therefore, the VAZ 2106 carburetor must be adjusted from time to time.
Before proceeding with the adjustment, you need to make sure that the cause of the breakdown is not the failure of any element inside the device. You need to disassemble it, wash it and clean it. And only after you are convinced that all components of the structure are in full working order, you can begin adjustment.
Signs of trouble
Symptoms of the development of a rich mixture are:
- increased fuel consumption;
- increased engine temperature;
- loud exhausts and black smoke from the muffler pipe;
- reduction in machine power.
Signals about the arrival of a lean mixture are:
- loss of power characteristics;
- popping sounds under the hood;
- sudden heating of the engine.
Video tutorial for setting up a VAZ 2106 carburetor
All components of the car mechanism require careful care, regular maintenance and periodic preventive repairs. Prevention and maintenance consist of disassembling the housing, thoroughly cleaning and rinsing the internal and external surfaces of the parts.
After disassembling the carburetor, an external inspection of the parts is carried out and faulty components are rejected. You can start setting up only if all elements are in working order. After all defective components have been replaced and the carburetor assembly has been reassembled and installed, adjustments can begin.
Adjusting the float of the VAZ-2106 carburetor
The basis for setting up the unit is the adjustment of the float. Exceeding the standard filling level of the internal chamber leads to oversaturation of the fuel with oxygen and an increase in gasoline consumption without improving the dynamic characteristics of the car.
In terms of setting the float position, the adjustment of the 2106 carburetor is carried out in several stages:
- Removing and installing the top cover of the housing in a vertical position.
- Correction of the needle position, the result of which should be contact of the needle ball with the surface of the float.
- Control of the gap between the float and the cover, the adjusted gap should be 6 mm with a tolerance of +0.25 mm. A tool for eliminating excess or insufficient clearance is a float tongue, by pressing which the adjustment is made.
- Control of the float stroke, which in the adjusted state is 8 mm with a tolerance of +0.25 mm.
Adjusting valve clearances
The gaps are checked on a cold engine using a 0.15 mm gauge. Based on the results of the inspection, the need to refine the gaps is determined.
Ignition timing setting
The ignition timing is set by aligning the control marks on the gas distributor cover and the flywheel.
Debugging the idle speed mode
This stage of work requires preliminary preparation of the mechanisms. It is required to warm up the car's power unit to 900°C, achieve starting and stabilize the engine by rotating the qualitative and quantitative fuel screws, if this does not happen automatically.
Adjusting the VAZ carburetor at idle speed:
- By rotating the screw, which regulates the quantitative characteristics of the fuel, set the crankshaft speed in the range of 800-900 rpm;
- By rotating the screw, which is responsible for the quality of the fuel, achieve stable and smooth operation of the power unit at the maximum possible number of revolutions;
- Reduce the speed by tightening the quantity screw to speed values in the range of 950-1030 rpm;
- Increase the rotation speed again to maximum by unscrewing the quality screw;
- Consistently repeat steps 2-4 until the number 950-1030 rpm coincides with the maximum number of revolutions achieved by rotating the quality screw;
- Having achieved a coincidence of indicators, return the quality screw to the position corresponding to the number of revolutions of 800-900 rpm.
Adjusting the drive
- Checking the length between the tips. The required size is 80 millimeters.
- If you deviate from this size, remove one tip.
- Loosen its lock nut and by rotating adjust the distance to the desired size.
- Tighten the nut and return the rod.
- You need to check the adjustment. To do this, our assistant presses the gas pedal. We observe the throttle valve to see if it has opened completely.
- If not, then you need to remove the tip from the lever and reduce the length of the rod.
- Now you need to see what position the damper is in when the gas pedal is released: does it close completely. If not, the pull needs to be lengthened a little.
- Next we work with the air damper. We weaken its drive. In the cabin, we completely recess the damper.
- Press the three-arm lever so that the flap opens all the way. In this position, tighten the locking screw.
- Checking the adjustment. To do this, we completely close and open the door from the passenger compartment again. If the damper has not opened completely, we carry out the adjustment again. If the outcome is positive, fully tighten the screw.
Adjusting the starter
These works can be performed directly in the car. But you will have to first remove the filter cover.
- We turn out the plug. Underneath we find the adjustment screw.
- If you carry out the work without removing the carburetor from the car, pull out the choke. If you have the device in your hands, press the three-arm lever. After the damper is completely closed, push the rod down until it stops.
- Let's see what the gap is between the camera and the air damper. A 5.5 mm drill will help us with this.
- If necessary, make adjustments by turning the adjusting screw using a screwdriver.
- We return the plug back.
- Now you need to check the distance between the camera and the throttle valve. The required size is 1 millimeter. A drill with a similar diameter is suitable for this. The gap is adjusted using a rod, which is either rearranged into a different hole or bent.
Adjusting the float system
Before you begin this work, you need to make sure that the needle valve is working reliably.
- We take a measurement between the float and the gasket. This distance should be 6.5 millimeters. A slight deviation of 0.25 millimeters is allowed. You can also simply use a suitable drill bit to measure.
- The clearance is adjusted by changing the angle of the float tongue.
- Turn the float all the way. We measure the distance to the gasket in this position. It should be equal to 8 millimeters. Using the tongue we achieve the desired value.
Adjusting the idle speed on a VAZ 2106
First you need to prepare the car. We warm up the engine to a temperature of 900 degrees. We ensure that the engine operates stably at idle speed.
Let's watch a video in which everything is shown in an accessible and understandable way:
The text instructions are as follows:
- Using the quantity screw, we achieve a crankshaft speed of 820 to 900 rpm.
- Using the quality screw, we bring the unit into stable and uniform operation. Then, by tightening the screw, we destabilize the operation of the motor and unscrew it again to restore it. Our task is thus to achieve the most stable engine operation with the leanest possible mixture.
- Using the quantity screw, we again bring the speed to the desired value.
- It is best to carry out the operation two or three times.
Adjusting the carburetor damper OZONE VAZ 2106
The following step-by-step photo instructions will help you understand the adjustment process:
Carburetor Basics
Contrary to popular belief, the suction of fuel from the carburetor does not occur due to the internal operating thrust of the engine. To perform this function, the device is equipped with a diffuser.
This element is not a separate element, but a narrowed part of the carburetor neck. When an air flow passes through it, due to the difference in width, a vacuum occurs, a drop in pressure. Near this place there is a small hole for supplying gasoline. Thanks to the resulting vacuum, atmospheric pressure acts on gasoline by displacing it from the float chamber through a special passage into the carburetor neck. In it, fuel is mixed with air and enters the engine cylinders through the intake manifold. The VAZ-2105 or 2106 engine, like any other automotive power unit, is capable of operating in several modes, each of which requires the appropriate type of air-fuel mixture.
How does the Ozone carburetor work?
Without understanding the principle of operation of the dosing device, it is impossible to carry out serious repairs and adjustments. The maximum is to adjust the fuel level in the chamber, clean the mesh and the CXX jet screwed into the outside of the housing. To eliminate deeper problems, it is worth studying the algorithm of the unit’s operation, starting with a cold start of the engine.
- The driver pulls the trigger handle all the way, the upper flap completely closes the air flow into the primary chamber. At the same time, the first throttle opens slightly.
- When the starter rotates, the pistons draw in pure gasoline without adding air - the engine starts.
- Under the influence of vacuum, the membrane slightly opens the upper damper, clearing the way for air. The air-fuel mixture begins to be supplied to the cylinders, otherwise the engine will stall due to over-enrichment.
- As the car warms up, the driver presses down the choke handle, the throttle closes and fuel begins to flow into the manifold from the idle hole (located under the throttle valve).
Immediately after starting the engine, the membrane pulls back the flap and opens the gap for air to pass.
At idle speed, the air-fuel mixture enters the manifold through the channels and CXX jets, the main chokes are tightly closed. Quality and quantity adjusting screws are built into these ducts. When the main throttles open and the main metering system comes into operation, the position of the screws does not matter - the combustible mixture is supplied to the engine directly through the chambers.
At idle speed, the fuel mixture enters the manifold through the lower hole located under the throttle
To start driving, the driver selects a gear and presses the accelerator pedal. The fuel supply pattern changes.
- The primary throttle valve opens. Due to the vacuum, air and gasoline are sucked through the main jets, mixed in the emulsion tube and sent to the diffuser, and from there to the manifold. The idle system operates in parallel.
- With a further increase in crankshaft speed, the vacuum in the receiving manifold increases. Through a separate channel, the vacuum is transmitted to a large rubber membrane, which, through traction, opens the second throttle.
- To prevent failures when the secondary damper opens, part of the fuel mixture is supplied to the chamber through a separate channel of the transition system.
- For dynamic acceleration, the driver sharply presses the gas pedal. The accelerator pump is activated - the thrust acts on the diaphragm, which pushes gasoline to the nozzle of the sprayer. It produces a powerful jet inside the primary chamber.
After opening the throttle, the fuel mixture enters the manifold through the main diffuser
When the pedal is pressed to the floor and both throttles are fully open, the engine is additionally fed with fuel through the econostat tube. It draws fuel directly from the float chamber.
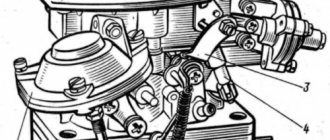
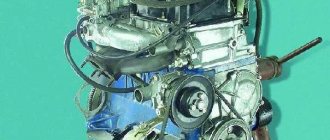
Carburetor design
1. Carburetor heating unit VAZ 2105; 2. Throttle valve of the first chamber; 3. Crankcase gas suction pipe; 4. Accelerator pump drive lever; 5. Accelerator pump drive cam; 6. Accelerator pump diaphragm; 7. Fuel jet for power mode economizer; 8. Carburetor body VAZ 2105; 9. Power mode economizer diaphragm; 10. Solenoid shut-off valve; 11. Idle fuel jet; 12. Carburetor cover VAZ 2105; 13. Fuel supply pipe; 14. Main air jet of the first chamber; 15. Air damper; 16. Accelerator pump nozzles with fuel supply valve; 17. Trigger diaphragm; 18. Adjusting screw of the starting device; 19. Adjusting screw for the amount of idle mixture; 20. Second chamber lock lever; 21. Vacuum supply pipe to the vacuum regulator of the ignition distributor VAZ 2105; 22. Idle mixture quality adjusting screw; 23. Throttle valve drive lever; 24. Adjusting screw for slightly opening the throttle valve of the first chamber; 25. Air damper control lever; 26. Starter rod; 27. Electrical wire for the idle speed economizer limit switch; 28. Choke lever; 29. Main air jet of the second chamber; 30. Emulsion tube of the second chamber; 31. Sprayer of the main dosing system of the second chamber; 32. Fuel filter VAZ 2105; 33. Needle valve of the float chamber of the VAZ 2105; 34. Throttle valve of the second chamber; 35. Second chamber throttle lever; 36. Main fuel jet of the second chamber; 37. Second chamber throttle drive lever; 38. Float.
The design of the VAZ-2105 (2106) carburetor provides a number of structural elements that provide the necessary characteristics of the combustible composition. The engine can operate in various modes: warming up, idling, medium speed and heavy load. Each of the above situations requires a certain consistency of the ingredients of the air-fuel mixture. The carburetor consists of more than fifty parts. Let's take a closer look at each element of the device. It is worth mentioning that all segments are important components of the device; their dismantling can have a negative impact on the operation of the power unit.
VAZ 2106 carburetor maintenance
During the operation of the carburetor, the narrow channels of the jets become clogged. This usually happens when using low-quality fuel, untimely replacement of the air filter, etc. The composition of the fuel-air mixture is disrupted and its flow into the engine is difficult. As a result, the power unit begins to operate intermittently, and its dynamic characteristics decrease. In such cases, it is necessary to flush the contaminated jets with a special cleaning compound and then blow them with air.
If the carburetor jets become clogged, they should be washed with a special agent and blown out with air.
In addition, it is recommended to periodically adjust the composition of the fuel-air mixture to the optimum using special adjusting screws. Otherwise, the engine will run unstably.
VAZ 2106 stalls at idle
In idle mode the valves are closed. A vacuum is formed under them, ensuring the flow of fuel through the hole under the damper of the first chamber. The cause of a situation in which the engine starts but runs unstably is most often the carburetor. Depressurization of its housing may occur. This will lead to excess air entering the carburetor, leaning the fuel-air mixture. The settings of the quality and quantity screws that regulate the composition and quantity of the combustible mixture may also fail. In addition, the lack or absence of fuel in the float chamber leads to a lean mixture entering the engine. The current situation will require the car owner to perform the following actions. 1. To eliminate depressurization of the housing, replace the sealing gaskets between its individual parts.
The Ozone carburetor uses a heat-insulating gasket as a sealing element
2. Tighten all bolted connections.
During operation, to prevent depressurization, the screw connections of the carburetor parts should be periodically tightened.
3. To prevent depressurization, replace the rubber ring of the solenoid valve and quality screw. 4. Check the condition of the vacuum ignition timing regulator hose for wear and mechanical damage.
A loose connection in the vacuum ignition timing regulator hose allows excess air to enter the carburetor.
Dips when pressing the gas pedal VAZ 2106
When you press the accelerator pedal, the throttle valve opens. Next, the accelerator pump comes into operation through an articulated lever. If it is faulty, then pressing the pedal will lead to interruptions and engine stop. This most often manifests itself when starting from a stop and suddenly accelerating. When you sharply press the accelerator lever, a powerful jet of fuel should be observed from the nozzle channel into the emulsion chamber. A weak stream may be the result of: • clogged supply channels, spray nozzle and discharge valve; • depressurization of the housing; • a broken tube of the vacuum ignition timing regulator. To eliminate this malfunction you must:
1. Replace the carburetor sealing elements. 2. Tighten bolted connections. 3. Replace the rubber o-ring of the solenoid valve. 4. Check the vacuum ignition timing regulator tube for wear and mechanical damage. 5. Repair the accelerator pump (rinse the supply channels, clean the spray nozzle of deposits, replace the diaphragm).
The causes of interruptions when pressing the accelerator pedal are often faulty elements of the accelerator pump.