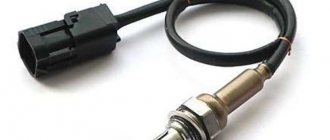
DRL lamps and dimensions
The 2180's daytime running and side lights use LED bulbs. Their undoubted advantages include high brightness and low electricity consumption. This allows you to significantly reduce the load on the car's generator. LED lights are resistant to impacts: shaking, vibration on the road.
To replace burnt out tail light bulbs:
- Disconnect the ground;
- We gain access to the headlight by unscrewing part of the inner trunk lining opposite the rear lights;
- We disconnect the wires from the cartridge we need, remove it by turning clockwise;
- We remove the burnt out light bulbs;
- The entire rear optics are removed after unscrewing the fastening nuts with a size 8 wrench.
- Reassemble in reverse order.
How does a rain sensor work?
Daytime running lights: operating features and regulatory requirements for 2022
The principle of operation of the rain sensor
The described device consists of an LED and several photosensitive elements (photodiodes). The light emanating from the LED is reflected from the glass surface and returned to the light-sensitive elements. If there is rain or snow on the surface, the degree of reflection changes and the sensor turns on the wipers.
The more wet the windshield is, the less refracted light will be reflected. Photocells react to the change and after that the wipers turn on. This is why false alarms may occur when insects get on the glass or if there are defects on the surface. To prevent untimely activation of the wipers, it is enough to turn off the sensor in dry weather and install the device only on undamaged glass.
Why do DRLs not work on Vesta?
The rear lights of the VAZ 2114 do not light up: reasons, do-it-yourself repairs
Daytime running lights on Lada Vesta may fail for the following reasons:
- The lamp has burned out - after checking, if necessary, you need to replace it with a new one.
- The fuse has blown - the daytime running lights will not work if the fuse is faulty. It is located in the Lada Vesta mounting block.
- There is a break in the wiring - the fault can be identified using a multimeter switched to voltmeter mode. It is also worth checking the reliability of the contacts.
- An additional body electronics unit has broken down - the fault can be eliminated by completely replacing the broken component (Lada Vesta is equipped with units with part numbers 231A08052R or 231A03142R as standard).
- Electronic short circuit protection has tripped - unsuccessful replacement of the DRL lamps on the Vesta with LED ones is the cause of this malfunction. The DRL lamps and headlights will not light up even after reinstalling the standard elements. To disable triggered protection, you must reboot the EMM unit. AvtoVAZ has issued a special instruction for such cases. In addition, you can use the Grade-X scanner (the device is sold by official Lada dealers).
DRLs do not work on Vesta
To check the integrity of the fuse, you will need to open the car's mounting block. The element responsible for the Vesta DRL is marked F39.
What lamps are used in Lada Vesta?
Before replacing a burnt-out lamp, you need to find out what lamp standards are used in a given car. The following types of light sources are used on Lada Vesta:
| Near | H7 |
| Further | H1 |
| Rear turn signals | WY16W |
| Front turn signals | PY21W |
| Turn signal on the mirror | W5W |
| DRL and front marker | W21/5W |
| Rear clearance | W5W |
| Stop signal | PY21W |
| PTF | H16 |
| Registration plate illumination | W5W |
| Reverse | W16W |
| Salon lamps | LED board |
| Glove box | W5W |
| Lamps in the trunk | W5W |
Use only those lamps recommended by the manufacturer. The use of lamps of lower power will create too dim a light, while powerful lamps burn out faster and load the vehicle’s on-board network. In some cases, wiring may melt and cause a fire.
What is necessary
The reverse lights do not light up on a VAZ-2110 car: how to fix the problem
To scan a car you must perform the following operations:
- Python 2.7 and PyQt4 are installed (32/64 depending on the version of Python, depending on the version of Windows);
- install DDT4ALL (the program is constantly improving), unpack it to drive “C” in Python27Scriptsddt4all;
- install the latest DDT database and unpack it into the program installation folder;
- run ddt4all.py on the command line;
- In the main window, click search; after scanning is completed, blocks will be displayed on the left.
To install the software database, copy the special “ecus” directory from your database and move it to the root of the source code tree. After this, ddt4all.py is launched.
Changing the high beam lamp of Lada Vesta
Replacing a high beam bulb on a Lada Vesta is no different from replacing a low beam bulb. The only difference is the type of lamp itself and its location. And the high beam lamp is located closer to the edge of the car. If Vesta uses H7 lamps for low beam, then H1 for high beam. Otherwise, the replacement procedure is completely identical.
To put it very briefly, we unscrew the plastic casing, remove the wire plug, bend the latch and take out the lamp. We put a new one in its place. Here is the sequence of work for replacing the bulb in the high beam headlights on a Lada Vesta. I think comments here will be superfluous.
Which low beam lamps to choose for viburnum
As we already indicated above, H7 lamps are installed in the low beam. Today a large number of lamps of varying quality are offered with this type of base. We recommend installing only high-quality and proven light bulbs that have already proven themselves.
- PHILIPS H7-12-55 LONGLIFE ECO VISION (4x lifespan) lamp price from 400 rubles (lamp installed from the factory)
- PHILIPS H7-12-55 30% Vision lamp price from 300 rubles (with increased brightness)
- PHILIPS H7-12-55 130% X-TREME VISION 3700K set price from 1500 (considered one of the brightest halogen lamps)
- OSRAM H7-12-55 Ultra Life (3x resource) price from 400 rubles (just like Philips was sometimes installed from the factory)
- OSRAM H7-12-55 30% Super lamp price from 300 rubles (lamp with 30% increased brightness, similar to philips)
- OSRAM H7-12-55 110% NIGHT BREAKER UNLIMITED kit price from 1500 rubles (110% more light than a regular lamp)
- BOSCH H7-12-55 Pure Light lamp price from 250 rub.
- MAYAK H7-12- 55 price per lamp from 90 rubles (inexpensive Chinese equivalent)
- GE H7-12-55 (PX26d) (General Electric) price per lamp from 180 rub.
If you want your low beam bulbs to last as long as possible, you should choose the following models:
- PHILIPS H7-12-55 LONGLIFE ECO VISION
- OSRAM H7-12-55 Ultra Life
These lamps have an extended service life, so they will last longer than regular lamps. However, we note that some owners do not have enough light in a car with these lamps.
If there is not enough light, you can install lamps with increased brightness of 30% or 110, 130% - but you must be prepared for the fact that they burn out faster than ordinary ones. We do not recommend using them as DRLs.
- OSRAM H7-12-55 110% NIGHT BREAKER UNLIMITED
- PHILIPS H7-12-55 130% X-TREME VISION 3700K
When installing such lamps, it is better to use running lights and drive on them during the day, so as not to “burn out” expensive lamps with increased brightness.
Step-by-step instruction
The right and left lamps change according to the same principle, but there is a slight difference. It is better to replace the low beam on the left by removing the battery. This will make it easier to get to the headlights in the engine compartment.
Running lights
On the Lada Vesta, these lamps are combined with side lighting and have two spirals. One of them has a power of 21, and the other - 5 watts.
Operating procedure:
- To remove the running light, turn the cartridge body counterclockwise. There is a flag on the chuck for rotation. See the direction of rotation when looking from behind the headlight.
- Pull the cartridge out along with the connected wires.
- Remove the burnt out bulb and insert the new one as far as it will go.
- Inspect the rubber seal on the cartridge. If it is damaged, replace it with a new one, otherwise dust and dirt will get inside the headlight.
- Install the chuck and turn until it stops.
Turn signal lamps
On Vesta, the turn signal bulbs have a single spiral with a power of 21 watts.
Reinstallation procedure:
- Similar to the running lights, rotate and remove the socket.
- Push the bulb in, then twist and pull it out of the socket.
- Insert a new one, making sure that the protrusions coincide with the grooves of the cartridge.
- Check the serviceability of the rubber gasket, replace if necessary.
- Install the cartridge.
The glass of the turn signal light is orange, so it needs to be replaced with a similar model.
What to buy?
One of the Drayvovites, who is known in the community under the nickname 22KAZAK, carefully studied this issue before replacing the lamps in all the above components on his Lada Vesta Altai sedan. As a result, he came to the conclusion that it is possible to replace factory lamps with an analogue one, but only if you purchase tested, certified products and proper installation, so this point must be monitored especially carefully.
So, to replace you will need:
- Low beam – LED lamps OPTIMA CL-6 LED HEADLIGHT. Installing such lamps will also require the purchase of universal rubber covers for the headlamp.
- Dimensions and DRLs are MTF W21/5W LEDs. They fully comply with the requirements and match the polarity.
- License plate light – PHILIPS.
During the installation process, questions usually do not arise and you can do everything yourself. The main thing is to correctly calculate the polarity when installing lamps in side lights/DRLs. If you are not confident in your abilities and knowledge, it is strongly recommended to consult an auto electrician or entrust the work to him.
So, I decided. Finally, create a post about diodization of everything. I’ll say right away that the path was not easy, but the result, at least for me, pleases me. There are no global reasons why this is worth doing, it all comes down to the banal I want and I like it that way. But I won’t start a debate; everyone decides for themselves whether they need it or not.
In this post I will try to outline the entire chronology of events that preceded the final result, as well as the reasons why I chose certain lamps. I'm breaking the post into blocks for better comprehension. In each block I will indicate where I ordered the lamps and their cost. The cost will take into account only the final result, without intermediate solutions and for the entire set of lamps at once.
Interior lighting I'll start with the interior and trunk lighting. I have a luxury package, so the interior lighting for front and rear passengers is initially LED. For the glove compartment, doors and trunk, initially, without bothering at all, I bought a handful of these light bulbs that shine in one direction.
It seemed like an ideal solution, it seemed to me then. However, after traveling with them for a year, I realized that the light from them is not very good, and even gives off a blue color. Plus, in the trunk they started flashing sometimes. I decided not to save at all and took, in my opinion, a very good solution, although expensive. These are small-scale LED boards. The workmanship is excellent, they fit into place - as they were, the only thing is that I put a little rag tape between the board and the conductive plates, otherwise the board was not fixed tightly and rattled when shaken.
The light is now bright and pure white. I put them in the doors, glove compartment, and trunk. Total - 5 pieces. I ordered here, the amount including delivery was 1450 rubles. They've been standing for about a month now.
Rear license plate illumination Initially, I installed the same lamps here as in the interior, so that there would be no short circuit (due to the peculiarities of our cartridges), I glued pieces of Orthodox blue electrical tape to the contacts of the lamps. At first, as with the interior, everything was fine, but less than six months had passed before the lamps began to behave like this:
I decided to replace it with a suitable option, but again expensive, albeit from Westashhop.
I was worried about the light temperature of 6000K, I thought it would be blue. But the fears turned out to be in vain; they again shine with a bright, pure white light.
They have been working for more than six months without problems. I never regret spending 555 rubles.
Daytime running lights When I was choosing LED DRLs while driving, there was mass hysteria with the installation of magnificent VANSSI. In general, before this I had blue Chinese incandescent light bulbs that shone white. Of course, not as bright as native ones or diodes, but it seemed to be enough. Their durability, however, was very poor; I threw out the first set after only a month and a half of use. That's why I decided to change to diodes. I did not support the worldwide love for vanssi and decided to take an alternative option. I didn’t like lamps where the diodes shine straight ahead, I wanted to find an option so that the light would come through reflectors, and to some extent I found them. The diodes here shine only a little forward at most; the luminous flux mainly goes through the reflectors. The main problem with these particular lamps is that they are not SRCK, i.e. bolt on they are not installed.
I had to disassemble them a little, namely, remove the plastic base and bend the contacts as follows.
I insulated the two contacts with the same blue electrical tape so as not to touch each other. The operating mode of the lamps became absolutely normal - a bright glow during the day with the lights off and a dim glow when the lights were on. The lamps have also been working for more than six months and have not caused any problems. They do not shine blue like cheap lamps, but pure white light. At the time of purchase they cost 688 rubles per pair.
Fog lights Initially, while driving, I saw options for LED fog lights with three lenses for three diodes. Even turned off they looked very impressive. I immediately discarded the two-mode ones for myself, since I don’t like the yellow light, and I didn’t want to create a light-music system with them turning on and off. I wasn't interested in high power either. In my opinion, fog lights are needed solely for greater visibility of you on the highway. Therefore, I chose for myself an excellent option from the ZFT-360 vesta shop. What I liked about them was the absence of the ill-fated dual-mode and, most importantly, it was made of metal and glass. Let me remind you that most of these solutions have plastic “glass”. Unfortunately, Vestashop could not bring them to me due to quarantine. Then I found them on Avito in the southern port. Arriving at the place, it turned out that they were not there either. To say that I was upset is to say nothing. The seller offered the same universal ones. There was, of course, plastic here, and there was also no screw for adjusting the light. I agreed.
The light, of course, is not perfect - it gives off a purple glow, but there are no problems with focus, the light flow goes forward and down, as it should. Also activated the cornering light function. Works one to one like on vagas. When you turn the steering wheel at low speeds or turn on the turn signal, the PTF on this side turns on. The function is useless, but cool, I decided to leave it. To install them, I also had to suffer a little. Since they are universal, I had to sharpen the plastic bumpers on the bumper with a file to attach the PTF. Overall, I’m happy with it so far, but if they fail, I’ll definitely order a ZFT360. The glass will be less scratched by sand and dust. Price tag 1950, installed about 2 months ago.
High beam Let me remind you that in the low beam I have an Osram Nightbreaker Laser with smooth ignition (there is already a post about this on the drive). I decided to install diodes in the far one to chase away the unwary nauseous people in the left lane on the highway. Initially I wanted to leave the headlights completely factory appearance, i.e. Don’t screw anything up and don’t put rubber plugs in, because it’s a complete mess. But at the same time, the lamps must have at least some kind of cooling radiator, because everyone knows that powerful diodes do not last long without cooling. Initially, due to inexperience, I chose this option
The light is very good, but there is one problem - firstly, a large control unit, and secondly, an adapter, which also takes up a lot of space. Among the advantages of these lamps, I note the very good light, and it is pure white, without blue tint, as well as ease of installation, since the complete socket into which the lamp is inserted is made of heat-resistant plastic with recesses and grooves for proper installation in the headlight. Well, as a result, they didn’t fit with the standard covers. I managed to install the control unit and adapter inside the headlight, but the lid did not close at all. Those who are not critical about installing standard covers can safely install these lamps, I recommend them. I sold the previous lamps on Avito at cost and ordered these instead. They probably only have one plus - the lamps fit completely into the headlights. The downside is that the metal socket is not securely fixed with a bracket in the headlight in the desired position. It took a lot of effort to install it correctly. Life hack - remove the bracket in the headlight and install it without it first. Then put the bracket back. The cooling bands are ideally located in the space between the reflector and the rear of the headlight housing.
The light is generally not bad, but it is worse than the previous version. Gives off a little blue and is a little less bright. But it turns on and off effectively - the advantage of LED lamps is that you can directly create light music =) They have been standing for about 5 months, everything works, but I practically don’t use them. They cost 1,460 rubles at the time of purchase.
Front turn signals Here I guessed right away. Ordered once and for all. Got it here.
You need to choose the color Yellow and the base PY21W. The light from them is incredibly bright. Diodes consume so much power that the comfort unit does not even understand that there are diodes and does not increase the blinking frequency of the turn signals. The lamps fit into the headlight as if they were original.
They've been in place for about a year now and work great. At the time of purchase they cost 480 rubles per pair.
Rear turn signals I installed these on the back at the same time as the front turn signals. A problem arose with them - the comfort unit understood that the load was small and thought. That the lamp had burned out, so they were blinking very often. At that time, I no longer liked these lamps, so I took others, and additionally took 50W resistance at 10 Ohms so that they would not blink quickly. As a result, this collective farm appeared.
So I traveled for about three months. The resistors did not get too hot due to constant contact with the body, everything was fine. These new lamps shine with a much more saturated orange light, just some kind of dark orange, I really liked the color. The problem is that they fit less reliably in the socket due to the textolite contact pad. The first option sits more securely in the cartridge. But, in fairness, I note that they have never fallen out on me.
Later I discovered the magical world of the ECU Tweaker program and simply turned off the turn signal check and threw out the resistors. At the time of purchase, the final version cost 715 rubles and has been working properly for 4 months.
Reversing lamps I bought popular lamps for reversing, they basically worked and even suited everyone. The only thing I didn’t really like was that they were flat. I didn’t like how they sat inside the headlights, and the light from them only came up, down and back.
Purely by chance, wandering through Aliexpress, I found these bulbs and immediately ordered them. They work almost the same way. I wouldn’t say that the light is somehow different from the previous version, but I like that the headlight fits more neatly.
I can recommend both options for purchase. Just don't take the overpriced Vansie. Cost 317 rubles, installed for only a month.
Brake lights Here, too, I guessed right the first time. I ordered excellent light bulbs with BAY15D base here.
The light is decent; when you press the pedal, the brakes light up instantly. The light from the headlight is rich red, and not pale like that of halogen lights. They work as they should, in the parking light mode and in the brake light mode. They last for more than six months and work perfectly. At the time of purchase – 680 rubles.
Rear dimensions For dimensions I was looking for decent looking lamps on Ali, and thought I found them here.
But this was a mistake, since these lamps, although they look more or less, do not shine with red, but with some kind of crimson light.
A small warning to those car enthusiasts who want to install LEDs instead of some incandescent lamps in the Lada Vesta (comfort and higher configuration), for example, license plate lights, dimensions, and also connect to standard electrical wiring, for example, to power a trailer, connect various equipment (additional lighting, etc.).
Cars of this configuration are equipped with a so-called comfort unit or an additional body electronics unit - EMM, which monitors the integrity of the vehicle's standard wiring and records the current consumption of electrical equipment.
I also had the idea of installing LEDs instead of some already archaic incandescent lamps, and when visiting a car dealer, I consulted on this issue and realized that it was better not to do this, at least while the car was under warranty.
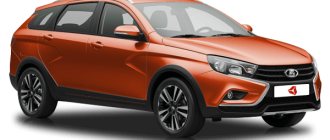
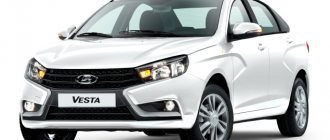
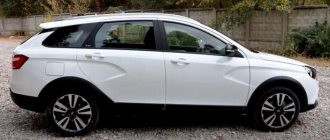
Lada Vesta SW Cross in the showroom. St. Petersburg
The fact is that when replacing lamps with LEDs, the current consumption changes and the EMM unit will track this and can block the circuit in which, in its opinion, the fault is located, that is, the left or right side of the car may be de-energized. Plus, Lada Vesta has somewhat non-standard lamp sockets, which can also lead to a short circuit when installing lamps and LEDs, the bases of which are designed for installation in sockets of other, most common types. Naturally, the EMM unit will immediately turn off this power line and cause an error. And if there is no such unit in the car, then the fuse will simply blow when installing an “inappropriate” light bulb. Some owners of Lada Vesta even change the bases so that ordinary light bulbs fit and there are no short circuits when replacing light bulbs.
In this regard, the operating manual contains a table that shows the characteristics of all lamps installed in the car:
Table of incandescent lamps of the Lada Vesta SW Cross car
And it is said that the use of lamps or LEDs of other characteristics is prohibited, even if the base is suitable:
Warning in the instruction manual
The EMM unit itself is quite expensive (about 15 thousand rubles) and this amount may cost you the desire to change the light bulbs.
But there is good news, the EMM unit can be made to work again by unlocking it by applying supply voltage to a certain contact of the connector (information on how to do this is available on the Internet). To get to the block you need to remove the glove compartment. However, you need to take into account that you still need special equipment, since after unlocking the unit you need to reset the error, so, most likely, with such a malfunction, a trip to a car service cannot be avoided.
And you also need to take into account that the number of unlocks of the EMM block is limited - only four, that is, for the fifth time you will have to change the EMM block, or, if you have the appropriate equipment, you can replace the microcircuits that are blocked:
And the block will work again. However, the purpose of this article is not to repair the EMM unit, but to warn owners of the Lada Vesta car that there is such a specific subtlety when replacing ordinary light bulbs. 
What kind of DRL lamps are on the Lada Vesta and is it worth replacing them with LED ones? Marking of running lights Owning any car leads to the fact that its owner makes certain modifications to it. In cases where you own a domestic car, such modifications suggest themselves. The owners of the Lada Vesta noticed that the standard DRL bulbs in it shine rather depressingly, so they have more than once thought about replacing or modifying them.
In the article you will find out why the DRL lights on the Lada Vesta do not light up, and also study the instructions for turning off and replacing the DRL bulbs on the Vesta with your own hands.
What kind of DRL lamps are on the west side?
Before replacing the DRL element in Vesta yourself, you need to figure out what type of light bulbs are in the standard form of the car.
Today, the technical features of this AvtoVAZ model have been studied in some detail, so it is known for sure that analogue W21/5W are installed in DHO Lada Vesta lamps from the factory. Unlike low beam bulbs, DRL bulbs can be easily replaced with analog LED ones. When modifying the headlight, a car enthusiast may encounter a number of problems that, in the worst case, will lead to a burnout of the electronics unit.
Marking of DRL bulbs
Compared to standard lighting elements, these lamps differ in the following points:
• Glow color – white (basic lamps have a yellow tint, while the diode element can be of different colors);
• The main lighting element is LEDs;
• More uniform distribution of light across the reflector. In addition to MTF, the following analogs are very popular among car enthusiasts: Philips Vision W21/5W, Vanssi W21/5W. The price for each of the listed analogues does not exceed a thousand rubles per piece.
Why do the DRL lights on Vesta not light up?
Troubles can also happen when operating a car. Lack of daytime running lights is one of these troubles. There may be several reasons for the malfunction:
• Burnt out lamps are the most favorable option. The problem is solved by replacing burnt out elements with new ones;
• Fuse failure. The fuse box in Vesta is located in the mounting block, and the layout of all elements is on the cover of the block itself;
• There is a problem with the vehicle's wiring. In this case, you cannot do without the help of a qualified electrician;
• Failure of the main electronics unit (the problem is solved by replacing the entire unit assembly).
If the DRLs on a Lada Vesta stop working after replacing the lamps with non-original ones, you should check the markings of the installed elements. If they do not correspond to the factory parameters, they should be replaced with suitable ones.
How to disable DRL on Vesta
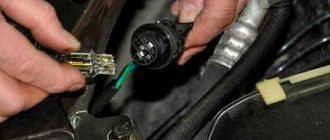
After purchasing new lamps, to install them, you need to remove the old lighting elements from the DRLs. It’s quite easy to get to the lamps themselves, after which you need to turn the lamp socket counterclockwise. If you remove the working lamps for the running lights of the Lada Vesta, then you should not touch the surface of the base with your bare hands, because the next time they are used, they will burn out quite quickly. Installation of lamps in the Lada Vesta DRLs occurs in the reverse order and does not require any special tools. If you don’t understand how to turn off the DRL on the West, watch the video on YouTube, or find instructions on the Drive2 portal.
Replacing running lights on the west
A car enthusiast, as a rule, decides to change the DRL lamp on a West in two cases:
1. If he is not satisfied with the brightness of standard lamps; 2. If the old DRLs are burnt out.
In each case, replacement is carried out in several steps and does not require any special knowledge. Replacing running lights on a West is a fairly simple process, but installing incorrectly labeled items can still lead to a problem. Important! Do not forget that when installing analog lighting elements, it is necessary to take into account the labeling of the lamps, because mismatch of lamps will lead to failure of the main electronics unit.
Should I replace the standard bulbs in the DRLs with LEDs?
This question is purely a matter for each individual car enthusiast. The only drawback from such a replacement of lighting elements is the selection of the wrong analogues and, as a result, disruption of the factory wiring, etc.
LED lamps have many more advantages: brighter light, “white” tint, stylish look. In any case, replacing the DRL lamps on a West with factory ones is a matter of five minutes, be it a luxury, cross or basic car.
Lamps used on the vest
All optics on the Lada vesta comply with established international standards and perfectly complement the appearance of the car. As mentioned earlier, halogen bulbs of standard H1 and H7 are used for high and low beam. The H7 model is 20% brighter than the H1, but their light output does not blind oncoming drivers.
Daytime running lights for Lada vesta use 5W, and side lights use W21. These are baseless two-pin incandescent lamps. The brake light also shows a two-pin light fixture, but with a metal socket. The model of this lighting fixture is P21. Reverse gear is indicated by the W16W lamp. The most commonly used lamps for 2180 are Osram, BOSCH, and Philips. You can purchase them yourself in spare parts stores, and then replace them without turning to service centers. This will significantly reduce the time and money spent on servicing the 2180 car.
Owner reviews
| № | Positive |
| 1. | Dmitry Vasilyevich , 41 years old (drive2.ru): the car is three years old, the low beam relay, lighting fixtures have never been changed, they work as usual. |
| 2. | Georgiy , 39 years old (prom.ua): VAZs have good lighting, before Vesta I had a Granta, so I have something to compare with. |
| 3. | Kirill , 28 years old (autotoday.com): after the winter, the glass of the optics began to fog up, I changed the seals, the problem disappeared. |
| 4. | Maxim Petrovich , 44 years old (rozetka.ua): The BS is good, but the long-range one is rather weak. On the recommendation of my friends, I installed halogen lamps. I'm pleased with the quality of lighting. |
| 5. | Petr Nikolaevich , 43 years old, (avtoflit.com): my positive review of the standard lighting system, no complaints. |
| 6. | Sergey Mikhailovich , 41 years old, (autotoday.com): This is my second year driving a Lada Vesta, there are no comments on the lighting. I have heard complaints from drivers that the BS often does not work and the lights do not turn on. I believe that the reason is failure to comply with maintenance deadlines. |
| 7. | Kirill Stepanovich , 30 years old, (drive2.ru): I’m pleased with the standard lighting system of the model, the road surface is widely visible, covering the edge of the curb. |
| Negative | |
| 8. | Mikhail Stepanovich , 39 years old (prom.ua): in the second year of using the car, the low beam suddenly stopped working. It turned out that the cause was a fuse that had blown. |
| 9. | Stepan Nikolaevich , 40 years old, (avtoflit.com): extremely dissatisfied with the optics, the BS is weak. On the recommendation of my friends, I installed additional lighting. |
| 10. | Sergey Mikhailovich , 43 years old, (drive2.ru): after driving through puddles, the BS disappeared, the technicians quickly found the cause - the relay. |
| 11. | Semenovich , 39 years old, (autotoday.com): after two years of using the car, he replaced the lamps with imported ones. The quality of domestic ones still lags behind their foreign analogues. At times the light glitched, dimmed, and periodically disappeared. |
Main light
In the Lada Vesta, the low and high beam bulbs are covered in the headlight with plastic covers. Low beam - closer to the center of the car.
Do not touch the glass with your hands, this will cause it to darken and quickly fail.
They have a lot of power, so they get very hot during operation. When replacing, be careful not to break the expensive light bulb, otherwise you will have to spend money on buying a new one.
Replacement instructions:
- Turn and remove the plastic cover.
- Remove the electrical block.
- Press the retaining spring and disconnect it from the reflector hook.
- Move the spring to the side.
- Pull the bulb out of the headlight without touching the glass.
- Install the new light bulb in reverse order.
Pay attention to the cleanliness and condition of the new lamp: the glass must be perfectly clean. High-quality packaging in a store should ensure the cleanliness of the product
In extreme cases, the glass can be wiped with a clean cloth moistened with alcohol.
High-quality packaging in the store should ensure the cleanliness of the product. In extreme cases, the glass can be wiped with a clean cloth moistened with alcohol.
Adjusting headlights on LADA Vesta
The headlight adjustment procedure is performed if you have changed springs, optics or other body parts. This is quite simple to do - the main thing is not to deviate from the instructions:
- Place your car with the headlights on perpendicular to a flat wall - it should be at a distance of exactly 3 meters.
- Have your assistant sit in the driver's seat.
- Make sure that line 0 runs along the longitudinal plane of the LADA Vesta.
- Lines 1 and 2 should run through the center of the low beam bulbs.
- Install the electric corrector on the panel with a load of 75 kg (average driver).
- Take any dense material and cover the light of one of the headlights.
- Now you should check the location of the light spots on the wall - to do this, turn on the low beam.
If the light spots do not meet the requirements in the picture above, then they need to be adjusted. This can be done by adjusting the screws on the headlight unit. One of the screws is responsible for adjusting the light vertically, and the second – horizontally.
In this easy way, you can adjust the headlights on a LADA Vesta in less than an hour - it is not necessary to take the car to an official dealer.
How to remove protection?
To independently remove the protection (reboot) in the EMM block, AVTOVAZ has issued a special instruction. In short, it says that to remove the blocking, it is enough to apply +12 volts to the 3rd contact (free) of the white block of the block for 2-3 seconds with the ignition on, and then reset the errors of the comfort block controller. After this, performance should be restored.
Detailed instructions for removing protection:
- Remove the glove compartment lid to gain access to the comfort unit.
- Connect a connector with a wire at least 50 cm long to the free pin 3 of the white block.
- Apply +12V to the other end, for example from the green wire of the glove compartment lighting block.
- Turn on the ignition for 3 seconds.
- Turn off the ignition and remove the installed circuit, returning everything to its original state.
- Reset the EMM unit errors using a Grade-X scanner (or any other available method).
- Check the functionality of the circuits.
There is a more humane way - you can remove the protection using a special Grade-X scanner, which is now available at official Lada dealers. It is enough to find the corresponding parameters in the list that are responsible for unlocking the right and left sides of the car, respectively. After activation and complete reset of the unit, lighting functionality is usually restored.
Grade-X Scanner
If these instructions do not bring the desired result, this indicates that one or more driver channels are damaged. In this case, there are two options for eliminating the malfunction - repairing the unit or replacing it with a new one. If you are comfortable with a soldering iron, then you can easily figure out the circuit diagram of the unit and, using inexpensive attachments (installing additional relays), cheaply repair the electronics. If it is possible to purchase new driver chips, then repairing the unit will come down to replacing them.
For those interested, we provide sample diagrams for repairs using the installation of an additional relay.
As a conclusion, it is worth noting that interfering with normally functioning car components is always fraught with unexpected problems, and before replacing a simple working light bulb, think 10 times - whether all this will result in expensive repairs and a lot of wasted time.
Problems
There is one big problem - the risk of burning out the electronics unit, which, by the way, happened to many Vesta owners. For example, if you put LEDs in the DRL of a sedan, then after a short time they will simply stop shining. As a rule, in such cases, the fuses are replaced, which are marked in the instructions with the symbols F16 and F17.
Replacement must be done carefully
However, there are none under the cover that covers the fuse box. In the end, it all ends with a burnt-out electronics unit, which has to be replaced. It's all about the higher resistance of the diodes, which is why Vesta's electronics unit cannot withstand it.
The most unpleasant thing is that this is not a warranty case, so contacting the dealership for a warranty replacement will not help. You have to buy the unit yourself, and it is quite expensive - it is not always possible to find a part even for 8,000 rubles, and sometimes the price tag for an element reaches 19,000 rubles!
Moreover, such a problem can arise not only because of LEDs. If you thoughtlessly select and install components, it is more than possible to end up with a burnt-out unit.
Lada vesta has quite a lot of functions that almost no one knows about
In addition to those described above, you can change the settings for power windows, daytime running lights, brush sweep, and belt buzzer. There is also a hidden menu for MMS, radio and testing. The connection occurs via Bluetooth.
You can customize the car for yourself, but remember that all work is performed at your own risk. If you are not confident in your strengths and capabilities, then contact specialists.
There are a lot of additional functions and settings - this is good and interesting. However, the manufacturer decided to remain silent about some of them, although they could make life easier for drivers and make AVTOVAZ products more attractive to potential buyers. Not all functions are necessary or required, but they can be useful in different cases. Therefore, it is worth learning about them in more detail and deciding for yourself whether to use them or not.
How to choose lamps
It is worth distinguishing between the four lamps that are located in the Priora headlight unit - low and high beams, turn signal and dimensions. It is the low beam lighting that should interest you. It is equipped with an H7 lamp. All lighting is represented by halogen optics.
In some cases, when it becomes necessary to replace optics, drivers decide to install alternative options, but maintaining factory standards will still be a more reliable choice.
As for the pricing policy, a low beam lamp will cost 250-500 rubles on average.
The characteristics of various halogen lamps may differ from each other; you should pay particular attention to the parameters that correspond to low-beam lighting devices. All necessary parameters and certificates must be publicly available on the packaging. The luminous flux, for example, is limited by the state standard and must correspond to the range of 1350-1650 lumens. If the specification is unsuitable or there is no information about it, do not purchase such products.
Changing the parameters of the center
You can change the following parameters:
- The “BCM” block (on the left), the “Doorlock” function (below the block) and in the same place “Doorlock - Configuration”.
- Enabling “AntiHiJack” in the line “ANTI_HIJACK_CF (-)”, specify the required value, click “TRUE”, “Send”. Initially, AntiHiJack is deactivated on the machine. If you activate it, then with one click on the key fob the car will be disarmed, and with a second click it will be unlocked. When opening a door from the inside, only one door will open, the others will be closed, provided the central locking is activated. You can deactivate the functions by selecting the “FALSE” command and then “Send”.
- Speed threshold for activating a signal about an unlocked door - go to “DOOR_WARNING_SPEED_THRESH_TP (km/h)”, specify the required speed on the right and click “Send”.
- Changing the speed threshold for automatic central locking - go to “LWS_SPEED_THRESH__CF (km/h)”, specify the required speed, click “Send”.
- Auto-arming timeout (triggered when the system is turned off by the key fob or if the door is not closed) for this period of time in “AUTO_RELOCK_TIMEOUT_CF (min)” specify the required number of minutes, then click “Send”.
A little background
One sunny day you got bored and decided to do some easy tuning of your Lada Vesta, which, as you know, starts with the light bulbs.
It's no secret that standard DRL lamps look somewhat depressing, with a yellowish tint. It’s especially sad that they decided to make LED running lights on the X-ray’s sibling.
So, you bought Chinese white LED bulbs with huge declared lumens to embellish the appearance of your pet. You start dismantling the old ones, install new lamps and, in anticipation of white rays of light, start the car and get... no light.
After slight bewilderment, you try to return everything to its original state - install the incandescent lamps back in place and again check the operation of the running lights. But a miracle does not happen, the light is still missing and you begin to sort through ideas, look for the reason for what happened. Usually the first thought that comes to a car owner’s mind is “The fuse has blown!” You open the fuse table, find the required F39 and are perplexed - it is intact.
Installing LEDs in DRLs on Lada Granta
In accordance with the regulations on the operation of vehicles, every car on the road must be marked with a daytime running light or low beam headlights if there is no daytime running light.
This is done, first of all, for safety, because even under conditions of excellent visibility, the running lights of a car traveling in traffic attract the attention of other road users, reducing accidents on the road. Lada cars of the entire model range are standardly equipped from the factory with a running light, most often this is an ordinary incandescent lamp located in the headlight unit or designed as a separate module
Lada cars of the entire model range are standardly equipped from the factory with a running light, most often this is an ordinary incandescent lamp placed in the headlight unit or designed as a separate module.
Another important parameter for many is that LEDs have a pure and white tint; the installation of LEDs or lighting devices other than yellow or white is prohibited by the regulations on the operation of vehicles. The use of unauthorized lighting equipment may result in deprivation of the right to drive a vehicle and sending it to a parking fine.
The peculiarity of the daytime running light of the Lada Grant and Lada Kalina is that the wiring uses a rather rare pinout of the SRSK connector, which is used more in imported cars.
As a result, good lamps that we would advise you to install are very expensive, sometimes tens of times more expensive than an incandescent lamp. However, if the price does not scare you, choose high-quality lamps with an appropriate power supply and install them according to the instructions.
It is not safe to use lamps of a different power supply principle for car wiring and they will not work correctly or will not work at all.
The new lamp is inserted tightly until it stops.
The peculiarity of the SRSK pinout used on Lada cars is that the “plus” and “minus” of the power supply are located separately from each other on each side and if the lamp is not bipolar, then it will only work if it is installed on a certain side. We advise you to turn on the side light so as not to make a mistake when installing a new lamp; if installed correctly, it will work immediately.
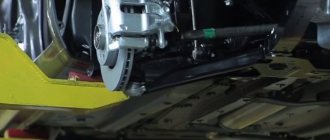
On the driver's side, replacing the lamp is complicated by the presence of an air filter housing in front of the lamp base, but this will not make the process much more difficult.
Pull up the rubber mushrooms that secure the filter housing to the housing and move it to the side, providing access to the lamp base. The replacement process itself is similar to the lamp on the other side.
But the qualitative improvement in lighting is especially noticeable when working in the dimensions mode. LED lamps are more than 300% more efficient in this operating mode. It is difficult to overestimate the contribution to safety when a car is on the road with a side light clearly indicating it.
At the same time, the load on the on-board power supply network has decreased significantly. If a standard incandescent lamp consumes one 21 Watt of power in daytime running mode, then a brighter LED lamp consumes only 7 Watts, which is only 2 Watts more than the consumption of incandescent lamps in the side light mode.
(2 ratings)Loading…