The “Seven” has a fairly simple and modest interior design by modern standards. Therefore, car owners transform the interior of the car on their own, making its appearance individual and bright. Tuning the instrument panel of a VAZ 2107 is one of the primary ways to improve the simple and discreet appearance of the car’s dashboard.
Why is special attention paid to “tidying up” a VAZ when tuning? It is the dashboard that draws the attention of the driver and passengers during the trip. Therefore, tuning the interior should start with refining the “tidy”.
The simplest option
Owners of the “Seven” injector who have a certain amount of money and do not have enough free time should pay attention to ready-made kits containing everything necessary for tuning. Each set comes with instructions, following which it will not be difficult to improve the functionality and appearance of the dashboard.
But for those who are not looking for easy ways and dream of a completely unique design, the method described above is definitely not suitable.
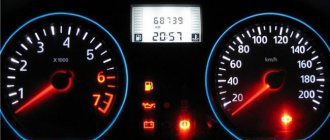
Description of the electronic instrument cluster
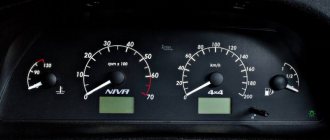
The standard instrument panel on the VAZ 2107 has a simple design and does not represent anything remarkable. That is why owners of sevens often wonder about tuning the standard one, or replacing the analog panel with a digital one. Among all the advantages of the Europanel is the possibility of installing it on the seven yourself without the help of specialists. The only drawback is the price, which varies from 8 to 10 thousand rubles.
Electronic instrument clusters in Russia are produced by different manufacturers. You can install digital equipment only on injection sevens. This type of equipment may be partially unsuitable for carburetor cars. The design of the equipment uses light indicators and units of measuring devices. If we delve into the details of such a device for the VAZ 2107, then it is worth noting the following points:
- The on-board computer is one of the biggest advantages of the installation. When replacing an analog panel with a digital one, the owner automatically acquires an on-board computer. As you understand, the computer only works on injection-type cars.
- The speedometer and tachometer are the two main indicators by which the speed of movement is controlled, as well as the speed of the crankshaft.
- Fuel indicator.
- Econometer.
- Emergency stop indicator and direction indicators.
- Control indication of oil pressure and battery charging.
The new instrument panel on the VAZ 2107 is not only beautiful and modern. With this equipment, the driver will be informed about the need to perform maintenance procedures, having previously configured the system. The device has a backlight adjustment function, which eliminates the possibility of blinding the driver while driving in the dark. One of the positive functions of the installation is the display of only those parameters that deviate from the specified ones.
Installation of electronic combination
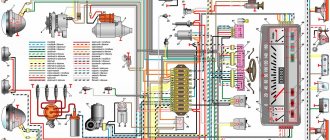
Electronic devices are adapted to work with control units January 5.1, VS 5.1, 7.2, M7.3, M7.4 and Bosch M1.5.4, MP7.0 and M17.9. It is also possible to connect parking sensors to the dashboard. It is not rational to install the equipment in question on carburetor sevens, since in this case the on-board computer will not function, as well as indicators, the operation of which is tied to the computer.
When installing equipment on a car, you must first remove the analog instrument panel. Initially, do not forget to turn off the power to the car by disconnecting the negative terminal from the battery. In place of the standard one, a digital instrument panel is installed, which is fixed with similar fasteners. First, power wires are connected to the device and terminated with clips. On the back of the device there are corresponding sockets for connecting plugs. In this case, no modifications will be required.
After installing and connecting the digital instrument panel, you will also need to install the handles on the control levers for the ventilation and heating system of the car. After assembling the equipment, you need to connect the terminal to the battery and turn on the ignition. When you turn on the ignition, enjoy the updated modern instrument panel on the seven.
It is worth noting separately that the necessary wires and adapters are included with the installed equipment. The on-board computer controls many different parameters, and therefore, having installed such a device on the seven, you will no longer need to frequently visit a car service center to conduct a diagnostic study and identify errors.
In conclusion, it is worth noting that the owners who installed the devices on the injection sevens are satisfied with modern equipment, modernization of the interior, as well as an increase in the number of options. In addition to the high cost, the electronic panel has another drawback - if the car already has an on-board computer, it will have to be dismantled.
Do-it-yourself tuning
In this case, you can save a lot of money. You will also have to spend a lot of time. But the panel will look completely unique.
First of all, you need to decide on the design. It makes sense to look at the photographs, of which there are quite a lot on the Internet.
The easiest way is this:
- replace factory needles on instruments;
- install new stickers with scales;
- change the lighting.
All these require only accuracy and basic knowledge of electrical engineering. At the same time, you can order a set of arrows and backgrounds for instruments in any studio that specializes in finishing cars. The professionals there are able to make them according to your design or develop it themselves. This will, of course, cost a pretty penny.
Removing the instrument panel
This is the first stage of any tuning, which will have to be performed in all cases.
Before you begin, please read the instructions. The procedure is as follows:
- disconnect the negative terminal from the battery;
- remove all heater handles on the panel (tread carefully - they break easily);
- unscrew the nut holding the lever in place that resets the readings;
- push it inside;
- remove the plugs from the screws securing the dismantled element;
- unscrew them with a screwdriver;
- remove the panel from the elephant.
Backlight
LEDs are now commonly used. The beauty of them is that installation is very simple and quick. Plus, there are quite a few colors available. Choosing one of them that best matches the interior design or body paint will allow you to turn your “seven” into a real masterpiece.
As a rule, it is enough to install only a dozen diodes on one panel to radically modernize its appearance. They are connected to each other by a loop of wires. Additionally, they are matted with fine sandpaper - without this operation they will burn too brightly.
Optimal location:
- four pieces in the corners of the dimensional devices;
- one diode for two small sensors;
- the rest is your choice.
After completing the work, connect the panel to power and make sure everything is functioning as it should.
Along with the backlight, it makes sense to install new hands. There will be a lot of work to be done here. Signs can be purchased ready-made or cut out of plexiglass. Do not do this unless you are confident in your ability to disassemble and reassemble the mechanisms.
Front lights
The front part of the car usually attracts more attention, so amateurs begin to tune primarily the headlights.
Evil headlights
It’s very easy to give your car a menacing, gloomy and even evil look: just perform tuning like “evil headlights”. This is one of the easiest ways to give the “seven” an unusual appearance.
Depending on the owner’s capabilities, tuning can be done using a variety of materials:
- thin plywood;
- sheet metal;
- tinting film;
- paints.
The car's "angry" squint gives you goosebumps
The essence of this tuning is as follows: cover part of the headlight so that the remaining uncovered headlight resembles evil eyes. If any materials from plywood or metal are selected, then a blank is cut out in advance and glued into the cavity of the headlight. Using film or paint is even easier - just remove the headlight and apply darkening on the inside.
Tuning headlights from plywood painted black
Angel eyes
In tuning, angel eyes are the luminous rings on the “face” of a car - like a BMW. Today everyone can afford this lighting option - it’s inexpensive and fast. In addition, the body of the VAZ 2107 will somewhat resemble an expensive BMW and thereby increase the status of the owner.
Headlights that are very unusual for the “Seven”
There are several technical solutions for making angel eyes with your own hands. The easiest option is to use LEDs. To work you will need:
- white LEDs 5 mm - 2 pcs.;
- 0.25 W resistor;
- wiring;
- transparent rod made of organic glass or plastic (diameter 8–10 mm);
- auxiliary materials (soldering iron, hair dryer, drill and glass jar).
The work is quite painstaking:
- Take the rod and clamp it in a vice.
- Using a drill, drill holes for the LEDs at both ends of the rod.
- Give the rod the shape of a ring - bend it around the jar and heat it with a hairdryer so that the workpiece remains in this shape.
- Solder wires to the LEDs, connect a resistor to one of the wires.
- Assemble an electrical circuit similar to the circuit of lighting devices that is already available on the “seven”.
- Insert the LEDs into the holes of the workpiece and glue them with superglue.
Video: how to make angel eyes
You can buy ready-made angel eyes at a car store - this will make it much easier to connect new lighting fixtures to the standard equipment of the car.
Using LEDs of different shades, you can achieve an even more impressive effect.
Expansion of functionality
The VAZ-2107 is equipped with a minimum of instruments, and therefore installing new ones will significantly increase the information content of the panel. Most often they add:
- light and temperature sensors;
- fuel consumption indicator per kilometer;
- ECU;
- TV, etc.
Additional holes are cut for them. It is also necessary to install wiring and make changes to the design of the machine (in particular, to provide it with missing sensors).
Source
How to tune the instrument panel of a VAZ 2107 yourself
The VAZ 2107 car is distinguished by its simple interior design, so very often owners resort to alterations and modernization. One of the most popular devices undergoing modernization is the dashboard. The easiest way to improve it is to install an electronic panel. It is only suitable for injection-type cars. On a carburetor-type VAZ 2107, you can change the instrument panel by doing tuning yourself.
The easiest and most reliable way
For those who do not want to seriously engage in alterations and are ready to make some investments, ready-made kits are offered. They have everything you need to do your own tuning of the VAZ 2107 instrument panel. Each kit comes with detailed instructions. The only tool you need is a screwdriver. Also, you need to be familiar with the connector configuration.
In specialized stores you can also find ready-made dashboards for every taste, including those with electronic sensors. This is also a pretty good option for those who want to change something and not spend a lot of time on it. You can carry out the replacement yourself, since the finished panels fully comply with all the characteristics of the standard ones. The only thing is that before carrying out such an operation, you need to thoroughly study the connection process.
How to install a ready-made tuned device on a seven
Car owners who do not want to redo the dashboard on a VAZ 2107 themselves choose the modernization method by purchasing ready-made kits. This kit contains everything you need to tune the instrument panel on a VAZ 2107. Moreover, such kits are suitable not only for carburetor sevens, but also injection ones.
Even a beginner can cope with installing a tuned device on a VAZ 2107. The kit comes with instructions so you can carry out the work without contacting specialists. To carry out work on upgrading the tidy on the seven, you will need a minimum set of tools, in particular a screwdriver.
The principle of tuning the tidy is to perform the following manipulations:
- Dismantling with disconnecting connectors. When disconnecting connectors, it is recommended to make appropriate marks so as not to make a mistake when connecting.
- Install new hands and scales from the purchased set.
- Reinstall the tidy.
This option is simple, but it is not always popular. This is due to the fact that only the sticker is installed, that is, the design changes, but the backlight remains the same. This simple upgrade can be complemented by installing LED lighting. We will consider in detail how to do this in the material.
Self-production of arrows and instrument stickers
Buying ready-made arrows and stickers for the dashboard of a VAZ 2107 is the easiest way of tuning. A more difficult option is to develop your own custom sticker design. The result will be a truly unique tidy on the seven. Making stickers yourself is a more labor-intensive method, and if you decide to use it, then you will need to make templates for implementation. Using these templates, cut out and draw stickers. As practice shows, it is much easier to buy ready-made stickers and, if necessary, upgrade them.
If you have difficulty making scales yourself, there are many options for ready-made templates on the Internet. They can not only be downloaded to your computer, but also, if necessary, modified in graphic editors. After the scales are ready for printing, all that remains is to print them in a professional photo center. Install printed stickers on the dashboard yourself.
The development of the original design of the dashboard can be entrusted to the designer, which will ultimately result in a truly unique design of the tidy. Arrows can also be purchased from foreign cars, but for this it is important to take into account the fastening, which must be suitable in diameter. Knowing how to make overlays for a VAZ 2107 panel, you should get down to business.
It is important! When removing the indicator arrows from the instrument panel, you must first make marks on the back side. This will eliminate the possibility that they will show incorrect values after assembly.
Installation of LED lighting for VAZ 2107 devices
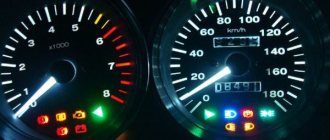
The seven's instrument panel can be upgraded by replacing the backlight. You can also do this yourself by replacing the standard light bulbs with LEDs. Moreover, you can not only replace the standard lamps with LEDs in the design of the shield, but also install additional LEDs. It is important not to overdo it here, otherwise the tidy will look like a Christmas tree. The backlight should not be bright, otherwise it will dazzle the driver, which will lead to decreased attentiveness and rapid eye fatigue.
Self-production of arrows and instrument stickers
Tuning the VAZ-2107 torpedo can be done using homemade elements: arrows and stickers. Such things are bought on the shelves of specialized retail outlets, or made with your own hands according to individual designer patterns. The last option is a little more difficult to implement and guarantees a greater percentage of uniqueness of the design.
When replacing arrows and stickers, you should pay attention to such nuances as:
- Before installing a new scale, the surface to be treated should be cleaned and degreased;
- When setting the arrows, watch your movements: these are very fragile elements that are damaged even from weak mechanical influences;
- You should pay close attention to the correct installation of the arrows: incorrect installation will lead to the instruments visually displaying erroneous values.
Please note: the arrows can be easily removed using pliers. When pulling out the element, try to move carefully so as not to bend the fastening axis.
What is tuning and how is it useful?
Car tuning (from English tuning - setting, adjustment) is a modification, technical improvement of a car, making changes to the factory characteristics in order to improve its characteristics. In simple words, tuning is a modification of a car to suit individual needs and tastes.
Almost everything in the car is subject to tuning: engine, transmission, suspension, wheels, brakes, seats, steering wheel, dashboard, lights, headlights, bumpers, mirrors and much more.
Tuning the appearance of a car (painting it in unusual colors, installing cast or forged wheels, stickers, airbrushing, tinting windows, installing spoilers, changing headlights, etc.) is also called styling, as it allows you to create an individual style for the car, making it stand out in traffic.
According to my observations on the city streets, “classics” are often subject to tuning of both external elements and the interior. There were “sevens” that were almost as good as modern foreign cars in terms of comfort: with air conditioning, electric windows, powerful acoustics, comfortable seats, and beautiful dashboard lighting. I believe that tuning offers almost unlimited possibilities that are worth using; it gives a second life to an old but beloved car.
Do-it-yourself panel modernization
Installing dashboard lights
The main aspect in upgrading your own car with your own hands is efficiency. Absolutely every motorist sincerely wants his car to have a spectacular and original look. It may seem strange, but in most cases the most beloved part for car owners is considered to be the instrument panel. It is subject to the most daring design ideas, so it can be modified in every possible way or completely changed. A combination of different parts can bring the desired result.
First you need to stock up on the necessary material. Replacing an instrument panel for a VAZ requires careful dismantling of the entire device
When removing the glass from the speedometer, it is very important not to scratch it. Next you need to remove the index arrows
It is better to replace the standard tab with a new one. LED strips are a good choice for new lighting bulbs.
Tuning the interior of the VAZ 2107
Probably every owner of the “Seven” has ever thought about tuning his car. VAZ 2107 is the last model in the series of VAZ “classics”, discontinued relatively recently - in 2012. And now more than a million Russians continue to use it. The level of comfort of the “Seven” does not reach modern cars, which is why there is a desire to improve it. VAZ 2107 , like other “classic” models, is one of the most tuned Russian cars due to its outdated design and lack of many modern amenities.
Tuning the engine, suspension and other hardware is useful for those who want to turn their car into a racing car, or simply like to accelerate well on the track. In principle, the VAZ 2107 has a reliable engine, the power of which is sufficient for normal trips in city mode or on the highway. More attention should be paid to the interior, because the comfort of the driver and passenger directly depends on the quality of its design.
My brother drove a VAZ 2107 for 5 years. A classic “seven” with classic shortcomings: dim dashboard lighting, sticking window lift, freezing door handles in winter, creaky seats. For some reason, thoughts about tuning did not occur to me at that time, but it’s a pity, the car could have been made much more comfortable and interesting.
What applies to tuning the interior of a VAZ 2107
Interior tuning is making changes to its elements: seats, doors, ceiling, steering wheel, dashboard, power windows, etc. It may consist of:
- replacing elements with more comfortable ones;
- reupholstery with special materials (leather, velor, etc.);
- connecting additional functions not provided by the factory - electric windows, heated seats, air conditioning, heated windows, instrument panel lighting, sound insulation.
There are many options for tuning the interior, so you can make the interior of the car look the way you really want.
Photo gallery: examples of the tuned interior of the “Seven”
Introduction
The domestic VAZ-2107 is in many ways inferior to its foreign counterparts; many car enthusiasts complain about the too simple interior decoration, which does not have original features. However, competent tuning of the VAZ-2107 torpedo allows you to transform the vehicle beyond recognition, raising the level of previous parts to standard elements of expensive foreign cars. Due to its simplicity and classic design, the dashboard can be modified by the owner as much and as desired. Let's consider the main points of improvements to the torpedo and beard of the domestic VAZ-2107.
Torpedo tuning
The “Seven” is known for its interior, which is very modest by modern standards. Therefore, VAZ 2107 owners change the internal structure of the car in various ways, trying to make it stylish and ergonomic.
The dashboard (colloquially referred to as a dashboard or dashboard) is the part of the car that both the driver and passengers see most often, so it is the part that receives the most attention when tuning the car’s interior.
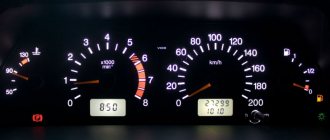
The dashboard of a car is a set of arrows and light indicators that allow the driver to monitor the technical condition of the car, control the performance of devices and systems, as well as the speed of movement.
The standard “seven” torpedo looks quite simple and mean. In addition, it has a serious drawback - very weak backlighting, which is why at night the driver has to be distracted from the road, looking closely at the numbers. This is extremely unsafe when driving on the highway at high speed.
Directions for improving the “Seven” torpedo could be as follows:
- purchasing tuned elements and installing them instead of standard ones;
- introduction of additional mechanisms and systems (thermometer, parking sensors, on-board computer, etc.);
- independent installation of instrument scales, lighting, etc. - both “native” and from other car models.
Adding new devices
Another important point when tuning the VAZ 2107 instrument panel is the installation of additional indicators. This could be, for example, indicators of fuel consumption per unit of time, on-board computer, temperature and light sensors, and so on. In fact, there are many options. The most important thing is that all this fits organically into your overall design. If you don’t want to do all this work yourself, you can contact a tuning studio. Here you will be offered a lot of interesting options. But of course, in this case there can be no talk of any savings.
On the other hand, if you doubt your abilities, then this is the only option to transform the dashboard of your car. Experts will help you realize your fantasies, or offer one of the options that, in their opinion, is best suited for your VAZ 2107.
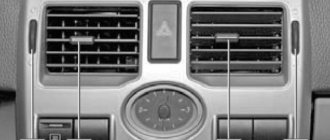
Replacing the beard
Between the passenger and driver's seats of the "seven" there is a console where various equipment is located (radio, clock, cigarette lighter socket). This part of the panel is briefly and figuratively called the beard. Car owners pay increased attention to this element, increasing its originality, visual appeal and functionality.
Improving the “seven” beard involves the introduction of various mechanisms and elements:
- radios with improved characteristics;
- backlight buttons;
- hours;
- switches for low and high beams, side lights;
- electric fan control buttons;
- USB connectors for connecting additional devices;
- devices for monitoring the operation of the electrical network;
- storage places for small items, usually placed below near the gearshift lever.
In addition, the panel is covered with trim from various materials, which performs a decorative function, improving the classic interior of the car.
Typically, tuning a “beard” is the manufacture and installation of a new console with provided cells for securing switches, indicators and covering it with decorative finishing materials. The simplest and most affordable material is plywood with a thickness of 6 mm or more. For decorative finishing, artificial leather or carbon fiber of the selected color is traditionally used. Replacing the “beard” can be combined with the trim of the doors, ceiling and dashboard.
To make a tuned VAZ 2107 “beard” you will need the following tools:
- electric jigsaw;
- screwdriver;
- Bulgarian;
- locksmith tools;
- pencil or marker;
- ruler or tape measure;
- glue;
- furniture stapler.
The work is performed in the following order:
- Dismantle the old beard.
The tuned “beard” differs from the standard one in its excellent ergonomics, economical use of space and stylish design.
Video: making your own “beard” for the “seven”
How to create a beard: step-by-step instructions
Creating a beard with your own hands is a rather difficult task that must be performed with extreme precision. After making the frame, you can create bars and then insert them into the designated place. Once their installation is completed, you can begin tightening the frame using self-tapping screws. Since we are creating a VAZ beard with an armrest, it is recommended to steam the plywood in hot boiled water before starting work. This will allow you to achieve better ductility of the material during processing. Steaming the plywood will also make it possible to solve the problem associated with the transition to a narrower part between the front seats and a wider one where the radio is located. As soon as the entire tuning structure is ready, it must be dried. This process usually takes about two days.
Next, the owner must create a bent plywood insert with his own hands, in which there is a small hole. It is used to create free space for placing a lever. The workpiece will have to be boiled to give it the desired shape. Some VAZ owners use a simple kitchen sink wall. Once the part is processed, the element will have to be completely dried.
Tuning seats VAZ 2107
Unlike earlier VAZ Seven models, the factory was equipped with anatomically shaped seats and headrests connected to the backrest. The front seats of the VAZ 2107 are quite fragile and quickly fail - the frame breaks, the backrests warp, and the upholstery wears off.
On our “seven” the seats were exactly like this: wobbly and creaky. The adjustment mechanism also constantly jammed - before adjusting it to suit you, you had to spend a lot of effort.
The easiest way to tune seats is to install covers. Covers for VAZs are sold in almost any auto store; custom-tailoring is also possible.
Seat trim for VAZ 2107
After upholstering the seats, the interior of the car becomes very attractive. For this you can use:
Natural leather is undoubtedly the most durable. But as you know, this is a very expensive material, and in hot weather it is uncomfortable to sit on leather seats. The most budget-friendly and fairly reliable upholstery is made from Alcantara and velor. Therefore, these materials are most widely used among car enthusiasts.
Based on the purpose of tuning and financial capabilities, you can do a complete reupholstery of the interior, including the ceiling, door trim, sun visors, steering wheel, and dashboard.
After you decide on the type of material, you need to choose its color. Traditionally, seat upholstery is made in the same color as the interior upholstery, but a harmonious combination of different shades can make the car interior more original and attractive.
Video: self-upholstery of VAZ 2107 seats
Changing seat mountings
When installing non-original seats on the “seven”, a situation may arise that the seats do not fit the mounts. In this case, you will have to resort to welding.
Experts believe that any seats that fit the dimensions can be installed on the “seven”. However, changing their mounting is a very labor-intensive job, so if possible, it is better to choose seats that do not require welding for installation.
Anyone who has ever driven a classic remembers well and knows which seats are in the front. In my case, taking into account the fact that the car is 20 years old, the seats have become unsuitable for use. After some thought, I decided to take a more complicated and expensive route, namely installing seats from a used foreign car. In general, I ended up taking it from the Passat, but only the front ones. In general, when I bought the chairs, I basically knew that the fastenings of the vv and the vase were different and very, very different. As you already understood, there were problems with this. We thought for a long time about how to get out of the situation and came to the conclusion that we needed to make some kind of swap of the sleds from the old chairs with new seats. In general, we started by completely cutting off the stand, the one near the tunnel, and making a new one in order to achieve the same level as the one near the door. When I brought them to the chairs, there were ears for fastening wheels for the sled, but they were too long (to be installed to the floor) and I had to cut them off and sacrifice the driver’s seat elevator mechanism. It’s unpleasant, of course, but what can you do?
RyslanZinchenko
https://www.drive2.ru/c/288230376152277729/
Installation of seats from another car on a VAZ 2107
Seat covers are a great tuning option, but if they are already loose, they will have to be replaced. On the “seven” you can install both new original seats and seats from foreign cars. Seats from a 1996 Mercedes W210 and a 1993 Toyota Corolla are suitable. Seats from SKODA and Fiat are suitable, but to install them you will need to make two additional holes.
In addition to the above, Peugeot and Nissan seats are used, but they do not match and require modification of the fastening. The seats from Volkswagen fit almost without modifications, but they are too high for the VAZ 2107, therefore, despite the increased comfort, installing them is not recommended.
Replacing seats is considered a change to the design of the vehicle and, in accordance with Russian legislation, requires mandatory registration with the State Traffic Safety Inspectorate.
The most common reasons for dismantling
There are a lot of reasons for removing the tidy on a VAZ 2107, and some of them can be called banal, but nothing can be done. The most common reason when you need to remove the instrument panel is a burnt-out backlight bulb. Replacing light bulbs in the dashboard of a VAZ 2107 is carried out only when dismantling the device, and this procedure is simply impossible to perform otherwise.
The dashboard on the VAZ 2107 must also be removed for a number of the following reasons:
- Malfunction of pointer indicators.
- Failure of the instrument lighting, as well as lack of functionality of the arrow indicators.
- Replacing the device with a new one, for example, if a digital panel is installed instead of the factory instrument panel.
- Tuning or upgrading the device.
As practice shows, most often the need to dismantle the dashboard arises precisely because the backlight bulb burns out. If the device is dismantled for this reason, it is recommended to immediately replace conventional light bulbs with LED ones.
We recommend: Replacing rear brakes with disc brakes on a VAZ 2107
Required Tools
Before starting work, you will need to prepare the necessary tools so that you do not have to be distracted during the process. Despite the fact that the work of removing the device in question is quite labor-intensive, to implement it you will need a small set of tools, including:
- Phillips and slotted screwdriver.
- Electrical tape to indicate chips that are disconnected from the device.
- Work gloves for unscrewing the speedometer cable.
When all the tools are prepared, it remains to make sure that the parts and elements that are planned to be installed or replaced on the dismantled device are available. After this, we proceed to perform the main part of the work.
Instructions for removing the dashboard on a VAZ 2107
Initially, it should be noted that the process of dismantling the tidy on VAZ 2107 cars, the injector and carburetor are identical, therefore the instructions described below are appropriate for sevens of all years of manufacture. Having prepared to carry out the work, you can proceed by following the following sequence:
- First you need to turn off the power to the car, for which you remove the negative terminal from the battery. This must be done, since the work will be carried out in the electrical part, and the likelihood of a short circuit occurring is quite high.
- Next, we move into the interior, and using a slotted screwdriver, we remove three caps from the levers responsible for the operation of the heater.
- Using a slotted screwdriver, remove the plastic plug on which the heating sign is depicted. This plug is on the right, and under it there is a Phillips screw that needs to be unscrewed. (There are 2 screws under the plug, but only one needs to be unscrewed - the top one, which secures the right side of the dashboard).
- Next to the hazard warning button, there is an odometer reset button, which is secured with a plastic nut. The nut must be unscrewed and removed with the washer located behind it. The button is recessed inside the panel.
- The right side of the tidy is weakened at this stage, and it remains to perform several additional manipulations in order to completely dismantle the device. To do this, pull out the right side of the device, thereby freeing access to its rear part. Here you need to disconnect all the chips and wires to perform dismantling.
- Initially, the power chips for the stove button are disconnected. Be sure to remember the location of the wires. It is recommended to take photos so as not to be confused when assembly is carried out.
- Next you need to disconnect the speedometer cable. It is secured with a special nut, which can be unscrewed by hand.
- All chips connected to the dashboard are disconnected. It is almost impossible to confuse their locations, since they have different fastenings and differ in size.
- The supply hose is removed from the economizer fitting. This cable is located on the left side of the device.
- After all the chips, cables and wires are disconnected from the device, you can dismantle it.
Steering wheel improvement
The steering wheel is the main control element of the car, so it must be comfortable to operate and suitable in size. In the VAZ 2107, the main disadvantage of the steering wheel is its large size, which slows down the steering speed and impairs maneuverability.
I got behind the wheel of my brother’s “Seven” several times when I was studying at a driving school, and there was a catastrophic lack of lessons with an instructor. In my opinion, the steering wheel is really uncomfortable. It is large, but the rim is quite thin, and it is uncomfortable to hold. And it is not located very well - in the turning position it noticeably covers the dashboard and, unfortunately, is not adjustable. Our steering wheel also had a feature - either constructive, or the wheel alignment was poorly adjusted - the car drives straight not with the steering wheel in a straight position, but with the steering wheel turned slightly to the right.
The easiest type of tuning that will help cope with external defects of the steering wheel, for example, abrasions, is to install a braid on its rim. It also makes control more convenient, since your hands will no longer slide on the steering wheel.
To replace the steering wheel, the old steering wheel must be removed. Car stores sell sports steering wheels for the VAZ 2107. You can also install a steering wheel from a foreign car on the “Seven”, but not from just any car; it must fit the mounts. Alternatively, you can go to an auto-disassembly shop with your steering wheel and choose the right one there.
A more technically complex tuning option is to install hydraulic or electric power steering.
Torpedo from BMW E30
I walked and wandered around and bought a lot of spare parts and a new resonator and muffler. Such tuning can be done in two ways: Replacing the dashboard; Replacement of the entire torpedo. The first option will allow you to get by with little expense and replace the panel with another one that suits you more. You just have to adjust the socket a little in size. It is somewhat more difficult to install a new panel. At the same time, it must be suitable in size and provide the ability to connect all vehicle systems.
The final choice depends on your ultimate goals and capabilities. Dashboard Let's start with the simplest tuning option. A donor will have to be found for a replacement. The simplest option would be to install a panel from a VAZ. There will be a minimum of problems with this work, and the resulting design will look much more advantageous. You will have almost no problems connecting wires. Here they are almost identical. All main devices are also connected in the same way.
Then the handle is removed from the mileage reset button.
VAZ 2107 dashboard reupholstery
On the right side of these levers, the decorative plug is removed. Using a Phillips screwdriver, unscrew the self-tapping screw that holds the VAZ torpedo. The next step is to disconnect the speedometer drive cable from it.
To do this, unscrew the knurled nut. Next, the vacuum supply hose and the bags with wires, which are initially marked, are disconnected. If necessary, repair work is carried out, including replacing the light bulbs of the main devices.
The procedure is carried out by scrolling the cartridge counterclockwise. Dismantling work involves unscrewing the nut securing the holders to the torpedo body.
Dismantling an old torpedo If we talk about which car the panel fits the VAZ from, then auto mechanics recommend installing a torpedo from a BMW or Volga
Tuning the gear knob
The gear shift lever is used to control the movement of a car with a manual transmission. This device is like a connecting link between the engine and the wheels.
To avoid rattling and vibration of the gearshift lever, instead of the installed bushings and rubber bands, insert a piece of hose of suitable diameter.
Additionally, you can make it easier to control the gears by reducing the length of the handle. To do this, the lever is removed, about 5 cm in length is cut from it with a hacksaw and the same thread is cut at the end.
When installing a gearshift lever from foreign cars on a VAZ 2107, it is important to make sure that it can be securely fastened, otherwise an incorrectly mounted mechanism can lead to an emergency. Proper tuning of the gear shift lever will increase the comfort and safety of driving.
Tuning the interior of a VAZ 2107 is an almost limitless topic. The main directions for improving the interior of the “Seven”: tuning the front panel (torpedo), instrument panel, center console (“beard”), seats, steering wheel, gearshift lever, as well as installing acoustics. By tuning the interior, you will make your favorite car not only individual and original, but also truly comfortable.
Source
Installation highlights
Before deciding which panel you can install, you should take into account that the original VAZ 2107 torpedo can be returned at any time. If such a procedure is carried out independently, it is recommended to use a book on repairing classics. It will take a lot of time to complete the work.
When connecting the wires, you need to remember that one goes to ground, and the second goes to the panel to the corresponding contact. It is recommended to label which connector goes where. To operate the speedometer, a speed sensor from model 2110 with 6 pulses is installed. If the “seven” is equipped with an econometer, it is recommended to install a tee from 2106 on 2 sensors, including a pressure sensor from engine 402.
The panel from the BVM is also suitable for the VAZ 2107 torpedo. But not all car enthusiasts know which model. It is recommended to use a BMW E30 torpedo with some modifications. You will need to install front electric windows. This is due to the fact that with this panel the handles will interfere with closing the doors. Since the gear knob in the standard position is not suitable for use with this torpedo, you will have to bend the gear lever. The stove also requires some changes.
Auto mechanics know everything about the specifics of the work ahead. For example, the torpedo from this BMW model is slightly wider, but when installing it there is no need to make major changes.
The advantages of the new panel include:
- larger parameters - the length of the hood has increased by 10 cm,
- the height of the car increased by 5 cm,
- about 20 liters added. pp., of which 5 l. With. within 2 days it takes new caps on the disks.
Particular attention should be paid to fastening. Small screws are used for this. The nuances of the work also include installing the steering column cover - it will need to be trimmed. Some VAZ 2107 car owners trim the dashboard itself, but adjusting the casing to the required dimensions is much easier. This must be done carefully.