Many modifications are made to a car to attract the attention of others. Most often these are cosmetic changes, but there is one functional upgrade that is popular among car tuning enthusiasts. It allows the driver not only to express himself to others, but also to improve the power characteristics of the car. We are talking about installing a direct-flow muffler, which is commonly called a direct-flow muffler. In this article, we will look at how to install direct flow on a car, as well as what pros and cons it brings.
Exhaust system of injection engine of VAZ 2108, 2109, 21099 cars
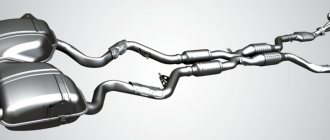
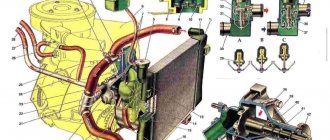
The exhaust gas exhaust system of the injection engine of VAZ 2108, 2109, 21099 cars consists of several parts: an exhaust manifold on the engine, a muffler exhaust pipe, an exhaust gas catalytic converter (ECM for EURO-2 standards), an additional muffler, and a main muffler. Some vehicles equipped with a CO potentiometer may not have a catalytic converter.
Features of the exhaust gas exhaust system of the injection engine of VAZ 2108, 2109, 21099 cars
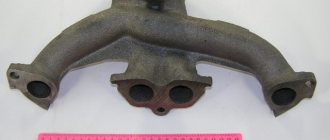
The exhaust manifold is made of cast iron and is attached to the engine block head on six studs, through a gasket consisting of two symmetrical parts.
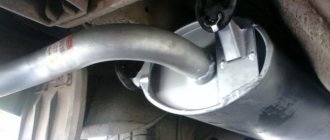
The exhaust manifold flange is connected to the exhaust pipe flange with four studs and nuts. A heat-resistant metal-asbestos gasket is installed between the flanges. The receiving pipe has a flange with two holes, two pipes and a gas receiver. An ECM oxygen sensor is installed on the exhaust pipe gas receiver. The mounting of the exhaust pipe and catalytic converter is hinged to reduce the transmission of vibrations to the body. The mobility and tightness of the connection is ensured by two springs installed under the coupling bolts instead of washers and a metal-graphite sealing ring with a spherical outer surface.
The catalytic converter has a flange with a concave spherical surface on the side of the connection with the exhaust pipe, and a flange with a convex spherical surface on the side of the additional muffler. A thermal protective metal screen is installed above the neutralizer. The connection between the neutralizer and the additional muffler is fixed.
An additional muffler (resonator) consists of a housing with a perforated pipe and partitions inside. The pipes of the additional muffler also have a flange on the neutralizer side, and a flared edge on the main muffler side. The outside of the optional muffler can be treated with aluminum to improve corrosion resistance.
The main muffler also consists of a housing with perforated pipes and partitions inside. The housing can be made of stainless steel to prevent corrosion. Two pipes are attached to the muffler body: on one side, flared, for connection with an additional muffler, on the other side, straight, for exhaust gases. The connection to the additional muffler is made through a metal ring and a two-piece clamp.
Both mufflers do not have welding points and are assembled by rolling parts to prevent corrosion.
Diagram of the exhaust system of the injection engine of VAZ 2108, 2109, 21099 cars
Notes and additions
— On VAZ 2108, 2109, 21099 cars without a catalytic converter, the exhaust pipe had a socket instead of a flange for connection with an additional muffler, the pipe of which also had a socket (flared edge). The connection was made through a metal ring and a two-piece clamp.
Source
How to make a forward flow with your own hands
A good direct-flow system produced by sports car manufacturers costs serious money, and the desire to make a direct-flow system yourself is quite understandable.
If you look at such accessories in detail, you will notice that they are a standard exhaust outlet with a modified design - smoothed bends and a small number of welds. Due to this structure of the exhaust system, it becomes easier for the car to cope with the emission of exhaust gases into the atmosphere. Making a forward flow with your own hands is not as difficult as installing it on a car, but you should understand that such interference in the design of the car has its own effect on different models. Most often, a homemade direct-flow system is installed on “weekend cars” that were purchased in order to conduct various experiments on them.
To make a direct flow yourself, you will need: a metal pipe with a wall thickness of at least 3 millimeters, a welding machine, a drill, a grinder (for cutting metal), stainless steel (metal sponges for washing dishes are most often used - about 50 pieces).
The process of self-production of direct flow is as follows:
- It is necessary to remove the installed muffler from the car and open the resonator. To do this, take a grinder and make a hole along the entire length of the resonator, and then spread the metal sheets to the sides, as if opening a tin can;
- After this, you will see all the insides of the resonator, which consists of two parts of a pipe and several stiffeners. All this has to be cut out of the resonator “to zero” so that its metal shell remains directly. The most convenient way to cut is with a grinder, but be prepared for the fact that it will take a lot of time. When removing pieces of pipes, leave 3-4 centimeters on each side to make it easier to weld modified exhaust options later;
- Next, we take a pipe of the same diameter as the pipes remaining sticking out in the resonator on both sides. We cut it so that it is long enough to be installed in the resonator between the cut pieces and welded using a welding machine. It is important to remember the rule here: “Measure twice, cut once.” If you change it incorrectly and the cut pipe size turns out to be shorter in length than necessary, you will have to cut a new piece - it is prohibited to fold this part from several pieces of pipe;
- When the pipe of the required length is cut, we must begin to modernize it. To do this, take a small diameter drill and make a lot of holes in this piece of pipe. At the same time, leave 3-4 centimeters of pipe on each side so that reliable welding can be ensured. If your drill cannot handle the pipe, you can use a grinder and make many cuts on the pipe every 1.5-2 centimeters.
- After this, it is necessary to weld the holey piece of pipe onto the parts of the pipes that remain sticking out in the resonator;
- When the piece of pipe is securely welded, it is necessary to fill the entire resonator with mesh stainless steel. To do this, take 50 purchased metal dishwashing sponges and start placing them in the resonator, filling all the free space.
Attention: some sponges may come with improvised “hooks” made of paper, plastic or fabric. Such elements must be removed from the metal before placing it in the resonator.
- Next, close the resonator and weld the lid securely;
- At this point, creating a direct flow with your own hands can be considered complete. All that remains is to install the car muffler in place.
Design Features
All domestic cars have approximately the same exhaust system. This greatly simplifies the issue of self-repair without the involvement of specialists.
The exhaust system (ES) includes several main components.
System element
A special probe is placed inside this pipe. This device studies the composition of exhaust gases, controls and analyzes the composition of the mixture that goes into the cylinder block
This is the very element of the system that allows you to minimize the harmfulness of gases escaping from the aircraft.
It is mounted to the catalyst using a special clamp. The purpose of the additional muffler is to absorb the main noise, so the sound at the exit from the pipe is insignificant
The same component that peeks out from under the rear bumper of your car. It connects to the additional muffler with a clamp
Main components and fasteners
The entire exhaust system of the VAZ 2109 car is in a suspended state and is held in place by the presence of rubber mounting hangers. The hangers, in turn, are screwed to the bottom of the car.
Popular faults
The exhaust system itself, together with the muffler, is quite reliable and durable due to its simple design.
Frankly speaking, there is nothing to break if you compare the aircraft with the engine, fuel, oil system, and so on.
The most common and unpleasant situation that can happen to an aircraft on a VAZ 2109 is a broken muffler. This is due to the quality of our roads, or rather to their absence.
Smell of gas
If you smell gas inside the car while driving, it may be a sign of problems with the exhaust system. This usually happens when one of the exhaust pipes or tubes is damaged and begins to leak. When this happens, gasoline vapors escape through the crack. Sometimes this leak may be located inside your car.
These are just a few common signs to understand if your car has problems with the exhaust system. If you notice at least one of them or it seems to you that there is something wrong with the exhaust system, then experts recommend contacting a service to determine the causes of the malfunction and further repairs.
Source
Repair methods
Often traveling along our “magnificent” roads, you now and then run over all kinds of bumps, potholes, and holes. If, after passing another similar obstacle, the car begins to make noticeable noise, which was not the case before, then the most likely outcome is a hole in the main muffler. The presence of a hole does not allow you to work calmly, quietly and efficiently as before.
The law of the Russian Federation states that it is prohibited to operate a car with a broken muffler. Therefore, the only correct solution would be to repair the unit.
There are two ways to repair the main muffler:
- Replace with a new one. Practical, easy and fast. You can do this kind of work with your own hands without any problems.
- Fill the hole. This option is suitable only if the hole can be welded given its size, and you also have experience in welding. It is better to entrust welding to professionals.
Catalyst
Replacing the catalyst on the “nine” is an impractical operation due to the cost. It is much cheaper to replace this element with a flame arrester. The exhaust system of the VAZ-2109 (injector, 8 valves) will not change its characteristics, and the exhaust will remain quiet. The only thing that will change is the toxicity of the gases. The exhaust will be more pungent. So what does it take? First, the catalyst itself is removed. To do this, you will again need a set of keys and an inspection hole. After unscrewing all the fasteners, the part is taken out. A flame arrester is installed in its place. A ready-made flame arrester is ideal in size. There are a lot of these sold in stores.
Exhaust system of carburetor VAZ 21099
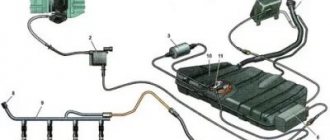
In addition to the exhaust manifold installed on the cylinder head, it consists of three main elements (see figure below):
- exhaust pipe 3;
- additional muffler (“resonator”) 6;
- muffler 7.
To attach parts to the body, there are hooks on the muffler and resonator, by which these parts are suspended from the bottom through rubber pads 5.
To ensure that the receiving pipe flange does not experience overloads when oscillating in motion, there is a receiving pipe bracket 1 attached to the block.
Between the flange and the manifold there is a sealing metal-asbestos gasket 2; connections of pipes whose ends are flared are made using special clamps 4 with metal rings:
The car muffler has failed, what to do?
There are situations when the muffler burns out or even falls off. In this case there are two options:
- The VAZ 2109 muffler is being replaced;
- old one is being repaired.
General view of the exhaust gas removal system
Positions: 1- exhaust pipe; 2 – resonator; 3 – main muffler.
Installing a new muffler
The work is carried out on an overpass or inspection pit. Before replacing elements of the exhaust gas exhaust system, it is necessary to secure the vehicle with thrust bars, placing them under the rear wheels. To replace the muffler you will need:
- new muffler;
- liquid for removing scale on connecting fasteners WD40;
- keys for “13” - two pieces;
- extension for key.
The order in which the muffler is replaced on a VAZ 2109:
- Unscrew the nuts securing the muffler pipe clamp to the resonator pipe.
- The clamp is removed.
- The pipe is disconnected and the sealing ring is removed.
- The rubber suspension cushions are removed. To do this, the muffler must be raised.
- The muffler is lowered to the ground and pulled out from under the car.
- The new muffler is installed in the reverse order in which the old muffler was removed.
Tip: When installing a new muffler, it is best to replace the o-rings with new ones. This will ensure a tight connection.
How to replace the muffler yourself can be clearly seen in the video.
Installing a new resonator
- The resonator pipe is disconnected from the receiving pipe after the clamp is loosened.
- It is removed from the rubber cushions when the device is lifted up.
- In the reverse order in which the old resonator was removed, a new one is installed.
- Under the bottom of the car, the nuts securing the exhaust pipe to the bracket are unscrewed. The bolts securing the bracket to the car body are unscrewed, which is then removed.
Installing a new exhaust pipe
Detaching the bracket from the body
- The exhaust pipe is freed from its attachment to the exhaust manifold.
- The exhaust pipe of the muffler is disconnected from the resonator pipe.
- The sealing ring is removed.
The design of the exhaust system of a VAZ-2109 car
It’s worth noting right away that there is nothing particularly complicated here. In fact, the exhaust system of the “nine” is very simple, without any electronic gadgets, and it can be called classic. Accordingly, if you decide to do repairs or tuning, then no unexpected problems are expected here. The exhaust system of the “nine” consists of:
- intake pipe;
- catalyst;
- additional and main mufflers;
- exhaust manifold.
Speaking about the components listed above, it is worth explaining their purpose. In particular, a lambda probe is located inside the exhaust pipe of cars with an injection engine. It analyzes the composition of the exhaust gases and at the same time the mixture going into the cylinder block. The pipe itself is connected with four studs to an exhaust manifold made of cast iron.
Thanks to the installed catalyst, the harmfulness of the exhaust emitted into the atmosphere is reduced to a minimum. And finally, mufflers. An additional one (also called a resonator) is attached to the catalyst using a special unit. It should be noted that this scheme is used on cars with injection engines. On carburetor “nines”, an additional muffler is connected to the main pipe. The only exceptions here are models sent for export. A catalyst was also installed on them. The task of the resonator is to take on the main noise. Accordingly, the output sound will no longer be as strong. And finally, the main muffler. This is what you can see by looking under the rear bumper of your car.
Possible differences in the exhaust system on injection VAZ 21099
On injection engines, the exhaust system without feedback has a device absolutely identical to the scheme described above, but cars exported were distinguished by the presence of an oxygen sensor (λ-probe) and (not always) a catalytic converter.
The owner of such a car was often unaware of such changes in the design until problems with the exhaust system appeared.
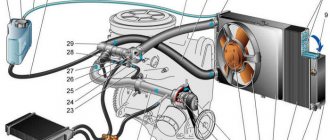
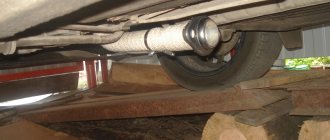
The oxygen sensor “crashes” into the exhaust pipe (Fig. above). It determines the concentration of unburned oxygen in the exhaust gases, which serves as a criterion for assessing the efficiency of combustion of the air-fuel mixture. The ECU, after processing the DC data, changes the control signal to the injectors in accordance with them, changing the amount of fuel injected.
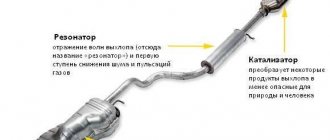
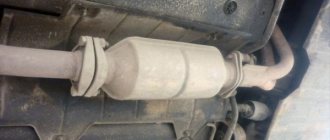
The catalyst (Fig. below) is installed after the exhaust pipe and serves to reduce exhaust toxicity by burning carbon monoxide. Unlike the resonator, it has a flange connection with the receiving pipe:
Low-quality fuel causes rapid “clogging” of the catalyst cells, which creates excessive resistance to the movement of gases and leads to loss of engine power. For this reason, many owners replace it with a simple insert into the exhaust system, or destroy and shake out the ceramic. True, after this you have to make changes to the ECU software, i.e. do a flashing.
Types of mufflers and their differences
There are 4 types of mufflers based on the method of absorbing acoustic waves:
The reflective circuit is reverse-flow, the rest are direct-flow.
Reflective
If one muffler is installed in a car, then a reflective version is used. It uses the principle of “breaking” the flow of exhaust gases by creating several partitions, expansion chambers and turns. Exhaust volume is reduced to standard levels. For this reason, the vast majority of factory vehicles are equipped with the reflective type.
most popular for factory vehicle configuration
The disadvantage of this type of muffler is the reduction in engine power due to the resistance of the exhaust system to the flow of exhaust gases.
Resonator
A resonator muffler is installed as the first stage in the exhaust system of powerful engines. It consists of a perforated pipe placed in a housing. The body is divided into two or three sections. The energy of the exhaust gases is weakened due to a stepwise reduction in pressure.
installed as the first stage of exhaust energy suppression
The part reduces the force of sound vibrations and maintains engine power with a free flow of exhaust gases.
Restrictive
In restrictive mufflers, the gas flow passes through a diaphragm or cone narrowing, which leads to a decrease in engine power. The acoustic protection of such devices is low, since the diaphragm does not interfere with the rectilinear movement of the sound wave.
Absorption
The damping function for sound vibrations in the absorption muffler is performed by a finely porous non-flammable material located in the space between the perforated pipe and the housing. The design is similar to the resonator type. This type has little effect on power reduction.
The main problems with the exhaust system of the VAZ-2109
Due to the simplicity of the design mentioned above, there is essentially nothing to break here. The main enemies of the VAZ-2109 exhaust system are low-quality fuel and bad roads. In the first case, the insides of the muffler simply burn out, resulting in the sound made by the car more like a roar. The same problem, by the way, can arise with the lambda probe. However, here the sound made by the car will not change. Often, due to a faulty ignition system, the catalyst fails. This is explained simply. Not completely burned gasoline enters the catalyst in sufficiently large quantities. Already there it burns out, sintering the ceramics.
Well, if you fall into some fairly deep hole, you may encounter a problem such as mechanical damage to the exhaust system. Often in such cases it is necessary to change one of the components. However, in most cases you can get by with welding work.
Even if you have to face the need for replacement, there is nothing particularly difficult here. It is best to do this work by driving the car onto a pit or lift. All elements are attached to the body using hangers. They are connected to each other with clamps. Therefore, dismantling the problematic unit and putting a new one in its place will not be difficult. And in this case, a minimal set of tools will be required.
The only thing I would like to warn you about is safety precautions. Before starting work, wait a while for all elements of the system to cool down. Particular attention should be paid here to the catalyst. The thing is that during operation it heats up to 600 degrees. Accordingly, the catalyst takes much longer to cool down than mufflers or the exhaust pipe.
Replacing a return flow muffler with a direct flow one with your own hands
When manufacturing a direct flow, it is advisable to use the positive properties of several types of structures.
Reasons for replacing a standard muffler with a direct-flow muffler
Car owners change the factory muffler to a direct flow one for several reasons:
- obtaining an increase in engine power;
- subjective improvement of acoustic parameters of the exhaust;
- increasing the aesthetic parameters of the car;
- complete modernization of the exhaust channel;
- The installed muffler has failed.
Tools and materials for work
A direct-flow muffler is often purchased, but for lovers of tools and an insatiable thirst for creativity, we recommend making it yourself. It is preferable to make parts from stainless steel with a thickness of 0.8–2.0 mm. Select ferrous metal blanks with a thickness of 1.0–1.5 mm for the case, the rest 2.0–4.0 mm to avoid premature burnout of parts, and also use standard blanks. For the body, use a suitable size: a fire extinguisher, a thermos, an empty gas or scuba cylinder.
To fill the muffler chamber, non-flammable porous material or a combination of them is used:
- basalt or other mineral wool;
- fine mesh metal mesh;
- metal mesh for the kitchen;
- metal shavings.
- angle grinder (grinder);
- drill or drilling machine;
- welding machine;
- consumables: metal discs for grinders, drills, electrodes, etc.
Reworking an old muffler
- We dismantle the old muffler, disassemble it using a grinder, leaving the body parts and the inlet pipe. While preserving the partitions, we drill holes in them for the passage of exhaust gases. The cameras further reduce exhaust volume.
We cut out everything that is not needed from the old muffler
We perforate the inner pipe in an accessible way. The diameter of the perforated pipe is equal to the diameter of the inlet pipe or more up to 30%.
a small number of small holes will help preserve the rich bass rumble from the engine when exhausting
Keep in mind that mineral wool fibers will be “blown out” of the chamber faster through large holes and grooves.
Stainless steel helps to increase the service life of parts and mechanisms several times
In the future, the diameter of the inner pipe can be reduced by simple manipulations, but increasing it is disproportionately more difficult.
cut the length of the pipe to the required size
We put metal mesh for the kitchen in place of the perforation of the pipe.
cover the internal perforation with fine-porous non-flammable material
Wrap the kitchen mesh tightly with metal mesh in 1-3 layers. We fix the mesh with annealed steel wire with multiple twists or crimp it with several clamps.
We enhance perforation, reducing its permeability to mineral wool
We coordinate and clean the welding points, weld the perforated pipe into its regular place.
We carry out welding in compliance with all safety rules
We fill all free space inside the muffler tightly with the selected filler.
the presence of several chambers contributes to greater functionality of the muffler
Working with mineral wool requires personal protective equipment.
the absence of a metal mesh between the holes and the wool will lead to a faster “blowing” of the wool out of the muffler
We grab the edge of the “lid” of the body with two or three tacks to avoid displacement and weld the body.
To protect against corrosion and give it an aesthetic appearance, we paint it with heat-resistant paint in your favorite color.
To make the muffler last longer, we drill one or more holes with a diameter of 1.5–2.0 mm in the housing to drain condensate. To determine the lowest point, the car must be horizontal.
Videos about the muffler
There are many videos on the Internet in which the authors inventively and simply demonstrate how to make a direct flow with their own hands.
Video: how to make a straight-through muffler with your own hands
Another clear example of making a muffler from scratch. The straight-through version is made of stainless steel with two exhaust pipes.
Self-upgrade
Before tuning a VAZ 21099 injection car, you will need to find out how this system works. Outgoing exhaust gases contribute to reduced power. This flow must be suppressed. Reducing its volume in order to quickly remove exhaust allows the chamber to be filled with air masses and fuel in the shortest possible time.
It is necessary to take into account that the more combustible mixture gets into the cylinder, the higher the power will be obtained. This reduces air resistance at any point of the muffler and other elements of the system in question. This improves engine response and reduces fuel consumption. Note that the exhaust system comes in the following types.
- Reverse flow, which increases gas resistance. They, passing through the bends of the system, lose speed, creating vortex flows and forming significant resistance.
- Direct flow, which is presented in the form of a straight pipe with wide perforation between the outlet and the inlet.
The direct-flow exhaust system is mainly subjected to auto tuning. In this case, it is necessary to replace its elements with other devices that have bends.
How to make forward flow quieter
To reduce exhaust volume, devices are used that reduce the flow area of the exhaust pipe of the muffler. Let's look at the damper and flute commonly used on cars.
Damper installation
The damper is installed either before or after the muffler. The volume of the forward exhaust will be clearly reduced only when the damper is completely closed. Technological clearances of 3-5% remain for the passage of exhaust gases - so the engine does not stall. In this regard, engine power is significantly reduced due to blockage of the exhaust system.
the damper is made by hand
A damper is also used to switch from a direct-flow to a return-flow muffler and vice versa, if necessary. In this case, a new muffler is installed parallel to the old one, and the damper is mounted in front of them. This scheme is already used on some brands of cars from the factory.
mechanical adjustment of the damper is carried out on the move by the driver from the cab
You can drive a short distance with the throttle closed, but driving constantly is unacceptable for the engine.
the damper is installed in front of the muffler
Making and installing a flute
The flute (silencer) has more preferable characteristics. It dampens the exhaust pipe clearance much less than a damper. You can buy a flute, knowing the internal diameter of the outlet pipe, or make it yourself. Various silencer designs are shown in the photo.
Flute mounting options
Possible versions of the flute.
- External - for outlet pipe diameters up to 50–60 mm.
method of attaching a flute to a small diameter exhaust pipe
a properly designed flute “helps” you ride more quietly
the sound becomes “more pleasant” to the ears of the traffic inspector
Tools and materials for making a flute
- Bulgarian;
- electric drill;
- welding machine;
- spanners.
It is better to choose blanks from stainless steel with a thickness of 0.8–1.2 mm, which guarantees long service life. Blanks made of “ferrous” metals are acceptable with a thickness of 2.0–2.5 mm or less if we plan to use the flute for short periods. As blanks we use two pieces of pipe and sheet metal for the flange.
Making a flute with your own hands
The order of work performed:
- We adjust all parts to the required dimensions. We measure the dimensions of the flange and larger pipe “on site”.
- We drill holes.
the notch divides the gas exhaust into two streams, which reduces the exhaust volume
To further relieve the exhaust system from excess exhaust gas pressure, holes are drilled in the flange.
additional holes allow for a freer exhaust
the flow of exhaust gases is suppressed due to unloading holes and counterflow
There is no need to paint stainless steel
Videos about the flute
Video: sound of exhaust through forward flow without flute
Video: sound of a flute on the same car
Basic faults
In general, the muffler and the VAZ exhaust system itself are quite reliable. In fact, there is almost nothing to break there. Therefore, the worst thing that can happen to a driver is a broken muffler, and this happens very often on our roads.
Muffler VAZ 2109
Removal and repair of the main muffler
If, after encountering a deep hole, bump or pothole, the VAZ 2109 car begins to work much louder, most likely the main muffler has been broken and an additional hole has appeared in it. Russian automobile technical regulations prohibit driving with a faulty system, so you have no choice but to undertake muffler repair.
In general, there are 2 simplest options for fixing the problem: replace the old VAZ 2109 muffler with a new one or weld it. Of course, you shouldn’t do welding yourself – you need the appropriate skills.
However, in any case, you will have to remove the muffler for replacement or repair, so let's talk about how to do it correctly.
Changing the resonator
To do this, we need a basic set of tools (open-end wrenches and heads), as well as an inspection hole. You can start repairing the VAZ-2109 exhaust system only after making sure that it has cooled down. So, we need to disconnect the resonator from the muffler on one side and the catalyst on the other. You need a socket wrench to unscrew a couple of bolts. Then we lift the resonator and disconnect it from the rubber pads. If the resonator does not budge, you need to use a flat-head screwdriver. With this we can carefully pry off the rubber suspension element. Then everything is simple - we take the part out and put a new one in its place. Assembly is carried out in reverse order.