Print this article Font size 16
The exhaust manifold is a component of the exhaust system that carries out the process of removing exhaust gases from the cylinders of the power unit into the exhaust pipe.
If the collector malfunctions, the culprit may be either the element itself or its gasket. Replacing the exhaust manifold (exhaust manifold) gasket is a common procedure when repairing a VAZ 2109.
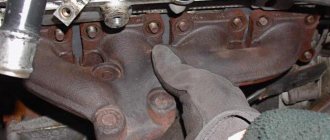
Appearance of the unit
Replacement of manifold Lada 21099 (VAZ 21099)
Burnout of the gasket under the exhaust manifold is a rather unpleasant and common malfunction on the VAZ 2109.
A product that has become unusable will allow exhaust gases from a running engine to pass under the hood, and the characteristic chattering sound when the engine is under load also does not greatly contribute to a comfortable ride. Replacing the manifold gasket on a VAZ 2109 will help avoid such problems.
The collector gasket is made from a specially compressed asbestos mixture reinforced with steel thread; it can be purchased at any spare parts store. The price of the product, depending on the manufacturer, varies from 50 to 200 rubles. For a VAZ 2109, replacing the intake manifold gasket at a car service center will cost approximately 1,500 rubles and more, not counting the cost of the gasket itself.
Causes of malfunctions
The key factor that causes 90% of exhaust manifold malfunctions on VAZ 2114 cars is high temperature and poor quality materials from which the parts are made. During operation, the steel repeatedly heats up and cools down, which leads to the appearance of cracks in the body. This is a common occurrence for VAZ cars older than 7-8 years.
Auto repair shops offer crack welding services using argon welding. However, for a number of reasons, this activity is useless for cars older than 7 years.
1) Just removing and installing the exhaust manifold will cost about 2.5 thousand rubles. Taking into account the work of the welder and other actions, the cost of repairs can be 4-5 thousand rubles. If you do the work yourself, buying a new part will cost less.
2) Welding, even argon welding, disrupts the structure of “tired” metal. A boiled part rarely lasts longer than a year, after which new holes appear. The older the car, the faster the problem returns, and the collector has to be removed again.
If the car is older than 8 years and there are problems with cracks in the manifold, it is better to remove the part and replace it with a new one.
Preliminary work
Replacing the VAZ 2109 intake manifold gasket with your own hands is not very difficult and does not require specific knowledge or expensive tools - the required set of keys is usually present in the trunk of every car enthusiast.
But before replacing, you should try to tighten the fastening of the intake unit - if the gasket is not burned out, it is the loose fastening that may cause exhaust gases to get under the hood. If tightening the fastening does not help, it means that the gasket is completely burned out and needs to be replaced. Replacing the VAZ 2109 manifold gasket will require preliminary work to dismantle the air filter, remove the carburetor and the manifold itself. All of the above work is carried out exclusively on a cold engine.
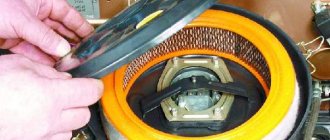
Removing the air filter with housing
On the injection engine of a VAZ 2109 car, to remove the air filter, it is enough to unscrew the four self-tapping screws securing the cover of the filter element housing - for this, use a 10mm wrench or a ratchet. There will be a filter element under the cover. If the cover is difficult to lift, you can disconnect the mass air flow sensor from the plug.
On a carbureted engine, there are three latches under the hood that can be easily opened. There is a screw in the middle of the metal cover, which can also be unscrewed by hand, after which the cover is removed. Under the cover there is a filter element that must be carefully removed. Subsequently, during reassembly, the filter element can be replaced - if the time has come or if the filter element is very dirty.
Removing the carburetor
After the air filter has been removed, you can begin to remove the carburetor. To remove the carburetor on a VAZ 2109, you will need the following tools:
- two screwdrivers - flat and Phillips;
- 13 open-end wrench;
- head at 8;
- ratchet.
Instructions for dismantling the carburetor will be as follows:
- The coolant supply hose to the carburetor starter is disconnected from the fitting by unscrewing the fastening clamps. The coolant itself is drained into a previously prepared container.
- The exhaust pipe coming from the exhaust manifold and from the cylinder block bracket is disconnected.
- Then the throttle cable bracket is disconnected. To do this, first remove one end of the spring from the throttle control rod, and then remove the entire spring, then loosen the nut on the bracket and remove the cable from its engagement.
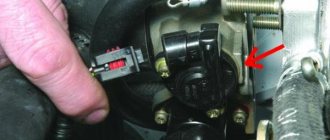
- The EPHH screw sensor is disconnected from the power plug.
- Two hoses and a vacuum tube are disconnected from the carburetor heating unit.
- The crankcase ventilation hose is removed.
- Unscrew the 4 nuts securing the carburetor to the intake manifold.
- The carburetor is removed carefully and without jerking - by lifting it from the studs.
The work of removing the carburetor is completed. The presented photos and videos will help you clearly follow the process of removing the carburetor.
Removing the intake manifold
After the work of removing the air filter and dismantling the carburetor is completed, you can begin to remove the intake unit. To do this you will need the following set of tools:
- open-end wrench 13;
- head 13 - regular and deep;
- ratchet and crank;
- ratchet with 10mm head.
The work order will be as follows:
- The platform located under the carburetor is bent back - to do this, two fastening nuts are unscrewed.
- All hoses leading to the manifold are disconnected.
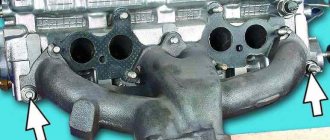
- Six mounting nuts are unscrewed from the intake manifold.
- The intake manifold is removed from the studs - to do this, it should be slightly rocked from side to side, as it can burn to the gasket.
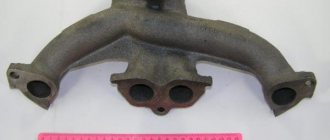
Removing the exhaust manifold
Removing the VAZ 2109 exhaust manifold will require the following tools:
- wrenches 13 - open-end and cap;
- deep head at 13;
- ratchet.
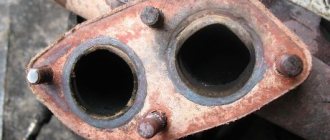
- The four nuts securing the exhaust pipe are unscrewed from the manifold.
- The “pants” are pulled off the studs and moved to the side, then the remaining three nuts securing the manifold are unscrewed.
- The exhaust manifold is carefully and without jerking removed from the studs.
When removing the collectors, a problem may arise such as sticking of the studs and nuts - since the metal is constantly heating and cooling, a souring process occurs.
To make work easier, the fastening studs can be filled with WD 40 liquid in advance, about a day before starting work. This will make it much easier to remove the manifold for subsequent gasket replacement. \
If the pin breaks off when unscrewing, you just have to drill it out, and then cut a new thread and screw on a new pin.
Tools and necessary parts
To remove the exhaust manifold on a VAZ 2114 in order to replace the gasket or entire part, you will need the following tool:
- open-end and ring wrenches for 8, 10, 13, 17;
- wrench with heads 17, 19;
- screwdrivers, pliers.
It is also a good idea to have tools such as a Dremel, nut saw or nut pick on hand. As a rule, the fasteners on the exhaust system parts stick tightly.
A few days before your planned repair, begin treating accessible nuts with WD-40 or another penetrating lubricant. Repeat the operation 2-3 times. This will make the task of removing the manifold a little easier. .
The question often arises: is it worth using a sealant after removing and replacing the gasket? Experts believe that if you apply sealant to the gasket, it should only be high-quality silicone. A bad sealant can bring a lot of trouble to a VAZ 2114 engine: when it burns out, it turns into “pellets” that are pulled into the crankcase. And this is unnecessary contamination of the piston system.
Replacing the gasket
After the preparatory work is completed - the air filter, carburetor and intake and exhaust manifold are dismantled, you can begin the main work, for which all previous steps were done - directly replacing the gasket itself.
The work order will look like this:
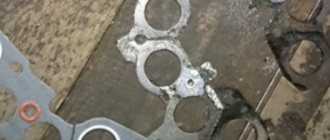
- We remove the old gasket - this can be difficult, since, most likely, it is tightly burned to the cylinder head - in this case, you need to use a thin screwdriver or knife. To make the work easier, you can use special aerosol solvents in cans, sold in auto parts stores. It is also necessary to carefully remove carbon deposits from the mating surface of the block - you can use sandpaper for this.
- The new product is installed on the exhaust manifold, then all work is done in the reverse order. Replacing the intake manifold gasket on a VAZ 2109 is carried out in a similar way.
Replacement of the exhaust manifold gasket on the VAZ 2109 has been completed. The exhaust pipe of the muffler is secured with brass nuts, preferably new ones. And don't forget to fill in the coolant that was drained when dismantling the carburetor!
How to extend gasket life
Although replacing the exhaust manifold gasket is inexpensive and can be done successfully in your own garage, who wants to waste their time on it? It's better to let it serve longer. And to extend its service life, listen to the following tips:
- monitor the condition of the cooling system, check the level of antifreeze (antifreeze) to prevent engine overheating;
- use only high-quality fuel;
- check the tightness of the connection between the cylinder head and the exhaust manifold;
- If you find that the integrity of the gasket is damaged, do not wait until it burns out completely, replace it;
- When buying an exhaust manifold gasket, choose a quality product from well-known manufacturers.
In this article we will discuss the symptoms when the exhaust manifold gasket has burned out. For an exhaust device, the gasket is one of the main parts on which the entire correctness and accuracy of the exhaust system will depend.
If the manifold seal is not replaced in a timely manner, the safety conditions for operating the vehicle are greatly reduced.
In general, a manifold is a device designed to remove exhaust gases from a car engine. The second function of the collector is to improve the filling of the working chambers and enhance the ventilation of the working space. All operation of the exhaust device is carried out at elevated temperatures and high gas pressure.
This element is attached directly to the head ( cylinder head
) and the other side is in contact with the exhaust pipe or converter. The most important task of the exhaust manifold gasket is to prevent exhaust gases from entering the valve space. These gases, in turn, can cause fire of parts or elements of the power unit.
Symptoms of a blown exhaust manifold gasket
The following can be distinguished: exhaust gases begin to flow into the car interior or their smell is felt; the car engine begins to start poorly; Strange sounds appear in the engine compartment. If these ailments are detected, you should begin to inspect the exhaust system. The collector itself is made of high-strength austenitic steel.
In this regard, burnout and replacement of the collector is quite rare. The main reason for the breakdown of the collector itself is drops of water falling on its hot surface, which leads to the formation of cracks in it.
The weak link of this durable and reliable element is the gaskets. Wear of the manifold gasket occurs mainly due to: poor quality of the material or very long operation under increased loads.
Manifold gaskets are now made from steel-reinforced, durable asbestos. However, even such a durable material is susceptible to destruction. The process of replacing the exhaust manifold gasket is not at all difficult.
Experts even recommend replacing the gasket after some time, without waiting for it to fail.
We carry out the following procedures:
- 1. Open the hood of the car;
- 2. Remove the air intake. Then remove the carburetor. Under these engine elements is the exhaust manifold;
- 3. Remove the thermal shield. It covers the collector;
- 4. Unscrew two nuts on each cylinder that secure the manifold;
- 5. Unscrew a couple of bolts from the exhaust pipe;
- 6. Remove the manifold;
- 7. There should be an old gasket or remains of it on the cylinder head;
- 8. We clear all the space for a new gasket;
- 9. Clean everything until it shines;
- 10. After cleaning, apply a graphite-based lubricant to the area;
- 11. Now install a new gasket;
- 12. Reassemble everything in reverse order.
- 1. The pressure on the turbine begins to decrease;
- 2. When driving at high speeds and under load, black smoke appears in the exhaust;
- 3. When driving on the highway, you feel increased fuel consumption;
- 4. It may start to whistle at certain speeds.
As you can see, the symptoms can significantly affect the driving characteristics of the car. Therefore, you should not delay replacing a burnt gasket. In this article, we discussed the main symptoms that the exhaust manifold gasket has burned out. I would like to add the word “may” to all the symptoms described in the article, since they may not appear, or they may appear in a slightly different way.
Symptoms that the exhaust manifold gasket has burnt out. Full list and action plan »
Care instructions
In order for the new gasket to last as long as possible, before installation it is recommended to cover the product with a layer of graphite lubricant on both sides - this will extend the service life of the material and increase the tightness, and will also help avoid burning. It is also recommended to coat the cylinder head studs with a layer of graphite lubricant.
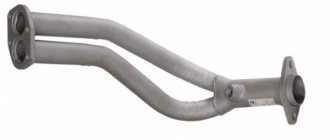
VAZ 2109 pants are replaced extremely rarely, since it is an all-metal unit. The gasket is changed more often, since the effect of hot exhaust gases on it is very strong. But to tell the truth, over the life of the car of 10-15 years, there is a possibility that the metal pipe of the VAZ 2109 pants will burn out.
And the reason is that hot gas, leaving the exhaust manifold, enters the exhaust pipe. Moreover, its metal has a relatively small thickness, and the result is the formation of cracks on its surface and the pants can simply fall off the bar. An example of such burnout is clearly visible in the photo; their service life was exactly 15 years.
How to replace VAZ 2109 pants?
It is convenient to carry out all work in a pit or overpass. If, of course, such working conditions are not provided, it is possible on the ground. To do this, you only need to remove the air filter housing. Without it it is much easier to get to the exhaust manifold.
Take a 13mm socket and a ratchet (preferably with a cardan, as some of the nuts will be difficult to unscrew). Please note that work is carried out only on a cooled engine. If you do this while it's hot, you will get injured. In addition, bronze nuts are much easier to unscrew when cold.
Online auto parts store "AvtoPasker"
The online store "AvtoPasker" is one of the largest and most convenient catalogs of auto parts for Russian-made cars, such as VAZ, GAZ, Oka, Moskvich, as well as neighboring countries - ZAZ, RAF, LuAZ. You can easily find the necessary part for your car using our catalog with illustrations and explanations. The catalog also includes a search by spare part number or name. To order auto parts, simply add the required product to your online cart - it’s very fast and convenient.
Online auto parts store "AvtoPasker" is always happy to welcome new customers
Please note the system of discounts for customers through our network of stores
Replacing the exhaust manifold and its gasket
The exhaust manifold on a VAZ 2109-2108 most often has to be removed to replace the gasket, because if it burns out, then it starts leaking in this place and the exhaust gases will go under the hood, and the sound of operation will be quite loud. In general, this problem will not lead to anything good. In order to remove the exhaust manifold, you must first perform the following steps:
After this we will need very few tools, namely:
- open-end or socket wrench 13
- head deep 13
- extension
- ratchet handle
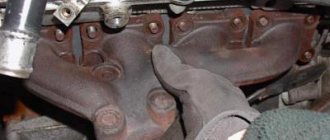
So, first you need to unscrew the 4 nuts securing the exhaust manifold to the pants (exhaust pipe), which are shown in the photo below:
And move your pants a little to the side, pulling them off their heels. Then you need to unscrew the three remaining nuts securing the manifold, since the remaining 6 were unscrewed when removing the intake manifold.
And now you can remove the VAZ 2109-2108 exhaust manifold from the studs without any problems, moving it back:
How to repair a muffler
If your car's muffler requires repair or complete replacement, it is not recommended to do this work yourself, since there is a high risk that you will only worsen the condition of the exhaust system, and possibly the entire vehicle as a whole. In order to prevent such a situation, contact only specialized car services. In our car service center, qualified specialists with the necessary competence in the field of working with exhaust systems will competently diagnose the exhaust system of your car, and, if necessary, repair or install a new muffler in the shortest possible time.
If you encounter any malfunction in the exhaust system and you need to diagnose it, repair it or replace the muffler, then our salon specialists will be happy to help you with this, since we carry out all types of this work!
Replacing the manifold gasket
If the gasket is stuck to the cylinder head, you can carefully pry it off with a knife blade or a thin screwdriver, then completely remove it from its seat:
After this, we get this rather unpleasant picture:
You can remove traces of the old gasket on the surface of the cylinder head using a special spray, applying it to the entire area and waiting for at least 15 minutes:
The remaining marks can be removed using a thin blade, and the entire surface can be finally brought into perfect condition by treating the entire surface with the finest sandpaper, the so-called zero sandpaper. As a result, we get the following result, as in the photo below:
After this, you can begin replacing the gasket by carefully placing it on the studs and installing the manifold in the reverse order of removal. If you are interested in the price of the exhaust manifold, then for VAZ 2109-2108 cars it is about 1500-1700 rubles.
Source
Basic aspects of manifold tuning
The basis of tuning is polishing inside and out. Thanks to this, you can achieve a neat and attractive appearance. This action improves performance. When the walls in the collector are smooth, gases move through it in one direction without resistance. Faster purging can improve engine cooling.
On VAZ 2109 cars, by polishing the spider, its internal diameter can be increased. Exhaust gas flow increases, as does engine efficiency. Sequence of work:
- Before removing the manifold on a VAZ 2109, you need to dismantle all attachments and disconnect the cylinder head.
- Disassemble the cylinder head, dry out the valves, remove the rocker arms and springs.
- Using the head at “6”, pull out the guides.
- Remove the inlet and outlet devices.
- Eliminate defects (if any) on the cylinder head, exhaust and intake manifold. A spider that is deformed or has obvious damage cannot be installed.
- Mill the block head by 1 mm.
- Wash the cylinder head until it shines. If the gasket is stuck to the block or cylinder head, get rid of its remains without using metal objects.
- After lubricating the valve guides, mount them in place. To work, use an “11” head and a hammer.
- Check the condition of the valves. If there are deformed ones, change them.
- Assemble the head, install rocker arms, caps, valves.
- Reinstall the intake and exhaust manifolds. The manifold gasket must be replaced; an old one cannot be installed.
- Install the cylinder head onto the block using a new gasket and bolts.
The general algorithm for carrying out the work is not very complicated, the main thing is accuracy and precision. Do not trust cylinder head milling to dubious workshops. Otherwise you will have to buy a new one.
How is the intake manifold of a VAZ 2109 replaced?
Burnout of the gasket under the exhaust manifold is a rather unpleasant and common malfunction on the VAZ 2109.
A product that has become unusable will allow exhaust gases from a running engine to pass under the hood, and the characteristic chattering sound when the engine is under load also does not greatly contribute to a comfortable ride. Replacing the manifold gasket on a VAZ 2109 will help avoid such problems.
The collector gasket is made from a specially compressed asbestos mixture reinforced with steel thread; it can be purchased at any spare parts store. The price of the product, depending on the manufacturer, varies from 50 to 200 rubles. For a VAZ 2109, replacing the intake manifold gasket at a car service center will cost approximately 1,500 rubles and more, not counting the cost of the gasket itself.
Replacing the carburetor with a system with distributed fuel injection
Carburetor cars are gradually disappearing from our lives; such cars are no longer manufactured by the industry, and their design is considered obsolete. But the question of whether a carburetor injector is better or not is still burning, and debates on this topic are often conducted on auto forums.
Each type of fuel system (FS) has its own advantages and disadvantages; the injector is a modern unit that provides a more accurate dose of fuel-air mixture. But the carburetor circuit is simple, it is easier to carry out diagnostics, and often not only specialists, but also many drivers can deal with the malfunction.
Sources
- Regulatory, legal acts Law of the Russian Federation “On the Protection of Consumer Rights” with comments to the law and sample applications for 2022 / Regulatory legal acts. - M.: AST, 2022. - 742 p.
- Victor, Vladimirovich Likharev Operational-Investigation Code of the Russian Federation. Project / Viktor Vladimirovich Likharev. - M.: Prospekt, 1993. - 168 p.
- Shastitko, A.E. Application of antimonopoly legislation in the markets of derivative goods: from determining product boundaries to advocating competition / A.E. Shastitko. - M.: Synergy, 2015. - 809 p.
- Olga, Petrovna Eppel You were detained: what to do? / Olga Petrovna Eppel. - M.: Yurayt, 2010. - 720 p.
- Sushkevich, A.G. Application of legislation on competition protection to foreign persons and organizations / A.G. Sushkevich. - M.: Synergy, 2007. - 376 p.
Preliminary work
Replacing the VAZ 2109 intake manifold gasket with your own hands is not very difficult and does not require specific knowledge or expensive tools - the required set of keys is usually present in the trunk of every car enthusiast.
But before replacing, you should try to tighten the fastening of the intake unit - if the gasket is not burned out, it is the loose fastening that may cause exhaust gases to get under the hood. If tightening the fastening does not help, it means that the gasket is completely burned out and needs to be replaced. Replacing the VAZ 2109 manifold gasket will require preliminary work to dismantle the air filter, remove the carburetor and the manifold itself. All of the above work is carried out exclusively on a cold engine.
Removing the air filter with housing
On the injection engine of a VAZ 2109 car, to remove the air filter, it is enough to unscrew the four self-tapping screws securing the cover of the filter element housing - for this, use a 10mm wrench or a ratchet. There will be a filter element under the cover. If the cover is difficult to lift, you can disconnect the mass air flow sensor from the plug.
On a carbureted engine, there are three latches under the hood that can be easily opened. There is a screw in the middle of the metal cover, which can also be unscrewed by hand, after which the cover is removed. Under the cover there is a filter element that must be carefully removed. Subsequently, during reassembly, the filter element can be replaced - if the time has come or if the filter element is very dirty.
Removing the carburetor
After the air filter has been removed, you can begin to remove the carburetor. To remove the carburetor on a VAZ 2109, you will need the following tools:
- two screwdrivers - flat and Phillips;
- 13 open-end wrench;
- head at 8;
- ratchet.
Instructions for dismantling the carburetor will be as follows:
- The coolant supply hose to the carburetor starter is disconnected from the fitting by unscrewing the fastening clamps. The coolant itself is drained into a previously prepared container.
- The exhaust pipe coming from the exhaust manifold and from the cylinder block bracket is disconnected.
- Then the throttle cable bracket is disconnected. To do this, first remove one end of the spring from the throttle control rod, and then remove the entire spring, then loosen the nut on the bracket and remove the cable from its engagement.
- The EPHH screw sensor is disconnected from the power plug.
- Two hoses and a vacuum tube are disconnected from the carburetor heating unit.
- The crankcase ventilation hose is removed.
- Unscrew the 4 nuts securing the carburetor to the intake manifold.
- The carburetor is removed carefully and without jerking - by lifting it from the studs.
The work of removing the carburetor is completed. The presented photos and videos will help you clearly follow the process of removing the carburetor.
Removing the intake manifold
After the work of removing the air filter and dismantling the carburetor is completed, you can begin to remove the intake unit. To do this you will need the following set of tools:
- open-end wrench 13;
- head 13 - regular and deep;
- ratchet and crank;
- ratchet with 10mm head.
Recommended Method
Level control technology includes a number of stages:
- We dismantle the housing of the air filter element. To do this, unscrew the fastening nut of the housing cover, unclip the latches, remove the cover, take out the filter and tighten the 4 nuts that secure the housing to the carburetor.
- Raise the body and disconnect the rubber pipes. We move the body to the side.
- Loosen the clamps securing the fuel pipes going to the carburetor and disconnect them.
- Remove the wire suitable for the idle speed solenoid valve;
- Disconnect the drive cable of the air damper (the “choke” handle);
- Unscrew the 5 screws securing the carburetor cover;
- Having removed the cover, we immediately determine the fuel level in the chambers by lowering a ruler or caliper into one of them until it stops (using its depth gauge). If the measurement shows a level of 25-26 mm, it corresponds to the norm and no adjustment is required;
If the amount of fuel in the chamber is lower or higher than normal, we perform a visual inspection and a series of measurements on the floats, and if necessary, we correct their position.
To carry out adjustment work, place the removed carburetor cover on a flat horizontal surface with the floats facing up.
First, we look at the position of the elements from above. The outer side surfaces of the floats are parallel to the special imprints on the gasket. Deviations can cause the floats to touch adjacent elements and surfaces, causing the fuel level to be incorrect. If necessary, adjust the position of the floats by bending their mounting arms. The next step is to measure the gap between the floats and the gasket. A rod with a diameter of 2 mm is useful here - this is how much the specified gap should be.
If it does not correspond, we bend the tongue of the floats, with which they act on the locking needle. After this adjustment, we check the total height of the floats, which is normally 34 mm. If this is not the case, check the gap again, adjust it if necessary and measure the height again.
The last stage of setup is determining the working stroke of the floats. To do this, place a caliper near the float, mark the distance from its lower corner to the surface of the cover, then lift the float with your hand and mark where the lower corner is.
Replacing the gasket
After the preparatory work is completed - the air filter, carburetor and intake and exhaust manifold are dismantled, you can begin the main work, for which all previous steps were done - directly replacing the gasket itself.
The work order will look like this:
- We remove the old gasket - this can be difficult, since, most likely, it is tightly burned to the cylinder head - in this case, you need to use a thin screwdriver or knife. To make the work easier, you can use special aerosol solvents in cans, sold in auto parts stores. It is also necessary to carefully remove carbon deposits from the mating surface of the block - you can use sandpaper for this.
- The new product is installed on the exhaust manifold, then all work is done in the reverse order. Replacing the intake manifold gasket on a VAZ 2109 is carried out in a similar way.
Replacement of the exhaust manifold gasket on the VAZ 2109 has been completed. The exhaust pipe of the muffler is secured with brass nuts, preferably new ones. And don't forget to fill in the coolant that was drained when dismantling the carburetor!
Preparation stages
To replace the manifold or its gasket, in any case you will have to dismantle the VK. But before you get to the element you are looking for, you will first need to go through some preparatory steps. Namely, tighten the fasteners, and then remove the air filter and carburetor if the first stage does not help.
Your actions
Often, loose manifold fastenings caused the entry of contaminants, which disrupted the performance of the exhaust system. If the tightening did not give any result, then the gasket is definitely burned out or the collector itself is damaged, which is less likely
Removing the air filter
- If the engine is fuel-injected, to remove the air filter you will need to unscrew the four fastening screws of the filter housing cover. The filter itself is located under the cover. If you have difficulty lifting the cover, disconnect the mass air flow sensor and remove the filter device.
- If you have a carburetor under the hood, then the filter and housing will be held in place by three latches. There is a screw in the center of the metal cover, which is often unscrewed by hand. Once you remove it, you can lift the lid. There is a filter underneath, which should be removed carefully. Pay attention to its condition. If the filter has been in use for quite a long time, it is recommended to replace it during reassembly.
Removing the carburetor is carried out in the following sequence:
- Disconnect the coolant supply hose to the engine starting device from the fitting. To do this, unscrew the clamps;
- Be sure to drain the coolant into a prepared container;
- Disconnect the exhaust pipe that comes from the exhaust manifold and the BC bracket;
- Disconnect the throttle cable bracket. To do this, you need to remove one end of the spring from the damper control rod, and then remove the entire spring. Now loosen the nut on the bracket, which will allow you to remove the cable from the engagement;
- Disconnect the EPH sensor from the power plug;
- Disconnect the vacuum tube and a pair of hoses from the carburetor heating unit;
- Remove the engine crankcase ventilation hose;
- Remove the four mounting nuts holding the carburetor and intake manifold;
- Remove the carburetor carefully without yanking. It must be gradually removed from the studs. Dismantling the unit
Removing and installing the fuel manifold and injectors
The Multiport Fuel Injection (MFI) system is a device controlled by the ECM. It measures the fraction of fuel under pressure in each cylinder.
The ECM provides control pulses to the fuel injector solenoid.
Fuel enters the top of the injector through the ball or valve needle and a recess in the guide plate at the injector outlet.
The guide plate has 6 holes that control the fuel flow, which creates a conical spray of fuel towards the intake valve. The atomized fuel evaporates before entering the combustion chamber.
Conclusion Attention: the fuel system is under pressure. To reduce the risk of personal injury or fire, the fuel system must be relieved of pressure before disconnecting fuel lines.
1. Release fuel pressure.
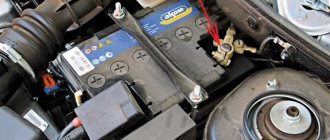
2. Disconnect the “-” battery cable.
3. Remove the fuel injector harness connectors.
4. Remove the exhaust gas recirculation valve.
5. Remove the supply line.
6. Remove the fuel manifold mounting bolts.
Before removal, the fuel manifold should be spray cleaned according to the included instructions.
Dismantling of collectors
Now comes the turn to remove the intake and exhaust manifolds. Having dismantled them, you can understand whether it is possible to get by with replacing the gasket, or whether the collectors themselves will need to be completely replaced.
The gasket is a consumable item, the purchase of which will literally cost you 50-250 rubles, depending on the manufacturer and region. Services for replacing the gasket at a service station cost more than 1,500 rubles. Add to this the cost of a high-quality gasket and you will get quite a lot of money. Such costs can be avoided if you do everything yourself.
Dismantled unit
Intake manifold
By removing the air filter and carburetor, you will gain access to the intake manifold.
To dismantle it you will need a certain set of tools:
When everything is ready, you can start working.
An exhaust manifold
To dismantle a graduate you will need:
Is everything ready? Then let's get started.
Well, the check showed that the burnt gasket was to blame. Therefore, only it will have to be changed.
Pad
Alas, to get to a simple gasket, it was necessary to remove the air filter, carburetor, exhaust, and intake manifolds. But there is no way without this.
To replace an old, used gasket, you will need:
By the way, this is a great reason to change it for a fresh one. Installing a new gasket It is up to you to ensure that the new gasket has a long service life. To do this, before installation, treat the gaskets on both sides with graphite lubricant. This way you will increase the product’s resistance to temperature changes that it regularly encounters. Similarly, coat the cylinder head studs with graphite lubricant for the same purpose.
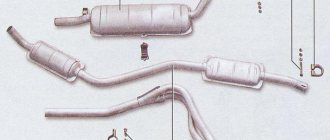
Changing the resonator
It is also advisable to replace the resonator on a VAZ 2110. This is done after changing the muffler.
New resonator for VAZ 2110
The work of replacing the resonator is performed in the following sequence:
- The resonator is secured to the muffler with a crimp clamp with an O-ring.
- It is attached to the neutralizer using a floating flange consisting of two bolts and a flare.
- On the opposite side of the element there is a so-called fist.
- Removing bolts is often quite difficult. So that you don't have to suffer, just cut them off with a grinder and buy new bolts. This is the simplest solution to the problem.
- If you couldn’t get a grinder, use a liquid key. This is a popular product among motorists - WD40 or its analogues. Treat the bolt attachment points with this compound, wait a while, after which the bolts should come off.
- After removing the bolts, remove the muffler clamp.
- Remove the resonator from the suspension rubber bands. Check the condition of the rubber bands. If they are worn out, replace them with new ones.
- Take a new resonator, secure them to rubber and connect them to the muffler so that the pipe leading to the muffler from the resonator is parallel to the ground.
- If you notice wear, burrs, or traces of rust on the neutralizer fist, be sure to coat the connection with sealant. Moreover, it must be a high-temperature sealant.
- Armed with new bolts and nuts, tighten the catalytic converter and resonator flanges.
- The neutralizer is fixed to the resonator with two bolts using a flange connection. The fastening occurs to the states, but there is a receiving pipe, using a spring-loaded connection and two flares. The space between them contains a sealing ring made of graphite or metal asbestos.
Read more: Euro 2 without removing the catalyst
Article: 2101-1008082
Order code: 041112
Thread diameter - M8 L (length) - 38 Strength class - 8.8 Note: d=25
Information used: JSC "AVTONORMAL"
- » href=»/catalog/vaz-3/legkovye_avtomobili-30/vaz_2121-13/truba_vpusknaya_i_vypusknoiy_kollektor-55/#part58671″>Stud M8x16x38Engine / Intake pipe and exhaust manifold
- » href=»/catalog/vaz-3/legkovye_avtomobili-30/vaz_2121-13/truba_vpusknaya_i_vypusknoiy_kollektor-56/#part58705″>Stud M8x16x38Engine / Intake pipe and exhaust manifold
- Passenger cars / VAZ / VAZ-21231 drawing
- » href=»/catalog/vaz-3/legkovye_avtomobili-30/vaz_2123-315/truba_vpusknaya-88/#part977346″>Stud M8x16x38Engine / Intake pipe
- Passenger cars / VAZ / VAZ-21142 drawings
- » href=»/catalog/vaz-3/legkovye_avtomobili-30/vaz_2114-647/truba_vpusknaya_i_vypusknoiy_kollektor-41/#part1669639″>Stud M8x16x38Engine / Intake pipe and exhaust manifold
- » href=»/catalog/vaz-3/legkovye_avtomobili-30/vaz_2114-647/kollektor_vypusknoiy-44/#part1669678″>Stud M8x16x38Engine / Exhaust manifold
- Passenger cars / VAZ / VAZ-212133 drawings
- » href=»/catalog/vaz-3/legkovye_avtomobili-30/vaz_21213-731/truba_vpusknaya_i_vypusknoiy_kollektor-99/#part2009868″>Stud M8x16x38Engine / Intake pipe and exhaust manifold
- » href=»/catalog/vaz-3/legkovye_avtomobili-30/vaz_21213-731/truba_vpusknaya_i_vypusknoiy_kollektor-101/#part2009903″>Stud M8x16x38Engine / Intake pipe and exhaust manifold
- » href=»/catalog/vaz-3/legkovye_avtomobili-30/vaz_21213-731/truba_vpusknaya_i_vypusknoiy_kollektor-100/#part2009889″>Stud M8x16x38Engine / Intake pipe and exhaust manifold
- Passenger cars / AZLK / Moskvich-21411 drawing
- » href=»/catalog/azlk-9/legkovye_avtomobili-30/moskvich_2141-53/vpusknaya_truba_i_vypusknoiy_kollektor-65/#part148755″>Gas pipeline mounting studEngine mod. 2106 / Intake pipe and exhaust manifold
- Passenger cars / IZH / IZH 2126 with VAZ1 engine drawing
- » href=»/catalog/ij-7/legkovye_avtomobili-30/ij_2126_s_dvigatelem_vaz-307/truba_vpusknaya_i_vypusknoiy_kollektor-15/#part945973″>HairpinEngine / Intake pipe and exhaust manifold
- Passenger cars / IZH / IZH 27171 drawing
- » href=»/catalog/ij-7/legkovye_avtomobili-30/ij_2717-607/truba_vpusknaya_i_vypusknoiy_kollektor-48/#part1693938″>Stud VAZ-2106 engine / Intake pipe and exhaust manifold
- Passenger cars / VAZ / Lada Granta 21901 drawing
- » href=»/catalog/vaz-3/legkovye_avtomobili-30/lada_granta_2190-1236/truba_premnaya_s_neiytralizatorom-92/#part2981204″>Stud Exhaust gas system / Continuous pipe with converter
- Passenger cars / VAZ / Lada Kalina 2192, 21941 drawing
VAZ is also looking for
Traffic safety while driving is one of the main tasks of every car owner. Maximum safety on the road is achieved when all vehicle systems are in full working order. One of the most important components for safe driving is the exhaust manifold studs for the VAZ 2109, which are also quite often used on other brands of cars. This part is directly responsible for the safety and security of the car on the road, and it also wears out relatively quickly, so it requires special attention and timely replacement.
Source