The car jerks, there is no traction, vibration is felt, or the engine is rough; all these are symptoms of improper operation of the individual ignition coil (IIC). Other signs of a faulty ignition coil are the presence of errors 0301, 0302, 0303 and 0304, indicating misfire in one of the cylinders. Let's look at a few simple ways to check the ignition coil with your own hands.
It is worth noting that the process of checking IKZ on modern Lada cars (XRAY, Vesta, Largus, Granta, Kalina and Priora) does not have significant differences. All actions are performed in the same way.
Story
The ignition system in Lada cars has changed over generations. Earlier cars with carburetor fuel injection used a distributor ignition system, which is quite unreliable and required manual adjustment and frequent maintenance.
The distributor was replaced with the advent of injection engines by a modular ignition system; a spark in such a system was produced by a module consisting of two coils. This system began to use a crankshaft position sensor, which helped the engine control unit determine the top dead center and compression stroke of the fuel-air mixture.
Lada Priora fuse box under the instrument panel
F1 25 Electric radiator fan of the cooling system F2 25 Heated rear window Priors F3 10 High beam right F4 10 High beam left F5 10 Sound signal F6 7.5 Low beam (left) F7 7.5 Low beam (right) F8 10 Alarm signal F9 25 Heater Priors F10) 7.5 Interior lighting, instrument cluster, brake light F11 20 Windshield wiper F12 10 Terminal 15 devices F13 15 Cigarette lighter F14 5 Left side light, license plate light, trunk light F15 5 Right side light F16 10 Terminal 15 ABS F17 10 Fog light (PTF) left F18 10 Fog light (PTF) right F19 15 Heated seats F31 or F27 30 Electrical package control unit
Ignition system
Such a system is a collection of parts that are involved in the process of spark formation in the engine. A spark in an internal combustion engine is necessary to ignite the fuel mixture in the combustion chamber. If the engine loses spark, its operation stops completely.
The Priora ignition system includes the following elements:
These three parts are responsible for the formation of a spark in the Priora engine; failure of one of them entails the loss of spark in a particular cylinder.
Let's look at each part of the car's ignition system in more detail to understand their purpose in more detail.
Spark plug
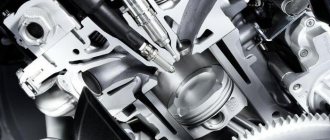
Spark plugs are used in all gasoline-powered vehicles. It screws into the cylinder head and creates a spark in the combustion chamber, which is necessary to ignite the fuel mixture.
The spark plug is a part with a threaded part that is screwed into the cylinder head; an electrode is placed inside the threaded part that generates a spark. Since the spark plug operates under high voltage, a special insulator is used in the spark plug to prevent breakdown and leakage of voltage.
Ignition coil
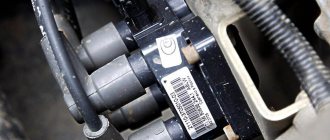
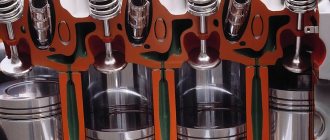
As described above, the Priora already uses an individual ignition coil. Such a coil is installed on each cylinder and is responsible for supplying a spark to a specific cylinder. The transition to IKZ made it possible to increase engine power while saving fuel.
The ignition coil is a part in which there are two windings, primary and secondary. A voltage of 12V is supplied to the primary winding, and a voltage of almost 40,000 Volts is generated on the secondary winding. This voltage is necessary for reliable spark formation in the combustion chamber.
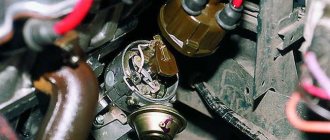
Crankshaft position sensor
This sensor is necessary to determine the top dead center of the internal combustion engine, that is, when the compression stroke occurs in the engine, it is necessary to supply a spark in the combustion chamber. This sensor understands when the piston is at the top and sends a signal to the ECU, which in turn sends a signal to the IKZ to form a spark in this cylinder. This is how the fuel-air mixture ignites in a specific cylinder.
This sensor is installed next to the crankshaft pulley and reads readings from it. There are marks on the crankshaft pulley that the DPKV reads and thereby determines TDC.
It should be noted that a breakdown of this sensor or a break in its power supply leads to a loss of spark in the internal combustion engine and the inability to start it.
Types of coils
Which spark plugs are suitable for a Priora car? It is worth remembering the quality of the parts and their condition. Sometimes spark plugs have an incorrect gap; it should not be less than 1 mm. To be sure of the performance of your car, it is better to change the spark plugs and ignition coil at the same time. This is important because the contact mechanism gradually wears out and becomes unusable, as a result of which sparking is disrupted and fuel consumption increases.
Replacing spark plugs is as follows:
- the HV wire must be pulled out by the tip;
- candles are laid out strictly in a certain sequence, each next to its cylinder;
- a stuck spark plug can be easily pulled out if the engine is warmed up;
- New spark plugs are installed when the engine is cold.
The spark plugs are screwed in using a special wrench so that the O-ring fits into place. After this, you need to tighten the spark plug 90 degrees with a wrench. When installing old spark plugs, they are tightened only 15 degrees.
An internal combustion engine requires fuel and a spark to operate. Lada Priora is equipped with an injection internal combustion engine with electronic fuel supply. In Priora, AvtoVAZ for the first time used an updated ignition system, which is now equipped in all Lada cars.
This article describes in detail the ignition system of the Lada Priora car, namely the parts involved in the formation of the spark.
Misfires on Priora
There may be no spark at the Prior due to a breakdown of the sensor, coil, spark plug or ECU. Failures that lead to loss of spark are quite easy to solve, with the exception of a breakdown in the ECU.
If the spark on a Priora disappears on all 4 cylinders, this indicates a breakdown of the crankshaft sensor in 80% of cases, in the remaining 20% the ECU may fail.
If there is no spark on one of the cylinders, then there may be several reasons - a spark plug, a coil or a transistor in the ECU.
Consider each of the reasons in more detail.
Spark plug
Quite often, low-quality spark plugs can fail after several hundred kilometers or even immediately after installation. It is recommended to purchase only high-quality spark plugs.
Which spark plugs are best for Priora can be read in our article.
You can check the serviceability of the spark plug on a special stand or by trying to replace it with a new one or by installing a suspicious spark plug in the working cylinder.
Ignition coil
Problems with the coil appear practically the same as with spark plugs. One of the windings in it may break or break through the insulation, which causes the coil to malfunction. IKZ Prioras cannot be repaired and if they break down they are replaced with a new one.
You can check the serviceability of the coil by replacing it with a coil of another cylinder or using a special diagnostic device ELM 327.
You can read how to check the coil here.
Crankshaft position sensor
DPKV is installed in a place that is subject to both mechanical and temperature influences. Since the sensor works on the principle of a magnet, and its sensitive part tends to magnetize chips. The formation of chips on the sensor will negatively affect the reading from the crankshaft pulley, which can lead to the inability to determine TDC and, consequently, to loss of spark.
Original or analogue?
There are more than 10 different manufacturers of ignition coils on the market. Depending on this, the price for IKZ can vary significantly. For example, good imported ignition coils for VAZ engines can now be found for 1500-1800 rubles. Cheaper Russian analogues will be 2 times cheaper.
It is worth considering that a fake part will have a significantly shorter service life than the original part. For example, according to reviews from owners, after installing Chinese ignition coils, the “cylinder misfires” error almost immediately appeared and the engine began to tune up. After 500-1000 km, the ignition coils completely failed.
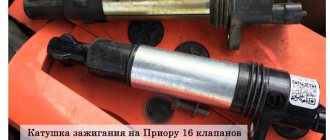
Life hack: Priora car ignition coil for 16 valves, its price and design
To go, you need to start! The ignition coil of a Priora car is not expensive. Its price for VAZ 2170 is from 2000+ rubles. On some machines this is a sore part that constantly breaks down. On a Priora with a 16-valve engine, there are about 4-5 analogues of this part.
Read the article to the end and find out how to check its performance and which one is better. Starting the engine of a Lada Priora car is a difficult procedure, which involves several parts and assemblies at once. At the same time, the standby engine start is carried out very quickly. At this time, several small subprocesses take place, and one of them is the creation of the first spark to ignite the fuel-air mixture.
To create a spark, it is not possible to place an open fire under the hood. The injection engine has become more “advanced” compared to its carburetor predecessor - it uses ignition coils, one installed with each cylinder.
An incident may occur, causing the engine to start “unevenly”. You will have to immediately look for how to check the elements of the ignition system. If it turns out that the problem is in these small parts, do not rush to despair, because in stores there is a good standard ignition coil for Priora 16 valves, the price of which is comparable to analogues. The wires to the ignition coils are an equally important component, which if it doesn’t work, you won’t go anywhere.
Electrical diagram of the LADA PRIORA car
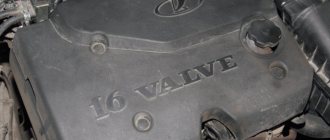
For all owners of the domestic passenger car Lada Priora, as well as for service auto electricians who repair cars, we offer high-quality color electrical diagrams for your reference, indicating all fuses, relays, fans and other modules. The Lada Priora has a 1.6 liter 16 valve engine, an anti-lock brake system (ABS), and air conditioning. The material is intended for electrical equipment specialists and employees of enterprises involved in the maintenance and repair of automobiles, and can be used in training service station personnel.
Basic faults
A normal Priora part should last from 50 to 100 thousand kilometers, depending on how often you start the engine. If an element of the Priora ignition system malfunctions, the following symptoms will occur:
- When accelerating, the car will jerk (as if the box is kicking in a car with an automatic transmission), or when driving in first or second gear.
- The integrity of the winding is broken. It is worth paying attention to the tip of the ignition coil of the Priora car.
- The motor "troits". This manifests itself in vibration and excess noise that appears under the hood, while traction decreases.
What can be put on the classics from the existing MPSZ
Among the most well-known microprocessor systems, Maya, Secu 3 or Mikas MPSZ are most often used. Assembling any of them is not difficult, if you have the skills to correctly see and read the instructions with the diagram, and follow the sequence of installation actions. When choosing a microprocessor system, you should not be intimidated by the fancy circuitry that product sellers like to show off, offering the services of a familiar electrician for “guaranteed high-quality installation for pennies.” All components can be installed on the classic with your own hands.
When choosing, pay attention to the quality of the block itself. It is considered good form if there is no warping of the plastic parts of the burrs or microcracks. The second indicator is the presence of a large scattering surface in the form of an aluminum base
The microprocessor remains the most capricious part and the choice of place under the hood or in the cabin must be taken very seriously
The second indicator is the presence of a large scattering surface in the form of an aluminum base. The microprocessor remains the most capricious part and the choice of place under the hood or in the cabin must be taken very seriously.
The ignition coils can be separated into a separate unit; alternatively, they can be mounted directly next to the spark plugs on the head cover.
Design and principle of operation
So, starting the engine begins with turning the key in the ignition switch. At the same time, current must flow to the spark plugs, they give a spark to the fuel-air mixture, which is pumped up by the pump, the starter begins to rotate, causing the crankshaft to start moving. But the battery operates with low voltage electrical current.
Each coil is a small transformer. Two levels of winding are hidden under the housing of the element of the VAZ-2170 Priora ignition system. Its wires are low-voltage and high-voltage. The first ones receive current from the battery, the second ones transmit it to the spark plugs. When the current is converted, it is transferred to the spark plugs. The ECU “manages” this process, correctly distributing the force between the spark plugs.
As for how many ignition coils are in the Priora, there are 4 of them - one for each cylinder. Their work does not mix or overlap in any way. Each of them has “its own scope of work.”
Procedure for starting a car engine in cold weather
To ensure trouble-free starting of the engine, the car must be prepared for winter use before the onset of cold weather. It is necessary to fill the engine and gearbox with oil designed to operate at low temperatures. It is imperative to replace spark plugs and filters, oil, air and gasoline. And of course the most important thing is the technical condition of the battery. Even if the battery is new, it must be charged from an external charger. If all these requirements are met in advance, then there will be no problems starting the engine in the cold season.
It is recommended to start the car engine in the following order:
- You need to insert the key into the ignition, turn it clockwise one sector and make sure that all electrical appliances are turned off. Although they should turn off automatically when the starter is running, it is nevertheless better to turn them off so as not to create additional load on the engine at the first moment after starting it.
- To bring a cold battery into working condition, you need to warm it up by turning on the headlights or side lights for 20-30 seconds.
- If the transmission is not automatic, then be sure to depress the clutch pedal all the way. In this case, the gearbox will be disconnected from the engine, which will significantly reduce the load on the starter. 4. Turn on the ignition for half a second so that the engine shaft moves from a dead center and the oil lubricates the rubbing surfaces of the engine.
- Turn on the ignition again for no more than 3 seconds. If the engine does not start, you must wait at least 15 seconds before restarting. During this time, the battery, warmed up due to an unsuccessful engine start, will gain strength. If after 5-6 attempts with pauses it was not possible to start the engine and the battery did not die, it means that either the water that got into the mechanisms froze and it is necessary to warm up the car by placing it in a warm garage. Or a malfunction has occurred and you need to contact service.
- If the car engine starts, you need to smoothly release the clutch pedal. After warming up, the car is ready to go.
Manufacturers and prices of analogues - which ignition coils are better for the Priora
No one, not even AvtoVAZ, promises that the analogue will work as long as the standard model. There are a sufficient number of options on the market. It will take quite a long time to determine which is better. The following components are suitable for Priora 16cl:
- SOATE (manufactured in Stary Oskol) (article 2112-3705010-12), price – 1,200 rubles.
- MZATE-2 (article 59.3705), price - 1,000 rubles.
- Baker Priora 2112-3705010-10 – 1100 rubles.
- Fenox IC16085 (STK) – 1,300 rubles.
How to determine a breakdown
In order to determine the malfunction, you just need to take a closer look at the behavior of the car. Typical signs of problems with ignition coils are as follows:
- the engine begins to “trouble”, unstable operation of the power plant is noted, the more time passes from the moment the problem appeared, the worse the engine performs;
- The poor performance of the unit is especially noticeable at sub-zero temperatures; the situation more or less normalizes only after the engine warms up. In addition, the problem may occur frequently if the machine is located in an area of high humidity;
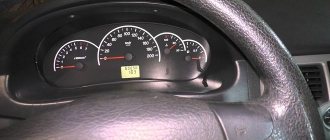
- when you sharply press the gas pedal on the engine;
- There is a special indicator on the instrument panel, the so-called Check Engine. It signals to the car owner that there is some kind of malfunction in the car’s power circuit. You can decipher the indicator readings using the instruction manual that came with the car upon purchase.
Diagnosing a failure of an element is not difficult; it is more difficult to identify which part is not working. Each cylinder in the Priora has an individual coil installed; there is no ignition module on the car. Therefore, you will have to run each of them with a multimeter and check each tip. Special attention should be paid to the caps, because if a problem happens to them, you won’t have to change the part. To identify the problem, you just need to remove the element and clamp it with pliers. If the silicone from which the part is made begins to wrinkle, then the tip needs to be replaced. If, when compressed, it remains even and smooth, then the problem lies in something else.
Performance check: how to check ignition coils on a Priora
Before you start replacing the ignition coils, you definitely need to check them and inspect them. Cracks, chips, and other damage to its body are unacceptable. If you see that the plastic is damaged, it means the part has overheated and cannot be used further.
The answer to the question of how to check an element of the 16-valve Priora ignition system is not limited to inspection. First you need to swap them and see if there are interruptions in the other cylinder. If there are interruptions, the problem is in the coil. There are several ways to use devices. To work you need:
- Secure the car in place and turn off the engine.
- Remove the negative from the battery.
- Disconnect the part from the motor, and then connect a fully functional spark plug to it.
- Turn off the fuel pump.
- Use protective equipment against electric shock, this is a must!
- Turn on the ignition and crank the starter. The spark plug should spark during normal operation.
- Sometimes repair of the Priora ignition coil begins after receiving data from the ECU. The codes start with 0301 and end with 0304, indicating each cylinder accordingly. However, the problem is displayed in the coil-plug module, so the culprit will have to be found out separately.
Replacing spark plugs - step-by-step instructions.
Good day to all. Almost every car enthusiast has at least once replaced spark plugs or glow plugs on their own. We described replacing glow plugs here. Spark plugs are the most important element in the operation of any car. Their purpose is to ignite the fuel-air mixture in the combustion chamber.
The spark plug is the final element on which the entire car ignition system operates. Spark plugs are consumables and require periodic replacement during operation. This article will provide information on how to do this yourself and avoid mistakes.
When to change spark plugs
To understand the specific timing of replacing spark plugs, you need to refer to the technical regulations of the car on which this operation must be performed. This is done due to the fact that depending on the make and year of manufacture of the car, the requirements vary.
What's wrong with the weather and how does it affect spark plugs? You ask. Very simple. Partial dust, sand, dirt, water from the road gets onto the engine. In the process of replacing spark plugs, we observe sand in the wells, oil that flows from under the gasket (Ford), and even water (from above from under the plastic where the wipers are). It's different on different cars. Since the engines are located differently.
How to change spark plugs
Everyone knows this very well, but still many neglect the requirements for replacing spark plugs. Perhaps the rush prevents everything from being done efficiently. Or they do not represent the full responsibility of the matter.
Spark plugs are changed when the engine is cool. It must be taken into account that spark plugs operate at high temperatures, so if you do not cool the car after driving, there is a risk of burns.
In addition, since the cylinder head is aluminum and the spark plugs are steel, they have different expansion coefficients when heated, and a plug that is unscrewed from a hot engine can bite.
The spark plugs really bite and they break off or come out of the cylinder head together with the threads. When unscrewing long spark plugs, they turn 1.2 turns and get snagged. Short candles most often envelop the candle thread.
Preparing to replace spark plugs
Before removing the coils (or wires) and the spark plug itself, it is necessary to thoroughly blow off the working surface so that the dust and sand that accumulate on it do not get inside the cylinder and damage the cylinder mirror and elements of the piston group. This must be done with a professional, powerful compressor.
If there is no compressor, but you need to unscrew the spark plugs, then find one (for example, a tire shop, there is always compressed air there). I do not consider the case when replacement is required in an open field.
If you unscrew the spark plugs without cleaning and blowing out the spark plug well, sand will fall into the cylinder. In engines that are tilted, when starting, the piston will rub sand against the cylinder wall as an abrasive. It will be a bully.
Some will say that this is nonsense. But such cases do occur. The human factor is present everywhere.
How to tighten spark plugs correctly
Go ahead. Let's imagine that you have completed all the preparatory operations and the spark plugs have come out. Great. You are well done. Now you need to screw in the new spark plugs.
First of all, you need to carefully inspect all the new spark plugs one by one. There should be no chips on the ceramic insulator, the threads should be clean, good, and there should be no other externally visible damage.
- Carefully place the spark plug (without throwing it towards the spark plug well, so as not to damage the insulator) into the well.
- Fit the spark plug by hand. In case of biting, go through the thread in the head with a tap (if possible). Be careful not to drop the tap into the cylinder.
- Tighten the spark plug to the required torque using a torque wrench.
If you put a load on the spark plug that exceeds the recommended norm, the sealing ring will be overtightened, overheating will occur and there will be a possibility of destruction of the spark plug, which may simply break.
It is also possible to strip the threads of the cylinder head, which will require an expensive and complex repair. Thus, tightening the candles is an extremely important point and doing it “by eye” is highly not recommended, even though this rule may be neglected even in some services.
Thank you all for your attention. I hope that this information will be useful to all those who are interested in it.
subscribe to the channel
. Stay up to date with all developments in auto repair.
Source
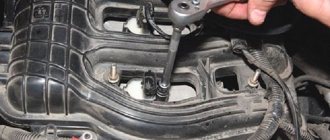
Removing and installing a coil on a Priora
To change the ignition system element in a 16 valve engine, follow these steps:
- Park the car level, securing it with the hand brake.
- Raise the hood and remove the negative from the battery.
- Undress the motor by removing its plastic protective casing.
- Find the spare part you need, and then the wire block connected to it.
- Squeeze the wire block clamp and turn off the power.
- Using the 10th key, unscrew the bolt that secures the part to the metal.
- Carefully remove the spool, trying to move it vertically. It would be a shame to damage the wiring at the very last moment.
- Remove the faulty part and replace it with a new one. Tighten the fastening bolt, connect the wire block and place the negative on the battery. Check functionality.
Source
How to spot a fake
A few examples of how to visually distinguish original (high-quality) Bosch ignition coils from counterfeits :
- Under the casing of the original, a plastic case is visible (the fake has a metal case).
- There are two stamps on the original casing. They are not present on the fake.
- The outer edge of the original mounting axle box has a protrusion. There is no protrusion on the fake.
- On the fake there is no high voltage symbol (lightning) next to the mounting axle box.
- On the original plug, the font is made more clearly, the surface of the plug is better processed.
- The coding profile of the counterfeit plug is more rounded.
- The fake contacts are noticeably thicker and more rounded.
- The original has traces of casting.
- The factory number on the original is circled in an oval.
- The counterfeit rubber tip does not have a manufacturing date, product type number or logo.
- The extreme turns of the contact spring of the original are wound more tightly.
Other distinctive features with photos are presented in the report, which site users can download:
To download files you need to log in to the site.
Before purchasing new IKZ, make sure that the old ones are faulty (how to check ignition coils). Or maybe try to repair them? Leave reviews about ignition coils and your recommendations in the comments.
Let us remind you that the smooth operation of engines also depends on spark plugs. Do you know which candles are best to choose?
Life hack: Priora car ignition coil for 16 valves, its price and design
To go, you need to start! The ignition coil of a Priora car is not expensive. Its price for VAZ 2170 is from 2000+ rubles. On some machines this is a sore part that constantly breaks down. On a Priora with a 16-valve engine, there are about 4-5 analogues of this part.
Read the article to the end and find out how to check its performance and which one is better. Starting the engine of a Lada Priora car is a difficult procedure, which involves several parts and assemblies at once. At the same time, the standby engine start is carried out very quickly. At this time, several small subprocesses take place, and one of them is the creation of the first spark to ignite the fuel-air mixture.
To create a spark, it is not possible to place an open fire under the hood. The injection engine has become more “advanced” compared to its carburetor predecessor - it uses ignition coils, one installed with each cylinder.
An incident may occur, causing the engine to start “unevenly”. You will have to immediately look for how to check the elements of the ignition system. If it turns out that the problem is in these small parts, do not rush to despair, because in stores there is a good standard ignition coil for Priora 16 valves, the price of which is comparable to analogues. The wires to the ignition coils are an equally important component, which if it doesn’t work, you won’t go anywhere.
What have manufacturers done to help car owners?
Initially, microprocessor ignition options went on sale, where a modified distributor was installed, configured to work together with a hall sensor and control a classic brand car.
And everything seemed to be going well, except that for the classics the work of the distributor still remained problematic. Among other things, at the very beginning it was clear that for the electronic system, the characteristics of the UOS for a heated or unheated motor are clearly different. Because when setting the UOS to cold and then warming up the engine, inevitable detonations occur.
Due to all the inconvenient moments, system manufacturers decided to make the following modification. They had to make the microprocessor ignition for classic cars almost identical to the injection version, leaving only the injection system control unchanged.
Basic faults
A normal Priora part should last from 50 to 100 thousand kilometers, depending on how often you start the engine. If an element of the Priora ignition system malfunctions, the following symptoms will occur:
- When accelerating, the car will jerk (as if the box is kicking in a car with an automatic transmission), or when driving in first or second gear.
- The integrity of the winding is broken. It is worth paying attention to the tip of the ignition coil of the Priora car.
- The motor "troits". This manifests itself in vibration and excess noise that appears under the hood, while traction decreases.
Signs of a malfunctioning ignition module
A malfunction of the ignition module is determined by the following symptoms:
- Difficulty starting a cold engine due to lack of spark on one or more spark plugs.
- Floating engine speed at idle is a situation in which the speed changes without any action on the part of the driver.
- Dips in power, which manifests itself during acceleration and driving up a long climb.
- Decrease in engine power.
- Cylinders 1-4 or 2-3 do not work (engine “troits”).
- Indication of the “Check Engine” indicator.
Design and principle of operation
So, starting the engine begins with turning the key in the ignition switch. At the same time, current must flow to the spark plugs, they give a spark to the fuel-air mixture, which is pumped up by the pump, the starter begins to rotate, causing the crankshaft to start moving. But the battery operates with low voltage electrical current.
Each coil is a small transformer. Two levels of winding are hidden under the housing of the element of the VAZ-2170 Priora ignition system. Its wires are low-voltage and high-voltage. The first ones receive current from the battery, the second ones transmit it to the spark plugs. When the current is converted, it is transferred to the spark plugs. The ECU “manages” this process, correctly distributing the force between the spark plugs.
As for how many ignition coils are in the Priora, there are 4 of them - one for each cylinder. Their work does not mix or overlap in any way. Each of them has “its own scope of work.”
Self-replacement
- Before changing the ignition switch on a Priora, you must take into account that this operation will be more labor-intensive than a similar process when working with classic VAZ car models.
- A motorist can complete this job in an hour. He also needs to stock up on tools:
- Phillips screwdriver or screwdriver with a similar bit;
- hammer 0.5 kg;
- a pointed chisel or punch with a blade width of 8–10 mm;
- hex head 10;
- ratchet equipment with middle extension.
Due to the fact that the repairs are supposed to be carried out in dark, cramped conditions, it is worth thinking about local comfortable lighting. Some find it convenient to work with a car lamp equipped with a hook or magnet for hanging in any conditions.
Some motorists are accustomed to using a bright headlamp with LEDs for such purposes.
Where to repair a VAZ engine
How to remove the ignition switch on a Priora
Before carrying out work, it is necessary to remove the terminals from the battery. Experts recommend using a proven algorithm:
At the initial stage, you will need to get rid of the casing that hides the ins and outs of the steering column. The operation is simple and requires only a screwdriver or screwdriver to unscrew threaded hardware. The second stage involves unscrewing the special bolts. They are manufactured with tear-off caps and are disposable materials. This design approach provides a certain degree of security, minimizing the possibility of unauthorized access to starting the car. A chisel is used to unscrew them.
It is important to remember that they have a right-hand thread. Having torn the hardware from its place, you can finally get rid of them using long-nose pliers (curved or straight)
Remove the clamp. Special bolts held the clamp installed on the steering column
The latter is installed to hold the lock. The dismantling work is completed by disconnecting the power plugs in order to have full access to working with the lock.
Next, we purchase a new lock with an immobilizer and relearn it if necessary. Usually you can do it the first time. In some situations, transponders in keys are changed so that the standard protection can recognize electronic signals and unlock in a timely manner.
New lock installation stage
For installation, you will need the bolts used in breakaway fasteners. When a certain force is created, the edges will break off, leaving a head that the classic key will not take. As a result, the clamps will be tightened sufficiently tightly and at the same time receive additional protection.
All four bolts are screwed in the same way with the edges breaking off. The estimated cost of the castle is about 1000 rubles. Most often, special bolts may be included in the kit so as not to purchase them separately.
It is important to know that it is not recommended to reuse old torn hardware to attach the clamp. A replacement service will cost another few hundred. In the end, by doing everything yourself, you can save money.
In the end, by doing everything yourself, you can save money.
A replacement service will cost another few hundred. As a result, by doing everything yourself, you can save money.
Do I need to put fender liners on the front?
Conclusion
The motorist can independently carry out all operations without outside help. The main thing is to have a lock and tools available.
Report on replacing the ignition switch on a Lada Priora
So, to get to the lock mount, we first need to remove the steering column cover. After this, this entire structure becomes available to us. Now, using a sharp chisel, you need to tear off all the bolts securing the lock, since the caps there are without edges.
- When all 4 bolts are broken, you can finally unscrew them by hand, or using long-nose pliers, as shown more clearly in the photo.
- When they are all unscrewed, you can remove the lock from the steering shaft, since there is nothing else holding it.
- And in order to completely release the ignition switch, you need to disconnect the two plugs with wires.
We install the new part in the reverse order, having previously purchased a new one. The price of a lock on a Priora is no more than 1,800 rubles complete with keys and door cylinders. But you can buy the same one at a disassembly for half the price, although it is no worse in quality.
To install, you need to buy new 4 bolts with tear-off caps. They twist until the caps break off.
The photo above shows an example of tens, but the meaning does not change. As a result, the caps come off like this, as shown in the photo.
Manufacturers and prices of analogues - which ignition coils are better for the Priora
No one, not even AvtoVAZ, promises that the analogue will work as long as the standard model. There are a sufficient number of options on the market. It will take quite a long time to determine which is better. The following components are suitable for Priora 16cl:
- SOATE (manufactured in Stary Oskol) (article 2112-3705010-12), price – 1,200 rubles.
- MZATE-2 (article 59.3705), price - 1,000 rubles.
- Baker Priora 2112-3705010-10 – 1100 rubles.
- Fenox IC16085 (STK) – 1,300 rubles.
Module check
After signs similar to failure of the ignition module appear, it must be checked before buying a new one, since its cost is not cheap.
There are three ways to check: substitution, visual inspection and a multimeter.
Substitution
The best and easiest way to check the MZ is to install another known good one from another exactly the same car. After which it will immediately become clear what the matter is and whether the Ministry of Health is to blame for this problem.
Visual inspection
It is necessary to inspect the module for chips, cracks, etc. There should be no damage to it. There should be no moisture or rust on the contact part.
Performance check: how to check ignition coils on a Priora
Before you start replacing the ignition coils, you definitely need to check them and inspect them. Cracks, chips, and other damage to its body are unacceptable. If you see that the plastic is damaged, it means the part has overheated and cannot be used further.
The answer to the question of how to check an element of the 16-valve Priora ignition system is not limited to inspection. First you need to swap them and see if there are interruptions in the other cylinder. If there are interruptions, the problem is in the coil. There are several ways to use devices. To work you need:
- Secure the car in place and turn off the engine.
- Remove the negative from the battery.
- Disconnect the part from the motor, and then connect a fully functional spark plug to it.
- Turn off the fuel pump.
- Use protective equipment against electric shock, this is a must!
- Turn on the ignition and crank the starter. The spark plug should spark during normal operation.
- Sometimes repair of the Priora ignition coil begins after receiving data from the ECU. The codes start with 0301 and end with 0304, indicating each cylinder accordingly. However, the problem is displayed in the coil-plug module, so the culprit will have to be found out separately.
Now we check the ignition system element on the Priora with a multimeter. For this and further work with components, models AZ-1 or MD-1 are suitable. For this:
- Remove the part to be examined from under the hood.
- Set the measurement switch to the “200 Ohm” position, connect the probes. The display should show “0” or values close to it.
- Using probes, the external winding is checked. Pinout – 1.3. The display should show exactly 0.08 Ohm. The error is the number that the display showed during calibration; it must be subtracted. If nothing is shown, check that the probes are accurately touching the winding. If there is contact, but there is no result, the winding is broken and needs to be replaced.
- Set the multimeter to 2 MΩ measurement limit to test the high voltage winding. Connect the black probe to the terminal of the second connector, and the red probe to the terminal of the coil. The indicator should be 342 kOhm - but only for a cold part. It should be cooled before testing. This also requires checking the exact contact with the probe.
Remember that the winding of this spare part does not change, but the tip can be easily changed. Most often, repairs are limited to routine replacement - in order to be completely sure of the tightness of the part.
McSystem › Blog › To the blog: Will a spark ignite a flame? Not always!
This modification will be useful in almost the entire line of VAZ injection engines, regardless of the type and composition of the ECM equipment and the ignition system in particular.
Immediately a warning - based on the results of comments and questions.! ! ! Intervening and making changes to the electrical circuit of a car requires at least basic skills in electrical engineering and awareness of the actions being performed! ! !If you feel that the electrical circuits and electrics of the car are not your profile, contact a more qualified person or an experienced auto electrician. This is in your best interests. And it will save you from unpredictable consequences.
Updates and additions are at the end of the article. A detailed detailed analysis of changes in the ignition system after modifications are described here:
Part two.
Expanded results In order. Engine VAZ 21124. 1.6 liters, 16 valves. Individual ignition coils (or dual module with high-voltage wires). Everything is beautiful. And at first glance, it seems that everything is thought out, so it should work clearly and reliably. It turns out that this is far from true. This is a VAZ!
Quite a lot has been written about ignition problems on this engine - about the choice of spark plugs, replacement and selection of individual ignition coils (hereinafter - IKZ).
So I came face to face with this problem. The main manifestations are the engine rotates unevenly at idle (speeds dance in the range of approximately 720-840 rpm), sluggish acceleration with twitching, increased consumption. In principle, most people understand - misfires, rare , but there is.
The ECU doesn't see them directly. Last year, one coil clearly started to fail - the ECU saw it. I replaced it and it started to loosen up a bit. But still the engine was missing something. What a good spark! Here's about this in detail. From the versions: - replacing the spark plugs (the current NGKs lasted only 7 tons km) with something more expensive from the "platinum, iridium" series, etc. - a costly option. - changing the IKZ, but for them a little more than 7 years (the original BOSH ones are there, the mileage is 75 tkm) - it’s a little expensive (the cost of one IKZ is around 540 UAH ($22), and there are four of them) and there is no confidence that the problem will go away. - Mass air flow sensor, which is also not fun... - look into ECU for serviceability of keys, current-limiting resistors, etc. Acting at random or based on assumptions is not my method or my approach.
Reading the ECU showed: 1.
Speed jumps2. Injection time jumps, slightly3. OZ jumps at XX (9-15 degrees) - a bit much4. Power supply, mass air flow sensor, air sensing sensor - everything is stable and beautiful.5. The ECU masses are all ideal (previous modifications and correct wiring were made) Verdict - unstable sparking.
The ICP parameters were measured - the resistance of the primary winding, inductance, the resistance of the secondary winding (taking into account the diode in the high-voltage circuit), checking for the absence of short-circuited turns - the norm.
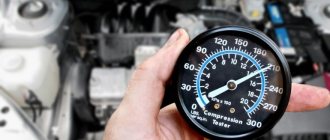
The coils have a minimal (± 2%) spread and nothing alarming in the parameters. More on this later. On the hastily assembled “stand” there is a normal spark, a little weaker in appearance than on a classic with a contactless ignition system, but still clear throughout the entire range of rotational speeds (2 - 45 Hz), with an accumulation time of 2.0 ms. The coils are alive. The rubber caps in the explosive part of the coil have been replaced. To complete the picture, I decided to look at the diagrams on the coils with an oscilloscope on the engine, pulled out my C1-65A - a reliable, proven workhorse to the car and off we go. The ignition is on. The engine is running. On board the network (to the battery) 14.35V, which at XX, one hundred at 2000 rpm is stable. Amazing! Let's see. As usual, I start with power to the coils (+12V from the ignition switch) and I am HORROR! On the coils, as well as on the IKZ harness connector, the ripple is exactly 2.5V. I was not mistaken, I measured it in 2 modes (and the oscilloscope has been an everyday tool for many years and not the only working tool - there is no room for doubt). I apologize for the bad photos - the scan is slow and the shutter speed in the camera is short.
source
Removing and installing a coil on a Priora
To change the ignition system element in a 16 valve engine, follow these steps:
- Park the car level, securing it with the hand brake.
- Raise the hood and remove the negative from the battery.
- Undress the motor by removing its plastic protective casing.
- Find the spare part you need, and then the wire block connected to it.
- Squeeze the wire block clamp and turn off the power.
- Using the 10th key, unscrew the bolt that secures the part to the metal.
- Carefully remove the spool, trying to move it vertically. It would be a shame to damage the wiring at the very last moment.
- Remove the faulty part and replace it with a new one. Tighten the fastening bolt, connect the wire block and place the negative on the battery. Check functionality.
Source
Other spare parts for VAZ (Lada) Priora
Having found out which ignition coils VAZ (Lada) Priora owners prefer to install, you can look at other popular spare parts for this car. In June 2022, the leaders on PartReview were:
- #1 Hola shock absorbers - 16% of votes.
- #1 Brembo brake discs - 18% of votes.
- #1 TIIR brake pads - 9% of votes.
- #1 Shell Motor Oil - 7% of votes.
- #1 Nokian Tires - 10% of votes.
You can also find out what VAZ (Lada) Priora owners chose among manufacturers of such spare parts as: Drive belt, Timing Belt, Cooling Radiator, Pump, Thermostat, and others.
Tip repair
A cracked ignition coil tip is a common problem. However, you can return the coil to working condition by making repairs on your own, provided that the coil itself has not burned out. This will require a degreasing wipe, a silicone ignition coil O-ring (new), a new tip and silicone sealant. The whole procedure will take a couple of minutes.
With numerous, and sometimes even minor misfires, the engine may operate unstably, floating speeds will appear, the car may jerk while driving, etc. To determine which cylinder is faulty, it is necessary to alternately remove the coil power plug from each of them, or rather, disconnect it for a while.
If, if one of the cylinders is disconnected, interruptions in operation are still present, then this is where the reason lies. Often, it is the ignition coil of one of the cylinders that leads to the consequences described above. And to replace it, you will need the following tool:
- 10 mm head
- Extension
- Ratchet or small wrench