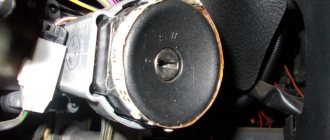
It is known that locks for VAZ-1118 car doors have an interesting property - you can replace their cylinder without removing the mechanism from the door itself. On previous models, dismantling is more difficult: you need to press the bracket holding the cylinder with a paper clip or an awl, getting into the hole on a mechanical drive. In the Kalina model, that is, VAZ-1118, this bracket is pressed out by pressing with a ruler or a screwdriver. Which, in turn, is done on the installed lock (there is no point in removing it). Next, the replacement operation is discussed in more detail.
Removing the front door lock and outside handle
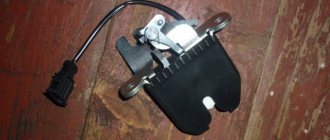
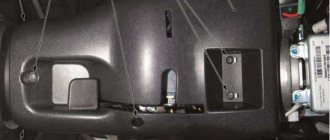
Front door lock with locking drive and outside handle
Remove the front door trim (see “Removing the front door trim”).
Using a Phillips screwdriver, unscrew the screw securing the base of the inner handle. . and remove it from the mounting pin. We bend the edge of the protective material behind the inner door panel.
Using a screwdriver, we disconnect the rod from the cylinder mechanism of the outer handle lock.
Similarly, disconnect the rod from the outer handle.
Using a 8mm socket, unscrew the bolt securing the outer handle.
Using the “8” socket, unscrew the handle securing nut.
. and remove the outer handle.
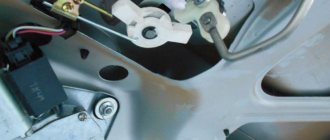
Using a Phillips screwdriver, unscrew the three screws securing the door lock. Move the red block lock up.
. and disconnect the block from the locking drive.
Use a screwdriver to press out the plastic rod clamp, turning it around its axis. . and, having disconnected the rod of the inner handle from the lock, remove the rod.
We remove the front door lock along with the locking drive and rods through the technological opening in the inner door panel. Install the front door lock in reverse order
Dismantling Kalina locks
Tools and materials: (for torture and attempting to restore the lock) - “Bulgarian’s wife” - set of screwdrivers - soldering iron - welding
1) One of the experimental samples on the operating stool. Let's start disassembling. You will need a set of “stars”.
2) We gradually disassemble it into details. And we remember what and where it was installed. This is an important point. Otherwise, you'll get tired later.
And here is the first bummer. Rivet installed. Many people stop at this point and do not dare to further dismantle the non-removable lock))) This is a tautology
3) The lock is already faulty, there is nothing to lose. We grind the rivet with a grinder.
Construction of standard locks: features and disadvantages
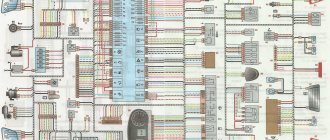
The Kalina rear door lock has a simple mechanism when compared with the devices equipped in foreign cars. The VAZ mechanism has to be changed more often than foreign cars. The electric lock circuit for a Zhiguli hatchback, sedan, station wagon is concluded in the operation of the left and right core blocks. When they close, the door is blocked, when it opens, it opens.
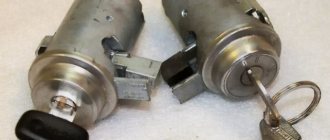
A car lock is a device consisting of a cylinder, pins, teeth and a rod. The inner block can be replaced, then the main body does not have to be dismantled. The cost of the core is about 500 rubles, and the one-piece device is 1500 rubles. The interlocking pins create the coding, but if one of the teeth is broken, one side of the core will not fit into the groove when the key is turned.
If the part creaks when opening or the key operates with difficulty, these are the first signs that the Grant door lock cylinder needs to be repaired or replaced.
Repair of door handle on Kalina VAZ-1119
A very simple way to quickly repair a door handle
, no need to open the
door
, everything is done from the outside.
3. To remove the door lock, disconnect the wire terminal from the “negative” terminal of the battery
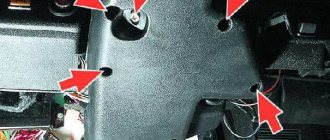
Using a Phillips screwdriver, unscrew the screw securing the intermediate lever of the locking rod, and remove the lever together with the rods from the rectangular protrusion, removing the locking rod from the plastic holder (shown by the arrow).
4. Use a Phillips screwdriver to unscrew the screw securing the base of the inner door handle and remove it. together with traction from a hollow pin. Remove the decorative glass trim and take out the glass guide.
5. Removal, installation, replacement and repair of the outer front door handle of the Lada Kalina | Section 10. Using a Phillips screwdriver, unscrew the three screws securing the door .
Purpose in different cars
Without the participation of limit switches in a car, even such a process as opening and closing doors, hood or trunk is not complete. If there is an unauthorized attempt to open them, the security alarm is immediately triggered, which is connected to the corresponding parts through certain wires.
Without the help of a switch, the lamp inside the car will not automatically turn on at night, the control sensor will not work, etc. The trunk lighting will not turn on when it is opened. The brake lights will not light up when you press the brake pedal if the corresponding part – the “frog” – is faulty.
The units vary in shape and installation location depending on the make of the car. The door elements of many cars are located in the door opening (slam). It’s just impossible to see where the door switches are located on Kalina, since the part is hidden in the door lock.
Replacing the ignition switch yourself
Unfortunately, the Lada Kalina cannot please you with its reliability and durability; many systems, including the ignition switch, fail within a couple of years, so in order to save on repairs at expensive car repair shops, it is better to find out how to do it yourself. So, having come to the conclusion that the lock needs to be changed, we buy a new lock, which costs around a thousand rubles. In the kit we will receive three cylinders (on the doors and trunk) and 2 keys. You also need to purchase four shear bolts , since the old ones will no longer be suitable after dismantling.
In addition to the product itself, we will need the following tools:
- chisel;
- two screwdrivers, a flat one for removing the clamps and a cross for the bolts;
- 10mm wrench or 10mm ratchet;
- key to 8.
Let's get started
1. First you will need to disconnect the battery cable from the negative.
2. Armed with a cross-head screwdriver, unscrew the fasteners on the steering column. To make it more convenient for you, we immediately warn you: there are two bolts on the right and left sides (3), two at the bottom in the middle (2), and two at the very bottom (1). There is also a self-tapping screw located directly under the steering wheel (4).
3. We take out the clamps holding the steering column switches. We dismantle the switches.
4. Now we need the help of a chisel. It is necessary to apply blows of medium power and unscrew the bolts. Bolts, as a rule, become very sticky after several years of use, so you will have to work hard. As soon as you notice that the bolts begin to move out of place, you can pick up pliers and continue to work only with their help.
5. We need to get to the lock connectors, of which there are only two (main power and immobilizer antenna). The connectors are hidden under the console casing. To gain access to the connectors, you need to slightly pull the wiring harness away from the lock and pull them out.
Two configurations and two schemes
In the “Norma” version, if it has a central locking system, you can use two control wires. Ground is supplied to one of them if the locks need to be opened, and to the second one if the locks need to be closed. The period of connection to ground should take 0.7 seconds, and most alarms have such a setting.
If we talk about the “Lux” configuration, the control wires will not help us here. The relay contacts built into the alarm will have to be connected to the breaks in the power cords. Despite all the complexity, there were no complaints about this scheme, and we will consider it right now.
The “luxury” option is the most complex
First you need to make sure that the central locking system in the car is really connected according to the “Lux” scheme. The control button located on the door must be trigger (non-latching). If you have exactly this type of car, you will have to tinker. It will be necessary to extend 4 power cables to the signaling unit. These cords, in turn, must go from the break point of the two standard wires (yellow-white and yellow-black). Find them in the bundle under the threshold.
Any alarm system is supplied with two relays, one of which is activated for closing, the second for unlocking the locks. Power cables drawn from the break points are connected to the relay contacts.
The part of the yellow-white wire that goes to the actuators is connected to the common contact. Another relay contact (normally closed) is connected to the second half of the cable. They connect to the yellow-black wire in a similar way, but here an opening relay is used, not a locking one. Each of the normally open contacts receives power.
Any power wiring is supplied with power through a fuse.
In our case, the rating “15 Amperes” is used. Immediately before installation, you need to call the pair of wires that are directed to the actuators. The probe should show a value of 1.2 - 1.3 Ohms. And of course, when performing installation work, you first need to remove the negative terminal from the battery. Be careful!
Connection option for “Norma”
Let's say there is a switch in the driver's door, but it has two fixed positions. Then it will be easy to connect the alarm. You will need to make not 4, but 2 taps, and not from the power cords, but from two signal cords. There is no need to make breaks, just make a T-shaped connection. The diagram here looks standard:
You can complete the installation without breaking the wires at all.
In the circuit discussed above, there is no fuse. We connected to the signal wiring, not the power wiring, and theoretically we can not be afraid of any short circuits. Still, it is better to insulate the free terminals on the signaling. The same applies to all connection points.
Recommendations from the magazine “Behind the Wheel”
Let’s turn again to the “Behind the Wheel” review, which discusses how to remove door locks in a VAZ-1118 Kalina. If the casing has been dismantled, this is not bad. Next, according to the recommendations, unscrew the screw securing the inner handle:
The lock mechanism is connected to two rods made in the form of rods. Both of them are dismantled by disconnecting the plastic clips:
To disengage the latch, press on the plastic tab with a screwdriver.
At the last step, as you might guess, all that remains is to unscrew the screws holding the mechanism motionless.
But first, you need to dismantle the external handle. To do this, unscrew two bolts equipped with an “8” hex head.
How to install the activator
The only way for the viburnum to get into the trunk is to turn the key and press the button. Naturally, doing this is not always convenient. Weather, busy hands and other troubles contribute. At this stage, many car enthusiasts begin to think about the trunk activator. It is quite possible to do this, you just need to try a little.
The Kalina station wagon trunk lock activator is easy to install. It is enough to take a self-drilling screw and secure it on one side with it and on the other with a wire holder. To check the device, you need to connect it to the standard connector.
The only problem in all this work may be the back door being picked up at the wrong time. After the current stops supplying the activator, it closes with the first latch, but the trunk is not completely closed. In order to get into the so-called fifth door, you will have to use the key again.
A lock with a button is not difficult. But during work it is necessary to assemble the circuit and stretch the wires. In this case, one programmable alarm channel (additional) should be used. There are two main connection options. First: the button goes to +12 on the activator, bypassing the relay. The advantage of this connection is its simplicity and the absence of unnecessary elements, the disadvantage is the need to run additional wires.
Installing the activator using the second method is more labor-intensive. You will have to use additional elements, namely diodes. In addition, there is a need to search for “mass”. The main advantage is the use of a minimum number of wires.
Many experts prefer the first option due to its simplicity. The wire can be copper PV-3 with a square cross-section. It must be pulled along the left side and thresholds. The switching can be crimping and electrical tape on top.
Ignition switch malfunctions
Like any electronic device, the ignition switch of the Lada Kalina is subject to frequent breakdowns. Malfunctions can occur for a variety of reasons, the most common of which are the following.
- Oxidation of contacts always leads to serious damage (usually due to moisture and dampness in the machine)
- Contact burnout , which occurs due to sudden voltage surges. Voltage drops usually occur when the power unit is started, during which the temperature inside the system rises sharply, causing the insulation to simply burn out. This is why it is so important to approach the launch issue wisely.
- Mechanical damage . If, when you are about to turn the key, you notice that it has become more difficult to do so than usual, it means that something happened to the lock cylinder, perhaps it was simply clogged with dirt or dust, or maybe there was a defect at the factory that came to light only now.
If the problem lies in burnout or oxidation, then when you turn the key in the lock, you will not see any reaction from the ignition system. In this case, you just need to replace the contacts without changing the entire lock; if the defect in the wires is not severe, then you can get by with cleaning the contacts.
Damage to the lock cylinder also occurs when someone tries to steal a car. In any case, the lock needs to be changed completely. But how to do it yourself?
Replacing the larva in Kalina
First of all, replacing the lock elements means that the door trim will be completely missing. Therefore, first we will figure out how to dismantle the trim on Lada Kalina cars. The second chapter is devoted to how to remove the larva and install a new one in its place. The last step will actually be the simplest.
Removing the door trim yourself
The casing is attached not only to screws, but also to plastic pistons. The number of screws holding the part in question is four:
Numbers here indicate all fastening elements. But to get to them, you need to remove the screw cap “3”, as well as the inner door handle. The pawl handle also needs to be unscrewed.
If these actions are completed successfully, the casing begins to be dismantled, moving it away from the metal. Dismantling is carried out starting from any of the corners, but care must be taken: the pistons holding the plastic are fragile.
If the package includes power windows, you will need to disconnect the connector connected to the button block. Also, another similar connector is present in most trim levels - where there is a central lock. Both connectors must be disconnected.
All the steps described here involve electronics in any case.
Therefore, at the stage before dismantling the trim, you need to open the hood, take the “10” key and unscrew the negative terminal. We are talking about the battery terminal, which can be connected last (when the last screw is screwed in). Anyone who breaks this rule will look for blown fuses. Draw a conclusion.
How to get to the door mechanism
According to the recommendation of the magazine "Behind the Wheel", in the absence of casing, access to the lock is always available. Simply put, there will be no need to remove the inner lining made of metal. The steel sheet is simply bent to the side.
The rotating part with the protrusion is called the “drive”, and this is what you will need next.
Replacing the larva will be easy:
- The key in the cylinder currently fixed in the door is turned 90 degrees;
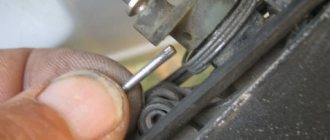
- Using a steel ruler, knife or thin screwdriver, you need to press the locking tongue located opposite the slot in the body of the cylinder. You need to place a screwdriver between the rotating and stationary parts of the mechanism. Know that in the driver's door the slot is made from the bottom (looks “to the floor”), in the passenger doors - from the top!
- By pulling the key towards you, the larva is pulled out;
- The new cylinder is installed like this: with the key inserted, it is pushed into the lock until it stops. The locking tab will need to be pushed inward.
The following photo illustrates the “second step”.
The slot itself, when the mechanism is assembled, is located between the drive and the lock body (at least that is how it is designed). You need to manage to squeeze a screwdriver into the space between these parts. Sometimes this action does not lead to a positive result, and then the lock has to be removed as an assembly.
Prevention
As a measure to prevent breakdowns, experienced specialists recommend periodically performing maintenance on electrical circuits. This requires a complete review of all wires and disconnectors twice a year for damage to the braiding and oxidation of copper contacts. Damaged parts or loose joints must be replaced with new ones.
Also, advice from “experienced” motorists speaks of the rationality of treating parts with special dielectric oil - this prevents air and moisture from entering sensitive areas and significantly increases the service life of devices.
The pinout of panels of the Kalina car from Lada is distinguished by its simplicity and reliability. There are no complex controllers or blocks here. Consequently, system maintenance and troubleshooting do not require in-depth knowledge of electronics or expensive tools.
When installing an alarm system, they most often make mistakes with connecting the central locking system. Standard central locking is now installed on many cars, and the Lada Kalina of generation “1” was no exception. But the fact is that in the “Norma” configuration one scheme for connecting locks is used, and in the “Lux” this scheme is different. And the connection of the signaling, of course, is also done differently. Let's consider how alarm and alarm systems can be combined if we are talking about any of the specified configurations.
Egnition lock
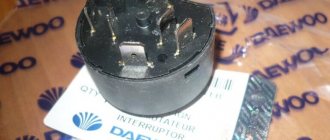
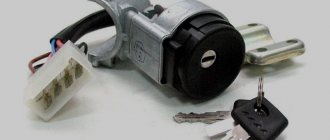
The ignition switch is a complex device designed to control the supply of power to vehicle systems, prevent battery discharge and ensure that the engine starts from the starter system. The castle includes two components:
- mechanical, represented by a lock cylinder;
- electrical, which is a set of contacts that close electrical impulses when the key is turned in one way or another.
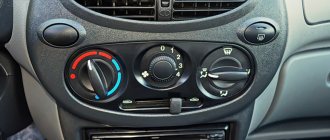
The ignition switch on the Lada Kalina has three modes:
- Mode "0". In this position, the key can be easily removed, and the lighting, emergency lights, and audio system work.
- Mode "1", fixed. It is no longer possible to remove the key from this position; when it turns on, the ignition system is turned on and power is supplied to all systems except the starter. But it is worth considering that keeping the key in mode “1” for a long time can lead to battery discharge. This position is used when turning on the starter, so that the running fuel pump pumps up the required pressure to ensure further ideal operation of the starter.
- Mode “2”—activation of the starter system.
The Lada Kalina ignition switch kit contains a key for the lock, which serves not only in its straight profile, but also as a key for the doors and trunk.
How to program new keys for Lada Kalina
This process is called immobilizer training. Its purpose is to write new key chips into the ECU memory in case the old ones are lost. This is relevant after replacing locks, keys, etc.
You need to perform the following procedure:
- Close all doors. Turn on the ignition and wait 6 seconds.
- Turn off the ignition. The immobilizer indicator on the panel will begin to blink quickly, confirming the start of the learning procedure.
- Pull out the red key and insert a new one, turn on the ignition. Wait for three beeps from the buzzer.
- We wait until the buzzer gives two more signals and turn off the ignition.
- If you need to train another key, then repeat steps 3 and 4. After completing training, insert the training key again for 5 seconds while the indicator is flashing and wait for three beeps. After this, two more signals should sound after some time.
- Turn off the ignition.
- We wait until the buzzer beeps once.
- Turn off the ignition for 2-3 seconds and turn it off.
- The hazard warning lights will flash and the horn will sound.
- Turn off the ignition and remove the learning key.
- We wait more than 10 seconds, then turn on the ignition with a new key.
- We wait 6 seconds and try to start the engine, if it fails, then turn off the ignition again, wait 10 seconds and repeat this procedure.
Keys with a built-in remote control for electric locks are registered in the same way.