Reasons why the PP stopped working
In fact, there are not so many of them and the most common are:
- The easiest one is poor contact between the panel and the electronic control unit. The problem is solved by replacing the plug or simply cleaning the contacts.
- A breakdown in the instrument panel itself or malfunctions. To solve the problem, all connectors are reconnected, taking into account the correct connection diagram.
- Malfunctions of the tachometer, speedometer, fuel level controller. In this case, the cause is mechanical or electrical. To troubleshoot problems, replace regulators or check the operation of fuses.
- The illumination of the VAZ-1215 software stopped working. In this situation, it is necessary to find out the cause of the problem.
It is unlikely that a simultaneous failure will occur in the operation of the sensors on which the operation of the PP directly depends. If we take into account that they do not work directly with devices, but through an ECU (electronic control unit), then, accordingly, malfunctions will lead to the PP stopping working. In addition, it is worth noting that the engine will also stop working.
There are situations when all devices on the panel stop working simultaneously. In this case, the car driver must check the condition of fuse F16, which has a power of 16 A.
To check, you must turn on the hazard signal or turn signal. If they don't work, it means the fuse has blown. Therefore, we can conclude that a short circuit has occurred. To fix the problem, check the electrical circuit.
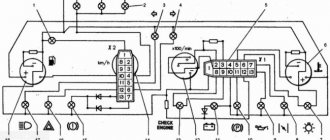
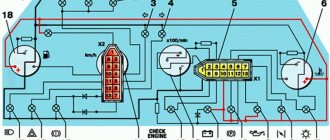
However, it also happens that the fuse is intact and in working condition, but the instrument panel on a VAZ-2115 car stops working. Here the reason is much more difficult to find out. The solution to the problem is to remove the instrument panel and check whether voltage is flowing from this fuse to the terminals of the white and red blocks. The white block supplies power to the speedometer, tachometer, and temperature gauge. And the red one is the fuel gauge.
If, as a result of checking, the terminals show a voltage of +12 V, then this indicates that the PCB does not work as a result of poor contact of the wire that goes to the ground of the car. If the +12 V voltage is not reflected at the terminals, then it is necessary to disassemble the mounting block and look for the cause of the problem.
Functionality check
After completing the replacement, install the panel inside the car, connect the connectors, but do not rush into final fixation - you still need to make sure that everything works properly.
To do this, turn on the ignition and see if the backlight turns on. Then check whether the indicator lights responsible for:
- hand brake;
- oil pressure;
- fault signal, etc.
Then test the turn signals, headlights and side lights. If everything is in order, then complete the panel assembly.
- https://bumper.guru/klassicheskie-modeli-vaz/tyuning/vaz-2114-ne-gorit-podsvetka-paneli-priborov.html
- https://remontvazov.com/ne-gorit-podsvetka-paneli-priborov-vaz-2114
- https://ladaprofi.ru/vaz-2114/skolko-vsego-lampochek-v-pribornoj-paneli-vaz-2114.html
Replacing dashboard lamps yourself
When the panel lamps stop lighting, you should immediately replace them with new ones. For this job we will need the following arsenal:
- Phillips screwdriver
- new light bulbs.
Let's get started
First of all, we remove the decorative trim of the radio (since the dashboard and radio are connected to each other, you will have to disturb the music system too), which is held on by fasteners; here it is better to use a screwdriver, threading it under the trim.
The main condition of work is caution. You need to start detaching the cover from the bottom edge. When the bottom edge comes off, you need to pull it towards you a little. Now detach the top edge. Further:
- Disconnect the wire directed to the cigarette lighter.
- In the same way as we removed the cover from the radio, we remove it from the dashboard. Above the left and right edges we find two self-tapping screws. They need to be unscrewed. We unscrew the screws located at the top and bottom.
- We remove the trim with a little effort (since it is also held on by fasteners, so the decorative plate will have to be rocked a little).
- We disconnect all the wires: from the alarm system, from the clock, from the headlights and other things.
- We remove the control panel itself, for which we unscrew the four screws on which it is held. In order not to damage the wires, it would be better to disconnect them on the one hand.
- Now the most important thing. We remove the sockets of the light bulbs that have stopped burning. To remove the cartridges, you need to turn them counterclockwise with a gentle movement. We replace the defective lamps with new ones, wrap them and install the entire structure in the reverse order of disassembly.
Why lamps burn out or stop working: causes and consequences
Burnt-out lamps complicate driver control over car instrument readings
We recommend: Car wheel balancing
The backlight operating conditions are not ideal: shaking, temperature changes, possible power surges in the on-board network, and so on. When driving, you must turn on low beam headlights. Along with it, the instrument lighting also turns on. This can shorten the life of the lamps, and over time, not the entire panel is illuminated evenly.
The main danger of lamps burning out in the instrument cluster is that some of them are control lamps. In this case, you may not know about the failure of individual machine components. And uneven illumination looks ugly.
Why there is no light in the VAZ 2114 interior: the secrets of an electrician
The electrical equipment system of the VAZ 2114 car includes a whole range of different lighting devices.
It's good when it's light in the cabin
Conventionally, they can be divided into the following groups:
- Headlight;
- Tail lights;
- Lighting in the cabin.
To make it easier for the driver to navigate the road at night, halogen low and high beam lamps are installed in front of the car in the headlight unit. Turn signal lamps are also installed in one unit with them, so that when repairing the car the entire unit can be removed. At the rear there is one block on each side, which includes brake lights, turn lamps and reverse lamps.
ONE OR MORE LIGHTS ARE NOT BURNING
In this case, there can be two situations:
- The backlight of the VAZ 2114 instrument panel does not light up;
- One or more warning lamps are not working.
Let's consider the first variant of malfunctions, when the backlight of the VAZ 2114 instrument panel does not work. You must begin checking the functionality of the backlight by checking the serviceability of the fuse in this circuit. This only applies when all the backlights are off.
The fuse box on this model, as well as on the VAZ 2113 and VAZ 2115, is located in the engine compartment on the driver's side. You need to remove its cover and find the fuse responsible for the backlight, this is F10. It is designed for a current of 7.5 A. If it burns out, replace it with a new one and check the operation of the backlight paws.
Further events can develop as follows: either everything works or it doesn’t. If the instrument panel backlight works, the test ends here, otherwise it is necessary to continue troubleshooting. It may be due to poor contact of the connectors or an open circuit in the power supply of the backlight lamps.
To find and eliminate these problems, you need to remember the basic concepts of the laws of electrical engineering, and have a car LED electrical circuit tester, tester or voltmeter. If there is neither one nor the other, then it is better to seek help from an auto electrician.
The situation is much simpler when one or more, but not all, backlights are off. Burnt out light bulbs are simply replaced with known good ones. From the practice of auto electricians, we can conclude that in most cases a fuse or light bulb blows. It rarely comes to troubleshooting using instruments, but sometimes it happens. You should be aware that if a replacement (new) fuse blows repeatedly, you should look for a short circuit in the electrical circuit.
In the second case, they do approximately the same, but take into account that there are no fuses for each indicator lamp. They try to replace the light bulb with a new one, if it doesn’t light up again, then the contacts need to be checked. As a rule, this is enough to troubleshoot problems. Otherwise, it is better to ask a specialist for help, because the sensor that works in conjunction with this warning lamp may be the culprit.
Dashboard lamps
The most common breakdown
Before digging into the inside of the car, check how securely the ground wire leading to the front panel is secured. A restless passenger in front often simply pulls him out of his place with his feet. To prevent the situation from repeating itself, after fastening it is worth insulating the wire from reach.
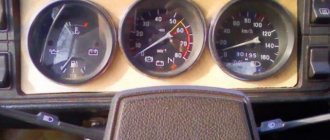
Its signs are very characteristic:
- All indicators do not work: speedometer, tachometer, odometer, fuel level recorder, coolant temperature sensor;
- The rest of the equipment - optics, radio, even the panel backlight - turn on normally and do not act up;
- The ignition works properly, the car does not refuse to start;
- Fuse F3 is almost 100% blown. It is located in the mounting block and will have to be changed. But first you need to find out why it was covered, otherwise the new one installed will suffer the same fate. In most cases, a short circuit is to blame for burnout. On well-used VAZ-2114, the fuse often blows after each wash. Instead of carrying a spare one, you need to figure out where moisture is getting into it.
The instrument panel backlight has disappeared, what should I do?
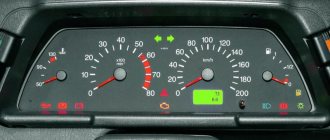
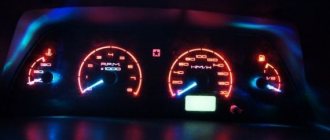
Ice-illumination of tidy
The dashboard going out is a nightmare for any driver, since with the disappearance of the light, other malfunctions may follow, such as non-functioning speedometer and other indicators.
Therefore, it is worth understanding that if the instrument panel does not light up, then this problem must be eliminated immediately , but not all car enthusiasts are capable of this.
It is worth understanding that if the backlight disappears, then the problem lies somewhere in the electrical circuits. This is where you need to look for the problem. This will require design knowledge of the vehicle's on-board circuit, a tester and related tools, such as electrical tape, a soldering iron or more. Of course, it is not always possible to eliminate the problem locally, and faulty products have to be replaced completely.
Causes of malfunction
Where does the problem lie? As mentioned earlier, it is worth looking for problems in electrical circuits. Let's look at the main locations where problems may be hiding:
- Fuse.
- Backlight bulbs and their electrical circuit.
- Wiring.
- There is a fault in the fuse box.
- Damage to the board.
Solutions
So, when all the main reasons are, so to speak, “in the face,” you can try to determine the exact location of the breakdown, and also fix it yourself. As always, it is worth noting that if a motorist does not know the design of the car or is not confident in his abilities, then it is recommended to contact a specialist car service center.
Fuse
General view of a blown fuse
Probably the first cause of all electrical circuit malfunctions is the notorious fuse.
This is where you should start troubleshooting. To find out which fuse is responsible for the instrument lighting, as well as its location in the mounting block, you should refer to the technical documentation. Also, on the fuse cover it is written which element should be checked. If the fuse is found and replaced, but the problem does not go away, then you should look for the source in another place.
Light bulbs
Light bulb in socket.
Incandescent lamp.
Recently, it has become fashionable to install LED lighting for the VAZ dashboard with your own hands. However, not all car enthusiasts correctly connect it to the on-board network. This can cause the light to go out at the most inopportune moment. So, it’s worth checking the contacts of the entire backlight circuit.
There have been cases where, as a result of bumps, all the light bulbs burned out at once. In this case, you need to look for a breakdown in the wiring, you can get stuck like that again!
The same applies to standard incandescent light bulbs that come with the car from the factory. Thus, a break or burnout of one of the light elements can lead to the fact that the entire backlight stops working. If you run the tester through the entire circuit, you can easily find an open circuit.
We recommend: Cleaning and adapting the throttle valve on a car
Wiring
The most unpleasant and hardest-to-test element of a car is the wiring.
Button for turning on the backlight and low beam.
Pinout of the backlight switch button.
So, a broken wire can cause the dashboard lights to stop receiving power and therefore not light up.
In order to eliminate the malfunction, you need to use a multimeter to test all the wires that are responsible for the car’s instrument panel lighting. So, any, even insignificant, wire that breaks can cause the light in the dashboard to go out.
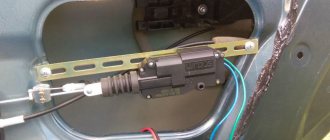
Oxidized contacts in the mounting block.
Another cause of malfunction can be oxidized wire pads.
Accordingly, there will be no contact, and not only will the light in the instrument panel not light up, but the other indicators located here may also not work. To fix the problem, you will have to disconnect the wire block on the fuse block and the parting panel itself. After this, clean the contact group and connect everything back. If everything worked, then the reason was found.
Safety block
Mounting block
Another important element that can rarely fail is the mounting block.
Thus, burnout can occur directly in the branches of the block itself or in the mounting socket. To eliminate the malfunction, you will have to remove the part from the car and check it sequentially using a tester.
Many auto mechanics do diagnostics directly without removing the safety block . But only professionals can do this, but the average car enthusiast will have to remove the product. If, after all, the mounting block “died”, then the element will have to be replaced, since it is almost impossible to repair it.
Check the contact group of fuses for malfunction.
The board is damaged
The worst thing that can happen and what every car enthusiast fears is the burning of the dashboard, or rather the control board.
There is only one way out - replacement, but many car enthusiasts manage to resurrect such elements using a soldering iron. Although, as practice shows, in 50% of cases it doesn’t last long.
The main reason for board burning is a short circuit. In this case, often the place where the wiring is connected and the most vulnerable point – the backlight – is on fire. If incandescent lamps are installed, they will be dark or black, but the LED backlight burns out in the places where the solder is connected to the board.
Lighting tuning
In order to save yourself from a lot of problems with lighting, you can install a VAZ 2114 interior lamp with customizable LED backlighting instead of a standard lampshade. Such tuning is within the capabilities of almost every motorist - it does not require either complex tools or extensive knowledge in the field of auto electrics. The most important thing you will need is to purchase a ready-made lampshade at a car dealership (it usually costs around 500 rubles).
LED lampshade VAZ 2114
For this money you will buy not just a new light source, but also such advantages as:
- efficiency;
- the presence of three customizable lighting modes with a memory function;
- delay before turning off (7 seconds) followed by smooth turning off of the backlight;
- function of automatically turning off the lighting when the door is not closed or not tightly closed after half an hour from the moment it was turned on (which is very convenient if you left the door open and did not turn off the lighting).
Removing the lampshade of the VAZ 2114
Installation of the LED lamp is carried out in the following order:
- Remove the plastic diffuser cap of the standard lamp (it is secured with latches).
- Disconnect the wires from the lamp contacts.
- Unscrew the screws (4 pieces) holding the lamp housing to the interior ceiling, and then remove the housing.
- Remove the diffuser cap from the new lampshade.
- Secure the housing of the new lampshade to the ceiling using self-tapping screws.
- Connect the wires to the contacts of the new lamp (in this case, be sure to take into account the attached diagram with the indicated polarity of the device. It is strictly forbidden to connect an LED lamp without taking into account the polarity).
- Secure the diffuser cover to the body of the new lampshade.
The new interior lighting installed in this way is brighter (at maximum mode) and will make night trips more comfortable for both the driver and his passengers.
What to do if the VAZ-2115 instrument panel does not work
As mentioned above, it is necessary to establish the cause of the instrument panel malfunction. If they are significant and cannot be repaired, then in this case it is necessary to install a new PCB. For a better outcome when installing the panel, you need to know and follow the following instructions:
- Replacement of the instrument panel is carried out strictly in accordance with the pinout.
- First you need to disconnect the cable going to the cigarette lighter.
- Dismantle the control panel. It is necessary to unscrew 2 screws located along the edges, top and bottom of the instrument panel.
- The next step will be to dismantle the lining. The difficulty is that it is held in place by clamps, so you need to swing it a little.
- After this, all wires going to the instrument panel are disconnected (light alarm connector, clock, speedometer, fuel level sensor).
- The very last step is to dismantle the control panel. All the bolts that secure it are unscrewed. At this stage, you should perform actions very carefully, as you can really damage the wiring.
Dashboard lamps
The dashboard provides the driver with a lot of useful information that allows him to monitor the condition of the car, the driving process, diagnose breakdowns in a timely manner and correct them. So, the panel light comes on for the following reasons:
- The battery is not charging.
- For one reason or another, the handbrake is stuck.
- Not enough fuel in the tank.
- The oil pressure has decreased (which indicates the need to urgently stop the engine to avoid more serious consequences).
- Excess water in the filter. To prevent water from entering the pump, which could lead to damage, you need to drain excess water from the filter.
- The fuel system is malfunctioning.
- There was a failure in the propulsion system and much more.
We recommend: How to install bi-xenon H4 with your own hands: diagrams and connection sequence
As you can see, the panel lamps allow you to determine what is wrong in the car; if the lamps themselves fail, then you can miss a very important breakdown, which can even lead to an accident. This is why it is so important not to delay replacement (the lamps cannot be repaired).
Today, the car market offers a wide range of lamps for the control panel, ranging from the standard version, which is cheaper but also has average characteristics, to modernized versions that give the panel, and therefore the entire atmosphere of the car, a different, more expressive atmosphere.
Professionals also advise replacing standard lamps with LEDs, which largely decorate the panel.
So, we list several of the currently most popular options suitable for the VAZ 2114.
- LED lamps Sho-Me SM-T5 (blue, white and red). Country of origin: Korea, price: 80 rubles. for a couple.
- High-brightness SMD LED module – 20 rubles.
- LED Sho-me SM-T5-cap-super (white) – 50 rub.
- Halogen lamps from Osram and Philips cost approximately 40-80 rubles apiece.
As you can see, prices for lamps are not high. It is worth noting that replacement takes very little time, which we will talk about later.
Solution
The stores offer several options for light sources for replacing lamps in the instrument cluster:
- traditional incandescent lamps,
- LED in a plastic socket,
- SMD LED is a more expensive and reliable option, a super-bright diode.
The choice will always depend on financial capabilities and lighting preferences
The number of backlight and control lamps is up to 19 pieces. It varies slightly depending on the design of the instrument cluster and the modification of the vehicle. Many car owners choose LEDs due to lower energy consumption and longer service life. This backlight is brighter and gives an interesting bluish color instead of the standard green. But due to the design of the diode, the brightness control of the instrument illumination will not work, always turning it on at full power. On a long road trip at night, this can be distracting and irritating to the eyes. But in any case, the choice of light sources is yours.
If you are going to install LEDs, it is recommended to first check them with a tester for the absence of a short circuit.
FakeHeader
Comments 84
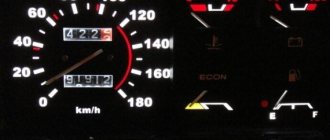
Who can tell me, I changed the tidy to blue, how to make the arrows bright red, otherwise they are not visible at night
I borrowed scarlet nail polish from my wife and painted the arrows with a thin layer on all sides.
normal, 7000 on the tachometer 180 on the speedometer