Good afternoon dear friends. Replacing light bulbs on a VAZ 2107 is not complete without partially disassembling the car’s elements. So, for example, if the lighting of the devices is dim, then many owners install LED lamps instead of standard lamps. To get to them, you need to remove the tidy. Today we will learn how to remove the instrument panel on a VAZ 2107 , an explanation of each step of the operation with a detailed video tutorial. Let's share the nuances of the work so as not to break anything.
Replacing light bulbs
To change the lights on the tidy, you first need to remove it.
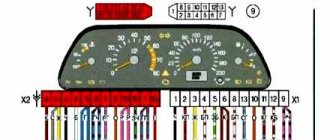
How to do this is indicated above. After dismantling it will need to be disassembled. This is done by snapping out the terminals. The result should look like this.
The photo above shows the location of the light bulbs mounted in the car's dashboard.
After disassembly, you need to unscrew the illuminator along with the socket and install a new element in its place.
There are only two types of light bulbs used on the car panel.
- Direct lighting – AMN 12-3-1. Modern standard T3W.
- Indicators A12-1.2 or, in a new way, W1.2.
Seven dashboard design
In terms of science intensity and level of professionalism, there can be no special complaints about the person performing this operation. If the owner knows how to disassemble an electric kettle and what is the best way to do it, then how to remove the instrument panel on a VAZ 2107 will certainly not raise any questions. Difficulties will appear only the first time, when before this you have not had to disassemble the Zhiguli front panel and pick out the tidy from it.
Absolutely all modifications 2107 and 2105 have a similar algorithm for dismantling the tidy, which we will announce today to help desperate owners who decide to spend a day off replacing a light bulb. First you need to be patient, this is the most important thing, and then have a good set of screwdrivers of different lengths and thicknesses. We will use them as assembly blades and manipulators where it is physically impossible to reach with our hands.
When to remove the tidy
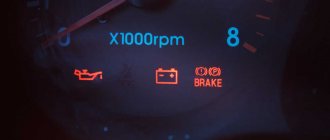
Repairing the dashboard can be useful in the case when any of the control lamps simply burns out, and this is extremely undesirable, since the car no longer has any means of monitoring such systems as, for example, the state of the injection engine control unit (naturally, in the latest 2107 models years with an injector). The Check Engine lamp appeared only in sevens with these motors, and if it burns out or loses contact with the circuit board due to vibration or moisture, then one can only guess at the reasons for the unstable operation of the engine.
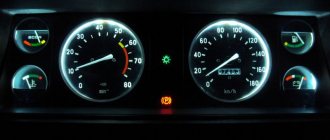
Well, the instruments themselves, the tachometer, speedometer and sensor status indicators in the systems, rarely fail, if ever. By the way, you should pay attention to the tidy at the moment when the ignition key is turned and all the lamps flash in test mode, so to speak. It is this moment that will make it clear that the control lamp of a particular system does not work and explanatory measures need to be carried out with it.
Removal and installation procedure
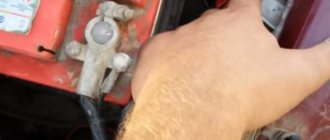
Before starting removal work, it is necessary to turn off the power to the car. To do this, simply disconnect the negative terminal from the battery. For some, it is enough to turn off the ground, while others simply remove the terminal. The following order will be:
- Removal will be hampered by the control knobs for the interior ventilation and the coolant supply valve to the heater radiator. In this case, a screwdriver comes to the rescue;
- The next step is to release the daily mileage reset handle. It is located on the right side of the dashboard near the hazard warning switch. You need to unscrew the fastening nut, remove it along with the washer and push it inside the panel;
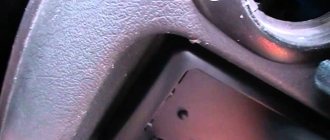
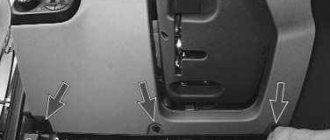
- On the right side of the “tidy” in the area of the heating and ventilation control levers, there is a plug that needs to be removed. A thin slotted screwdriver does this well. There is a self-tapping screw under the plug that needs to be unscrewed;
- After this, you need to lightly pull the right side of the panel towards you. It is not yet possible to pull it out any further. This is prevented by the speedometer cable, econometer hose and wires;
- The speedometer cable is secured with a knurled nut, which can be unscrewed without much effort. The only problem that can “spoil” the image of a repairman is the presence of grease on the speedometer cable sheath. Therefore, it is better to perform this operation with gloves. It is best to dismantle the cable from the right side of the panel or from above; this will not be possible in other places;
- Next, you need to remove the hose that supplies vacuum pressure to the econometer. It attaches without clamps, you just need to pull it towards you. Some effort may be required;
- This is not the end of the removal procedure; the shield is held in place by wires. They are combined into multi-colored plastic connectors. When releasing them, remember how they were located, so that later when assembling they are correctly installed in place.
What is needed for withdrawal?
The removal process for this model is somewhat different from other cars. For example, on a VAZ 2106, to remove it you need to release the latches, after which it can be easily removed from its installation location. All that remains is to remove the wiring and disconnect the speedometer cable to completely remove the panel. For a model like the VAZ 2105, the principle is completely different. Its installation in the socket is secured with mounting screws.
“Seven” has a completely different panel compared to its predecessors, which differs not only in appearance, but also in the way it is installed. No special tools are required for removal and installation. A standard set of slotted and Phillips screwdrivers is quite sufficient. This is quite enough to perform this operation.
The most common reasons for dismantling
There are a lot of reasons for removing the tidy on a VAZ 2107, and some of them can be called banal, but nothing can be done. The most common reason when you need to remove the instrument panel is a burnt-out backlight bulb. Replacing light bulbs in the dashboard of a VAZ 2107 is carried out only when dismantling the device, and this procedure is simply impossible to perform otherwise.
The dashboard on the VAZ 2107 must also be removed for a number of the following reasons:
- Malfunction of pointer indicators.
- Failure of the instrument lighting, as well as lack of functionality of the arrow indicators.
- Replacing the device with a new one, for example, if a digital panel is installed instead of the factory instrument panel.
- Tuning or upgrading the device.
As practice shows, most often the need to dismantle the dashboard arises precisely because the backlight bulb burns out. If the device is dismantled for this reason, it is recommended to immediately replace conventional light bulbs with LED ones.
Required Tools
Before starting work, you will need to prepare the necessary tools so that you do not have to be distracted during the process. Despite the fact that the work of removing the device in question is quite labor-intensive, to implement it you will need a small set of tools, including:
- Phillips and slotted screwdriver.
- Electrical tape to indicate chips that are disconnected from the device.
- Work gloves for unscrewing the speedometer cable.
When all the tools are prepared, it remains to make sure that the parts and elements that are planned to be installed or replaced on the dismantled device are available. After this, we proceed to perform the main part of the work.
Important points
- Before removing wires and connectors, it is recommended to mark them to make reassembly easier. It is convenient to apply these marks with a black marker or felt-tip pen (because most of the connectors under the dashboard are white).
- You need to carefully remove the upper part of the steering column protective cover, as you can damage the rubber ring on the ignition switch (it gets caught on the edge of the cover and breaks easily).
- When removing the additional panel, do not tilt the screwdriver too much: the clamps that hold this panel are plastic and break very easily.
As can be seen from this article, removing the dashboard on a VAZ 2107 is a labor-intensive task, but it is doable. The main thing is to adhere to the instructions outlined above and not to use too much effort when removing: the panel material, despite its apparent strength, breaks quite easily.
Source
Checking the speed sensor
How to remove a torpedo on a VAZ-2110: step-by-step instructions
The easiest way to check the speed sensor is to install a new one in its place. The price of the part is low, so this is the easiest and fastest way to make sure it is working or broken. If you don’t have a new VAZ 2107 speed sensor at hand, you should first check the old one, and then go to the store for a new one. To check the operation of the speed sensor, you will need a small plastic tube with a diameter corresponding to the thickness of the sensor axis, and a voltmeter (multimeter). The check is performed in the following sequence:
- connect a voltmeter to the sensor output that supplies electrical signals and to the vehicle ground;
- put the tube on the sensor axis;
- rotate the tube.
As the tube rotates, the voltage at the sensor output should increase in proportion to the rotation speed. If this does not happen, the VAZ 2107 speed sensor needs to be replaced.
Tip: In a similar way, you can check the speed sensor directly on the car. To do this, you need to hang up one of the drive wheels, connect a voltmeter to the sensor output and ground, and start rotating the wheels. If voltage and pulses appear, the sensor is working.
Instead of a voltmeter, you can use a test lamp. In this case, when checking the functionality, voltage must be applied to the “positive” output of the speed sensor. If the light flashes when you rotate the sensor, the problem is not with the sensor. You will have to check other components and parts of the “seven” that could affect the operation of the engine ECU.
source