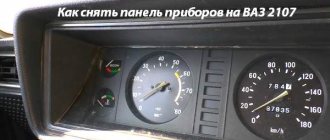
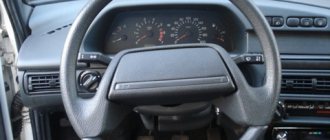
Instrument panel - removal and installation
1. Prepare the car for work and disconnect the terminal from the negative terminal of the battery (see “Preparing the car for maintenance and repair”).
2. Using a Phillips screwdriver, unscrew the three self-tapping screws securing the left trim of the instrument panel console.
3. Remove the trim, removing the protrusion in its lower part from the body bracket.
4. Using a Phillips screwdriver, unscrew the five screws securing the right trim of the instrument panel console.
5. Disconnect the wiring harness block from the cigarette lighter.
6. Disconnect the wire connector from the cigarette lighter lamp.
7. Pushing out from the inside, we take out the niche for small items.
8. Using a Phillips screwdriver, unscrew the two fastening screws and recess the diagnostic connector block inside the panel.
9. By pulling towards yourself or prying it with a screwdriver, remove the handle of the heater electric fan switch.
10. Using a narrow slotted screwdriver inserted between the lever and the handle, remove the handle from the lever.
11. Using a Phillips screwdriver, unscrew the two screws above the instrument panel.
12. We also unscrew the two screws under the instrument panel.
13. Using a screwdriver, remove the plug and unscrew the screw of the upper fastening of the instrument panel trim.
14. Unscrew two self-tapping screws (the second is on the right side of the lining) of the lower fastening of the lining.
15. Move the trim slightly away from the instrument panel.
16. With a marker (or in another way) we mark the order of connecting the wiring harness blocks to the switches.
17. Disconnect the wiring harness connectors from the switches.
Note: If it is necessary to replace the instrument panel trim, remove the switches from it.
19. Unscrew the bolts securing the steering column bracket and lower the column down (see “Steering column - removal and installation”).
20. Using a Phillips screwdriver, unscrew the two self-tapping screws securing the bracket to the panel.
21. 8 mm
Unscrew the two self-tapping screws securing the bracket to the right cross member.
. as well as two self-tapping screws for the lower bracket mounting.
22. We move the bracket with the control unit and the relay and fuse box to the side.
23. Using a Phillips screwdriver, unscrew the self-tapping screw securing the light guide and remove it from the instrument panel.
24. Using a Phillips screwdriver, unscrew the four self-tapping screws securing the heater control unit and recess it into the panel.
25. From the inside of the panel, turning 90°, remove the socket for the backlight lamp of the heater electric fan switch handle.
26. Having released the lock on the right side of the air duct, remove it from the panel.
27. Pull it towards you and remove the headlight hydraulic adjustment handle.
28. In the same way, remove the instrument lighting control knob.
29. Using a screwdriver, remove the decorative insert of the instrument panel.
30. To avoid damaging the light guide, use a Phillips screwdriver to unscrew the screw securing it and remove it from the panel.
Warning! The light guides for the illumination of the heater electric fan switch handles and the headlight hydraulic adjustment are not interchangeable.
21 mm socket wrench
(spark wrench), or using pliers with narrow jaws, unscrew the nut securing the hydraulic corrector (1) and recess it into the instrument panel.
32. In the same way, unscrew the nut securing the instrument backlight control (2) (see photo above).
33. Turn the light bulb socket 90° and remove the hydraulic corrector illumination lamp from the panel.
34. Disconnect the wiring harness connectors for the instrument backlight control.
35. Disconnect the two connectors of the immobilizer sensor wires.
36. Disconnect the wiring harness block from the immobilizer unit.
37. Disconnect the wiring harness connectors for the glove box lighting lamp.
38. Disconnect the wiring harness connectors for the portable lamp socket.
39. Using a Phillips screwdriver, unscrew the two screws for the top fastening of the panel (the second screw is located on the right side).
40. Unscrew the two screws of the lower panel fastening.
41. Using a Phillips screwdriver, unscrew the self-tapping screw securing the panel to the left cross member.
42. Remove the instrument panel.
Install the instrument panel in reverse order.
Dashboard tuning
If you want to somehow improve the appearance of the dashboard or make it functional, you can tune it.
The most common type of dashboard tuning is installing new lamps in the instrument lighting or installing additional lighting. Most often, lamps are replaced with lamps with a different color of luminous flux (for example, green or blue). The color selection should be such that it does not irritate the eyes, especially in the dark. Additional lighting is used mainly for the lower part of the panel at the feet. To do this, you can buy a ready-made set of LEDs and connect them to the car’s on-board network.
Another tuning method involves changing the appearance of the instrument scale. To do this, you can print ready-made solutions on a color printer, glue them to hard cardboard and install them instead of the old scale. It is worth considering that the lighting of the new scale may differ slightly from the factory one. Therefore, important criteria will be the color of the scale and the material to which it will be glued.
A more serious modernization involves changing the appearance of the panel itself. To do this, it can be painted or covered with new material. If you decide to cover the panel, then use only approved materials. Ordinary fabric and fur are prohibited, as they are flammable. The color of the upholstery should be chosen in accordance with the general background of the interior. A combination of two colors at once (for example, beige and brown) looks great.
How to remove the dashboard and instrument cluster on a VAZ 2114-2115
Added Mar 31, 2015 to Dashboards
In today's article we will look at the process of removing the instrument panel from cars of the VAZ 2114-VAZ 2115 family. Before moving directly to the description of the dismantling process itself, we will understand the design itself and the method of securing the dashboard. To do this, let's look at the corresponding diagram:
- The instrument panel (also known as the dashboard) is the main part of the entire structure, on which are fixed: the instrument cluster, on-board computer, heating system control knobs, switches and other elements.
- A protective and decorative cover on which air ducts are provided, through which the car windshield is blown.
- Mounting bracket.
- Decorative plug.
- Ashtray cover.
- Cross members to ensure structural rigidity.
- Left and right decorative panels of the center console.
- Instrument panel panel.
- Central mounting bracket.
So, we’ve sorted out the theory, we can move directly to practice. By the way, as an addition, we recommend that you familiarize yourself with the material devoted to the modification of the VAZ2115 dashboard - tuning the VAZ2114-2115 dashboard.
Torpedo device
What is a torpedo? In short, this is the dashboard. The word “torpedo” came to us from the West and has now become firmly established in the everyday life of domestic car enthusiasts.
Dashboard of a VAZ 2115 car
The instrument panels on the VAZ 2113, 2114 and 2115 are almost the same. These are complex collapsible structures made of metal with plastic inserts. In addition, in the panels of this line of VAZ models, engineers actively used polymer film, which covers most of the controls.
Diagram of the main elements of the VAZ 2115 dashboard
We remove the dashboard from a VAZ 2114 (VAZ 2115)
The process of dismantling the dashboard is as follows:
1. Disconnect the negative terminal from the battery. We also remove the radio, if installed. To do this, simply pull the radio out of its seat on the dashboard, disconnect the wiring harness block from it and completely remove it.
2. Using a small Phillips screwdriver, unscrew the screws securing the left decorative trim of the center console. We remove the trim, carefully removing its lower part from the body bracket.
3. Now we need to remove the right center console trim. To do this, unscrew the five screws and, holding the cover with your hand, remove it.
4. Remove the handles of the heating system control levers. In order not to damage the handles and remove them quickly, use a thin flat-blade screwdriver to pry up the latch on the handle, thereby freeing it from the protrusion on the lever.
5. Remove the heating system fan control knob. To do this, pull the handle with some effort until it is removed.
6. Unscrew the right screw that secures the instrument panel trim to the bracket. We also unscrew the screw on the left side of the instrument panel trim.
7. Unscrew the two screws in the upper part of the “window” of the instrument panel. After this, unscrew the two screws that are located directly under the instrument cluster.
8. Using a straight screwdriver, pry up and remove the decorative plug, which is located on the right side of the rear window heater switch.
9. Unscrew the self-tapping screw located under the plug.
10. Move the decorative trim of the instrument panel towards the steering wheel. We disconnect the wiring harnesses from the key switches, as well as from the on-board computer unit.
11. Completely remove the dashboard trim.
12. Using an “8” spanner, unscrew the self-tapping screw securing the dashboard on the left side. We do the same with the screw on the right side.
13. From the seat of the instrument panel, remove the housing of the nozzles of the interior ventilation and heating systems.
14. Using the “8” key, unscrew the screws securing the dashboard to the right cross member (one on the right, the second on the left).
15. Unscrew the fastening screw and move the dashboard bracket to the side together with the relay block and fuse block.
16. Remove the headlight hydraulic corrector and the instrument lighting switch.
17. Unscrew the screws of the steering column casing and remove it. After this, remove the steering wheel and steering column switches. Lower the steering column to the lower position.
18. Using a Phillips screwdriver, unscrew the self-tapping screw of the lower left fastening of the instrument panel. Then unscrew the top fastening screw.
19. Unscrew the lower and upper screws securing the dashboard on the right side.
20. Remove the “ears” of the right and left crossbars of the dashboard from the mounting studs on the steering column.
21. Move the dashboard slightly towards you and disconnect the wire connectors for the glove compartment lighting.
22. Disconnect the block with wiring harnesses from the glove compartment lighting switch.
23. Disconnect the connector block of the socket for connecting a portable lamp.
24. Remove the dashboard together with the cross members.
25. Install the instrument panel in the reverse order of removal.
Important points regarding replacement
- When removing the right side of the console, be careful. Behind it are wires that can easily get caught on the side and be damaged. So before removing this cover, you should remove the negative terminal from the battery. You should also turn off the car radio by removing its connector from the common wiring harness located behind the upper instrument panel;
- Removing the plastic handles from the stove levers can cause serious difficulties. The fact is that there are protrusions on the stove levers (top and bottom), and holes on the handles. When you put the handle on, it snaps onto the lever. The only way to remove it is to pry it off with a flat screwdriver as shown in the picture. But when prying up the handle with a screwdriver, you should not bend it too much: the plastic breaks very easily;
The handles on the levers of the VAZ 2115 stove can be removed using a flat screwdriver
So, a novice car enthusiast is quite capable of removing the dashboard from a VAZ 2115 and other cars in this line. All that is required is patience and attentiveness. If, after unscrewing all the fasteners, the dashboard stubbornly refuses to come off, you should inspect everything again: it is quite possible that some tiny screw was missed.
Photo review of installation and removal of the instrument panel VAZ 2113-2114-2115
VAZ / 2113, 2114, 2115 / repair / body / instruments, seats / Photo review of removing and installing the instrument panel with your own hands
Photo review of removing and installing the instrument panel with your own hands.
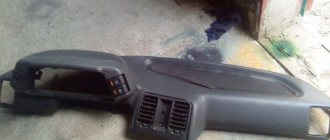
To remove the instrument panel of Lada Samara 2, disconnect the ground wire from the battery. Unscrew the fastening screws and remove the steering shaft facing casing and the ignition switch, disconnecting the wires from it. Remove the handles from the heater control levers and the headlight hydraulic adjustment handle.
- Instrument panel and its accessories
- 1 – instrument panel
- 2 – instrument panel trim
- 3 – bracket
- 4 – plug
- 5 – ashtray
- 6 – right cross member
- 7 – right console screen
- 8 – instrument panel panel
- 9 – central bracket
- 10 – left console screen
- 11 – left cross member
Unscrew the screws and disconnect the screens from the dashboard console - left 10 and right 7. Unscrew the screws securing the instrument cluster to the panel, fastening the panel to the cross member 6. Remove the decorative plug 4 and unscrew the screw securing the panel to the instrument panel of the VAZ 2114. Remove the instrument panel panel assembly with a cigarette lighter, switches for lighting VAZ 2115 devices, hazard warning lights, fog lights and rear window heating. Disconnect the electrical wires.
Remove instrument panel 1 as an assembly with trim 2 by removing the four screws securing it to brackets 3 and 11.
What's next
After all devices are disconnected from the car, you need to remove the handles from the heater switches.
This can be difficult to do, because they are fixed quite firmly. To install the handles, special latches are used, which are installed inside. There is a small protrusion on each handle that will help us remove them. You just need to get into this hole with the tip of a minus screwdriver, then pick up the latch and lift it up. The further procedure is as follows:
- The handle of the stove motor is removed. It is enough just to slightly pull it towards you;
- The torpedo is fastened to the instrument block using several self-tapping screws. They are removed using a “plus” screwdriver;
- Next, you need to remove the plug. It is fixed with a single self-tapping screw that needs to be removed;
- The cover is held in place by two fasteners. And again the screwdriver comes to our aid;
- Let's move on to the cables that are connected to the switches. They must be carefully removed, having previously marked each of them;
- Next, remove the steering mount bracket bolts;
- remove the fasteners from the bottom of the bracket. The key to 8 will help us here;
- remove the light guide;
- Next in line is the heating system control unit. Unscrew the fasteners and remove the cartridges;
- in front of us is a decorative insert. We also don’t need it, so we temporarily get rid of it;
- remove the hydraulic corrector;
- The last step is to dismantle the upper and lower fasteners.
That's all, actually. Now the torpedo is carefully removed, and you can perform any necessary actions with it. Assembly is carried out in reverse order. The procedure is quite complex and troublesome, filled with various little things, so please spare yourself time and patience. If any points remain unclear to you, you can watch the video on our website.
VAZ 2115 | Removing and installing the front panel assembly site (“dashboard”)
On vehicles equipped with airbags, after disconnecting the negative battery cable, wait 20 minutes before working on any airbag system components. (refer to the Section Removing and reinstalling components of the auxiliary safety system (SRS)).
Clamping pins are used here, consisting of two elements, which can be removed as follows: press the rod in the center of the pin as deeply as possible, using a screwdriver with a narrow blade. Slide the tines of the old fork under the head of the stud and lift it out of the panel. Carefully lower the panels away from the front panel and remove them from the metal mounting tabs on the bulkhead.
If the vehicle is equipped with a passenger airbag, a detailed description of the removal procedure is given in the Section Removing and reinstalling auxiliary safety system (SRS) components.
Why is the dashboard replaced?
Most often, the reason why the driver takes this step is an accident. After it, the dashboard becomes unusable: it cracks and loses its original appearance. There are situations when the shape of the product has not changed, but rather ugly cracks have appeared on it, which violates the overall aesthetics of the car.
There are many difficulties in this operation. The first of these is connecting electrical receivers. The fact is that many drivers forget to insert a plug and the device simply refuses to work. In this regard, everything has to start all over again. The second difficulty is dismantling. Most often, during disassembly, drivers accidentally break some fastener or device. All this forces the driver to turn to the services of auto repairmen and pay considerable sums for the work performed.
Removing a VAZ 2115 torpedo
remove the dashboard of a VAZ 2115
Torpedo is the modern name for the dashboard. At first it was used for foreign cars, but now this name is used by motorists in the CIS countries. The dashboard in the VAZ 2114 car is a collapsible iron structure containing plastic elements, see https://evpahealth.org.ua/video/3336370-otzhimaniya-rekord-video/. It also uses polymer film and polymer foam, which cover certain controls. The device panel contains a huge number of control devices and control parts.
Advice: a good way to decorate the interior of a VAZ 2114 is to reupholster the dashboard with genuine leather or eco-leather. The costs of such an update are small, but with proper design, great results can be achieved. Also in the VAZ 2114 they practice covering the visor and roof. Tuning can be done independently, but if you don’t have time, you can contact a car workshop.
Removing the dashboard can be useful in this case if the owner of a VAZ 2114 wants to change the heater radiator or even the entire stove. To get to these parts, you will definitely have to disassemble the dashboard. Depending on the purpose, the analysis may or may not be complete. For example, dismantling a heater core requires only partial removal of certain parts. For some body work, it is imperative to remove the dashboard, because the structure may be damaged during repairs. Disassembly of the structure is required when the motorist decides to increase sound insulation in the car interior - for this it is necessary to seal the wheel arches, hood, doors and dashboard.
Sound insulation of the VAZ 2115 engine shield, (gluing) of the instrument panel and all plastic parts of the car
How to remove
dashboard (
torpedo
) on a VAZ 2114
The automobile dashboard of a modern car is an independent part of the car's interior. And one of the most important components, which must meet two requirements and solve two important problems. Provide the highest functionality and create a sense of aesthetic satisfaction combined with the awareness of the comfort provided by a particular panel, with convenient glove boxes, cup holders, instruments and control buttons, as well as pleasant, dim lighting.
Instrument panel VAZ 2114
What is included in the design?
To make it easier to remove the entire dashboard or its individual elements, you need to know what the structure consists of. In a VAZ 2114 car, the dashboard includes 11 main elements, which are shown below:
Dashboard base. It contains controls for interior systems.
- Overlays. This part is needed to securely fasten the base.
- Bracket.
- The sealing element is a plug.
- Ashtray.
- Crossbar, there are two of them. The number “6” shows the right one.
- Right dashboard screen.
- A shield that blocks access to the wiring.
- Central bracket.
- Left screen of the instrument panel.
- Left cross member.
In VAZ cars, you can improve the appearance of the dashboard. To do this, you need to unload the dashboard from the dials. More stylish and modern information devices are usually installed to replace them. The same applies to the backlight; if you wish, you can update it yourself and install modern original LEDs.
By dismantling these elements one by one, you can completely disassemble the dashboard. Below you will find detailed instructions with which the motorist can completely remove the dashboard elements from the car.
Instrument panel VAZ 2114
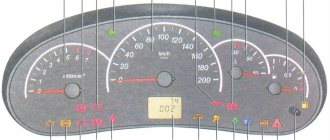
Cars of the Samara-2 family are equipped with a modern VAZ 2114 dashboard, which is also called “Europanel”. Designers have worked on it to ensure that it has a good front view, good looks, combined information and ergonomics, while at the same time helping the driver cope with normal everyday needs. And they mostly succeeded. A block of instruments and sensors installed in front of the driver’s eyes, behind the steering wheel, provides him with as much information as possible:
- In the central part there are two switching devices, on the left. engine speed indicator, by which the driver determines at what load the power plant is operating at a certain moment and, if necessary, corrects this process by switching speeds; in the window under the arrow there is a digital clock. On right. speedometer or current vehicle speed indicator, in the window under the arrow. digital indications of the distance traveled during the entire period of operation of the vehicle and the last trip;
- At the top between the indicator instruments is a turn signal indicator light with green arrows indicating left and right;
- In the lower central part. red triangle “stop signal”, and below it CHECK ENGINE. red signal of engine emergency conditions in accordance with information from the electronic on-board device;
- On the left middle side of the instrument panel
there is an engine temperature gauge, or coolant temperature gauge as it is called in the literature, and above it there is an icon that lights up when the engine is overheating. Under him. throttle icons, oil pressure, handbrake and battery activation; - In the right middle part there is an arrow indicating the presence of fuel in the fuel tank, above it there is an icon of a fully filled tank, below. icon for the minimum amount of fuel in the tank, as well as icons. low beam, low brake fluid and warning light.
Functions
It is incorrect to assume that the DS serves solely to transmit information regarding the current speed of the vehicle. In fact, this device has several tasks.
- Transferring information to the dashboard, namely the speedometer, about the speed of the car.
- Supports optimal functioning of the idle air control.
- Transferring data to the electronic control unit in order to maintain optimal speed depending on the travel mode.
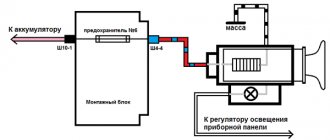
The DS is connected to the speedometer and controller using a mounting block located in the engine compartment. And inside the car, directly on the heater fan relay, there is a sensor fuse.
Errors and symptoms
If the device starts to work incorrectly or breaks down, you should pay attention to the on-board computer screen. Diagnostics of errors will determine that the DS has stopped functioning properly and measures should be taken to eliminate the breakdown
Error code
What does it mean
This error indicates that the computer does not receive a signal from the speed sensor.
This error code informs about the receipt of an unstable signal from the DS, which is intermittent.
If these error codes appear on the dashboard, you should definitely inspect the electrical circuit for oxidation or damage to the integrity of the contacts. Often it is because of this that the DS stops transmitting information.
But there are other signs by which you can determine that the DS is out of order:
- On the dashboard, the speedometer shows incorrect speed data or the needle does not move at all;
- With a slight acceleration, the speed floats, the engine switches off on its own;
- Fuel consumption increases;
- Engine power is noticeably reduced.
These signs may be signals of problems with other systems. But if you find one of the characteristic signs of a DS failure, plus one of two error codes appears on the on-board computer, then the problem lies precisely in the speed sensor.
Functionality check
The check is performed in several ways. Decide for yourself which one you prefer.
Checking the operation of the DS
Before doing this, be sure to check the condition of the wiring and contacts. If they are oxidized or rusted, or there are breaks in the circuit, then the DS itself may well be operational. You just need to return the wiring and contacts to a functional state. If the check shows that everything is intact and there are no problems with the contacts, then diagnose the speed sensor.
- If you don’t want to remove the DS, then place the car on a level surface, secure it with blocks and lift the left front wheel with a jack. Connect the voltmeter to the contacts of the sensor and begin to rotate the wheel with your hands. At the same time, look at the voltmeter data. If the voltage increases with frequency in proportion to the increase in wheel speed, the DS operates normally.
- Another method also does not require removing the measuring device. But for this you will need a test lamp. Use a jack to lift the left front wheel and connect the test lamp to the DC contacts. After this, manually rotate the wheel. If the lamp lights up, the sensor is working well.
- The third method involves dismantling the sensor and then checking the input and output voltage. The device for measuring the indicators will be a voltmeter.
- The fourth method is actively used by those who prefer to repair their car with their own hands. Here you have to check the sensor drive. To do this, lift the wheel using a jack and remove the sensor. Feel for the DS drive, and then begin to rotate the wheel. You can feel with your fingers that the drive rotates. If there are no jams, everything rotates evenly, then the drive is in good condition.