Added Mar 30, 2015 to Dashboards
VAZ 2170 is a fairly popular car from the domestic automobile industry. It is popular both among ordinary car enthusiasts and among professional tuners who are involved in radical improvements in all parameters: appearance, interior, driving performance.
In this article we will talk about the process of removing the instrument panel, as well as dismantling the instrument panel itself, that is, the dashboard. There is no need to explain why this may be needed: either for repairs or for tuning. By the way, regarding tuning, as an addition to this guide, we recommend that you read the article: modification of the Priora dashboard.
Removing the instrument panel
We carry out work to replace the instrument panel, panel wiring harness and elements of the heating and ventilation system.
Disconnect the wire terminal from the negative terminal of the battery. We remove the steering column switches (see “Removing the steering column switches, switch connector and spiral cable drum device”). Remove the cover of the fuse box (see “Replacing fuses and relays”). We disconnect the wire blocks from the ignition switch (see “Removing the ignition switch, replacing the contact group and immobilizer coil”). We disconnect the wire blocks from the electric power steering control unit (see “Removing the steering column”). Remove the floor tunnel lining (see “Removing the floor tunnel lining”). Overcoming the resistance of the plastic latches... ...we remove the upholstery of the left A-pillar. Similarly, remove the upholstery of the right front pillar.
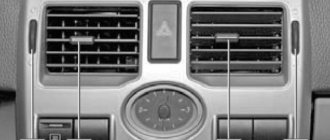
Using the blade of a slotted screwdriver, placing soft material under it, pry off the glass blower nozzle of the left door. Similarly, remove the blower nozzle on the right side.
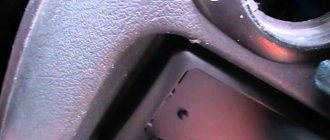
Using a 10mm socket, unscrew the nut for the upper fastening of the instrument panel, located in the cavity under the door glass blower nozzle. Similarly, unscrew the nut on the right side.
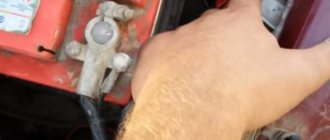
Using a 10mm socket, unscrew the bolt securing the ground wire ends of the instrument panel.
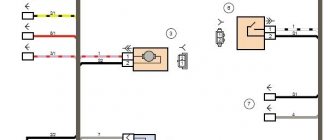
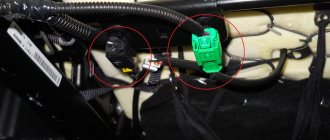
We disconnect the wiring harness connectors of the instrument panel from the wiring harness connectors located on the bracket above the fuse mounting block...
...and the wire block located on the right end of the bracket.
Disconnect the engine control wiring harness block from the instrument panel wiring harness block...
...and use a 10mm head to unscrew the nut securing the end of the ground wire. We disconnect the middle block of the instrument panel wiring harness from the electrical accessories control unit (see “Removing the electrical accessories remote control system controller”).
Disconnect the wiring harness from the airbag control unit.
Using a Phillips screwdriver, unscrew the four screws securing the instrument panel trim... ...and remove the trim.
Using pliers with narrow jaws, squeeze the clamps and disconnect the clamp securing the wiring harness from the bracket on the steering column.
Using a Phillips screwdriver, unscrew the screw on the side fastening of the instrument panel. Similarly, unscrew the screw on the right side of the instrument panel. Opening the glove box...
...and in the cavity behind it, use a Phillips screwdriver to unscrew the self-tapping screw securing the instrument panel.
Use a Phillips screwdriver to unscrew the console fastening screw on the left, and similarly on the right.
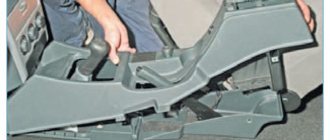
We remove the instrument panel from the car interior. We install the instrument panel in the reverse order.
Possible faults
The instrument cluster does not always tell the truth, and sometimes its readings can mislead the driver - they may seem absurd. For each common malfunction, a brief commentary will be given on the possibility of eliminating them:
- The fault lamp does not light up (check the lamp);
- the lamp is on - check the sensor, reset the error via the diagnostic connector.
If none of the above measures help resolve the problem, carefully inspect the wiring - damage to it may cause the light bulb to activate or deactivate.
Removing and installing the dashboard of a Lada Priora car
You will need: 8" and 10" socket wrenches, flat and Phillips blade screwdrivers.
1. Disconnect the wire from the negative terminal of the battery.
2. Remove the steering wheel.
3. Remove the steering column trim.
4. Remove the steering column switches.
5. Remove the floor tunnel linings.
6. Remove the instrument cluster.
Remove the right and left screws securing the center console of the instrument panel.
Use a screwdriver to pry off the heated side window nozzles on the right and left.
Using a 10mm socket wrench, unscrew the two nuts on the upper fastening of the instrument panel on the left and right
Turn the three latches and remove the fuse and relay box cover
Remove the four screws securing the instrument panel amplifier
Turn bottom left...
...and on the bottom right there are two screws securing the instrument panel.
Remove the screw securing the instrument panel to the left of the steering column
Remove the fastening screw located on the right under the instrument panel
Using a size 8 wrench, unscrew the bolt securing the ground wires of the instrument panel to the body bracket
Slide the instrument panel wiring harness clamps to the right
Disconnect the three harness pads from the pads mounted on the bracket
Disconnect the ignition switch (lock) wiring harness connector.
Disconnect the wiring harness connectors from the electric power steering
Using a 10mm wrench, unscrew the nut securing the ground wire of the instrument panel harness from the bracket for the electronic units
Slide the pad lock
Disconnect the instrument panel harness from the ignition system harness.
Disconnect the instrument panel harness connector from the power accessories control unit.
Disconnect the instrument panel harness connector from the airbag control unit
Remove the instrument panel and remove it from the passenger compartment
Install the instrument panel in the reverse order of removal.
Icons on the factory dashboard
All indicators should light up like a Christmas tree for three seconds when the engine starts. If some icon remains, it means the system is signaling a breakdown. To make it easier to understand all the indicators, here is a schematic picture:
1,5,9,10 are already known scales that display the main parameters that can change. 19 – on-board computer display. Further:
- 2 – Icon indicating the operation of the braking system.
- 3 – Battery condition. If the light remains on, the battery is discharged or the charge level is too low.
- 4.7 – Doublers for direction indicators (“turn signals”).
- 6 – Oil level (indicates low level).
- 8 – Handbrake. Lights yellow when the lever is tightened.
- 11 – “Gasoline light bulb.” Lights up when there are only 10 liters left.
- 12 – Button for switching on-board computer modes.
- 13 – “Emergency”.
- 14 – Electric power steering (indicates a breakdown).
- 15 – High beam on.
- 16 – Side lights/low beam.
- 17 – Airbag condition (malfunction).
- 18 – Immobilizer (if you hear a beep and the icon itself blinks, the immobilizer is faulty).
- 20 – Seat belts not fastened.
- 21 – Unsatisfactory condition of the service brake system.
- 22 – Disabling the airbag.
- 23 – ABS malfunction.
- 24 – “Check”, “Check Engine” - engine failure.
What lamps are installed in the Priora dashboard
Depending on the year of manufacture, Lada Priora can be equipped with both lamps with a conventional socket and with a VDO socket. To accurately determine the lamps, you must first remove the shield and determine the type of socket. The lamps in the sockets are the same, however, from the factory, the lamp mustaches are soldered to the socket and to replace the lamp, you need to unsolder or pull out the old one and install a new lamp in its place, while soldering the mustaches.
However, you can take a simpler route by purchasing ready-made lamps with sockets. Note that the lamps are installed in them without soldering the mustaches. That is, if the lamps burn out further, you simply change the lamp and that’s it.
A regular lamp socket looks like this
This is what a lamp with a VDO socket looks like
Features of dismantling
The process will not take much time, it is quite simple, no special tools are needed, only a cross-shaped twist. But before you find out how to remove the console on a Priora, learn about some of the features of the procedure.
Disassembly always begins with removing the radio and disconnecting the wires. To remove it, press the special buttons on the sides of the device; you should hear a characteristic click. Pull the radio towards you, disconnect the wires.
Now you need to remove the compartment in which the radio is located, after which the car owner will see two self-tapping screws, they must be unscrewed during the process of dismantling the console.
Noise Removal
Basically, the panel rattles both due to improper installation and because the three parts that make it up touch each other, which causes creaks and rattles in the cabin.
That is why sound insulation is necessary, which the manufacturers did not take care of properly, and it is up to the owner to finalize it. Modelin can be used as sound insulation. They can paste over:
- All places where three parts of the panel touch;
- Those parts of the panel where it comes into contact with the radio, on-board computer, etc.;
- All bolt holes are also covered with modelling. It won’t hurt to screw them in, but there will be additional sound insulation, as well as protection against heat loss;
- Sides of the glove compartment;
- "Black box" in those places where it comes into contact with the panel.
Sources
- vazweb.ru/desyatka/salon/torpeda.html
- drive2.com/l/525053636976313571/
- drive2.ru/l/8335986/
- drive2.ru/l/452409453484966614/
If disassembly is needed
Let us immediately note that if you have to replace the lining with a new one (the one you choose), then a complete disassembly may not be necessary for this.
1. The pad itself
2. Inserts for buttons, air ducts, instrument panel trim
But if noise insulation is planned due to the fact that the dashboard rattles when driving, then this cannot be avoided.
Disassembly work requires a lot of time and special scrupulousness. After all, if some fastening is spoiled or broken, then the new or tuned torpedo will not work as it should, it will creak and rattle unhappily while driving, spoiling the mood of the careless disassembler.
How to remove the center console of a Priora
About the console
Lada Priora was produced with an interior in two color options: gray and black. It is worth noting that a light interior was installed on the first Priora models, starting in 2007, and later a black interior with black seats and upholstery was added to it. But the center console itself was not subject to changes in color, and many owners of this car repainted or covered the Priora’s center console with film.
Modifications to the center console allowed for a more formal look that would suit the tastes of every owner. Many installed 2DIN radios with a large screen or completely replaced the standard multimedia player with something more advanced and powerful.
It should be noted that when installing a 2DIN radio in a standard Priora console, you need to work with a hacksaw and cut out a completely additional capacity for various kinds of small things. But with the console from the luxury Priora, such alterations do not need to be done.
Types of tuning of the Priora central console
Below are some of the most popular examples of console modifications by Prior owners.
Painting
Painting is carried out in several stages. To begin work on modifications, it is necessary to dismantle the console and remove all attached electrical equipment from it, such as a clock, climate control unit and media system.
Then the factory paintwork on the plastic is sanded, primed and painted.
Pros and cons of this method:
Pros:
- Durability;
- Reliability;
Minuses:
- The impossibility of returning everything to its original appearance;
- Long and expensive work process;
Pasting with film
This type of modification is the most popular and widespread due to its speed and low cost. With such modification, as well as with painting, it is necessary to dismantle the center console and all attachments. After removal, the console is treated with a degreaser and a film is glued to the degreased surface and, using a hairdryer, stretched over all convex areas.
Pros and cons of this method:
Pros:
- Cheapness;
- Rapidity;
- The ability to return to its original appearance;
Minuses:
Not durable, the film quickly begins to sand and crack;
Installing a 2DIN radio
This modification involves sawing off excess parts of the console, which may interfere with the installation of a large two-din radio. Practically no modifications will be required if you install such a radio in the center console of a luxury Priora, since a larger multimedia system is installed there from the factory.
How to remove the center console of a Priora
In order to remove the center console on a Priora, you need to prepare the tool that will be needed in the process of dismantling it. It should also be understood that the work is carried out with plastic parts and excessive force can damage them.
Step-by-step instructions for removing the console
We remove rubber mats from compartments for small items.
We take out the radio and disconnect it from the power supply.
The process of dismantling the center console is complete. We hope our article was useful to you.
Step-by-step instruction
1. Set the steering wheel to the lower position.
2. Next we need to remove the instrument panel trim. It is secured with four Phillips screws.
Unscrew the 2 screws on top.
In order to get to the lower mounting screws, you need to remove the plastic from the bottom of the steering wheel.
To remove, turn the three latches counterclockwise half a turn.
After turning the clamps from above, pry up the plastic with your hand and remove it.
3. Unscrew the 2 lower screws securing the instrument panel trim.
4. Using both hands, remove the cover. Let's start from the top.
Be careful not to break the latches.
5. Unscrew the 2 screws securing the dashboard using a Phillips screwdriver.
6. After unscrewing the screws, pull the dashboard slightly towards you.
7. Next you need to remove the connector that goes to the dashboard. The connector comes with a clever lock.
Press the latch in the indicated place below with a flat-head screwdriver.
After pressing, use a screwdriver to move the lock back. There is a boss on the latch that a screwdriver hooks onto and you can pull the latch back.
After the lock is removed, the connector can be easily removed from the instrument panel by hand.
8. We remove the instrument panel and perform the necessary operations, for example, replacing the panel backlight lamps.
9. We perform assembly in reverse order.
Video lesson
Source
Checking fuses
Often the cause of a speedometer malfunction is a blown fuse. Most often, a fuse fails due to water getting on it, which flows onto the contacts, which leads to an interruption in the operation of the electrical circuit. If the check reveals that the fuse responsible for the operation of the dashboard has blown, then the car owner will simply need to replace it with a new one. Finding the right fuse is quite simple by marking “IG/METER”, but if the replacement process does not help solve the problem, then you will have to check the integrity of the wires that go to the dashboard from the speed sensor.