Installation
Before installing new brake pads, remove dirt and wipe the rear brake parts. Assembly is carried out in reverse order. To install the pressure spring with the block, use the lower tension spring, hooking its end to the hook of the pressure spring. We tighten the spring with a screwdriver and insert the hook of the spring into the hole in the block.
Move the pistons to the center of the cylinder, bringing the pads together with two mounting blades. After completing the work, press the brake pedal 2-3 times to bring the pads to the drum. For clarity, the entire process is also shown in the video:
Let us remind you that periodically monitor the serviceability of the brake system and change the front brake discs on time.
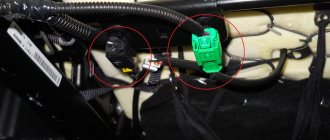
Setting up fan washer nozzles
Cleaning a car windshield is a parameter that directly affects traffic safety and driver comfort. Glass contaminated with dust, snow or insects tires the driver and reduces visibility. This could lead to an accident. To keep it clean, every car has windshield wipers ("windshield wipers") and windshield washers. Previously, windshield washers were a thin tube from which a stream of water came out, rarely two. In addition to its simple and reliable design, this system also has disadvantages. Then the jet hits a small area of glass and flows down. Therefore, the first blows of the wipers are applied to dry glass, staining the dirt and leaving scratches. The solution to this problem was window cleaning attachments. Let's look at how the windshield washer nozzles are adjusted.
Replacing rear brake pads (in drums) on Lada cars
The minimum permissible thickness of the friction linings of brake pads is 1.5 mm. Rear pads should only be replaced as a set on two rear wheels at once. Otherwise, the car may pull to the side. On all modern Lada cars (XRAY, Vesta, Largus, Granta, Priora, Kalina and Niva), replacing the rear pads is carried out in the same way without significant differences.
Required . new rear brake pads, a set of keys and remove the car from the handbrake.
Check the brake fluid level, if it is around 0, then pump out some of the fluid. Jack up the car and remove the wheel. Further:
- Unscrew the guide pins.
- remove the drum from the hub, knocking it with a hammer through a wooden spacer.
unscrew the drum guide pins
remove the drum from the wheel hub.
Next in order:
- disengage with the spring block.
- and remove the upper spring first.
- then the bottom one.
disengage the spring from the block, remove first the upper spring then the lower spring
- disengage the pressure spring from the block.
- remove the front pad.
- remove the spacer bar.
disengage the pressure spring from the block, remove the front block, remove the spacer bar
- Having disconnected the pressure spring from the rear block, lower the block.
- remove the rear shoe lever from the hole in the handbrake cable end.
Having disconnected the pressure spring from the rear block, lower the block
remove the rear shoe lever from the hole in the handbrake cable end
- pull the cotter pin out of the hole.
- remove the washer.
- pull out your finger.
pull out the cotter pin from the hole, remove the washer, pull out the pin
Before installing new brake pads, remove dirt and wipe the rear brake parts. Assembly is carried out in reverse order. To install the pressure spring with the block, use the lower tension spring, hooking its end to the hook of the pressure spring. We tighten the spring with a screwdriver and insert the hook of the spring into the hole in the block.
Steering columns from Kalina, Priora and Chevy Niva
Note. On the VAZ 2110 you can easily and simply install switches from Lada Kalina, Chevrolet Niva or some foreign cars.
Features you need to know about
Replacing the steering column switch for a VAZ 2110
Let's look at some features of steering column switches from other cars that we want to install in the VAZ 2110:
- The main thing is the connector, which must match the VAZ 2110 and then there will be no problems.
- It is also recommended to pay special attention to the shape of the switch. For example, the steering column shifters from the Priora become further from the steering wheel than the tenth shift paddles. In this case, you have to lengthen the steering shaft or install another one from the same Kalina.
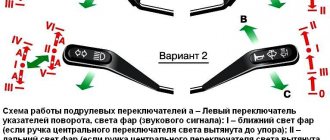
Steering column switches VAZ 2110
Note. There is another way: bend the steering column switch and cut off the excess part, and then glue it at a different angle, but this is not entirely correct. We need to think about safety, but a glued-on steering column does not fit in with this. Therefore, if we change the steering columns from Priora, Kalina or Niva, we will have to put up with a large distance of levers.
Conventional DIY installation of steering column stalks
- Disconnect the positive wire from the battery.
- Now remove the lower steering column casing by unscrewing the 7 fastening screws.
- Lower the steering column down.
- Remove the upper steering column casing.
VAZ 2110 replacement of steering column switches
- We find two plastic clips and squeeze them to remove the windshield wiper switch (see Replacing windshield wipers on a VAZ 2110 on your own) from the base.
- Disconnect the block with wires.
- We now remove the turn signal and headlight switch, again, squeezing the two plastic clips.
We take a test lamp at 12 and connect it to the corresponding contacts:
Replacing steering column switches VAZ 2110
- If the lever is in the first position, then everything is turned off.
- If the lever is in the second or third position, then the numbers of closed contacts will be 49a-49aL and this is a left turn indicator.
- If the lever is in the fourth or fifth positions, then this is a right turn indicator and the numbers of closed contacts: 49a-49aR.
- If the lever is in the sixth position, then these are low beam headlights and the numbers of closed contacts: 56-56b.
- If in position seven, then this is a high beam alarm and the numbers of closed contacts are 30-56a.
- High beam is position eight and the contact numbers here are 56-56a.
Replacing rear brake pads on a Priora - instructions
The service life of the rear brake pads of the Priora is quite long, but provided that the quality of the components is decent. Even factory ones can easily travel more than 50,000 km with careful operation without sudden braking or maneuvers using the handbrake. But there are also such instances that after the first 10,000 km they already begin to exhibit a terrible sound during operation, and efficiency sharply decreases.
If you decide to replace it, then below I will try to provide detailed instructions for replacing the rear pads on a Priora with a detailed photo report of the work done. So, first of all, it’s worth talking about the tool that you will need for all this work:
- Screwdriver flat and Phillips
- Pliers and long-nose pliers
- 7 deep head and knob
- Head 30 (if the rear drum cannot be removed in the usual way)
Modification of the steering columns on the VAZ 2110
If the driver is not interested in the replacement process itself, but only needs to eliminate the clicking of the steering column switches, then we can advise simply carrying out modifications.
Eliminating clicks
- We remove the switches from the VAZ 2110. Usually, no difficulties arise in this process.
- We disassemble the steering columns by snapping off the top cover with a screwdriver (small size).
- We find a small slide inside the switch (it is this that is responsible for the loud switching).
- Now you need to find a suitable rubber, for example, a car door seal (old and no longer needed). This very piece of rubber will need to be glued to the points of contact between the scenes.
Advice. To make the switching happen more smoothly, it is recommended to slightly file the plastic bump. We try to make the tip more rounded, otherwise it will jump. If this cannot be done, then you can use another method: weaken the spring.
- Let's put everything back together.
- We cover the switch body with some kind of vibration material. It is recommended to do the same with the steering shaft casing.
Closing the openings of the steering column switches
Openings can be closed easily and simply
Sitting behind the wheel of a VAZ 2110, you cannot help but notice the large gaps located near the steering column switches. This looks very unaesthetic and not at all practical. Let's try to close them:
- Take a piece of black carpet.
- We cover the steering column switch with Moment glue.
- We wait until the required time dries.
- We glue the carpet directly onto the steering column switch, closing the gap.
Note. It is not necessary to use only carpet. If you don’t have it, then you can take a piece of modelin or even an old felt boot.
You can easily replace the switch yourself, following the instructions. Thus, it will be possible to save the price of services in specialized workshops. During the work process, it is recommended to study photo and video materials.
Topic: Kalina steering wheel in VAZ 2110
I read an article on installing a Kalina steering wheel in a VAZ 2110, and some questions arose. Is there a special Kalinovsky steering wheel for tens or can you just remove the steering wheel from Kalina and put it on 2110?
Added: 2012-08-27 11:49:54
The thing is that I went to the market and was told that a steering wheel for Kalina costs 1,500 rubles. and a special one for 2110 - 2200 rubles. And what's the difference? Or this steering column cover costs 700 rubles.
The procedure for replacing the rear pads of a Lada Priora
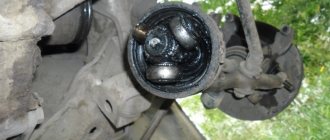
First you need to lift the rear of the car with a jack and place reliable supports in addition to the jack. Then try to remove the drum, for which you need to unscrew the two guide pins:
I repeat, if the drum cannot be removed in the usual way, then you can unscrew the hub securing nut and remove it together with it. As a result, it turns out even more convenient, since the hub will not interfere when removing the brake mechanisms:
Now we need a tool such as long-nose pliers. They need to remove the cotter pin of the handbrake lever, as clearly shown in the picture below:
Then you can begin to dismantle the right spring from below, prying it either with a screwdriver or pulling it a little with pliers until it comes off:
Next, on both sides you need to remove the small springs that fix the pads in a vertical position; they are located on the sides. This can be seen very clearly in the photo below:
When you have dealt with them, you can try to remove the pads. To do this, it is not even necessary to remove the upper spring; you can simply apply great force and move them apart at the top:
Thus, freed from the plate, they will spontaneously fall down:
When replacing the rear pads on a Priora, it is worth considering one important detail: after installing new ones, the drum may simply not fit. If this happens, then you need to slightly loosen the handbrake cable, which is located under the bottom of the car in the rear. It is necessary to loosen until the drum fits without unnecessary obstacles. We install all the removed parts in the reverse order and do not forget that for the first few hundred kilometers you should not resort to sharp braking, since the mechanisms are new and should get used to it.
Manufacturers and prices of analogues
Analogs include frame, frameless, and hybrid brushes.
There are several options on the market. Choose the one that suits you best - no matter whether it has a frame or not. The main thing is not to let the old windshield wiper start to scratch the windshield or rear window. When replacing cleaning brushes, use the following dimensions in millimeters (driver - passenger side):
- 630 – 480;
- 530 – 510;
- 510 – 500.
Other layouts are considered by car owners to be not as effective. Among the well-known analogs of windshield wiper blades are:
- Bosch Aerotwin - frameless, made in Belgium. Full name: Bosch aerotwin retrofitar 532 s. Price – 1200-1300 rubles. The length of the driver's seat is 53 cm, the passenger's length is 50 cm. Sold as a set.
- Bosch Twin is a simpler model. They have the same dimensions, but despite the lower price they are famous for their reliability. The cost is about 800 rubles.
- Bosch Eco is the most economical option. They are inexpensive and sold individually. Price – 300 rubles for one brush. Length – 50 cm.
- Denso Hybrid is recognized as almost the best model on the market. Withstands cold and heat. Price per piece – 500 rubles. Length 50 cm.
- Alca - simple, 500 rubles apiece. The length is 50 cm, but on the passenger side an area of approximately 5 cm wide is left uncovered.
Read more: Which timing belt is better to choose from the manufacturer?
Replacement of rear brake pads of Lada Priora (Lada Priora)
Details Parent category: Repair (manual for) Lada Priora cars
Operations performed when replacing brake pads of the rear wheel brake mechanism on a VAZ 2170 2171 2172 Lada Priora
Additionally, I would like to note that the rear brake mechanisms of the Priora and the tenth family are identical, and therefore the removal and installation of the pads can be performed according to the procedure for removing the rear pads on a VAZ 2110 2111 2112 car (instructions are given with color pictures). The minimum permissible thickness of the friction linings of brake pads is 1.5 mm. The pads are replaced in the following cases:
– the thickness of the friction linings is less than the permissible value; – the surface of the linings is oily; – the friction lining is not firmly connected to the base; – the linings have deep grooves and chips.
Difficulties in selecting parts
Before you begin replacement, you must select a suitable set of pads. There are many options for the Lada Priora on the market. Conventionally, they can be divided into two categories - parts equipped with ABS and those without this system. It is not difficult to understand what type your Lada Priora is - the diagram of cars with an anti-lock braking system includes an ABS sensor and a wire connected to it.
The basic principles of selection are common to the two categories. The product must be well packaged, have protective holograms and quality certificates. When purchasing a whole set with release springs, it is advisable to check them. We often came across sets from China where the spring brackets were turned in the wrong direction.
There is no need to look for how much the cheapest kit for a VAZ will cost. It is better to give preference to original parts or famous analogues. Even at a higher cost, the pads will provide excellent service life and excellent braking dynamics.
Selection for cars with ABS
Below is a list of pad sets with the best price-quality ratio.
| Part name and number | Minimum price, rub. |
| AT 2090-118BP | 400 |
| AutoReal AV18-350-2090 | 450 |
| Pilenga BSP1005N | 600 |
Stories from our readers
“Fucking basin. "
Hi all! My name is Mikhail, now I’ll tell you a story about how I managed to exchange my two-wheeler for a 2010 Camry. It all started with the fact that I began to be wildly irritated by the breakdowns of the two-wheeler, it seemed like nothing serious was broken, but damn it, there were so many little things that really started to irritate me. This is where the idea arose that it was time to change the car to a foreign car. The choice fell on the melting Camry of the tenth years.
Yes, I had matured morally, but financially I just couldn’t handle it. I’ll say right away that I am against loans and taking a car, especially not a new one, on credit is unreasonable. My salary is 24k a month, so collecting 600-700 thousand is almost impossible for me. I started looking for different ways to make money on the Internet. You can’t imagine how many scams there are, what I haven’t tried: sports betting, network marketing, and even the volcano casino, where I successfully lost about 10 thousand ((The only direction in which it seemed to me that I could make money was currency trading on the stock exchange, they call it Forex. But when I started delving into it, I realized that it was very difficult for me. I continued to dig further and came across binary options. The essence is the same as in Forex, but it’s much easier to understand. I started reading forums, studying trading strategies. I tried it on a demo account, then opened a real account. To be honest, I didn’t manage to start earning money right away, until I understood all the mechanics of options, I lost about 3,000 rubles, but as it turned out, it was a precious experience. Now I earn 5-7 thousand rubles a day. I managed to get the car buy after half a year, but in my opinion this is a good result, and it’s not about the car, my life has changed, I naturally quit my job, I have more free time for myself and my family. You’ll laugh, but I work directly on the phone)) If If you want to change your life like me, then here’s what I advise you to do right now: 1. Register on the site 2. Practice on a Demo account (it’s free). 3. As soon as you get something on the Demo account, top up your REAL ACCOUNT and go to REAL MONEY! I also advise you to download the application to your phone, it’s much more convenient to work from your phone. Download here.
The steering column switches from Priora, Kalina or Chevy Niva are the same, the only difference is that there is an additional button on the right switch to control the On-Board Computer (there is no button on the switches from Chevy Niva).
The connector for these switches is the same as the decimal one and there will be no problems with installation. But there is one big “but” here - the shape of the steering column switch from the Chevy Niva, Kalina, Priora differs in shape from the switches of the VAZ 2110.
That is, the paddle shifters from the Priora are further from the steering wheel than the ten-wheel ones, and this is not entirely convenient. See for yourself. To eliminate this misunderstanding with the remoteness of the levers, all possible discussions begin on the topic “how to make the steering column switches from a Chevy Niva closer to the steering wheel.” They try to replace the steering wheel, lengthen the steering shaft manually or install a steering shaft from Kalina. They try to bend the steering column switches, cut them off, glue them at a different angle, etc. (I’ll say right away that it’s impossible to bend the steering column switch under heat, and gluing it with glue is somehow not reliable, because we are talking about your safety on the road!)
The top photo is a Virage steering wheel (the distance from the steering wheel is the same as a regular steering wheel) with ten paddle shifters. The distance to the levers is 8 cm.
The bottom photo shows a Kalinovsky steering wheel for tens with a casing (as in Option 2) and steering columns from a Chevy Niva. The distance to the levers is 11cm. It turns out that if you change the steering column switches to Priorovsky ones without changing the steering shaft, then the distance to the levers will be 3 cm further.
Modification of the steering columns on the VAZ 2110
If the driver is not interested in the replacement process itself, but only needs to eliminate the clicking of the steering column switches, then we can advise simply carrying out modifications.
Eliminating clicks
- We remove the switches from the VAZ 2110. Usually, no difficulties arise in this process.
- We disassemble the steering columns by snapping off the top cover with a screwdriver (small size).
- We find a small slide inside the switch (it is this that is responsible for the loud switching).
- Now you need to find a suitable rubber, for example, a car door seal (old and no longer needed). This very piece of rubber will need to be glued to the points of contact between the scenes.
Advice. To make the switching happen more smoothly, it is recommended to slightly file the plastic bump. We try to make the tip more rounded, otherwise it will jump. If this cannot be done, then you can use another method: weaken the spring.
- Let's put everything back together.
- We cover the switch body with some kind of vibration material. It is recommended to do the same with the steering shaft casing.
Closing the openings of the steering column switches
Openings can be closed easily and simply
Sitting behind the wheel of a VAZ 2110, you cannot help but notice the large gaps located near the steering column switches. This looks very unaesthetic and not at all practical. Let's try to close them:
- Take a piece of black carpet.
- We cover the steering column switch with Moment glue.
- We wait until the required time dries.
- We glue the carpet directly onto the steering column switch, closing the gap.
Note. It is not necessary to use only carpet. If you don’t have it, then you can take a piece of modelin or even an old felt boot.
You can easily replace the switch yourself, following the instructions. Thus, it will be possible to save the price of services in specialized workshops. During the work process, it is recommended to study photo and video materials.
Steering columns from Kalina, Priora and Chevy Niva
Note. On the VAZ 2110 you can easily and simply install switches from Lada Kalina, Chevrolet Niva or some foreign cars.
Features you need to know about
Replacing the steering column switch for a VAZ 2110
Let's look at some features of steering column switches from other cars that we want to install in the VAZ 2110:
- The main thing is the connector, which must match the VAZ 2110 and then there will be no problems.
- It is also recommended to pay special attention to the shape of the switch. For example, the steering column shifters from the Priora become further from the steering wheel than the tenth shift paddles. In this case, you have to lengthen the steering shaft or install another one from the same Kalina.
Steering column switches VAZ 2110
Note. There is another way: bend the steering column switch and cut off the excess part, and then glue it at a different angle, but this is not entirely correct. We need to think about safety, but a glued-on steering column does not fit in with this. Therefore, if we change the steering columns from Priora, Kalina or Niva, we will have to put up with a large distance of levers.
Conventional DIY installation of steering column stalks
- Disconnect the positive wire from the battery.
- Now remove the lower steering column casing by unscrewing the 7 fastening screws.
- Lower the steering column down.
- Remove the upper steering column casing.
VAZ 2110 replacement of steering column switches
- We find two plastic clips and squeeze them to remove the windshield wiper switch (see Replacing windshield wipers on a VAZ 2110 on your own) from the base.
- Disconnect the block with wires.
- We now remove the turn signal and headlight switch, again, squeezing the two plastic clips.