Payment for goods and downloading of the book in electronic form (PDF format) is made on the website.
To do this, you need to find the book you are interested in and click on the “Buy” button. The price of the book is indicated on the button.
For convenience, the price on the website for residents of Russia, Belarus and Kazakhstan is presented in rubles.
For residents of Ukraine in hryvnias, and for all other countries - dollars.
After clicking on the “BUY” button, a payment window will open where you can select a payment system with which you can pay for the selected book using any bank card (Visa, MasterCard, MIR, etc.)
When you click on the “Pay by bank card” button, the Portmone payment system will open, which is the easiest way to make a payment.
In addition, the website offers four payment systems for payment:
- Yandex (payment from any bank cards, Yandex Money account, QIWI Wallet, terminals, etc.);
- Portmone (payment from any bank cards, Portmone account);
- PayPal (payment from any bank cards, PayPal account);
- WebMoney (payment from any bank cards, payment from WebMoney wallets).
Payment via Yandex Cashier
After selecting payment via Yandex, the Yandex Cashier payment system will launch, where you need to select a convenient payment method (bank card, QIWI, Yandex Money account, etc.)
After specifying payment details and confirming payment, payment for the goods will occur.
If you have a bank card in a currency other than the ruble, then the money will be debited from the card at the rate of the Central Bank of Russia at the time of the purchase.
This payment method is optimal for residents of Russia, Kazakhstan and Belarus.
Official website of the Yandex Kassa payment system https://kassa.yandex.ru
Payment via Portmone
After selecting payment through Portmone, the payment system will launch, where you need to select the payment method: bank card or Portmone account.
The price in the Portmone payment system is converted into dollars at the exchange rate of the Central Bank of the country where you are located.
If you have a bank card in a currency other than the dollar, then the money will be debited from the card at the rate of the Central Bank of your country at the time of the purchase.
After specifying payment details and confirming payment, payment for the goods will occur.
Official website of the Portmone payment system https://www.portmone.com
How to replace switches on a Gazelle car
Steering column switches
The car uses two steering column switches mounted on the steering column. On some vehicles, the sound signal is turned on by the turn signal and headlight switches, and on others by the windshield wiper and washer switch
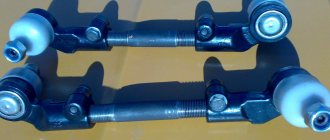
Left turn signal switch
The switch automatically returns to position I or II after the end of the turn. A – non-fixed position of the lever for briefly turning on the turn signal.
When the lever is moved from position I towards you to the non-fixed position, the high beam headlights turn on while the lever is held in this position.
The sound signal (option 1) is activated by pressing the lever button from any position.
For a switch without a sound signal (option 1), moving the lever towards you (arrow) from position 0 briefly turns on the washer and wiper.
For a switch with an audible signal (option 2), the washer and wiper are switched on briefly by moving the lever away from position 0 (arrow B).
The sound signal is activated by moving the lever from any position toward you (arrow C).
The washer and signal can be turned on in any position of the lever.
Replacing steering column switches
We remove the steering column covers (see the article - “Removing and disassembling the steering column”).
1. Using a slotted screwdriver, unscrew the two screws securing the turn signal and headlight switch.
2. Remove the switch and, disconnecting the wires from its terminals, sketch or write down the order of their connection.
You don’t have to write down, but immediately disconnect the wires one by one and connect them to the new switch.
3. It is best to immediately connect the wires to the new switch. Switches can be changed complete with wires. To do this, remove the instrument cluster.
We disconnect the plug blocks of the corresponding switch
4. We remove the plug block through the opening between the instrument panel and the steering column.
We replace the wiper, windshield washer and horn switch in the same way.
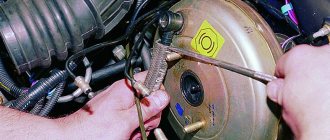
Replacing the hazard warning switch
Disconnect the battery.
From inside the dashboard, disconnect the plug block from the switch terminals.
1. Use your hand to push the switch out of the hole.
2. Install the switch in the following order:
We hold the connecting block in front of the hole in the dashboard and insert the switch leads into it.
To check, connect pilot lamps to the switch in accordance with the diagram.
Turn on the switch by pressing the button. In this case, the backlight lamp of the switch in the button as well as lamps 1 and 4 should be on.
Turn off the switch, the lamp in the button and lamp 4 should go out, and lamps 1 and 3 should be on.
If at least one of the lamps does not light up in the corresponding switch position, then the switch is faulty and needs to be replaced
After this, we recess the switch into the hole in the instrument panel until its spring clips snap into place.
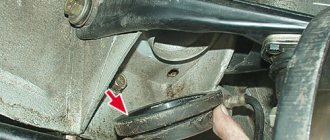
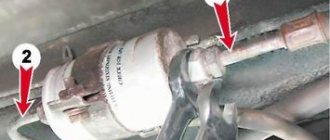
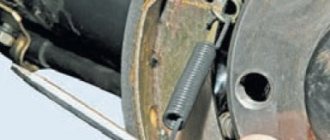
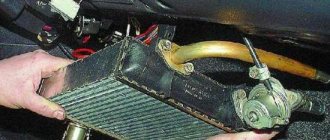
Replacing the brake light switch
1. Under the instrument panel, remove two plugs from the switch terminals
2. Use a 19mm wrench to loosen the locknut.
3. Using the same wrench, unscrew the nut
4. Remove the switch
Install the new switch in the reverse order. We connect the wires in any order.
Payment via PayPal
After selecting payment via PayPal, the PayPal payment system will launch, where you need to select the payment method: bank card or PayPal account.
If you already have a PayPal account, then you need to log into it and make a payment.
If you do not have a PayPal account and you want to pay using a bank card via PayPal, you need to click on the “Create an Account” button - shown with an arrow in the picture.
PayPal will then prompt you to select your country and provide your credit card information.
After specifying the information required to make the payment, you must click on the “Pay Now” button.
Official website of the PayPal payment system https://www.paypal.com
Payment via WebMoney
After selecting payment via WebMoney, the payment system will launch, where you need to select the payment method: bank card or WebMoney wallet.
If you already have a WebMoney wallet, then you need to log into it and make a payment.
If you do not have a WebMoney wallet and you want to pay in another way, you need to select any of the methods that WebMoney offers and make the payment
After specifying payment details and confirming payment, payment for the goods will occur.
Official website of the WebMoney payment system https://www.webmoney.ru/
Downloading a book
After successfully completing the payment (by any method) and returning to the KrutilVertel store from the payment system website, you will be taken to the successful payment page:
On this page you need to indicate your e-mail, where access to download the book will be sent.
If you are already registered on our website, then simply follow the link to your personal account.
The book you purchased will be in your personal account, from where you can always download it.
Please note that after making the payment, you need to return back from the payment system website to the KrutilVertel website.
If for some reason you did not return back to the site and closed the payment system tab with a message about the successful completion of the payment, please let us know - we will send you a letter indicating access to download the book.
How to replace the steering column switch on a VAZ-2107
The car uses a three-lever steering column switch mounted on the steering column.
The switches for the turn signal, headlights and operating modes of the headlight cleaner and washer have a common housing.
Replacing steering column switches and hazard warning switch
Using a screwdriver, remove the decorative trim.
Using a 24mm socket, unscrew the steering wheel mounting nut, leaving it flush on the shaft.
. by hitting the rim with your palms, we knock the steering wheel off the shaft splines
If it is not possible to remove it in this way, press the rim with your knees and knock it down, striking the shaft through a soft metal mandrel
Finally unscrew the nut and remove the steering wheel.
Using a Phillips screwdriver, unscrew the four screws holding the halves of the steering column casing together on both sides.
...and one self-tapping screw securing the lower half to the column.
Remove the bottom trim by cutting the plastic clamp securing the wiring harness to it.
When removing the top half of the housing, be careful not to lose the rubber ring from the ignition switch.
To replace the hazard warning switch, remove it from the connecting block and install a new one.
Inside the dashboard, we disconnect the connecting blocks of the voltage supply harness to the steering column switches: eight-connector, six- and two-connector.
We take them out from the bottom of the dashboard.
Using the “8” head, loosen the bolt of the clamp securing the steering column switches and remove them together with the wiring harnesses from the steering column, moving them upward along the axis
We install new steering column switches in the reverse order of removal.
When placing the wiring harnesses in the lower casing, be sure to secure them with a plastic clamp and make sure that they do not touch the steering shaft universal joint.
Problems when paying with bank cards
Sometimes difficulties may arise when paying with Visa/MasterCard bank cards. The most common of them:
- There is a restriction on the card for paying for online purchases
- A plastic card is not intended for making payments online.
- The plastic card is not activated for making payments online.
- There are not enough funds on the plastic card.
In order to solve these problems, you need to call or write to the technical support of the bank where you are served. Bank specialists will help you resolve them and make payments.
That's basically it. The entire process of paying for a book in PDF format on car repair on our website takes 1-2 minutes.
If you still have any questions, you can ask them using the feedback form, or write us an email at [email protected]
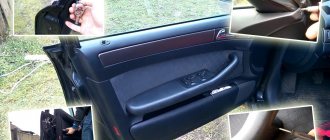
Replacing steering column switches for Honda Civic
Note:
Before you can replace the paddle shifters on your Honda Civic, you will first need to remove the steering wheel and steering column cable.
Removing the steering wheel and steering column cable on a Honda Civic
1. Lift the hood and secure it with the stop.
2. Using a 10 mm socket, disconnect the negative terminal of the battery.
3. Set the steering wheel to a position that corresponds to the straight-line movement of the vehicle.
4. Using a TORX T30 wrench, remove the screw securing the steering wheel trim on the left and right sides.
5. For easy access to the plug of the wiring block, turn the steering wheel to the right 90°.
6. Use a flat-head screwdriver to pry and remove the plug from the wire block.
7. Press the lock and disconnect the horn connector (black).
8. Slide the latch and disconnect the driver's airbag connector (yellow).
9. Remove the airbag module.
10. Use a 14 mm socket to loosen the steering wheel bolt.
Note:
The steering wheel is seated very tightly on the shaft splines, so do not completely unscrew the bolt securing it: if there is a sharp impact during removal, the steering wheel may jump off the splines and cause injury.
11. Mark the position of the steering wheel hub relative to the shaft by completely unscrewing the bolt. Make a mark on the end of the shaft, for example with a marker, and then screw the bolt into the shaft again by hand a few turns.
12. Use sharp blows to knock the steering wheel off the shaft splines.
13. Completely remove the bolt.
14. Remove the steering wheel.
15. Pull it towards you, pull it out of the clips and remove the lower left trim of the instrument panel.
16. Using a Phillips screwdriver, remove the 3 screws securing the steering column housing.
17. Remove the lower part of the casing.
18. Pull up and remove the top of the casing.
19. Disconnect the wire block from the steering column cable.
Replacing steering column switches for Honda Civic
1. Squeeze the clamp and disconnect the block from the steering column switch for exterior lighting and turn indicators.
2. Squeeze the clamp and disconnect the block from the steering column wiper and washer switch for the Honda Civic.
3. Use a small Phillips screwdriver to remove 2 screws.
4. Remove the mount for the exterior lighting switch and direction indicators of the Honda Civic.
5. Use a small Phillips screwdriver to remove 2 screws.
6. Remove the windshield and tailgate wiper/washer switch mountings.
7. Replace the Honda Civic steering column shift paddles with new ones.
8. Install the steering column switches in the reverse order of removal.
9. Reinstall the steering column cable. Orient it so that the arrow on the ring matches the arrow on the Honda Civic steering column switch holder.