Payment for goods and downloading of the book in electronic form (PDF format) is made on the website.
To do this, you need to find the book you are interested in and click on the “Buy” button. The price of the book is indicated on the button.
For convenience, the price on the website for residents of Russia, Belarus and Kazakhstan is presented in rubles.
For residents of Ukraine in hryvnias, and for all other countries - dollars.
After clicking on the “BUY” button, a payment window will open where you can select a payment system with which you can pay for the selected book using any bank card (Visa, MasterCard, MIR, etc.)
When you click on the “Pay by bank card” button, the Portmone payment system will open, which is the easiest way to make a payment.
In addition, the website offers four payment systems for payment:
- Yandex (payment from any bank cards, Yandex Money account, QIWI Wallet, terminals, etc.);
- Portmone (payment from any bank cards, Portmone account);
- PayPal (payment from any bank cards, PayPal account);
- WebMoney (payment from any bank cards, payment from WebMoney wallets).
Payment via Yandex Cashier
After selecting payment via Yandex, the Yandex Cashier payment system will launch, where you need to select a convenient payment method (bank card, QIWI, Yandex Money account, etc.)
After specifying payment details and confirming payment, payment for the goods will occur.
If you have a bank card in a currency other than the ruble, then the money will be debited from the card at the rate of the Central Bank of Russia at the time of the purchase.
This payment method is optimal for residents of Russia, Kazakhstan and Belarus.
Official website of the Yandex Kassa payment system https://kassa.yandex.ru
Payment via Portmone
After selecting payment through Portmone, the payment system will launch, where you need to select the payment method: bank card or Portmone account.
The price in the Portmone payment system is converted into dollars at the exchange rate of the Central Bank of the country where you are located.
If you have a bank card in a currency other than the dollar, then the money will be debited from the card at the rate of the Central Bank of your country at the time of the purchase.
After specifying payment details and confirming payment, payment for the goods will occur.
Official website of the Portmone payment system https://www.portmone.com
Payment via PayPal
After selecting payment via PayPal, the PayPal payment system will launch, where you need to select the payment method: bank card or PayPal account.
If you already have a PayPal account, then you need to log into it and make a payment.
If you do not have a PayPal account and you want to pay using a bank card via PayPal, you need to click on the “Create an Account” button - shown with an arrow in the picture.
PayPal will then prompt you to select your country and provide your credit card information.
After specifying the information required to make the payment, you must click on the “Pay Now” button.
Official website of the PayPal payment system https://www.paypal.com
Payment via WebMoney
After selecting payment via WebMoney, the payment system will launch, where you need to select the payment method: bank card or WebMoney wallet.
If you already have a WebMoney wallet, then you need to log into it and make a payment.
If you do not have a WebMoney wallet and you want to pay in another way, you need to select any of the methods that WebMoney offers and make the payment
After specifying payment details and confirming payment, payment for the goods will occur.
Official website of the WebMoney payment system https://www.webmoney.ru/
Also check out
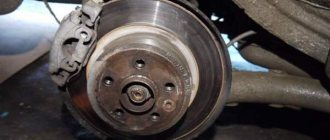
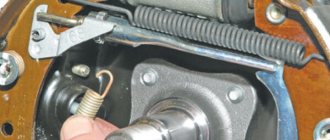
- Remove the suspension spring, remove the spring gasket from the upper support cup. After this, you can replace the front suspension spring.
To do this, do the following:
- Use electrical tape to secure the gasket to the spring and install the part in place.
- Place the blade in the hole for the shock absorber, supporting the spring with it, and fix the lower coil. There is a screw surface on the lower arm that indicates the correct position of the spring. Installation should achieve this position
- Having installed the lower coil in the correct position, jack up the lever and load the spring. Using a mounting spudger, seat the spring onto the screw surface.
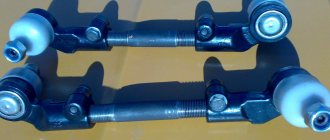
- Increase the load on the spring, install the stabilizer bar between the two studs that secure the bracket.
- Reassemble everything in reverse order.
After this, the replacement of the VAZ 2106 suspension springs can be considered complete.
You can check it out:
Downloading a book
After successfully completing the payment (by any method) and returning to the KrutilVertel store from the payment system website, you will be taken to the successful payment page:
On this page you need to indicate your e-mail, where access to download the book will be sent.
If you are already registered on our website, then simply follow the link to your personal account.
The book you purchased will be in your personal account, from where you can always download it.
Please note that after making the payment, you need to return back from the payment system website to the KrutilVertel website.
If for some reason you did not return back to the site and closed the payment system tab with a message about the successful completion of the payment, please let us know - we will send you a letter indicating access to download the book.
Replacing front shock absorbers on a VAZ “Classic”
Structurally, the front suspension of VAZ cars belonging to the “Classic” (VAZ-2101-2107) is the same, the sequence of work on replacing shock absorbers for these cars is identical, so let’s consider it using the example of the VAZ-2107.
The replacement work is not that complicated, so you can do it yourself. At the same time, you don’t need so many tools:
- Special key for holding the shock absorber rod;
- Open-end and socket wrenches 17;
- Open-end or socket wrench 13;
- WD-40.
Naturally, before starting work you need to stock up on new front suspension shock absorbers. It is better to drive the car into a pit or overpass.
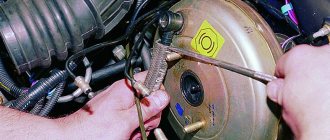
First, the upper shock absorber mount becomes loose. To do this, you need to open the hood and find technological holes in the wings that provide access to the shock absorber rod mounting nut.
Before loosening, you need to wipe the nut from dust and treat it with WD-40.
To unscrew the nut, you will need to hold the shock absorber rod, for which you will need a special wrench with a small slot for its upper edges.
In the absence of such a wrench, you can use a regular open-end wrench size 6.
But there is a small nuance in this - over time, the fit of the nut becomes so tight that in order to hold the rod, it may be necessary to extend the arm of the wrench with a piece of pipe that holds the rod.
And since the open-end wrench is quite small, a significant force can simply break it. Therefore, it is better to use a special key, which will be more difficult to break.
So, while holding the rod, use a 17mm wrench to unscrew the nut of the upper shock absorber mounting as shown above.
After this, the spring washer installed under the nut is removed, as well as the pillow washer and the upper pillow itself.
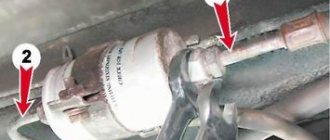
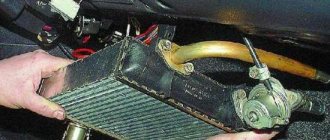
Next you need to move under the car. The shock absorber at the bottom is attached to the lower arm using a bracket.
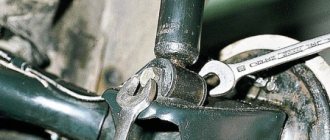
To disconnect it from the lever, you need to unscrew the two bolts securing the bracket. To do this, you will need a 13mm wrench; to make work easier, it is better to treat the joint with WD-40.
After unscrewing these bolts, you can pull the shock absorber down along with the bracket. Then the bracket is disconnected from the removed shock absorber.
To do this, you need to use two 17mm wrenches, an open-end and a socket.
Don't forget to remove the bottom cushion.
Before installing a new shock absorber, a bracket is attached to it, using new rubber elements - silent blocks.
First you need to secure the shock absorber to the top. To do this, the rod is completely pulled out, a new lower cushion must be put on it, after which it is inserted into the upper hole.
At the top, to prevent the rod from falling out of the hole, it must be secured with a nut, not forgetting to first install the top cushion, its washer and spring washer. In this case, there is no need to tighten the nut; the main thing is to prevent the stem from falling out.
Then you need to screw the shock absorber bracket to the lower arm, the bolts should be tightened completely.
Then the upper nut is tightened, which requires holding the rod back with a wrench.
The front shock absorber is replaced in the same way on the other side.
Important point:
If the work was carried out on a lift or the car was jacked up for ease of work, the fastening bolts must be tightened with the car lowered so that the suspension is under the load of the weight of the car.
Problems when paying with bank cards
Sometimes difficulties may arise when paying with Visa/MasterCard bank cards. The most common of them:
- There is a restriction on the card for paying for online purchases
- A plastic card is not intended for making payments online.
- The plastic card is not activated for making payments online.
- There are not enough funds on the plastic card.
In order to solve these problems, you need to call or write to the technical support of the bank where you are served. Bank specialists will help you resolve them and make payments.
That's basically it. The entire process of paying for a book in PDF format on car repair on our website takes 1-2 minutes.
If you still have any questions, you can ask them using the feedback form, or write us an email at [email protected]
Tools and materials
To carry out the entire scope of work, a limited number of tools and materials will be required. First of all, you need to acquire:
- shock absorbers;
- key at 6, 17, 13, 19;
- locksmith tool.
This is quite enough
to do all the work efficiently.
Before starting it, you should think about installing the car on an observation deck or lift. This is the only way to easily reach the element being replaced. The car must be on wheels, and the distance from its bottom to the ground should be approximately 50 cm
.
{banner_content}