The safety of the driver and passengers of the vehicle directly depends on the performance of the braking system. After a certain mileage, its components wear out, one of which is the caliper. Nevertheless, it is quite possible to repair the brake caliper, although most often it fails due to the process of souring of the guides or pistons.
Why is this dangerous in practice? If this unit malfunctions, the brake pads begin to wear unevenly. The same goes for brake disc wear. As for the pads, increased wear may be observed, for example, on the outside compared to the inside. Uneven wear indicates that the pistons are putting too much pressure on only one of the pads, while the other does not take part in the process. Urgent repair or replacement of the caliper is required, without waiting for it to completely jam.
About the reasons for caliper failure
This brake system component can break down due to improper maintenance or due to insufficient quality. The main reasons why caliper repair may be required are as follows:
- improper operation, which is associated with filling the guides with poor-quality lubricant - because of this, the boot swells and later “sours”;
- in the future, repair of the brake calipers may be necessary due to moisture getting on the guide, which leads to a breakthrough of the boot;
- Another reason is the piston itself, the body of which is also vulnerable to moisture getting inside;
- low-quality working fluid (brake) can corrode the piston from the inside if the concentration of water in it exceeds the norm.
Video tip for DIY caliper repair:
What is needed to repair a caliper using a repair kit?
Caliper repair is necessary if it is determined that braking problems or fluid leakage are due to it. If the caliper is working properly, do not interfere with it.
To repair the caliper you will need:
- Wheel chocks.
- Jack.
- Safety stand for the car.
- A set of open-end and spanner wrenches.
- Screwdriver.
- Pliers.
Repair of caliper guides
They are not difficult to detect - these are special bolts that are attached to the ears of the case. They need to be changed as soon as pockets of corrosion become noticeable. The repair process will look like this: unscrew the old guide and insert a new one in its place.
The main thing is not to forget about high-quality lubrication, and also check the condition and tightness of the anthers - there should be no cracks or tears on them.
Do-it-yourself dismantling of the caliper on a VAZ-2110
The very simple design of the product and the triviality of the process of dismantling it allow even a novice motorist to carry out repairs and maintenance. If you carefully follow the recommendations below, you are unlikely to encounter difficulties at any stage of the process. You will save a lot of money spent on a trip to a service station, and a considerable amount of time, because the service time is comparable to the time required to travel to the workshop.
Dismantling VAZ caliper
The sequence for dismantling the product is as follows:
- The first step is to jack up the car and remove the wheel. To be on the safe side, it can then be placed under the bottom of the car in case the jack fails;
- On a VAZ 2112, the caliper is attached to the bracket using two M17 bolts, which you should unscrew. Penetrating lubricant may be needed to strip the bolts;
- If you need to replace the VAZ caliper or carry out a comprehensive repair, unscrew the product from the brake hose. You seal the hose tip and you can begin further disassembling the product.
Do-it-yourself caliper repair - preliminary inspection
The return movement of the piston in this unit is ensured by a cuff. Firstly, it creates a tightness, and, secondly, it acts as a kind of spring. When the piston moves, it undergoes a slight deformation, but then returns to its previous state, slightly pressing it into the body. Determining the malfunction is quite simple - if you hang the wheel, it should rotate freely as soon as you press or release the brake pedal. There should be no signs of overheating on the discs themselves, otherwise you will need to repair the caliper yourself.
When conducting a visual inspection, we must make sure that there is no noticeable difference in the thickness of the outer and inner pads. The piston should move so that when pressed it easily sinks into its body. Its surface should not have noticeable traces of dirt or corrosion particles. You also need to conduct a superficial inspection of the boot and ensure its integrity.
About the main faults
Regardless of the type of caliper, there are parts in its design that are subject to increased wear. We do not take pads and discs into account, since they are considered consumables. As for the caliper, the return movement of the piston is ensured by a rubber cuff. When the driver presses the brake pedal, the piston comes out of the housing and deforms the cuff; when the pedal is released, the cuff tends to return to its original position and drags the piston along with it.
Over time, rubber loses its elasticity and cracks. This leads not only to the fact that the piston does not return to its original position, but also to the appearance of corrosion. The cuff is also used as a boot, so it needs to be changed periodically. In this case, it is necessary to purchase a repair kit for the rear brake caliper, which includes a cuff and half ring. Now let's move on.
DIY caliper development procedure
Let's move on to a description of the repair itself. The algorithm will be something like this:
- First you need to lift the car using a jack and unscrew the wheel, locking the steering wheel in the extreme position.
- The mounting spring is removed, and the surface near the brake hose is thoroughly cleaned. To do this, you can blow it with compressed air.
- The brake hose must be clamped with a clamp to prevent leakage of working fluid.
- We continue to repair the caliper ourselves. After this, unscrew the bolt that secures it and remove the hose itself to the side. It is necessary to ensure that dirt particles do not penetrate inside it.
- After this, the caps on the guides are removed, and they themselves are unscrewed using a 7 mm hexagon.
- Using a screwdriver, we recess the piston, moving its body away from the disk to a sufficient distance. You can begin dismantling the old caliper.
- First, take it out of the case and check for moisture. We take the piston out of the housing. To do this, you can remove it from the disk without disconnecting the caliper from the hose. Just press the brake pedal and it should fall out on its own. How to clamp a brake hose? Any tight clamp will do, you can even use the one that is used to secure caps to wheel rims at a tire shop. You can use a vice in which to firmly clamp the body, and remove the piston itself with pliers. Or use compressed air, making sure that the part is not damaged during removal.
- We take out the old cuff, first removing the remaining working fluid. We thoroughly clean the surface in which the protective cover was located and the cuff seats. We rinse and blow with air, after which you can install a new cuff.
- When repairing the front caliper, lightly water the working surfaces of the piston with brake fluid. The piston itself is laid strictly vertically and slightly recessed. We put a protective cover on top. In this case, you need to make sure that the rubber band does not jam.
- Now the piston can be recessed completely, but you need to be careful to prevent the boot from twisting.
- We unscrew the brackets that are equipped with the caliper. We clean the surfaces on which the pads move. Care must be taken not to damage the threads in which the guides are attached. The bracket is screwed into its original place.
- We lay the block, making sure that it has taken its position and is not stuck anywhere. The guides must be cleaned of the slightest particles of dirt. The caliper is put on the bracket, and its guides are tightened with your fingers. We put on the caps and fix the springs. Don't forget to put grease under the brake pistons boot and remove any excess grease from around it.
- All that remains is to put the hydraulic fluid hose back in place and bleed the entire system with a few presses of the brake pedal. We lower the car to the ground using a jack and check the level of working fluid in the tank - refill if necessary. This completes the caliper rebuild.
Rear brake caliper
The transition to disc brakes required new technical solutions from car developers. After all, the drum brake circuit, so convenient in terms of implementing the handbrake function, turned out to be unsuitable. After all, it was necessary to ensure not the expansion of the pads, but, on the contrary, their compression. Therefore, car manufacturers have begun to solve this problem in various ways. Some implemented mechanical compression of the pads, similar to what is used on drum brakes, while others decided to use electrical compression.
How does a rear brake caliper work?
Like the front caliper, the rear caliper consists of a brake cylinder with a piston, a caliper and guides that allow the caliper to move along the caliper. When you press the brake pedal, the pressure in the brake line increases, the piston comes out of the cylinder and presses one pad. Due to the fact that the caliper moves quietly along the caliper using guides, the pressure is evenly distributed on both brake pads and pressed against the brake disc.
The mechanical drive of the hand brake works similarly - the cable activates a lever mounted on the caliper body, which, in turn, squeezes one of the pads. The free movement of the caliper on the caliper distributes the clamping force evenly on both pads, ensuring equal pressure on the brake rotor. The electric drive of the hand brake is also made according to the same scheme. The difference is that in some models the electric motor presses the piston of the caliper cylinder, and in others directly on one of the pads.
Brake caliper malfunctions
The following types of rear caliper malfunctions occur:
- souring of the cylinder piston, as a result of which the fluid pressure when pressing the brake is not enough to move the piston;
- leakage of the piston seals, as a result of which the pads are pressed weaker than necessary and a loss of brake fluid occurs. If the brake fluid leaks completely and air enters the brake system, the braking efficiency of all wheels will sharply decrease;
- Damage to the brake cylinder piston boot. As a result, dirt gets between the piston and cylinder, which damages the mirror of the cylinder walls and leads to a decrease in braking efficiency and loss of brake fluid;
- damage to the guide anthers, due to which the dirt that gets on them increases the resistance to the movement of the caliper and the pressure between the pads is distributed unevenly. This leads to reduced braking efficiency, as well as uneven and rapid wear of the brake disc;
- loose caliper bracket or crack in the caliper bracket. These are the most dangerous malfunctions, because, firstly, the pads are pressed unevenly against the disc, and secondly, with strong braking, the bracket can break or unscrew from the fist. If this happens, the pads will fall out, the piston will come out of the cylinder and the fluid will pour out, instantly reducing the braking efficiency of the remaining wheels.
Rear caliper diagnostics
Diagnostics consists of two stages:
- Comparison of braking efficiency of all wheels.
- Visual inspection of the caliper.
To compare the braking efficiency of all wheels, carry out diagnostics using a computer stand. If this is not possible, you need to accelerate the car to 30 kilometers per hour on a flat, horizontal paved area, then depress the clutch pedal (on cars with automatic transmission, engage neutral gear) and sharply press the brake all the way.
This procedure allows you to determine the condition of brake calipers on any car, regardless of the presence of ABS. If all the calipers are working properly, the car will not skid. If one of the calipers is not working well or is faulty, the car will skid. During a skid, you will feel whether the front or rear of the car is turning, so finding a faulty caliper will not be difficult.
After all, the car always skids in the direction opposite to the faulty caliper.
To visually inspect the brake caliper, you need to support the front of the car with wheel chocks, then raise the rear with jacks. After lifting the car with jacks, be sure to install jack stands (they are sold in car dealerships). This will prevent the jacks from tipping over and causing the vehicle to fall. After installing the supports, remove the rear wheels and inspect the caliper. Carefully check the condition of the cylinder boots and guides. If cracks, ruptures and holes are detected, it is necessary to remove the caliper for a more serious assessment of the condition, possible repairs and replacement of the anthers.
Have an assistant press the brake pedal firmly several times to make sure there is no brake fluid leakage. Then ask an assistant to turn the handbrake on and off several times, while inspecting the operation of its drive and rotating the brake disc. This will help determine the condition of the handbrake drive mechanism. If, after pressing and releasing the brake pedal, the wheel does not immediately begin to rotate easily, it is necessary to replace the rubber piston seal. After all, it plays the role of a kind of spring that returns the piston to the cylinder after the fluid pressure is reduced.
How to remove a brake caliper
To remove the brake caliper, lift the rear of the vehicle as described above. Remove the wheel, then disconnect the handbrake drive. On cars with an electric handbrake, various devices and techniques are used to remove the caliper, which are described in detail in the car repair instructions.
Remove the protective caps from the guides, then unscrew them using the appropriate hex key. After this, remove the caliper, it may need a little help with a screwdriver, but in most cases just pulling with both hands is enough.
To avoid losing the brake pads, remove them and store them separately. Hang the caliper using rope or wire, attaching it to the body or shock absorber. If necessary, unscrew the bolts securing the bracket and remove it. If you need to completely remove the caliper, unscrew the brake hose end from it.
After unscrewing the hose, plug it with a piece of rubber or cellophane to prevent brake fluid from leaking. Some mechanics pinch the brake hose, but this reduces its life and can lead to cracks and weakening of the walls. If the circumstances are unfortunate, such a hose may burst during sudden and strong braking, as a result of which the effectiveness of the brakes on all wheels will drop tens of times.
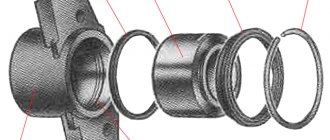
The design of this brake element
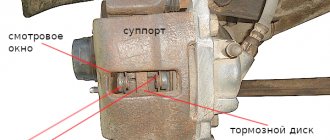
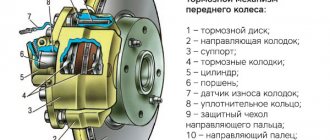
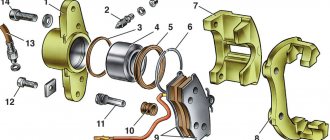
There are two types of disc calipers - front and rear, their design and repair method are slightly different, but their main elements are the same:
- The housing in which the piston (cylinder) is mounted.
- Bypass valve.
- Sealing ring.
- Piston (cylinder).
- Cylinder boot.
- Retaining ring.
- Frame.
- Pressure bar.
- Pads.
- Guide boot.
- Guides.
- 14. Fastening bolt.
- Brake hose.
The difference between the rear disc caliper is the presence of a parking brake.
Therefore, the piston (4) has a special thread through which it is screwed onto the parking brake rod (1). Thanks to this, it can operate under the influence of two drives - mechanical (parking) and hydraulic.
What is included in the front brake caliper repair kit?
They produce two types of repair kits - for one and two wheels. The difference between them is only in the number of parts. Typically they consist of:
- lubricants - one or two types (for lubricating the piston of the working brake cylinder and the guides of the caliper bracket), depends on the make and model of the car, as well as the manufacturer of the repair kit. Some inexpensive repair kits do not include it at all, so you will have to buy it yourself;
- cuffs (seals) of the pistons of the working cylinders (one for each caliper);
- boots of working brake cylinders (one per caliper);
- guide boots (two pieces per caliper);
- spare piston (not included in all types of repair kits).
Causes of failure
The caliper as an element of disc brakes is subjected to significant temperature loads, as well as exposure to external adverse factors: dirt, dust, moisture, chemicals. All this happens due to the fact that his device does not allow him to be protected from these negative phenomena. If there is significant overheating, as well as if the boot ruptures, the lubrication of the guides may disappear.
Improper maintenance of the guides, in which some craftsmen manage to stuff inappropriate lubricant into their boots: graphite or similar, leads to their swelling and souring, after which they jam or knock when suddenly activated.
A rupture of the piston boot causes dirt and moisture to enter it. After which it stops working - it starts to jam or, conversely, knock.
Causes of brake jamming
There are several elements in the brake system that lead to partial or complete wedge, and first of all these are the caliper guides, which owners forget to lubricate when replacing a set of pads or lubricate with the wrong thing. As a result, the “guides” rust or coke and prevent you from moving in space.
Soured caliper guides most often lead to a wedge
Caliper pistons appear a little less frequently in jamming statistics. They also fell into the zone of personal hostility to corrosion, but sometimes the cause of the problems is banal wear, due to which the piston loses alignment with the seat in the caliper and it jams in one place. However, the same thing and for the same reasons sometimes happens with the main brake cylinder, although this happens much less often. And the owner finds out about what happened immediately and, most likely, remembers it for the rest of his life.
Caliper pistons don't last forever either.
Handbrake pads also sometimes “sin” in winter. And it’s okay if the rear wheels just freeze to them and after some time “come unstuck”, because there are cases when the clutches and brakes are torn out of their seats, what? That's right - it sticks.
Uneven wear is one of the signs of brake jamming.
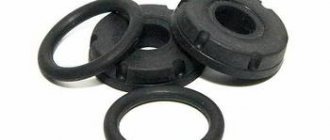
Repair kit
Replacing a caliper is a drastic measure; often you can limit yourself to repairing and replacing its components. Basically, the standard repair kit includes rubber elements:
- cuffs,
- anthers,
- protective rubber bands of the fitting,
- piston sealing rings.
But depending on the necessary repairs, they may include:
- retaining rings,
- clamping brackets,
- guides,
- directly the pistons themselves.
Thanks to the repair kit, you can significantly save and improve the operation of this brake system unit.
What to do if the rear brakes are stuck: 4 working methods
1. A screwdriver will help.
We can say that a vehicle owner is lucky if the car is equipped with disc brakes. Then there will be no difficulties with unlocking when the rear brakes jam:
- The wheel is dismantled, and the frozen brake pads are separated from the working disc of the brake system using a flat screwdriver.
- Next, the disk rotates, which should rotate easily after release.
- If the disc spins, the wheel is put back, the car is removed from the jack, you can move on.
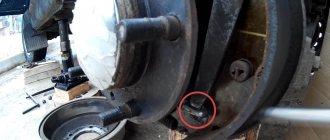
2. Wedging the rear drum brakes using a hammer.
If drum mechanisms are installed on the rear axle (they can be seen even on modern cars), you need to act differently. The difficulty with this method is that the rear drum pads are not as easy to reach as is the case with discs. But there is a way out:
- The immobilized wheel is removed using a hammer.
- The drum is tapped along its entire circumference.
- Then the drum is rotated, it should be released. If this happens, the wheel is put in place and you can drive.
The effectiveness of the hammer method is approximately 70%. But what if the hammer didn't help?
3. Load on the rear axle plus a sharp start.
To solve the problem in this case, you need to load the rear of the car. It would be best to fit three adults in the back seat. If those interested are found, they are seated in the cabin, the power unit is started, it is spun to high speeds and a sharp start is made.
If it didn’t work the first time, don’t be upset: sooner or later the rear brake pads will come off the brake disc. This can be determined by the characteristic knock of the pads coming off. Helping passengers leave the back seat of the car, and the driver sets off.
This outcome is possible for 20% of successful wedgings, but what to do with the remaining ten percent?
4. Using a blowtorch.
The rear wheel is dismantled, the brake drum is thoroughly warmed up using a blowtorch. The main thing now is to distribute the heating as evenly as possible over the entire area of the drum. Otherwise, the brake cuffs will fail. You should work with a soldering iron until a characteristic click is heard, which means that due to heating, the drum has expanded and the brake pads have “come unstuck” from it. The wheel is put in place, after which you need to try to spin it. If everything went well, the car can continue moving.
What actions need to be taken so as not to be puzzled in the future by the question of why the rear brakes are sticking?
There are two rules:
- Do not put the car on the handbrake when parking for a long time.
- If the vehicle has driven into a puddle and the brake pads are wet, you need to dry them so that the rear brakes do not jam in the future. To do this, you need to press the brake pedal several times while driving and only then drive the vehicle into the parking lot.
Signs of trouble
The breakdown of the caliper components and their impending repair can be understood by some signs that occur during braking:
- The car pulls and pulls to the side when braking.
- It feels like when braking you have to put more force on the pedal or, conversely, less.
- The brakes rattle or knock when driving over bumps or when stopping.
- The brakes are jamming, which will be indicated by possible skidding.
- The appearance of brake fluid leaks on the wheel.
- Feedback in the pedal, expressed in a strong pulsation when pressing the brake.
If these symptoms appear, you should not delay repairing faulty caliper elements. You must first figure out why this happened and make repairs immediately. You can learn more about the signs and causes in the attached videos at the end of the article.
Why do brake discs get hot?
Heating is not a malfunction if it occurs evenly on both sides and the temperature value does not exceed acceptable limits. In this article, by the word “heat” we mean overheating.
Most discs are made from cast iron. This metal is suitable for daily use - it is inexpensive and has good frictional properties. But it also has its drawbacks: due to frequent braking, the cast iron gets very hot, even to the point of smoke. The pads begin to melt and warp.
To reduce heating, or rather, speed up cooling, discs are produced with voids inside (ventilated). This has almost no effect on the characteristics.
To improve performance, perforations and alloys began to be used. If you replace standard brakes with drilled ones, they will cool down faster.
Why do brake discs get hot? The cause is almost always friction. In 99% of cases
And it doesn’t matter whether the front ones are heated or the rear ones, left or right. Having discovered a problem, car enthusiasts usually check the free play of the wheel:
- remove the car from the handbrake or gear;
- jack up the car;
- spin the wheel.
If you hear a rustling sound or the wheel rotates with force, the problem is most likely in the brake caliper, which does not release the pad (or pads) even when the pedal is released.
Often, rust covers the cylinder bore or the outer walls of the brake piston, which prevents it from moving freely. It can also cover the guides. Restoring a caliper at a service station is called development. It is necessary to change the rubber seals - this can only be done if you have a repair kit. Sometimes you have to change the piston too.
Another reason why the wheel rotates slowly and the brakes heat up is wear of the wheel bearing (when the brake disc heats up on one side). Actively heating up, it transfers heat to the disc brakes. True, in this case the movement will be accompanied by a howl or hum at certain speeds.
Well, what if the wheel rotates freely in a suspended state, but after the ride it burns your fingers badly? This can happen for a number of reasons:
- Severe wear or deformation of discs. As their thickness decreases, heating occurs faster.
- Installation of new low-quality pads.
- Replacement of brake fluid with inappropriate one.
- Large production of pads.
- The front brake discs heat up on cars with rear drum brakes - because the front axle bears a large load when braking.
- Excessively aggressive driving. With constant acceleration and sudden stops, the brakes do not have time to cool down.
- Delamination of the inner surface of the brake hose. This is an obstacle to the circulation of brake fluid - the pads will not be able to diverge normally.
- Air in the brake system circuit.
Front brake discs
Causes:
- wear;
- wedging caliper;
- low quality pads;
- aggressive driving with rear drum brakes;
- The pads were installed incorrectly.
On the one side
Typical problems are a stuck caliper or a worn wheel bearing. A crooked block may also be the cause.
After replacing the pads
If you did not have such a problem, but it appeared after replacing the pads, the problem is most likely due to the poor quality of the latter or the fact that you selected them incorrectly.
The cause may be improper pumping. Let the pads get used to it (which will happen over several hundred kilometers) - then the problem will disappear.
If the brakes rattle
This type of brake has pressure springs or floating calipers.
They are responsible for securing the pads to the caliper body. The reason for their failure is metal fatigue or poor quality. As a result, they lose their elasticity and stop pressing the pads against the body. Because of this, the pads rattle at the slightest passage of irregularities and may come into uneven contact with the disc, which will lead to the appearance of a shoulder or grooves on it. Also in this case, the staples themselves may rattle.
What should you do when your brake calipers or pads rattle? If it is not possible to replace them, then you should try to loosen them with your own hands using pliers to make them more rigid. To do this, you need to pull them out of their seats, unclench them and insert them into place, after which they will stop rattling for a while.
How to remove a brake caliper, work in stages
It is advisable to remove the brake caliper on a lift. To remove it correctly, you must adhere to a number of specific actions. We will give an example of removing a caliper on domestic car models.
1.Before carrying out such work, it is necessary to raise the vehicle using a lift. If for various reasons it is not possible to lift the car completely, you can use a jack.
2. Then, you need to take a wrench and unscrew the bolt on which the brake hose bracket with the brake device is attached. After completing this process, it is advisable to remove the bracket to make it more convenient to work.
3. When the bracket is removed, you will see the bolt that holds the brake hose. This bolt should be unscrewed and the hose removed.
4. Immediately after removing the brake hose, fluid will begin to flow out of the recess. You can prevent leakage by closing the hole with a bolt that is suitable in diameter and size.
5. Next, it is necessary to remove the brake pads so that they do not interfere and it is convenient to work.
6. Now, you need to unscrew the bolts in the brake device mount. After that, we bend the locking plates.
7. Do not forget that these same bolts are very different from each other and they must be screwed into exactly the hole from which they were removed.
8. And finally, we remove the brake caliper itself.
The piston (cylinder) is faulty
Poor quality of brake fluid, the appearance of rust on the surface when the boot of at least one piston (cylinder) ruptures or as a result of prolonged downtime of the machine entails its partial jamming.
This will initially be heard when its operation is delayed, when the pads begin to knock on the disc. In order to make the repair yourself in this case, you need to disassemble the caliper and pull out the rusty piston; this must be done after the guides have been unscrewed and the boot and retaining ring have been removed.
If the cylinder still moves even slightly, you can squeeze it out using a compressor by inserting a hose into the hole for supplying brake fluid. This can also be done without first disconnecting the housing from the brake system; you just need to press the pedal, after which the created pressure will squeeze the cylinder out of its seat. If it is tightly jammed, then a preventive measure can be soaking it in gasoline and other similar liquid.
It is worth considering that the rear caliper piston cannot be removed, but is simply unscrewed along the threads with pliers or a similar tool. After this, you need to wash the cylinder seat and clean it of dirt and rust. It is also worth doing with the piston (cylinder) itself. Next you need to insert the cylinder into place. It would be useful to replace its boot with a new one during assembly. You can see this in more detail in the attached video.
Install a new one or repair the old one?
In some cases, it is not practical to buy repair kits. For example, while unscrewing the guides, the threaded connection was damaged or the bleeder fitting broke. If there are also irreparable defects in the cylinder, then it is better to buy a new caliper. Of course, you can try to repair the old one, but it will cost like new, so there is not much point in this.
But if you only need to replace the cuff or guides, it will cost you 1,000 rubles. Original brake calipers are not always easy to find. And the price tag for it is often too high. In this case, you need to buy only a high-quality analogue. It is advisable to avoid Chinese calipers. Decent analogs will cost about 20-30% cheaper than the factory one. In order for a new caliper to last for a long time, it must be serviced every time you replace the pads or brake rotor.
Guide faulty
The main problem if the brake does not work can be jamming and souring of the caliper guides.
Repairing this malfunction with your own hands will not be difficult. By the way, in this case there is no difference when disassembling both the front and rear calipers. To do this, you need to unscrew and pull out both guides. Clean them from dirt or poor-quality lubricant, remove and replace the torn boots with new ones, after filling them with special grease for calipers.
About lubrication of guides
Quite often disputes arise among motorists about this. Some use copper and graphite lubricants, others use lithol. But neither the first nor the second option can be considered correct. The fact is that over time, such grease for the brake caliper guides dries out, which will lead to jamming of the pin. There is nothing good about this.
As for proper lubrication, it is advisable to use silicone synthetic high-temperature lubricant. This paste works effectively at temperatures from -40 to +290 degrees. As for copper, graphite and other lubricants, they are used as anti-squeak, but not for guides. Universal lubricant for brake caliper guides – SLIPKOTE 220-R. It does not coke over time and does not dry out. Helps keep fingers clean and smooth. You need to choose the lubricant carefully, because if you choose the wrong one, it can come back at even greater costs.
Signs of a faulty caliper
Signs of a faulty brake caliper:
- increased braking distance;
- difficulty rolling;
- the car pulls to the side when braking;
- pedal vibration when braking;
- grinding noise in the caliper area when driving: it is worth noting that the reasons can be different, from a trapped stone to banal wear of the pads, but wear of the pads can be caused by a faulty caliper;
- characteristic signs of overheating on the brake disc;
- uneven wear of pads from one caliper;
- excessive heating of the disk.
Brake caliper - repair or replacement?
90% of brake system damage is caused by calipers. When a breakdown is detected, a car owner is often faced with a choice: buy a new brake caliper or try to repair the old one? Let us examine in detail the signs of a brake system malfunction and options for getting out of this unpleasant and dangerous situation.
First, we should say a few words about what a brake caliper is . There are two types of brake systems - drum and disc. Almost all modern cars use disc brakes. The caliper is installed only on the disc brake system and is its main moving element. To some extent, the caliper plays a key role in the braking system, since it is the caliper that stops the wheel disc by compressing the pads.
The brake system requires regular and thorough maintenance, replacing the brake fluid recommended for your vehicle and using lubricant for preventive maintenance. But even these measures, in conditions of strong temperature changes in many regions of Russia, do not save from brake failure.
You can determine if a caliper is broken by the following signs:
– the car “steers” to the side when braking;
– pulsation of the brake pedal;
– squeaks when the car slows down;
– when pressing the brake pedal you have to apply more effort than before;
– the brakes “grab”;
– the disks overheat.
I would like to immediately warn you against checking the temperature of the disks with your bare hands, you risk getting burned! It is enough to simply bring your hand a short distance from the disk. If one of them overheats more than others, diagnostics are needed. If you have any of the problems described above, you should contact the service as soon as possible.
Repairing the brake system yourself is a bad idea. After all, we are talking about a risk to your life and the lives of others. It is better to entrust the disassembly and assembly of the caliper to professionals. Visually, you can only assess the thickness and degree of wear of the pads, but only if your car has alloy wheels. Otherwise, all 4 wheels will have to be removed for inspection. Under normal conditions, brake pad wear should be even on all sides.
The main causes of brake caliper failure:
– wear of anthers;
– souring of the piston;
- corrosion of metal.
How do you know the caliper itself needs to be replaced ? Unfortunately, this is impossible without completely disassembling the caliper. So in any case, you will have to pay money to disassemble and clean it.
Caliper repair
Caliper repair consists of installing new pistons, replacing sealing collars and anthers. But if marks, scratches, chips or traces of corrosion appear on the surface of the piston or cylinder surface, the caliper assembly must be replaced. This is exactly the case when the desire to save should not turn into reckless greed.
An alternative option is polishing the caliper surface, but this alternative is very dubious. This half-measure usually lasts for about six months, so very soon you will have to pay for repairs again. Another significant disadvantage of this method is the risk of turning the part too much. After such manipulations, the caliper may not fit tightly to the disc, and, therefore, jeopardize the operation of the braking system as a whole.
It is worth mentioning that services, as a rule, do not provide a guarantee for overhaul or repair. The reluctance of drivers to change the entire caliper is easily explained: the original is expensive, and it is better to change the calipers as a set (right and left at the same time). When buying a used part, the most common problem is to come across a polished and painted caliper that has already been affected by corrosion. It is almost impossible to determine this visually, but after a few months the car owner again “ends up” for brake repair.
How much will it cost to replace or repair a brake caliper? Let's look at an example: the front caliper of a Volkswagen Touareg (1st generation).
The average repair price for a car with 6 cylinders in Moscow is about 4,000 rubles. Painting the caliper will cost another 2,500. Plus the cost of components, depending on the degree of damage: seals, boots, pistons (up to 3,000 rubles).
Replacing the caliper will cost only 1000 rubles, but how much does the caliper itself cost?
Numbers of original VAG calipers: 7L6615149A and 7L6615150A . The average price for this caliper is 24,500 rubles. This means that you will have to pay almost 50,000 rubles just for the calipers themselves without work.
What are the alternatives? For this car there is only one: German brand SOLLO , numbers SSVA5833 and SSVA5832 . The average price is 11,000 rubles, which allows you to save 27,000 rubles!
It turns out that when using reliable manufacturers of non-original spare parts, replacement will cost 2 times more than repairs. Considering that most likely you will have to go to the service center again very soon, it is much more profitable and safer to immediately replace the caliper.
Let's summarize. You can only get by with repairs if, when disassembling the caliper, it turns out that it and the pistons are not damaged. Then replacing the sealing cuffs and cleaning will help. But if risks, scratches and chips appear on the surface of the piston or the cylinder surface, it is better not to play roulette and replace the caliper assembly. Firstly, you will receive a guarantee, and secondly, if you follow the operating rules, the new caliper will serve you for many years.
Caliper repair and maintenance
In any caliper, with or without a bracket, the performance of the piston is first checked - it should move normally. If so, the next step should be the aforementioned caliper removal, removing the brake pads and disconnecting the brake fluid line. Since the entire structure of this unit is movable due to a guide bolt that moves along a sleeve with a rubber gasket, the gasket should be checked for elasticity and tightness
The condition of the bolt and sleeve is no less important. If it is in doubt, there are traces of acidification, increased mechanical wear, etc.
– these parts are replaced with new ones.
Often the hole where the rubber gasket is inserted has a build-up of hardened dust. This causes the gasket to be compressed and prevent the caliper from moving along the guide bolts. In such cases, a mandatory procedure is to clean the hole from deposits. However, the use of a round file for these purposes is contraindicated for two reasons: firstly, this tool is ineffective; secondly, its use often leads to the appearance of potholes in which even more dirt accumulates. The best option is a drill with an attachment of the required diameter.
The next step is to apply a special lubricant to the inner surface of the caliper housing bore. In addition, the cylindrical rubber gasket, bushing and guide bolt also need lubrication. And you don’t need to be afraid to apply too much, because anyway, the excess lubricant will later be forced out by the parts.
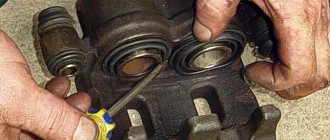
The piston is subject to mandatory lubrication, including preventive lubrication. To do this, first remove the gasket-boot ring using a simple flat-head screwdriver. Next, the piston is pressed in, and the resulting cavity is cleaned and filled with lubricant. The boot also needs to be cleaned, but it is more advisable to replace it, put on the piston and secure it with a ring. Thanks to this, the piston is less susceptible to corrosion and runs more smoothly, and the boot will not harden when high temperatures occur.
To provide increased protection of the caliper surface from oxidation, it is painted with anti-corrosion paint from cans. However, before this procedure, the metal is thoroughly cleaned of dirt and rust - in the latter case, you will need a metal brush. As practice shows, one can of paint is enough for three passes for each of the four calipers.
If there is a squeaking sound when braking a car, this means that some points of the caliper are poorly lubricated or the lubricant has completely burned out. To avoid discomfort, each time you replace the pads, apply lubricant to the following points - the non-working surface of the caliper, the two guide bolts and the piston. And there is no need to be afraid of doing something wrong: even a novice car driver, with minimal instruction, is quite capable of carrying out preventive and repair work on this mechanism.
Bulkhead
Before replacing the brake piston, the caliper must be removed from the vehicle. This can only be done by following the following instructions.
- First, you need to pinch the hose through which the brake fluid flows. This is considered a prerequisite after repair; for this reason, you do not need to fill in new brake fluid, which may not be available.
- After this, you will need to clean the hose mount, as most often it is dirty. Sometimes for complete cleaning you have to use special tools to help unscrew the nut. After unscrewing the nut, you need to plug the hole with an ordinary bolt, this will help prevent fluid from leaking out of the caliper.
- After complete disassembly, you should thoroughly clean the piston shrinkage area and the cuff groove. It is necessary to do this, because the new piston can wear off on old chips and scratches.
- Having eliminated all the shortcomings, you can install the new cuff in place, after lubricating it with new brake fluid. After this, lubricate the piston with liquid and begin to insert it into the shrink spot. This can be done by rocking it from side to side.
At the moment when the piston is already in the middle of the cylinder, you need to put a special cover on it. Having put on the cover, you can completely immerse the piston in the cylinder, and then squeeze it out with air and make sure that the boot sits evenly and is not twisted or lifted up anywhere
Then we completely recess the piston into the cylinder and begin assembling the caliper. During assembly, pay attention to the threads of the guides. We perform the remaining procedures in reverse order.
At the end of the work, you need to tighten the nut of the hose through which the brake fluid flows into the system. If there is not enough fluid, it should be topped up or replaced with a new one. You can check the amount of fluid by pressing the brake pedal. If it fails, then there is not enough fluid and there is air in the system. Don’t forget to bleed the brakes; this is done by unscrewing the special fitting on the caliper body. After unscrewing the fitting, wait until the liquid flows in an even stream without air bubbles. Then you can tighten the fitting.
Brembo caliper
Repairing a single-piston caliper costs about 2,500 rubles.
The actual price will depend on the design features of the unit. The work includes complete disassembly of the caliper, replacement of the seals and fittings, sandblasting, spray painting and assembly of the unit. Repairing a two-piston caliper costs approximately 3,500 rubles, a four-piston caliper costs 5,000, and a six-piston caliper costs 6,000. The work is guaranteed for one year, and it only takes 2.5–3 hours. Repairing a single-piston caliper costs about 2,500 rubles. The actual price will depend on the design features of the unit. The work includes complete disassembly of the caliper, replacement of the seals and fittings, sandblasting, spray painting and assembly of the unit. Repairing a two-piston caliper costs approximately 3,500 rubles, a four-piston caliper costs 5,000, and a six-piston caliper costs 6,000. The work is guaranteed for one year, and it only takes 2.5–3 hours.
Repair kit for caliper
The lack of original repair kits for calipers does not depend on the status of the automaker.
With equal success, the brake mechanism can be officially considered beyond repair in both an exclusive sports car and a budget city sedan. The lack of original repair kits for calipers does not depend on the status of the automaker. With equal success, the brake mechanism can be officially considered beyond repair in both an exclusive sports car and a budget city sedan.
Device
There will be a separate article about the caliper, but now I want to show on the “fingers” what moving parts there are that suffer first of all. This is a fairly simple device; it has only two working elements - guides and pistons.
They are the ones who are responsible for the whole “triumph”; if they fail, then the work is disrupted. However, the structure of the piston is now quite strong; physical leakage, when you break, say, a brake hose, is now a rare phenomenon. And therefore the caliper breaks due to souring of the pistons and guides, but more on that below.
