Much has been said about the importance of uninterrupted operation of all elements responsible for applying the brake. This article will talk about repairing the components of the caliper: the piston (cylinder), guides and replacing their boot - with your own hands, you can also learn about this clearly from the attached video.
To fully understand how to easily repair and replace these parts, it is worth understanding the structure of the front and rear calipers and the reasons for their failure, and what repair kit may be required for this.
The pistons of the brake cylinders are jammed, what should I do?
Welcome! Brake cylinders - thanks to them, braking is carried out, and without the pistons that are in them, these cylinders will not work at all, so if a piston fails, then you have to go to a car store and buy a new brake cylinder, because driving without brakes is scary and even more dangerous , but not in all cases the pistons stop working forever, sometimes they can be revived, and we will write in detail about how to do this in this article.
Note! To work, you will need to stock up on: A jack to lift any side of the car, as well as a wheel wrench and you may also have to stock up on bricks, and you may also need a basic set of wrenches and sockets!
Summary:
How to understand that the pistons of the brake cylinder are not working? Let us answer this question before we move on to the repair of pistons, namely inoperative (That is, the pistons do not move in the cylinder), the pistons are recognized if they do not move at all and stand in one place, as a result of which the car, namely the brakes, begins a number of problems occur, that is, the car cannot drive normally because it constantly slows down even though you don’t press the brake pedal at all, or it may be that the car will drive but it will brake much worse than it should, in general, let’s figure it out Why do these cylinder pistons fail?
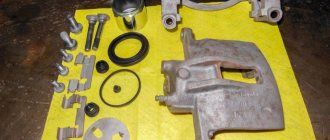
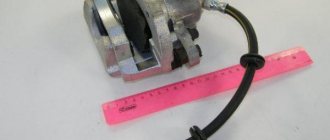
From time to time, the sealing ring (indicated in the photo below by an arrow) that fits the piston in a circle either wears out, or micro cracks form in it through which dirt begins to get into the piston itself, where the lubricant is located, and as a result the piston becomes unusable.
And also, the piston can simply sour in the brake caliper, and this can happen because of our roads, which in winter are mostly sprinkled with sand and salt, and the brake system is located in the very bottom of the car and therefore is subject to heavy braking. and in general, when moving, all this salt flies which little by little brings the situation to the point where the piston simply rusts, otherwise it simply sours, and therefore it will then be very difficult to move it from its place and thus it stops moving and therefore stops working.
By the way, you can very easily understand if your piston is somehow soured, if your car’s fuel consumption on the highway increases, and also if the car, as already mentioned earlier, starts to drive worse, and also if you notice that In neutral gear, the car began to slow down a little, this can also be understood if the car begins to skid on a winter road from braking, all this indicates that your piston has stopped working.
The design of this brake element
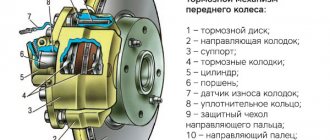
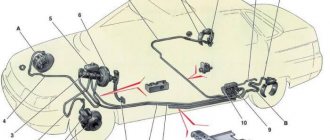
There are two types of disc calipers - front and rear, their design and repair method are slightly different, but their main elements are the same:
- The housing in which the piston (cylinder) is mounted.
- Bypass valve.
- Sealing ring.
- Piston (cylinder).
- Cylinder boot.
- Retaining ring.
- Frame.
- Pressure bar.
- Pads.
- Guide boot.
- Guides.
- 14. Fastening bolt.
- Brake hose.
The difference between the rear disc caliper is the presence of a parking brake.
Therefore, the piston (4) has a special thread through which it is screwed onto the parking brake rod (1). Thanks to this, it can operate under the influence of two drives - mechanical (parking) and hydraulic.
How to turn an inoperative brake cylinder piston into a functional one?
1) At the very beginning of the operation, you will need to remove the wheel from the car.
Note! By the way, when you remove the wheel from the car, try to spin it while it is in the air; if it slows down, then some piston has actually become unusable!
2) After your wheel is removed, immediately remove the caliper from the car after it in order to get out the brake piston that is not working. (For information on how to remove the brake caliper on front-wheel drive cars, see the article: “Replacing the brake caliper on a VAZ 2109”, and for information on how to remove this caliper on a classic, see “this article”)
Rust removal sequence
To keep your brake calipers in tip-top shape, you need to clean the sliding pins regularly. Remove old oil, debris and rust, then add heat-resistant lubricant to the pin and put it back in. The entire process may take about an hour.
The following step-by-step instructions will make cleaning easy:
Remove the caliper. This is not possible if the car is at ground level, so you will first need to jack up the car
Once it is raised, loosen all the nuts on the four wheels without removing them completely. Remove the nuts on the front two wheels. Keep the nuts in a safe place. Carefully place the film on the surface and cover the cap. This process ensures that most of the vacuum is properly retained in the brake system. Loosen the line at the point where it meets the caliper. Unscrew it partially and bring the tray to collect the drops. Using a screwdriver, remove the spring clip. Loosen the bolts and remove them, then remove the caliper from the rotor. When it is completely free, you can pull out the pads. After removal, use the rubber vacuum cap and pan to collect the liquid
Place a piece of wood between the piston and the outer flange. Do-it-yourself cleaning of calipers from rust is carried out using brake fluid to remove contaminants and grease. Use a cleaning brush and brake fluid. Spray some of the brake cleaner onto the brush and begin processing. Do not spray cleaner directly onto the calipers. The more carefully this step is performed, the better the cleaning effect will be. When finished, remove the front locking clip and close the drain valve using masking tape. Once it is closed, secure the brake hose fittings as well. Take some stiff cardboard and cut out a piece in the shape of an inverted L. You need to protect all parts of the car with plastic film. If paint gets in, the normal functioning of the braking system will be disrupted. You may need to use duct tape to hold the plastic in place. Spray the paint onto the caliper using a slow and steady motion. Take special care to prevent paint from getting between the brake pad and rotor. Leave the paint to dry before removing the plastic and cardboard. Move to the next wheel and repeat the process. Make sure the paint is completely dry before attaching the wheels. Repeat the process until the caliper is completely clean. Observe safety precautions when performing work. Any dust or dirt in the air can get on wet paint. In addition, the smoke from spray paint is dangerous if the driver inhales it, so it is recommended to wear a dust mask when working. Replace the piston and reattach the brake line, then install the brake caliper into the wheel. Once all four calipers are serviced and the wheels are installed, check the brakes. If any problems are found, contact customer service.
WHEN REPLACING THE PADS, I DETECTED A JAMMED PISTON. I'll tell you what I did.
It was necessary to replace the brake pads a long time ago, but I decided to replace them when an unpleasant grinding noise began to appear when braking. Since it was a business trip, I bought new pads during the day and postponed the replacement until the evening, before an early trip back.
So, I began the usual and fairly simple procedure of replacing the pads on an old “two-wheeler”. I quickly removed the wheel, halved the caliper, pulled out the remaining pads (the friction linings were gone), all that was left was to press the brake cylinder into its original position.
And at this moment, the whole process stopped. The piston jammed in the maximum position and did not want to return to its place. Since the pads were worn less than the “minimum”, the piston had a very small stroke, one might say did not move in the cylinder, and naturally everything began to rust and sour.
Express caliper repair
To resolve this issue, you need to follow the steps below.
- To begin the main work, you need to unscrew the caliper by turning it clockwise. If the part does not turn, you can try turning it in the other direction - in some cars the caliper is unscrewed counterclockwise;
- The next step is to unscrew the piston. To do this we use a key. After the part is unscrewed, it can be removed from the cylinder;
- When all the necessary elements are unscrewed, they must be checked for corrosion. Areas where there is rust should be thoroughly cleaned. It is better to sand difficult areas;
- After fighting rust, you need to drain the fluid from the caliper. We hope there is no need to explain how to do this;
If all the above steps have been carried out, then all that remains is to grind the inner surface of the cylinder itself. Here we do everything without fanaticism
, the main thing is to remove dirt and rust.
Once grinding is complete, you can add brake fluid and return the rubber ring to its place.
Now the clean piston is inserted back. It is inserted under pressure, as it needs to go through the o-ring
During this procedure, special care should be taken with the boot - the main thing is not to damage it
As mentioned above, the piston can be unscrewed both clockwise and counterclockwise. Therefore, this fact must be taken into account when screwing it in.
To keep the internal thread as close to the piston as possible, you just need to squeeze the handbrake flag.
Thanks to all the manipulations described above, you can successfully repair the caliper and get rid of its jamming.
Why does the brake caliper squeak and jam?
Secondary causes of jamming:
- the pads are not installed correctly initially, so they begin to creak;
- discs are worn out by 70–80 percent - due to aggressive driving style or natural reasons;
- the lubricant is incorrectly selected or is missing;
- Dirt and moisture got inside the mechanism.
One of the main reasons why a mechanism creaks or jams is overheating. Friction during active braking causes heat production. This causes high loads not only on the pads, but also on the presser itself. Therefore, at least conscientious manufacturers try to make it from the most durable material.
About diagnostics and scheduled maintenance
To prevent this kind of repair work from turning into a kind of regular ritual, it is necessary to regularly diagnose the entire brake system and monitor the cleanliness of each individual part.
Timely diagnosis
allows you to avoid not only jamming of the caliper, but also premature, uneven wear of the brake pad and overheating of the brake discs. All this makes it possible to maintain the serviceability of the brakes and be calm on the road.
Once a year, it is best to carry out a detailed check of the caliper piston and boot.
– it must be without any damage. The surface of the caliper, its piston and other parts should be free of rust and serious contamination.
For prevention, you can treat the surface of the caliper with WD-40 once every 6 months.
The information presented here is a list of actions to take in cases where the brake caliper is stuck and the braking system begins to lose its original effectiveness.
Symptoms of a problem
- oily spots on the visible or inner side of the wheel, which indicates a leak of DOT fluid, a decrease in its level in the expansion tank;
- unexpected, spontaneous pulling of the car to the side after braking - while the wheels are normally inflated and the suspension is fully operational;
- a grinding sound after releasing the brake pedal is the main sign of a situation where the piston is pressed in and does not return to its original position;
- The discs overheat greatly and give off an unpleasant burnt smell - even after driving with relatively infrequent braking.
Front caliper jammed
If the front brake caliper is stuck, this is often due to an aggressive driving style. This can be explained by the design difference of modern cars, where the brakes are applied faster at the front. Therefore, the burden here is incredible. Many cars are equipped with a pressure regulator or “sorcerer”. During heavy braking, it blocks fluid access, but only to the rear axle. The front axle continues to work and heat up.
However, if the rear caliper is equipped with a handbrake system, which is provided on some modifications, the likelihood of breakdowns and the rate of wear also increases.
Problems arising with the braking system
Most common problems:
- burning smell from the front pads, jamming of the front pads
- The brake pedal has a lot of free play when pressed or slowly goes to the floor when pressed.
- uneven braking of the rear wheels (usually found out during a state inspection)
- a lot of free time
- together
The first and mandatory condition is the absence of brake fluid leaks in the entire system (i.e. integrity of hose tubes, etc.
) The most common complaints from AUDI owners are about the front brakes - overheating, jamming, resulting in a burning smell, with prolonged driving, the pads lose their performance properties, and possible bending and uneven wear of the brake disc itself.
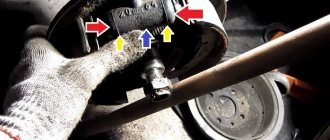
- On the right is an overheated block, below is a wrench for the brake pipes.
- In the worst case scenario, an overheated front caliper can negatively impact the health of the wheel bearing.
- Possible causes: jamming of the brake pads themselves in the brake caliper.
What to do if the caliper is stuck on the road
The first thing that is recommended is to give the elements half an hour to cool down. Then identify the problem wheel by conducting an effective test. You need to drive 20–30 meters, stop and touch all four disks with your finger through the provided holes. If the part is hot, it is this particular wheel that jams. It is removed, the car is first placed on a jack.
Cold water will help to quickly cool the elements, but you can water it on a surface that has already partially cooled. Otherwise, the disk will simply blow apart due to strong temperature changes.
If the handbrake cable jams, the inner or outer braid is most likely damaged. It is possible that the return spring has weakened and needs to be replaced with a new one. Also, both return brackets often become dirty. In this case, they must be cleaned of rust and treated with VD-40.
But what to do if sometimes you don’t have time for all this. Then the only way remains is to hit the return bracket with a hammer so that the cable returns to its original position. You can drive further, but just don’t use the handbrake again until it is repaired.
If the piston itself is jammed, a hammer can also quickly solve the problem. You need to tap it carefully, through a wooden spacer, throughout the entire mechanism. If the pads do not wedge, try inserting a screwdriver between the pad and the disc. Finally, the surest, but most dangerous way is to squeeze the hose with a clamp. But you must drive extremely carefully, without brakes.
If the brakes rattle
This type of brake has pressure springs or floating calipers.
They are responsible for securing the pads to the caliper body. The reason for their failure is metal fatigue or poor quality. As a result, they lose their elasticity and stop pressing the pads against the body. Because of this, the pads rattle at the slightest passage of irregularities and may come into uneven contact with the disc, which will lead to the appearance of a shoulder or grooves on it. Also in this case, the staples themselves may rattle.
What should you do when your brake calipers or pads rattle? If it is not possible to replace them, then you should try to loosen them with your own hands using pliers to make them more rigid. To do this, you need to pull them out of their seats, unclench them and insert them into place, after which they will stop rattling for a while.
Consequences
When the bracket wedges, the block remains pressed. This causes the discs to become very hot and the shoes to burn. If the speed of movement is high, and the degree of constriction is maximum, then it’s red-hot. It is obvious that braking efficiency drops sharply, the linings and disc become washed out and lose their properties.
After several heating and cooling procedures, the disks are sure to become deformed. After pressing the pedal, you will feel a beating, and you will not be able to brake at all. You will have to replace the repair kit, but the troubles will not end there, because the cause of the malfunction is in the caliper. If the hub begins to heat up, then the bearing will crumble and the CV joint will be destroyed.
Set for pressing/screwing in caliper pistons
In today’s review, I want to share with you my impressions of a tool for servicing car brakes, or, to be more precise, for pressing/screwing in pistons when replacing brake pads.
It just so happens that I have to periodically participate in such procedures. And over time, using improvised means such as a pry bar (for pressing) or a grinder key (for screwing in) became boring. Firstly, although the result is the same, it is inconvenient. Secondly, if you are tinkering with the brakes alone, then pressing the piston with a pry bar is quite problematic. In general, something had to be done about it. Therefore, I decided to acquire the appropriate tool. Aliexpress is full of different sets, differing primarily in the number of tools included in them. I decided not to waste time on trifles and purchase a full version that allows me to service calipers with two pistons.
It took the seller about a week to send the order after payment. The parcel was sent with a full track; anyone can view information about its journey from China to Belarus here.
At the post office they gave me a decent-looking box with a plastic suitcase inside. Exactly as you can see in the pictures in the ad. I would like to say that since the moment I received it, the set has already been tested several times, so this review is written with an eye to the experience of use. Because of this, the instrument does not look like new.