The caliper in a car is one of the most important parts. It is a unit necessary for attaching the brake pads of a vehicle. Only a small proportion of drivers pay due attention to the braking system, although this part of the car should be a priority.
Many owners of domestic VAZ cars have managed to appreciate the importance of the caliper, or rather, the need for its full serviceability. For example, some drivers almost crashed into the vehicle in front because the braking system failed at the most inopportune moment.
The driver should definitely periodically check the serviceability of the brake caliper on the VAZ 2110 and other domestic car models. If this part is damaged, it can be restored. In cases where the possibility of restoring the caliper is excluded, the component part is completely replaced.
Major breakdowns
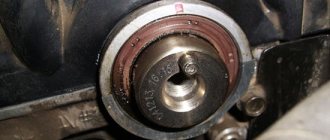
The front caliper of the VAZ-2110 is a structural element that holds the brake pads and is responsible for the level of pressure of these elements on the metal discs. It also helps ensure even pad wear, which guarantees effective braking in any situation. The body is made of aluminum alloy and the piston is made of steel.
Between these elements there is an oil seal that prevents brake fluid from leaking out of the system. The main caliper failures are as follows:
- The appearance of oxidation on the surface of the guide elements.
- Oxidation on the main piston, which leads to deterioration of the mechanism.
Failure can be identified by uneven wear of the pads, as well as by an increased braking distance. If such malfunctions are detected, be sure to change the pads.
Main causes of malfunction
The VAZ 2110 caliper is structurally an element that holds the brake pads and is responsible for the degree of their pressure on the brake discs. It is also responsible for uniform wear of the brake pads and guarantees the driver reliable braking in extreme situations. Thus, the importance of the caliper in the operation of the car is difficult to overestimate.
If by this time you have a completely reasonable question, what can happen to the caliper on a VAZ 2110 (2112), we will be happy to answer you. The main cause of malfunctions is “acidification” of the moving elements, coating them with an oxide film, clogging due to the destruction of protective boots or the use of improper lubricant, namely:
- acidification of the main piston mechanism;
- acidification of guides.
Piston mechanism and caliper guides VAZ 2110
A clear sign of problems that the caliper can cause on VAZ cars is uneven wear of the brake pads and an increased braking distance. In this case, the VAZ pads must be changed, and the caliper mechanism itself must be subjected to comprehensive diagnostics:
- check the condition of the piston, its degree of freedom, the presence of moisture, metal oxide, oxide formations and build-ups, the condition of the protective boots;
- Similarly, check the condition of the guides, make sure that there are no uncharacteristic scuffs, abrasions or deformations of the rod on the surface.
We must also not forget about regularly replacing the brake fluid in the system. This should be done approximately every 40 thousand km. mileage of VAZ-2110.
Since brake fluid is hygroscopic, it easily absorbs moisture, thereby oxidizing the piston mechanism and causing it to fail. The piston stroke becomes difficult and uneven wear of the brake pads and wheel wedge occurs.
Please note that the repair kit offered in stores for self-service of VAZ 2110 (2112) calipers contains special lubricant for both the main piston and the guides. The use of Lithol or graphite lubricant leads to swelling of the protective shock absorbers and further souring of the guides. This kind of repair is unlikely to benefit your car.
Brake fluid
Any brake fluid that is used in automotive systems absorbs moisture very well. It is hygroscopic, therefore it oxidizes the piston mechanism from the inside, which leads to failure of structural elements. This makes the piston stroke more difficult and the brake pads wear unevenly.
The front wheels may become jammed. For these reasons, it is necessary to replace the brake fluid. Its service life is about 90,000 km, but not more than two years. These solutions contain many useful additives that improve cooling and increase braking efficiency.
But over time, under the influence of high temperatures and pressure, these additives evaporate. And the consistency of the brake fluid becomes more like water, and this reduces the efficiency of the system.
Symptoms of wear
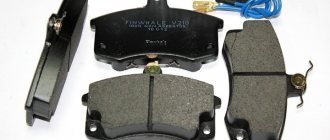
The middle pads will last about 30 thousand mileage and they wear out three times faster than the rear ones, since the main load during braking falls on them. Under no circumstances should you use pads from different sets or different degrees of wear; we install only a new set, from only one manufacturer.
Difference in thickness of old and new pads.
Regardless of the mileage, if these symptoms appear, we at least check the condition of the pads and discs:
- Creaks and clanks when braking.
- Vibration during braking.
- Increased braking distance.
- Large brake pedal travel.
- Uniform impacts when braking.
- Traces of dust and chips on the brake mechanisms.
It is these symptoms that will tell us that the service life of the brake pads has been exhausted. We can say with almost 100% confidence that the block has worn down to an acceptable thickness of 1.5–2 mm .
Let's start replacing.
Repair kits
You can purchase special kits designed for caliper repair. But there is no point in purchasing it. It is much better to replace the VAZ-2110 caliper. In this case, you will increase the life of the entire braking system and also improve its reliability. Such repair kits contain the lubricant that is necessary for the piston and guides.
You cannot use graphite lubricant such as CV joint or Litol-24, as this will cause the protective shock absorbers to swell and the guides to simply oxidize. As a result, repairs will not bring the desired effect for a long time.
Calipers for VAZ 2110: repair and maintenance
Have you ever wondered what exactly your safety on the road depends on? You can, of course, refer to other road users or the condition of the roads. But it will be much more relevant to talk about the technical side of the issue. The hero of our today's article on the VAZ 2110 is the caliper.
Front brake cylinder VAZ 2110
An incredibly simple mechanism in design and operation, at the same time it is an extremely important part of your VAZ car. A properly functioning caliper can give you those precious few meters of braking distance in reserve, which can protect you from a terrible disaster or damage to your vehicle.
Not every motorist knows how to properly monitor and maintain the brake mechanism, has a vague idea of how to dismantle it and, perhaps, will generally look at his interlocutor with a blank look when mentioning a certain VAZ caliper. But servicing this element of the brake system is quite simple and does not require much effort.
VAZ 2110 caliper maintenance
On the road you should not rely on the Almighty. Therefore, if you feel that something is wrong with the braking distance of the car, it is better to take the initiative into your own hands. Arm yourself with a modest arsenal of locksmith tools, consisting of a small number of open-end and socket wrenches, as well as a certain amount of theoretical knowledge - get down to business.
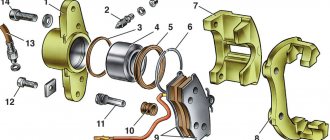
Main elements of the front brake system
- Brake disc – position 1 in the photo.
- Caliper, pos. 3.
- Brake pads – 4.
- Cylinder – 5.
- Piston – 6.
For the front wheel, the brake mechanism has automatic adjustment of the gap between the disc and pads, with a pad wear indicator and a floating caliper. The bracket includes the front brake cylinder of the VAZ 2110 and the caliper; they are secured to each other with bolts. The piston is installed in the cylinder cavity with an o-ring. The optimal clearance between the brake disc and pads is maintained due to the elasticity of the installed ring. How to change the brake cylinder of a device with your own hands is suggested in the article.
Do-it-yourself dismantling of the caliper on a VAZ-2110
The very simple design of the product and the triviality of the process of dismantling it allow even a novice motorist to carry out repairs and maintenance. If you carefully follow the recommendations below, you are unlikely to encounter difficulties at any stage of the process. You will save a lot of money spent on a trip to a service station, and a considerable amount of time, because the service time is comparable to the time required to travel to the workshop.
Dismantling VAZ caliper
The sequence for dismantling the product is as follows:
- The first step is to jack up the car and remove the wheel. To be on the safe side, it can then be placed under the bottom of the car in case the jack fails;
- On a VAZ 2112, the caliper is attached to the bracket using two M17 bolts, which you should unscrew. Penetrating lubricant may be needed to strip the bolts;
- If you need to replace the VAZ caliper or carry out a comprehensive repair, unscrew the product from the brake hose. You seal the hose tip and you can begin further disassembling the product.
Diagnostics
To check the front brake caliper of the VAZ-2110, you will need to perform the following steps:
- Assess the condition of the metal piston and the ease of its movement inside the cylinder.
- Check for metal oxidation, oxide formations or build-ups, or moisture on the elements.
- Assess the condition of all rubber boots.
- Check the condition of the VAZ-2110 caliper guides. You must make sure that there is no abrasion, deformation or scuffing on their surface.
Any damage to the caliper body and its and other elements should alert the driver. In this case, it is necessary to change the mechanism.
Detailing
Assembly elements on the front brake mechanism:
- Dustproof cover;
- Pad holder;
- Noise protection gasket and spring;
- Two pads: internal, with a wear indicator, and external;
- Fastening plates;
- Cylinder cover and piston;
- Caliper;
- Bracket;
- Air release valve;
- Gasket, bushing, pin, seal.
For the tenth to twelfth VAZ models, these units are structurally the same, only the VAZ 2110 caliper bracket is different. Therefore, it becomes possible to install not only the “native” unit, but also from “related” models. Naturally, this requires replacing the bracket itself.
It plays a vital role in securing the caliper and brake mechanism, and also forms the front clamping mechanism along with the caliper, piston and caliper.
Thus, the bracket is not only a holding element, but also a guiding element of the front wheel locking mechanism.
Front caliper parts
Naturally, when it fails, the entire assembly is often replaced, but individual elements can be repaired, for which there are special repair kits.
The price of a repair kit averages about 500 rubles and includes:
- 1 hose fitting with cap;
- 2 protective covers for guides;
- 1 O-ring;
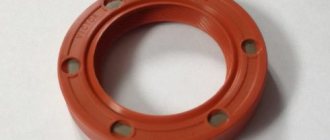
- 1 caliper protective ring.
The price of a new left or right front caliper fluctuates around 1000-1500 rubles.
Front wheel brake
Rice. 6-20. Pressure regulator performance test diagram: Pi
— pressure at the inlets to chambers A and D (see Fig. 6-18) of the pressure regulator, MPa (kg/cm 2 );
Pr
—pressure at the outlet of chamber B, MPa (kg/cm2);
Re
is the pressure at the outlet of the chamber C, MPa (kg/cm2);
1 - nominal pressure value Pr;
2 - upper limit of pressure
Pr;
3 - lower limit of pressure
Pr;
4 - the pressure
of the Re
manometer Mg) should fit into the shaded area (Fig. 6-20).
The readings of pressure gauges Мз and Мг (see Fig. 6-19) should not differ by more than 0.4 MPa (4 kgf/cm2) in the pressure range from 0 to 10 MPa (from 0 to 100 kgf/cm2) at regulator inputs.
Front wheel brake
Withdrawal. Raise the front of the car, place it on stands and remove the wheel. Unscrew the pipeline fitting and disconnect the flexible hose from the line; Plug the holes in the hose and tube to prevent brake fluid from leaking. Remove the hose from the guide bracket.
After unscrewing the two bolts that secure the shoe guide to the steering knuckle, remove the guide assembly with the caliper and working cylinder.
VAZ-2110 caliper maintenance and repairs
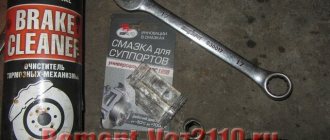
It is mandatory to service the VAZ caliper after each replacement of brake pads, as well as in the event of a forced inspection due to its malfunction, for which it is first necessary to check the condition of all rubber elements, shock absorbers and anthers. It is also imperative to replace the grease for the caliper guides. You need a good synthetic based silicone lubricant that can withstand high temperatures.
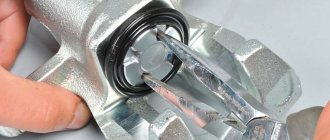
To remove the piston from its seat, it is necessary to create the appropriate force using an air compressor (pistons are repaired one at a time, the stroke of the second is blocked, for example, by a wooden block). With the same success, when removing the product from the car, you can press the brake pedal without disconnecting the VAZ 2112 caliper from the brake hose. It is advisable to use a rubber adapter in order to absorb the sharp impact of the freely moving piston and its “shot”.
VAZ 2110 caliper repair
The piston is pushed back using a special clamp. In this case, the boot should be bent to compensate for excess air pressure. The hole for the piston and for the guides are cleaned and washed with carburetor cleaning fluid, all gaskets, boots and seats are also thoroughly lubricated.
How to change the front brake cylinder of a VAZ 2110
- Remove the wheel and turn the steering wheel for easy access to the caliper;
- Using a hexagon, unscrew the two bolts securing the brake cylinder;
- Unscrew the caliper guide bolts;
- We remove the caliper, but do not touch the pads;
- We disconnect the bracket from the cylinder itself and unscrew the brake hose (be careful not to leak the brake fluid).
The new front brake cylinder is installed in the reverse order. After the procedure, you will definitely need to bleed the brakes (you can even cope with this task yourself).
The procedure for removing the caliper and video instructions using the example of a VAZ 2110
So, let's look at the order of actions that need to be performed.
- Raise the car with a jack
- Remove the front wheel
- Disconnect the brake hose from the front strut.
- Unscrew the two caliper mounting bolts from the inside
See the step-by-step instructions using the example of the VAZ 2110, which was made specifically for this article:
As you can see, this process can be completed in 5 minutes, the name of the necessary tool is at hand and an idea of all the necessary actions. A new caliper complete with brake pads has a price of 2,000 rubles for original AvtoVAZ products. If we consider cheaper analogues, then you can buy a caliper for 1,500 rubles - a piece.
Of course, in most cases it is necessary to change only the necessary spare parts of this entire structure, because the cylinder, bracket and pads are sold separately. And for many car owners it simply doesn’t make sense to buy the whole thing assembled.
Replacing the front brake cylinder
The main malfunction of the front wheel brake cylinders on the VAZ 2110-2112 can be considered their jamming, as a result of which, even when the brake pedal is released, the cylinder does not immediately return to its original position.
Also, problems with the passage of brake fluid from under the rubber are possible, which is also not normal. To replace this part yourself, you will need the following tool:
- 13 mm socket head
- Ratchet handle and crank
- Hex bit or similar bit for 10
- Socket wrench 13
- Special split wrench for brake pipes and hoses
Checking the caliper and restoring it
The caliper is installed on the front and rear brakes. Its verification and restoration can be carried out independently, but, in the absence of the necessary practical skills and theoretical knowledge, it is best to turn to professional specialists. Let's consider in theory a method for checking and restoring a caliper on a VAZ 2110, the price of which is one of the lowest on the market.
The main task comes down to properly disassembling the caliper, cleaning it of old grease residues, applying a new special compound and checking the integrity of the rubber seals. First you need to gain free access to the front brake mechanism, which is located directly behind the wheel. For these purposes, supports are installed that help to easily and quickly remove the wheel.
After this, they begin the process of replacing the brake pads on the front caliper of the VAZ 2110. To do this, you need to remove the lower bolt, which is responsible for fastening the caliper, using a screwdriver, the body of which can easily be tilted up. When replacing old brake pads, you should remember their location, since the installation of new parts should be carried out in the same place.
If the VAZ 2110 caliper body was folded up and the brake pads were removed, then you can proceed to the next stage. In this process, you will need to unscrew the upper bolt responsible for fastening the caliper. It is worth noting that the line and brake fluid must remain connected.
Next, the bolts that serve to connect the knuckle and caliper bracket are unscrewed. After removing the bolts, you can remove the bracket (along with the brake pad clamps and guides). Subsequently, the piston is removed from the caliper body. It can be quite difficult to do this yourself, so you can use the services of professional auto repairmen working at service stations.
If you decided to check and restore the VAZ 2110 caliper yourself from start to finish, then you can try to carry out the following steps:
- conveniently position the caliper body without disconnecting it from the brake line.
- press the brake pedal and release it only when the piston is pressed out of the cylinder by the pressure.
Do not be alarmed if liquid suddenly leaks from the cylinder, as this is quite normal for removing the piston using the above method. Next, you need to interrupt the brake line connection and also plug it (to prevent further fluid leakage). Once the so-called “blockage” has been established, the process of disassembling the “tens” caliper can be considered successfully completed.
It is worth considering the fact that the above steps do not cover the replacement and reassembly of the brake system. But, based on their complexity in describing the initial stage, one can understand how complex a part the caliper is.
Tools that will be needed during the replacement process
To replace the brake cylinder you will need a tool.
Before starting any repair work, you should prepare thoroughly. Replacing the brake master cylinder is no exception. To replace this part you will need:
- Set of keys. Having a variety of sockets and socket wrenches will be a huge advantage.
- Screwdriver Set.
- Round nose pliers will help when changing cuffs.
- Special “brake” wrench for 10.
In addition, during the replacement process, brake fluid will spill out, which is generally advisable to replace with new one. DOT-4 brake fluid is suitable for the VAZ-2110.
The process of removing the old part
In order to remove the brake master cylinder, you need to open the hood and do the following:
- To get to the part, you will first have to remove the sound insulation. You should not try to tear it off, as it is secured with bolts. Therefore, you should arm yourself with a screwdriver and unscrew all the fasteners. If the sound insulation is not removed after this, it means that not all fasteners have been unscrewed. If you pull the element, it can be damaged. After this, you can start replacing.
We unscrew several screws using a Phillips screwdriver to remove the sound insulation.
Disconnect the terminal with wires.
We disconnect the tubes and put rubber caps on them.
Unscrew the fastening bolts.
Remove the brake cylinder.
At this point, the dismantling process can be considered complete.
Installing a new part
Getting started with installation depends on what part you purchased. If it was assembled with the tank, then this will save the car owner from unnecessary work.
If the new gas turbine engine does not have a tank, you need to install the old tank. Before installation, it must be carefully inspected for cracks, chips and damage. If the tank is in poor condition, you will have to buy a new one. It is for this reason that it is recommended to immediately buy and assemble it.
Further work should proceed according to this algorithm:
- The new part is installed in its place under the hood of the car.
We install the new brake cylinder in its original place.
Fill the brake fluid and bleed the system.
After all the air has come out, clamp the pipes.
Next you need to carefully tighten the fasteners . At this point, the procedure for replacing the GTZ can be considered complete. You will need to add brake fluid to the reservoir, connect the sensor in the plug and install the sound insulation in the old place.
Video about replacing the master brake cylinder of a VAZ-2110
Do-it-yourself dismantling of the caliper on a VAZ-2110
The very simple design of the product and the triviality of the process of dismantling it allow even a novice motorist to carry out repairs and maintenance. If you carefully follow the recommendations below, you are unlikely to encounter difficulties at any stage of the process. You will save a lot of money spent on a trip to a service station, and a considerable amount of time, because the service time is comparable to the time required to travel to the workshop.
Dismantling VAZ caliper
The sequence for dismantling the product is as follows:
- The first step is to jack up the car and remove the wheel. To be on the safe side, it can then be placed under the bottom of the car in case the jack fails;
- On a VAZ 2112, the caliper is attached to the bracket using two M17 bolts, which you should unscrew. Penetrating lubricant may be needed to strip the bolts;
- If you need to replace the VAZ caliper or carry out a comprehensive repair, unscrew the product from the brake hose. You seal the hose tip and you can begin further disassembling the product.
Pressure regulator
1 – pressure regulator housing; 2 – piston; 3 – protective cap; 4, 8 – retaining rings; 5 – piston sleeve; 6 – piston spring; 7 – body bushing; 9, 22 – support washers; 10 – sealing rings of the pusher; 11 – support plate; 12 – pusher bushing spring; 13 – valve seat sealing ring; 14 – valve seat; 15 – sealing gasket; 16 – plug; 17 – valve spring; 18 – valve; 19 – pusher bushing; 20 – pusher; 21 – piston head seal; 23 – piston rod seal; 24 – plug; A, D – chambers connected to the main cylinder; B, C – chambers connected to the wheel cylinders of the rear brakes; K, M, N – gaps
The pressure regulator regulates the pressure in the hydraulic drive of the rear wheel brakes depending on the load on the rear axle of the vehicle. It is included in both circuits of the brake system and through it brake fluid flows to both rear brake mechanisms.
Pressure regulator 1 (Fig. Pressure regulator drive) is attached to bracket 9 with two bolts 2 and 16. At the same time, front bolt 2 simultaneously secures fork bracket 3 of lever 5 of the pressure regulator drive. A double-arm lever 5 is hinged on the pin of this bracket with a pin 4. Its upper arm is connected to an elastic lever 10, the other end of which is pivotally connected to the rear suspension arm bracket through an earring 11.
Bracket 3 together with lever 5 can be moved relative to the pressure regulator due to the oval holes for the fastening bolt. This regulates the force with which lever 5 acts on the regulator piston (see subsection 6.4.2). The regulator has four chambers: A and D (Fig. Pressure regulator) are connected to the main cylinder, B to the left, and C to the right wheel cylinders of the rear brakes.
In the initial position of the brake pedal, piston 2 (see Fig. Pressure regulator) is pressed by lever 5 (see Fig. Pressure regulator drive) through leaf spring 7 to pusher 20 (see Fig. Pressure regulator), which is pressed against the saddle under this force 14 of valve 18. In this case, valve 18 is pressed away from the seat and a gap H is formed, as well as a gap K between the piston head and seal 21. Through these gaps, chambers A and D communicate with chambers B and C.
When you press the brake pedal, fluid flows through gaps K and H and chambers B and C into the wheel cylinders of the brake mechanisms. As the fluid pressure increases, the force on the piston increases, tending to push it out of the housing. When the force from the liquid pressure exceeds the force from the elastic lever, the piston begins to move out of the body, and after it, under the action of springs 12 and 17, the pusher 20 moves together with the sleeve 19 and rings 10. In this case, the gap M increases, and the gaps H and K decrease . When the gap H is completely selected and the valve 18 isolates chamber D from chamber C, the pusher 20, together with the parts located on it, stops moving after the piston. Now the pressure in chamber C will vary depending on the pressure in chamber B. With a further increase in the force on the brake pedal, the pressure in chambers D, B and A increases, piston 2 continues to move out of the body, and sleeve 19 together with o-rings 10 and plate 11 under increasing pressure in chamber B, it shifts towards plug 16. At the same time, the gap M begins to decrease. Due to the decrease in the volume of chamber C, the pressure in it, and therefore in the brake drive, increases and will be practically equal to the pressure in chamber B. When the gap K becomes zero, the pressure in chamber B, and therefore in chamber C, will increase less degree than the pressure in chamber A due to throttling of the liquid between the piston head and seal 21. The relationship between the pressure in chambers B and A is determined by the ratio of the difference in the areas of the head and piston rod to the area of the head.
As the vehicle load increases, the elastic lever 10 (see Fig. Pressure regulator drive) is loaded more and the force from lever 5 on the piston increases, that is, the moment of contact between the piston head and seal 21 (see Fig. Pressure regulator) is achieved at greater pressure in the main brake cylinder. Thus, the effectiveness of the rear brakes increases with increasing load.
If the brake circuit “left front – right rear brake” fails, the o-rings 10, bushing 19, under the fluid pressure in chamber B, will move towards the plug 16 until the plate 11 rests on the seat 14. The pressure in the rear brake will be regulated by part of the regulator, which includes piston 2 with seal 21 and bushing 7. The operation of this part of the regulator, in the event of a failure of the said circuit, is similar to the operation with a working system. The nature of the change in pressure at the outlet of the regulator is the same as with a working system.
If the brake circuit “right front – left rear brake” fails, the pressure of the brake fluid forces the pusher 20 with the bushing 19 and sealing rings 10 toward the piston, pushing it out of the housing. The M gap increases and the H gap decreases. When valve 18 touches seat 14, the increase in pressure in chamber C stops, that is, the regulator in this case works as a pressure limiter. However, the achieved pressure is sufficient for reliable operation of the rear brake.
There is a hole in housing 1, closed by plug 24. Liquid leakage from under the plug when it is squeezed out indicates a leak in rings 10.
how to remove the caliper on a VAZ 2110 video Video
Video instructions on how to independently replace the front wheel brake caliper on a VAZ 2108-2109,…
Diary of an Auto Mechanic - A kit for brake calipers can be purchased here▻ https://ali.pub/oxsvd This video shows...
In this video I'll show you how to replace the brake caliper and bleed the brakes. To replace you will need a special...
The procedure for replacing front brake pads on VAZ 2108-099, VAZ 2110-2115, Lada Kalina, Priora, Granta. Lada repair...
High-quality used spare parts for Daewoo - https://avtolanos.com.ua.
Video review of replacing the front brake cylinder on a VAZ 2110-2112, Kalina, Granta, Priora.
Lubricating caliper guide pins, replacing pins and boots, video review of repairs. For all cars...
Trialli repair school: the video used brake discs https://www.trialli.ru/catalogue/tormoznaya-sistema/diski-tormoznye/df-142/ and brakes…
Trialli repair school: brake pads were used in the video https://www.trialli.ru/catalogue/tormoznaya-sistema/kolodki-tormoznye/pf-965/
How to replace brake discs and pads on a fret.
Repairing a stuck caliper. What happens when the brake caliper is stuck (the brakes get hot and the brake sticks...
Video guide for replacing front wheel brake discs on VAZ 2110-2112, 2114-2115, Kalina and Granta, Priora,…
We remove the brake caliper to replace the cylinder of a VAZ classic car. Tips on how to allow less air…
REPLACEMENT OF FRONT PADS FOR VAZ 2110,2111,2112.
Quick caliper repair. Detailed description of how to do it and in what order.
Do-it-yourself lubrication and repair of a brake caliper using the example of the front caliper of a VAZ 2112. Repair and maintenance…
Replacing a boot with a caliper For many car enthusiasts who are faced with repairing brake calipers...
A surefire way to press in the front brake piston yourself when replacing old pads with new ones without any...
Video guide on replacing the rear brake cylinder on VAZ front-wheel drive vehicles!
Source
Why is a caliper so important in a car?
Almost every detail in a car can be said to be very important. But, if the engine or any other part fails, the car will simply stop moving. Therefore, the driver will not be exposed to any danger, because there is no traffic.
In case of some problems and repairs to the brake system of the VAZ 2110-2112, the necessary action will be to remove the front wheel caliper. If the task is, for example, replacing brake discs, then the caliper can be removed as an assembly without disconnecting anything else.
Below we will look at this procedure more clearly. So, for this repair we will need the following tool:
Replacing brake caliper guides for VAZ 2110, 2111, 2112
Lately, there has been a grinding noise when braking. An inspection of the brake system showed that the discs and pads were in good condition.
One of the reasons for grinding and rattling of calipers may be worn guides. Also, worn guides can lead to uneven wear of the pads (when one of the pads wears out faster than the other). This is exactly the wear that was on the old pads when they were last replaced.
Inspection of the guides showed that they are not jammed, but the lubricant has coked and thickened, and there is also noticeable play.
4 guides were purchased along with anthers, the price was 40 rubles per piece. And also a special lubricant for brake systems BOSCH SUPEFIT (5000000151) for 50 rubles. One bag is just enough for four guides.
It is important to know that not any high temperature grease will work for caliper guides. Do not use ceramic grease or copper-based grease. These lubricants coke and cause the guides to jam.
They can also be aggressive towards anthers. As it turned out later, BOSCH lubricant is not suitable for guides; the temperature range is only -25°C +130°C, which is naturally not enough for this unit. Although the manufacturer claims that this lubricant is universal and is exactly suitable for guides. I found supporting information in the official brochure about the use of lubricant
These lubricants coke and cause the guides to jam. They can also be aggressive towards anthers. As it turned out later, BOSCH lubricant is not suitable for guides; the temperature range is only -25°C +130°C, which is naturally not enough for this unit. Although the manufacturer claims that this lubricant is universal and is exactly suitable for guides. I found supporting information in the official brochure about the use of lubricant.
We'll ride it for now, and we'll see.
Before replacing the guides, remove old grease and thoroughly wash the bracket. To remove the old grease I used 646 solvent.
Its disadvantage is that it is aggressive to the rubber from which the anthers are made, so after using the solvent, I washed the staples with a degreaser. New lubricant should be applied in a thin layer.
The boots on the new guides turned out to be complete crap, several tore at once, so I had to install the old ones, which turned out to be in good condition. By the way, when assembling, you should first put the boot on the bracket, and then on the guide. This makes it much easier and less likely to tear the boot.
After replacing the guides, the grinding noise when braking no longer bothers me.
VAZ 2110 | Front brake caliper
1. Using caution and safety precautions, clean the caliper from brake dust and dirt.2. Secure the caliper holder in a soft-jaw vice and remove the caliper from the caliper holder by pressing the face of the caliper down and removing it from the locating pins. Mark the orientation and remove the spring guides from the caliper holder.3. Using the blade of the screwdriver as a lever, remove the caliper piston dust boot mounting bracket, then, being careful, remove the dust boot in the same way.4. Remove the piston from the caliper using low pressure air supplied to the brake cylinder through the brake hose connection hole. In this case, instead of the brake pads, install a wooden block.5. Remove the wooden block and, being careful, remove the piston. Using a wooden or plastic tool, remove the O-ring from the groove in the caliper bore.6. Check the condition of all caliper parts and replace worn or damaged parts. Check the condition of the guide pins.7. Pay special attention to the cylinder and piston. If there are scratches, marks, wear or pitting, the piston and cylinder must be replaced, which means the caliper assembly must be replaced. Regardless of condition, replace all rubber seals.8. Wash all parts in methyl alcohol or clean brake fluid and wipe them. Use compressed air to clean tubes and holes.9. Install the O-ring into the caliper hole.10. Dip the piston into the brake fluid and apply a thin layer of brake fluid to the piston hole in the caliper. Install the dust boot on the piston so that the inner diameter of the boot fits into the groove of the piston.11. Insert the piston into the caliper and at the same time push the outer edge of the dust boot into the caliper until it locks into place. Install the dust cover mounting bracket.12. Check the ease of movement of the piston in the caliper. If necessary, replace the rubber boot of the dowel pin in the caliper body. Remove the plastic bushing from the pin, then, being careful, squeeze the rubber protective boot and remove it from the hole in the caliper body (see Fig. Removing the plastic bushing from the rubber protective boot, Location of the rubber protective boot of the locating pin on the caliper on models with solid brake discs ).13. In the reverse order of removal, install new rubber protective covers.14. Secure the caliper holder in a vice with soft jaws and install the guide springs in the same position as they were before removal.15. Install the caliper onto the caliper holder locating pins.Installation of calipers from Volga on VAZ 2110
| There are never too many 'brakes', so many are trying to improve their efficiency by replacing the original brake discs and pads with alternative, imported ones. There are also more advanced modifications to the brakes, for example, installing GAZ 3110 brakes on a VAZ 2110. |
Brakes GAZ 3110 and VAZ 2110, what is the difference?
The negative aspect of switching to more massive calipers from the Volga is in weight. For example, the weight of a VAZ caliper with pads is 3.2 kg, and the weight of a Volga caliper with pads and adapter is 5 kg. That is, by replacing the standard 'tens' calipers with Volgov calipers, we increase the amount of unsprung mass of the car.
The positive aspect of the Volga brakes is that the large pad area allows for better heat dissipation. Car enthusiasts also note their better efficiency compared to standard VAZ 2110 brakes.
Adapter for GAZ 3110 caliper for VAZ with front-wheel drive
Drawing of an adapter for the Volga caliper for VAZ 2108/2110/1118/2170 (AutoCAD format)
In the archive there is an adapter for brake discs R14 and R15, archive password: lada2111rf
Gas 3110 from storage. Automobile equipment surplus, used sale.nelikvidi.com
Installation of calipers from GAZ 3110 to VAZ 2110 (R15)
You will need: Volga calipers along with pads, an adapter for Volga calipers on a front-wheel drive VAZ (2 pcs), caliper hoses from a Chevrolet Niva (short).
Remove the caliper along with the bracket, and then disconnect the hose from the tube. Drill out the hole in the bracket on the body that holds the connection between the hose and the tube. This is done in order to thread the hose fitting. Connect one end of the hose to the tube. The other end is with a caliper.
Next, screw the adapter to the guide of the GAZ 3110 pads using M12x25 bolts with a pitch of 1.25 (it is advisable to use bolts with the letter 'X') and M12 bolts. Then screw the adapter with the guide to the steering knuckle using standard M10x25 bolts, pitch 1.25. Install the Volga pads, having previously cut off the wear sensor wires from them. Install the caliper. The bleeding fitting must be at the top, otherwise it is impossible to bleed the brakes. All that remains is to bleed the brakes, and here it is worth considering that with GAS calipers, more brake fluid is poured into the system.
Installation of calipers from GAZ 3110 to VAZ 2110 (R14)
In general, the installation is similar, but there are a number of points that are worth paying attention to: 1. Due to the fact that when installing R14 brake discs, the guide will move towards the steering knuckle, so we saw off the edges of the boot using a grinder. 2
The adapter is used for R14 brake discs. Bolts should be used 5mm shorter, M10x20 pitch 1.25 with an M10 lock washer. Otherwise, the bolt will press the adapter to the brake disc and the disc will not turn
2. The adapter is used for R14 brake discs. Bolts should be used 5mm shorter, M10x20 pitch 1.25 with an M10 lock washer. Otherwise, the bolt will press the adapter against the brake disc and the disc will not turn.
3. The Volga’s caliper is larger than that of the “ten”, so you have to install a disc with a different offset, in this case the ET35 offset. An 11mm spacer for the wheel rim is also used. When installing disks, the seat may cling to the disk guide; in this case, you can grind the guide or use a spacer of the required thickness.
Conclusion
The negative point, which is the large weight, in practice does not affect the behavior of the machine. And the performance of brakes with GAZ calipers is significantly better.
By the way, this is not the only way to tune the brakes; rear disc brakes are very popular, as well as simply replacing brake discs from R14 to R15.
Brake system VAZ 2110
Home • VAZ • 2110 • Brake system
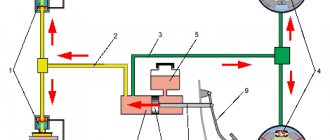
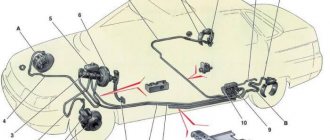
Brake system structure of the VAZ 2110: 1 – main cylinder of the hydraulic brake drive, 2 – pipeline of the “right front – left rear brake” circuit, 3 – flexible hose of the front brake, 4 – reservoir of the master cylinder, 5 – vacuum booster, 6 – pipeline of the “left” circuit front - right rear brake, 7 - rear wheel brake mechanism, 8 - elastic pressure regulator drive lever, 9 - flexible rear brake hose, 10 - pressure regulator, 11 - pressure regulator drive lever, 12 - brake pedal, 13 - front brake mechanism wheels.
The service brake system of the VAZ 2110 is hydraulic, dual-circuit (with diagonal separation of the circuits), with a pressure regulator, a vacuum booster and an indicator of insufficient brake fluid level in the reservoir. If one of the brake system circuits fails, the second circuit provides braking of the vehicle, although with less efficiency.
The brake mechanisms of the front wheels of the VAZ 2110 are disc (on VAZ 21103, 21113 and 2112 cars - ventilated), with a single-piston floating caliper and a brake pad wear indicator. The brake mechanisms of the rear wheels of the VAZ 2110 are drum brakes, with two-piston wheel cylinders and automatic adjustment of the gap between the shoes and the drum. The automatic clearance adjustment device is located in the wheel cylinder.
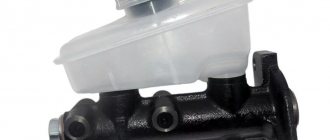
The main brake cylinder of the VAZ 2110 is attached to the vacuum booster housing on two studs. A translucent polyethylene tank with an emergency fluid level sensor is inserted into the holes in the upper part of the cylinder on rubber seals. The tank has markings for maximum and minimum fluid levels. Two screws are screwed into the bottom of the cylinder to limit the movement of the pistons. The screws are sealed with copper gaskets. In the front part of the cylinder (along the direction of the car) there is a plug screwed in that serves as a stop for the return spring, also sealed with a copper gasket. The pistons in the master cylinder are arranged in series, the one closest to the vacuum booster operates the right front and left rear brake mechanisms, and the one closest to the plug operates the left front and right rear. The high-pressure rubber sealing rings (cuffs) of the master brake cylinder and rear wheel cylinders are interchangeable (nominal diameter - 20.64 mm). The low pressure sealing ring is grooved, installed on the piston in contact with the vacuum booster rod.
The VAZ 2110 vacuum booster is located between the pedal assembly and the main brake cylinder and is attached to the pedal assembly bracket with two studs. The amplifier is of a non-separable design; if it fails, it should be replaced. The simplest way to check the serviceability of the amplifier: on a car with the engine turned off, press the brake pedal several times and, holding the pedal down, start the engine. If the amplifier is working properly, when the engine starts running, the pedal should move forward. Failure of the VAZ 2110 brake system or insufficient efficiency of the vacuum booster can also be caused by a leak in the hose that takes vacuum from the intake manifold.
The rear brake pressure regulator of the VAZ 2110 is attached with two bolts to a bracket in the left rear part of the body. One of these bolts (front) also secures the fork bracket of the pressure regulator drive lever of the VAZ 2110. Due to the ovality of the holes for its fastening, the bracket together with the lever can be moved relative to the pressure regulator, changing the force with which the lever acts on the regulator piston. As the load on the rear axle of the vehicle increases, the elastic lever is also loaded, transmitting force to the pressure regulator piston. When you press the brake pedal, the fluid pressure tends to push the piston outward, which is prevented by the force from the elastic lever. When the system comes into balance, a valve located in the regulator isolates the rear brake cylinders from the master cylinder, preventing further increases in braking force on the rear axle and preventing the rear wheels from locking up ahead of the front wheels. As the load on the rear axle increases, when the traction of the rear wheels with the road improves, the regulator provides more pressure in the wheel cylinders and vice versa - as the load decreases, the pressure drops. There is a hole in the regulator body that is closed with a plug. Leakage of brake fluid from this hole indicates leakage of the regulator O-rings.
The floating front brake caliper includes a caliper and a VAZ 2110 wheel cylinder, which are secured together with two bolts. The other two bolts secure the bracket to the pins installed in the holes in the pad guide. Lubricant is placed in these holes. Rubber protective covers are installed between the pins and the pad guide. The brake pads are pressed against the guide grooves by springs. The inner pad has a lining wear indicator. The cylinder contains a piston with a rectangular rubber sealing ring. Due to the elasticity of this ring, a constant optimal gap between the brake pads and the disc is maintained.
Brake discs of the VAZ 2110 are cast iron. The minimum permissible disc thickness during wear is 17.8 mm for ventilated discs and 10.8 mm for non-ventilated discs, the maximum runout along the outer radius is 0.15 mm.
The rear wheel brake cylinders of the VAZ 2110 are equipped with a device for automatically maintaining the gap between the shoes and the drum. The main element of the device is a steel spring split ring mounted on the piston with an axial clearance of 1.25-1.65 mm. The thrust rings (two per cylinder) are inserted with an interference fit, providing a shear force along the cylinder surface of at least 35 kgf, which exceeds the force of the brake pad tension springs. When the brake linings wear, the thrust rings shift under the action of the pistons by the amount of wear. If the piston mirror is damaged by mechanical impurities that have entered the brake fluid or formed due to corrosion (the presence of water in the brake fluid), the rings may sour in the cylinder and one or even both pistons will lose mobility. In this case, the brake cylinders of the VAZ 2110 must be replaced.
The drive of the parking brake system of the VAZ 2110 is mechanical, cable, to the rear wheels. It consists of a lever, an adjusting rod, an equalizer for two cables, a pad drive lever and a spacer bar.
Vacuum brake booster VAZ 2110
Vacuum unit structure of the VAZ 2110: 1 – vacuum amplifier housing; 2 – amplifier housing cup; 3 – rod; 4 – adjusting bolt; 5 – rod seal; 6 – sealing ring of the master cylinder flange; 7 – diaphragm return spring; 8 – amplifier stud; 9 – tip mounting flange; 10 – valve; 11 – hose tip; 12 – diaphragm; 13 – amplifier housing cover; 14 – sealing cover; 15 – piston; 16 – protective cover of the valve body; 17 – air filter; 18 – pusher; 19 – pusher return spring; 20 – valve spring; 21 – valve; 22 – valve body bushing; 23 – rod buffer; 24 – valve body; A – vacuum chamber; B – atmospheric chamber; C, D – channels.
Brake pressure regulator drive VAZ 2110
Drive device for the VAZ 2110 brake regulator: 1 – pressure regulator; 2, 16 – pressure regulator mounting bolts; 3 – pressure regulator drive lever bracket; 4 – pin; 5 – pressure regulator drive lever; 6 – axis of the pressure regulator drive lever; 7 – lever spring; 8 – body bracket; 9 – mounting bracket for the pressure regulator; 10 – elastic lever for the pressure regulator drive; 11 – earring; 12 – earring bracket; 13 – washer; 14 – retaining ring; 15 – bracket pin; A, B, C – holes.
Pressure regulator VAZ 2110
Diagram of the brake pressure regulator VAZ 2110: 1 – pressure regulator housing; 2 – piston; 3 – protective cap; 4, 8 – retaining rings; 5 – piston sleeve; 6 – piston spring; 7 – body bushing; 9, 22 – support washers; 10 – sealing rings of the pusher; 11 – support plate; 12 – pusher bushing spring; 13 – valve seat sealing ring; 14 – valve seat; 15 – sealing gasket; 16 – plug; 17 – valve spring; 18 – valve; 19 – pusher bushing; 20 – pusher; 21 – piston head seal; 23 – piston rod seal; 24 – plug; A, D – chambers connected to the main cylinder; B, C – chambers connected to the wheel cylinders of the rear brakes; K, M, N – gaps.
Main brake cylinder VAZ 2110
The structure of the main brake cylinder of the VAZ 2110: 1 – main cylinder body; 2 – low pressure sealing ring; 3 – drive piston of the “left front–right rear brake” circuit; 4 – spacer ring; 5 – high pressure sealing ring; 6 – pressure spring of the sealing ring; 7 – spring plate; 8 – piston return spring; 9 – washer; 10 – locking screw; 11 – drive piston of the “right front–left rear brake” circuit; 12 – connecting sleeve; 13 – tank; 14 – brake fluid emergency level sensor; A – gap.
Brake mechanism of the front wheel of a VAZ 2110
The design of the front brake mechanism of the VAZ 2110: 1 – brake disc; 2 – pad guide; 3 – caliper; 4 – brake pads; 5 – cylinder; 6 – piston; 7 – pad wear indicator; 8 – sealing ring; 9 – protective cover of the guide pin; 10 – guide pin; 11 – protective casing.
Brake mechanism of VAZ 2110 rear wheel
Diagram of the rear brakes of the VAZ 2110: 1 – hub fastening nut; 2 – wheel hub; 3 – lower tension spring of the pads; 4 – brake pad; 5 – guide spring; 6 – wheel cylinder; 7 – upper tension spring; 8 – expansion bar; 9 – finger of the parking brake drive lever; 10 – parking brake drive lever; 11 – brake mechanism shield.
VAZ 2110 rear brake wheel cylinder device
Diagram of the rear brake cylinder of the VAZ 2110: 1 – pad stop; 2 – protective cap; 3 – cylinder body; 4 – piston; 5 – seal; 6 – support plate; 7 – spring; 8 – crackers; 9 – thrust ring; 10 – thrust screw; 11 – fitting; A – slot on the thrust ring.
Handbrake drive VAZ 2110
Handbrake device VAZ 2110: 1 – lever fixation button; 2 – parking brake drive lever; 3 – protective cover; 4 – traction; 5 – cable equalizer; 6 – adjusting nut; 7 – lock nut; 8 – cable; 9 – cable sheath.
Brake fluid level sensor VAZ 2110
Design of the brake fluid reservoir cap of the VAZ 2110 with a level sensor: 1 – protective cap; 2 – sensor housing; 3 – sensor base; 4 – sealing ring; 5 – clamping ring; 6 – reflector; 7 – pusher; 8 – bushing; 9 – float; 10 – fixed contacts; 11 – moving contact.
Caliper repair
If you decide not to replace, but to repair the mechanism, then you can purchase a special kit for this purpose. It consists of the following components:
- Gaskets.
- New piston.
- Guide elements.
The cost of the repair kit is about 500 rubles. And a new caliper for a car of the tenth family, depending on the greed of the seller, may cost 2-3 times higher.
But before installing the new elements that are included in the kit, it is necessary to completely disassemble the VAZ-2110 caliper. To do this you will need to use an air compressor. Connect it to the hole for the brake pipe, and then gradually supply air. It is advisable to install a rubber spacer or a wooden block under the piston. This will avoid a shot, since the piston moves freely.
A similar action can be performed immediately before removing the mechanism. To do this, you do not need to disconnect the caliper from the system; instead of the brake pads, install a small wooden block. Gently press the brake pedal to build up pressure in the system. In this case, you will lose some amount of liquid, but if you were planning to fill in a new one anyway, then this is not a problem.
Installation of a new piston is done using a clamp. Be sure to bend back the boot to avoid damaging it. Before installing the piston, it is necessary to remove contaminants on the internal surfaces with non-aggressive liquids. It is not recommended to use liquid to clean the carburetor, as it can damage rubber and plastic products.
Repair of the rear wheel brake cylinder of VAZ 2108, 2109, 21099 cars
Leaking brake cylinders of the rear wheels of VAZ 2108, 2109, 21099 cars are a very common malfunction.
The reason is wear of the sealing rings (cuffs) on their pistons. By purchasing a cheap repair kit for rear brake cylinders (several rubber rings), you can carry out simple repairs and extend their performance for a while. The only condition is that the inner surface of the brake cylinder (mirror) is in good condition. Corrosion and risks on the mirror will not allow for quality repairs. In this case, it is necessary to replace the rear wheel brake cylinder with a new one.
Required Tools
- 10 mm spanner
- 12 mm spanner
- 13 mm spanner
- a special wrench for unscrewing the brake pipe
Preparatory work
— place the car in the pit, the handbrake should be lowered, the wheels should be supported
— loosen the rear wheel bolts, jack it up and remove it
— weaken the tension of the parking brake cable (handbrake)
To facilitate this operation and improve access to the parking brake actuator adjusting nut, you can disconnect the connection between the muffler and the resonator. Using a 13 mm wrench, unscrew the nuts securing the clamp at their connection and disconnect it.
Using a 13 mm wrench, unscrew the lock nut on the handbrake rod with another 13 mm wrench while holding the adjusting nut. Using the same wrench, unscrew the adjusting nut while holding the handbrake rod with pliers.
- unscrew the guide pins of the brake drum and remove it
If the pins do not turn away, lightly tap them with a hammer. If the drum cannot be removed, we also tap it with a hammer on all sides through a wooden spacer. We clean its mounting hole from contamination and treat it with a penetrating liquid.
Repair
The first rule: if you don’t want further troubles, especially when one of the wheels jams, never repair only one caliper, always both together!
To sort through, repair or replace individual parts, and possibly completely change the unit if it turns out that there is nothing left to repair, you need to follow the following algorithm:
Remove the ring securing the cover, and then the cover itself; To avoid damaging anything, place a piece of wood or a rag between the caliper and the piston, then remove the piston
Also watch your fingers - parts of the mechanism can press them; After removal, pay attention to the piston and cylinder. If you find any damage on them, then the entire assembly needs to be replaced; If everything is fine, using a wooden or possibly a plastic tool, remove the piston seal from the caliper cylinder; If you have a PD51 model, you need to squeeze out the bushing, remove the covers protecting from dust on both sides; All elements should be washed with a liquid intended specifically for cleaning brake mechanisms; You probably purchased a repair kit
From this, “push” a new seal onto the piston, then place it in the cylinder. This must be done without using brute force, otherwise the brake mechanism may subsequently jam; Install the piston dust cover - a new one, from the repair kit; The bushings must be lubricated with silicone grease, which is also included in the repair kit, then installed in the corresponding holes; Install the dust covers in their proper places; Before installing the caliper on the car, replace the copper gaskets on the hose connection.
The front brakes can now be completely reassembled. A prerequisite after repair is to bleed the brakes.
All that remains is to check whether the wheels lock properly when you press the brake pedal, and whether the caliper is sticking. Everything is fine? So, you can hit the road.
Source
VAZ 2110 | Removing, disassembling, checking, assembling and installing brake calipers
Removing, disassembling, checking, assembling and installing brake calipers
The front wheel brake assembly components are shown in the illustration Front Brake Assembly.
Rear brake assembly
Removal and disassembly
Prepare a container to collect the brake fluid.
- Unscrew the caliper installation bolts (there is one bolt on the rear brake mechanism) and remove the caliper from the bracket.
- Remove the brake pads with anti-squeal pads and pad holders.
- On the rear brake mechanism, remove the main stud, the guide sleeve with two oil seals and the cover of the main stud.
Do not put your fingers between the piston and caliper while removing the piston using compressed air.
- Use a screwdriver to remove the piston seal:
- On the front brake mechanism;
- Remove the two guide pins from the caliper bracket;
- Remove the guide bushing from the top side of the guide pin;
|
- Remove the two bolts securing the caliper bracket to the steering knuckle and remove the bracket;
- Remove the brake disc and install it in a position rotated 1/5 of a turn from the original;
- Tighten the wheel nuts to 103 Nm;
- Measure the disc runout in this position and record the measurement results;
- Repeat the last three operations for the remaining three positions of the disc on the hub;
- If in any of the positions the disc runout meets the requirements of the Specifications of the Chapter Brake System, install the disc in this position. Otherwise, replace the disc and measure its axial runout again;
- Install the caliper bracket and tighten its mounting bolts to the required torque.
- Assembly and installation are carried out in the reverse order. Please note the following points:
- Do not allow oil and grease to come into contact with the friction linings of the brake pads;
- When installing the boots, make sure that their metal parts fit securely to the caliper bracket;
- Tighten all connections to the required torque;
- After installation, fill the brake system with fluid, bleed it and check the system for leaks.
Assembly and installation
VAZ-2110 caliper maintenance and repairs
It is mandatory to service the VAZ caliper after each replacement of brake pads, as well as in the event of a forced inspection due to its malfunction, for which it is first necessary to check the condition of all rubber elements, shock absorbers and anthers. It is also imperative to replace the grease for the caliper guides. You need a good synthetic based silicone lubricant that can withstand high temperatures.
If you had to buy a repair kit, it contains such lubricant, all the necessary gaskets, new guides and a piston. The price of such pleasure will cost you about 500 rubles. Buying a new VAZ-2110 (2112) caliper, depending on the store and region of Russia, will cost from 1000 to 1500 rubles.
To remove the piston from its seat, it is necessary to create the appropriate force using an air compressor (pistons are repaired one at a time, the stroke of the second is blocked, for example, by a wooden block). With the same success, when removing the product from the car, you can press the brake pedal without disconnecting the VAZ 2112 caliper from the brake hose. It is advisable to use a rubber adapter in order to absorb the sharp impact of the freely moving piston and its “shot”.
VAZ 2110 caliper repair
The piston is pushed back using a special clamp. In this case, the boot should be bent to compensate for excess air pressure. The hole for the piston and for the guides are cleaned and washed with carburetor cleaning fluid, all gaskets, boots and seats are also thoroughly lubricated.
Procedure for replacing the front brake cylinder on a VAZ 2110-2112
To show the entire repair process more clearly, watch the video I recorded for this topic:
Video instruction
The video was made using the example of a VAZ 2110 car and is equally suitable for both 2111 and 2112. The only way the car parts may differ externally is the brake discs: ventilated or not, as well as their sizes.
Photo report
First of all, we will need to remove the front wheel of the car, after first lifting the car with a jack. After this, using a hexagon, you need to unscrew the two bolts securing the caliper bracket.
Now you can remove the bracket and remove the pads:
Then you can rip off the brake hose with a wrench, but you don’t have to unscrew it completely.
Next, we unscrew two more bolts securing the cylinder to the caliper, having previously bent the two locking plates under them using a screwdriver.
And we move the cylinder to the side, since nothing else holds it.
The hose can now be unscrewed completely by turning the brake cylinder itself several times counterclockwise.
To avoid excessive losses of brake fluid, it is advisable to fix the hose as high as possible, and always with the fitting facing up. You can also substitute a container if liquid suddenly leaks out.
A new front one costs about 500 rubles, so this price is quite acceptable. But the assembled caliper already costs about 2,000 rubles, which is already significant if you suddenly have to change the entire assembly. Installation of this part occurs in the reverse order.
Removing the caliper
The mechanism is of a very simple design; dismantling can be done without much difficulty. Even a novice motorist can cope with such work. In order to remove the VAZ-2110 caliper, you will need to perform the following steps:
- Loosen the wheel bolts on the side being repaired.
- Raise the side to be repaired using a jack and remove the wheel completely. Install it under the bottom of the car. This will protect you in case the car suddenly falls off the jack.
- Cars of the tenth family have the caliper attached to the bracket using two M17 bolts. They need to be unscrewed. If you can't strip the threads, use a penetrating lubricant.
- Unscrew the brake hose, which is located at the top of the caliper.
When dismantling, evaluate the condition of all rubber tubes. If there is damage on them, even small cracks, it is imperative to install new elements. Such breakdowns can lead to the brake system depressurizing while driving.
VAZ 2110 | Disc brake caliper
10.5. Disc brake caliper
| GENERAL INFORMATION |
Warning
It is recommended to purchase reconditioned calipers in exchange for removed ones. If you decide to repair (replace caliper parts), then purchase a repair kit. Both calipers should be disassembled and repaired at the same time.
1. Caliper assembly 2. Caliper bracket mounting bolt 3. Bleeding nipple 4. Dust cap 5. Anti-noise spring 6. Caliper guide 7. Pad wear indicator wire 8. Cable sheath mounting bracket 9. Brake disc 10. Inner bolt 6 -faceted head
11. Brake shield 12. Bolt 13. Washer 14. Plug 15. Plug 16. Bracket 17. Cable sheath fastening bracket 18. Piston, cuff, boot and spring ring 19. Repair kit for guide bushings 20. Pads| EXECUTION ORDER |
| 1. Raise the front (rear) part of the car, place it on stands, remove the wheel. |
| 2. Disconnect and plug the brake hose. If the caliper is removed to access other parts, do not disconnect the hose. |
| 3. The procedure for removing the front or rear caliper is described in subsection 10.4 as part of the procedure for replacing the pads. |
| EXECUTION ORDER |
| 1. Remove the dust boot snap ring and rubber boot. | |
| 2. Remove the piston by supplying compressed air from the pump into the cylinder. | |
| 3. Check the piston and cylinder surfaces. If there is damage (scratches, corrosion, chipping), replace the caliper assembly. | |
| 4. If these parts are in order, remove the piston cup using a thin wooden tool. | |
| 5. Remove the rubber cuffs. | |
| 6. Wash all parts in methyl alcohol or brake cleaner. | |
| 7. Using the repair kit, assemble the caliper as shown below. | |
| 8. Dip a new cuff in brake fluid and install it into the cylinder. | |
| 9. Lubricate the caliper cylinders (except the front calipers) and the piston with clean brake fluid. Insert the piston into the cylinder without distortion. Install the new dust cover and secure with the snap ring. | |
| 10. When assembling the front calipers, lubricate the piston with clean brake fluid and place a new dust boot on the bottom of the piston. Holding the piston over the caliper bore, insert the edges of the rubber boot into the grooves of the cylinder, insert the piston until it stops, then insert the upper edges of the boot into the groove on the piston. | |
| 11. Lubricate the rubbing surfaces of the guides and bolts with silicone grease and install them in the caliper. Install dust covers. | |