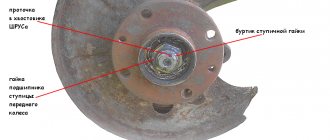
Before unscrewing the hub nut, it is advisable to read the instructions for routine maintenance of your car. It indicates the method of fixation, the direction of the thread and other nuances.
- Changing the geometry of the nut (one side is oval). Anyone who has repeatedly unscrewed such a nut has seen that the threads gradually become unusable;
- Punching after tightening. This solution is not suitable for replaceable units, since this will damage the screw part. However, many car manufacturers fix the hub nut in this way so that it does not unscrew while driving;
- Hairpin. The most reliable method of fixation. The nut does not unscrew on its own, and the thread does not deteriorate. For some reason, not all car designers use this simple method;
- The retainer is a “shoulder-groove”. A common method, more reliable than core punching, but detrimental to carvings. Longitudinal grooves (one or two) are made on the threaded connection of the axle shaft. The CV joint nut has the same number of collars, which bend into grooves after tightening. It is almost impossible to unscrew the nut without damaging the thread;
- A variety of fixing paints and adhesives. Not used on hub connections.
Since the connection is in unfavorable conditions (especially if the boot cap is lost), the nut does not unscrew the first time. An inexperienced driver panics, starts turning the nut in the wrong direction, uses attachments on the wrench in the form of a meter-long pipe, and as a result breaks the thread. The consequences are a forced replacement of a still-living CV joint.
How to unscrew the hub nut without ruining the threaded connection
First of all, stock up on quality tools. An ordinary wrench is not suitable for plumbing work, although many car owners stubbornly use them to repair CV joints (the size is the same, but the cost of the tool is lower). An open-end wrench can only be used to unscrew an already “undermined” nut, this is really more convenient.
For the hub (CV joint), only a union head is used. The end cap can be cast or stamped (the second option is cheaper), and exactly match the size of the nut. If you “lick” the edges using a tool with backlash, you will be working with an angle grinder, and you will have to say goodbye to the CV joint.
- Thoroughly clean the surface from corrosion and dirt. If a spline-shoulder pair is used, you need to pick out everything that is in the holes;
- Treat the joint with a penetrating compound for soured threads. For example, WD-40 liquid, or regular kerosene. You may need to "soak" the thread for several hours;
- Remove all fixing devices;
- Place the socket on the nut and try to turn it using the lever. At this stage, it is better not to use handles with ratchets, as the mechanism may be damaged;
- After “undermining”, the nut can be unscrewed with any wrench that is more convenient.
Throw away the old nut and stud. Clean the threaded connection from rust and traces of fixing compounds.
It is this method of fixation that most often leads to “licking” of the thread. VAZ drivers know what they are talking about. An inexperienced master, delighted at the easy movement of the nut, will ruin your grenade in 2-3 turns of the key.
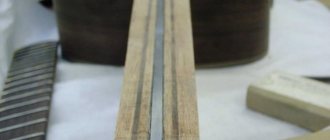
For proper release, you need a special punch that exactly matches the size of the spline collar. You won’t find them during the day with a fire, so it’s wise to make a useful tool yourself. For example, from an old file. With its help, you can unscrew the nut while maintaining the threads on the axle shaft.
The easiest way to unscrew/tear off a hub nut
The easiest way can be considered the following, but it involves completely replacing the nut. Don't worry, any method does not guarantee the safety of this part. To easily unscrew or tear the hub nut out of place (an option for all brands - from VAZ to foreign cars with a groove on the shaft), you need to take:
Unscrewing the VAZ hub nut using a drill
- New nut.
- Drill or screwdriver.
- Drill up to 3 mm.
- Chisel.
- Hammer.
Process.
- You need to drill the nut along the groove to counteract it.
- Using a chisel and hammer, simply break the nut and remove it, then replace it.
- If throwing away the nut is not possible, then you will have to sweat - and in the literal sense of the word too.
But this method should be used only as a last resort; first try using more or less simple and humane methods.
A few tips for motorists
- It is quite easy to understand that the front wheel hub of a VAZ 2110 is faulty. While the car is moving, you will hear grinding, humming and knocking noises every now and then.
- To ensure that the wheel alignment remains normal after replacement, perform the replacement without unscrewing the alignment bolts.
- The manufacturer recommends that car owners change the components of the front wheel hub at 55,000 km.
As you have already seen, DIY repairs are easy. Such repairs may have to be done every year, because the roads in the country leave much to be desired. But self-service will cost several times less than if you turn to a service station for the service. If you prepare in advance and do all the work sequentially, taking into account each step, the replacement will not take much time. You do not risk anything, the cost of the part is not that high. But such a simple job involves many nuances that are important to consider.
Similar news
How to Remove the Battery of a Skoda Fabia 2 Video... Usually, even a novice car owner can remove the battery from a car. There are no obstacles in this matter, you just need to open the hood and unscrew a few nuts. Alas, the situation changes when we talk about removing the battery from a Skoda Fabia car. What, how to deal with this problem, we will tell you in this publication. 1st and most three...
How to Remove the Rear Light of Renault Megane 3... Selecting and replacing stops on Megane (removing the rear light) Your safety mainly depends on the proper operation of the car's lighting devices, and naturally the presence of high-quality parts in the optics. Video about how to remove the rear bumper from an AUDI 100 C4, how to remove the front seat, etc. This should not be trampled upon. Reno Megan removal Common...
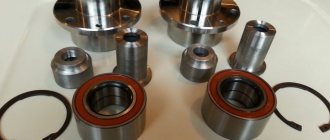
Bearing removal
When you have purchased a new bearing and are preparing to replace it, you will first need to remove the product. It won’t be difficult to get it, but you will have to spend a little time.
- First you need to loosen the bolts that secure the wheel.
- After they are loosened, you will need to jack up the car. Without this, replacing the bearing will not be possible.
- When the car has been raised, you need to completely unscrew the bolts and nuts that secure the wheel. It needs to be removed. It is worth noting that this can only be done after lifting the car with a jack.
- On the wheel you can find a special decorative cap. It will also need to be removed.
- Once you have removed the wheel and trim cap, you can see the drum. It is held in place with pins. These pins will need to be unscrewed. To do this, use a hexagon. There is no need to remove the drum, only the pins are unscrewed.
- Find the hub nut and unscrew it. Using a wrench extension, you need to remove the washer. Please note that this procedure will be much easier to do before lifting the car. If you do not have experience in replacing a VAZ 2110 bearing, then it is better to do just that.
- Next, using a removable device, you need to remove the hub. There shouldn't be any difficulties with this.
- Using the stop of the same puller, you will need to install the device on the axle.
- Find the hub piece and grab onto it. To do this, you need to use the paws of the removable device.
- After installation, be sure to check the quality of installation of the paws. If they hold steady, then you can tighten the threaded connection. This can be done with a key.
- After all these manipulations, you can finally remove the hub. It's not difficult to do. Behind the hub you will find the bearing outer race. It will contain balls and a separator.
- On the axle you will find a bearing ring.
- Attach the removable device. It will need to be attached to the back end. It is worth noting that here it will be much more difficult for the puller, so paws with sharper ends may be required. You can replace the presser feet, or use another removable device to make the job easier.
- Now you need to remove the inner ring. It is removed from the axle shaft using a removable device. Remove the ring only using a puller, this is much easier and safer.
- Only the hub remains. It is necessary to press out the old parts from it. For this you will need pliers. Use them to remove the locking element, after which you can remove the protective casing.
- To remove the casing you will need a vice. Using a vice, press the hub to knock the cover off. You need to knock the lid off very carefully so as not to damage anything.
- Dismantling is almost complete. All that remains is to press out the outer race. To do this, you will first have to select a head of the desired diameter. You also need special attachments. With their help, the bearing will come out on the other side.
- Just clamp the resulting structure and twist it. It will be quite difficult, but eventually the bearing will be removed. After this, you need to move on to the bearing replacement part.
As practice shows, the wheel bearing in a wheel is a very reliable element and does not require constant maintenance (adjustment, lubrication, etc.).
But over years of operation and frequent driving on less than ideal roads, the hub malfunction makes itself felt.
The second option is more preferable. Moreover, there are no special difficulties in replacing the bearing.
Let's look at the main signs of a breakdown.
So, unnecessary noise often appears when the wheels rotate, for example, whistling, humming, uneven knocking or rumble.
The reason for the hum and whistle may be an increase or, conversely, a decrease in the clearance in the bearing.
As for rattling and knocking, they are most often caused by a violation of the rolling surface, large gaps in the bearing, and insufficient lubrication of the element.
To find the “culprit” wheel, you need to lift each of them one by one and try to spin them to the maximum. If, even with such rotation, strong noise and hum are heard (we have already talked about this above), then there is no need to carry out further checks - just change the bearing.
If you still have doubts, grab the edge of the wheel with your hands and push it (away from you and towards you).
Tighten the hub nut and check the tightening torque. If it is too low, then tighten the nut to the required level and lock it. It happens that after such work the backlash disappears. If you're lucky, you can leave the bearing alone for a while.
If the problem has not disappeared, you should get ready for serious work.
REPAIR RECOMMENDATIONS
When disassembling in the field, drivers often encounter problems.
- For example, VAZ 2108 rear wheel bearings from SKF, made in Sweden, are popular among motorists. However, sometimes they may resist removal. An original device made from a towing strap and a jack can help you with this procedure outside of the service center.
- In addition, during repairs, it is also important to pay attention to the wear of the drum brake pads and conduct a thorough diagnosis of the suspension. Sometimes it happens that beating or knocking occurs due to “tired” silent blocks.
- When tightening the wheel fastenings, the torque wrench should be set to 186-225 nm or 19-23 kgf.
Didn't find the information you are looking for? on our forum.
What is the thread on the VAZ 2110 hub on the rear wheel
I would like to share my experience of restoring the broken thread of the rear hub 2110. It is almost impossible to break the thread by hand.
All these breakdowns occur from “crooked” car mechanics who tighten the bolts using a pneumatic tool. According to the regulations, the tightening torques for wheel bolts are: 65.2-92.6 (6.7-9.5) Nm (kgfm). But naturally, no one wants to use a torque wrench, guided by the motto “it will do and we’ll tighten it that way.” If you still managed to break the threads in the hub, then there are several ways out of this situation: 1) Replacing the hub. The most expensive and most reliable option. As a rule, in addition to the hub, the wheel bearing is also replaced. 2) Installing studs. The hairpin costs approx. 100 rub. + a nut for each stud will cost about 60-80 rubles. As a result, we get 400 + 320 = 730 rubles. one wheel. You can try, you will have to remove the wheel and brake drum. Problems are possible if the threads on the stud itself are broken. 3) cutting a larger thread over the old one. Factory wheel bolt thread: M12x1.25. You can cut M14x1.5 without removing the wheel (provided that some of the other bolts hold the wheel). The primary choice fell on the 2nd option, but the market convinced me that if you cut a large thread, it will last the same amount of time, but if you install studs, it will cost more, and if the thread does not work, then you will have to cut off the nut. We purchased 2 taps (rough and fine cutting) for m14x1.5 from Ermak (running ahead, don’t take these because they’re fucking China) for 300 rubles. + 4 chrome bolts m14x1.5 (100 rubles each) Let's start cutting. “With my hand, without straining, I unscrewed” the torn bolt, which indicates that there were practically no threads left, not to mention the “pressing of the wheel with the bolt.” Lubricated the tap with lard
and carefully, centering the tap, slowly began to screw it into the hole. I will say that at first it goes without problems, you can tighten it with a wrench, but closer to the middle you already need a tap holder.
The cutting principle is simple. Translational smooth rotational movements back and forth are necessary so that the tap does not get clogged and there is an opportunity for chips to escape. Before cutting, it is advisable to also determine the cutting depth by placing the old bolt against the tap.
As a result, 1 hole was drilled more or less. The bolt was tightened “by hand” with a balloon with force until it stops.
I decided to cut another thread in the diametrically opposite hole of the hub.
But it was not there. The tap began to work around, and the beginning of the new thread that had already been cut began to break off. It turned out that the tap withstood only the cutting of one hole, because... upon external inspection, the edges of the cutters of the tap turned out to be eaten away (that’s the quality for you, although there may be such a “strong” metal in the hub that turned out to be too tough for it)
As a result, we managed to finish the 2nd thread with the 2nd tap. The bolt was tightened with a balloon by hand, but you can still feel it. which is not all the way. In principle, during “re-shoeing” or during repairs at a service station, when you need to remove a wheel, if you take a MORE RESPONSIBLE approach to tightening the bolts “wisely” (ideally using a torque wrench), then everything will hold. I would still periodically recheck the tightness of the bolts, otherwise you never know)) Ideally, replace the hub in the future. All cutting manipulations are a temporary solution.
Update: After manipulating the thread cutting, namely while driving, when braking, a clucking sound appeared, as if something was clinging. Today I took off the wheel, removed the brake drum and found the reason - the new bolts are 2.5 turns longer than the original ones (m12x1.25), because of this, the parking brake foot began to catch when braking. In addition to everything, I went through 2 previously cut threads with a 2 number tap. To be honest, the 1st roughing tap does not completely cut the thread, or, to be more precise, the height of the thread. I cut off the excess length from the new bolts, assembled everything in the reverse order, and tightened the wheel bolts “feng shui”. I'm happy. Now all the bolts are tightened all the way.
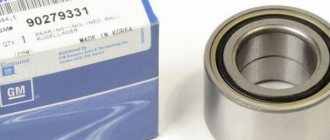
As you know, the wheel hub is the most important part where ball bearings with double-sided seals are used. On a VAZ 2110, replacing the rear hub is a complex and responsible matter. Although, replacing the rear hub of a VAZ 2110 can be done easily with your own hands, which is what will be discussed in this article.
What to do if the nuts do not unscrew?
Have you removed the clamps, “soaked off” the rust, bought a wrench with a 1 meter lever, but it still doesn’t work? There are proven ways to unscrew a nut without a grinder.
- Reverse rotation. Sometimes it is enough to first move the nut in the direction of tightening, and the process will begin;
- Tap the nut. Use a small hammer (preferably brass or copper) to tap the edges;
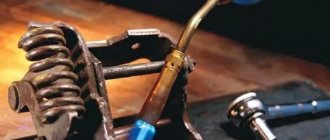
- Heat. A gas torch or blowtorch is an almost 100% guarantee of success due to the expansion of the metal. In an electrified garage you can use a hair dryer. Heat for at least 5 minutes.
Don’t panic, hit the key with a sledgehammer, or cut the hub with a grinder. Rust on the threads is not welding. The connection is still removable, it just requires a little patience.
If you have any questions, leave them in the comments below the article. We or our visitors will be happy to answer them
Possible problems for VAZ owners and not only
With long-term exposure to tools and repeated attempts to remove the nut, “force majeure” situations occur, which include:
- the edges are licked off;
- wear of the union head;
- does not withstand the ratchet mechanism;
- the thread on the shaft or locknut is knocked out;
- violation of adjustment, tightening torque;
- the bearing is damaged.
We buy a spare locknut and cotter pin in advance. It is also advisable to have a spare set of special keys before dismantling.
It is not recommended to unscrew
Don’t try to “discover America” again; the methods listed above will help break the locknut in 99% of cases. The following methods should not be attempted:
- Cut using argon, oxygen or electric welding;
- Strong blows with a hammer or sledgehammer on the end surface;
- Jumping on a lever;
- Impacts on the side, edges, base;
- Exposure of the part to open flame (for example, pour kerosene on it and set it on fire).
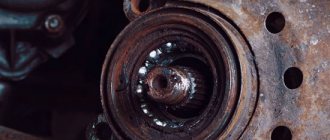
Causes of rear wheel bearing failure
- The bearing failed, having completely exhausted its service life (after which so-called metal fatigue occurred).
- The bearing collapsed due to sand and dirt entering it, which began to act as an abrasive material, which led to partial or complete abrasion of the bearing parts.
- One of the bearing rings cracked due to a strong impact (which occurs when the wheel hits a deep pothole at high speed).
- The nut on the hub is loosely tightened. This leads to the occurrence of play, which gradually destroys the bearing elements.
Signs of a bad wheel bearing
Installation
The inner surface of the fist is cleaned of dirt and lubricant (solid oil) is applied to it. The puller with the new bearing is installed in place and pressed into place. To make the process easier, it is recommended to first cool it thoroughly in the freezer.
A working unit is inserted into the fist as evenly as possible, trying to avoid distortion. After installing the bearing, put the hub back on and press it in if necessary. All other stages of work are carried out in reverse order.
The hub nut must be tightened using a torque wrench (the required force is 20 N*M).
Preparing the work site and tools
Replacing the front wheel bearing on a VAZ 2110 requires preparation of the workplace. A prerequisite is the presence of an inspection hole. This place should be well lit.
In addition, the following tools are being prepared:
- puller for removing the bearing;
spindle for punching the hub;- handle with head 30;
- set of keys, including sizes 17 and 19.
New bearings are prepared in advance.
Sequencing
- The hub nut is loosened using a 30mm socket and a wrench. After this, use a 22mm socket to slightly loosen the mounting bolts on the wheel.
- Wheel chocks are installed under the front wheels, and the car is in first gear. After this, the rear wheel with the faulty bearing is jacked up and removed.
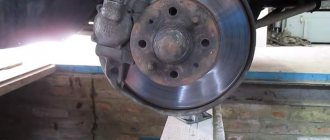
Brake drum cover visible
Remove the nut from the car: force method
- Lever made of pipe (length of at least one and a half meters).
- Powerful socket wrench (450 mm).
- Head of the appropriate size.
Place the head of the wrench on the hub nut, insert the wrench and place the pipe on the handle. Gradually increasing the applied effort, we unscrew the part.
As experienced car enthusiasts say, few hub nuts can resist for a long time if you use a Zilov cylinder!
How to unscrew a broken bolt
What to do, what to use and how to unscrew it if a pin or bolt is torn off. Video tips on how to independently unscrew a broken bolt/stud in an engine or manifold. A reliable way to unscrew if the head of a bolt has been torn off Read more