Many will agree that unscrewing the hub nut is an activity that can be punished in court; it is too inconvenient and difficult even for a physically strong person with all the necessary tools. However, since it is not always possible to choose the easiest one (option One, also known as the Main one!) - sending the car to a service station, where they will not only unscrew it but also carry out subsequent repairs. Then you will have to figure out the task yourself, using the easiest and most effective method possible.
How to unscrew the hub nut
Many will agree that unscrewing the hub nut is an activity that can be punished in court; it is too inconvenient and difficult even for a physically strong person with all the necessary tools. However, since it is not always possible to choose the easiest one (option One, also known as the Main one!) - sending the car to a service station, where they will not only unscrew it but also carry out subsequent repairs. Then you will have to figure out the task yourself, using the easiest and most effective method possible.
Types of Guitar Anchors
First of all, it’s worth understanding what kind of guitar rods there are, and how they generally work. This is important because each type has its own adjustment mechanism.
Contracting
The most popular type of truss rods, which is installed on almost every acoustic guitar. Its principle of operation is to compress the neck as you scroll the rod with the key. Conventionally, it consists of two parts - the first, static, which is responsible for holding part of the tool in one position, and the second, which can be twisted, and which regulates the degree to which the tree is compressed.
Mechanical impact on the nut
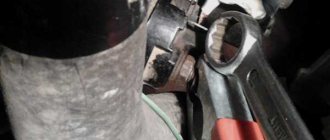
It happens that to unscrew the nut it is enough to apply force. However, this is fraught with the risk of breaking the edges, which means that it would be more optimal to use not an open-end wrench, but a spanner or socket wrench. If the nut does not budge, you should try to tighten it a little and only then unscrew it.
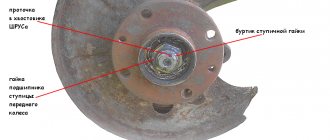
If the nut does not budge, you should not try to unscrew it with an open-end wrench; you can tear off the edges
You can also hit the nut several times with a hammer, which will destroy the oxide. If the edges are already torn off, then you can put a chisel on the nut and use the same hammer to try to turn it. The impact is much stronger than the traction, and the oxide is destroyed again. This option is much simpler than turning a nut to a smaller size and restoring the edges.
Unscrewing is often only possible when using a chisel
Chemical
Now we will consider methods for those who do not rely on the help of physics, but want to solve the problem with the help of chemistry. Your laboratory should have: kerosene, white spirit, acidified sulfuric acid, zinc, plasticine, hammer, water, sandpaper, wrench, chisel.
Attributes of the chemical method for unscrewing the nut
We moisten the nut and bolt with kerosene (experienced people recommend making a mixture of White Spirit and kerosene), applying a swab to them, it doesn’t matter whether it’s cotton or gauze. After some time - from an hour to a day, and with repeated attempts, you may find that the hub nut can be easily unscrewed. But even here you cannot do without force: at a minimum, you will probably have to work with sandpaper to clean the parts from rust. If even after this things don’t work, you should help with a hammer: tap it on the edges of the hub nut.
If in this case you are not successful, make a small container out of plasticine, secure the hub nut on top, pour water with sulfuric acid into it, and put zinc in the container. A chemical reaction begins that does a very good job of removing rust. Usually a day is enough for even advanced corrosion to go away from a part. Finish the job with a wrench. But this method is valid only in the case when the reason is that the nut is tightly stuck and/or rusted, and if it was simply tightened, neglecting the required tightening torque (to “be sure”), then you just need to tighten it.
Physical properties of metals and their use
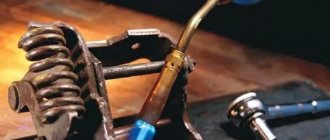
In order to unscrew the nut, it can be heated using a gas burner. It is worth noting here that the heating of the nut should be much stronger than that of the stud or bolt. And here again the destruction of the oxide occurs, but this time from high temperature. It burns, as does various dirt that gets into the thread. The problem with this method is the need to use an open flame, which is not always appropriate.
PHOTO: mrrestavrator.ru When the nut is heated with a torch, all the slag burns, while the metal expands, which facilitates loosening
This method also includes soaking rust and oxides using diesel fuel or various “liquid keys,” as well as applying lubricants. Reducing the friction force plays a very important role here.
To reduce friction, you can even use paraffin from a candle.
Dry residue
The result is a wear-resistant thread of the same diameter with a strong fit, resistant to corrosion and temperature influences, while the load on the threads is distributed more evenly due to the design features and profile of the insert. Read a detailed overview of technologies from the manufacturer: at the bottom of the page there is all the necessary technical documentation, or just flip through the brochure (available on the manufacturer’s website), where all aspects of the inserts are discussed very compactly.
The costs of time and consumables for thread restoration are available in the “Services” section.
Remove the nut from the car: force method
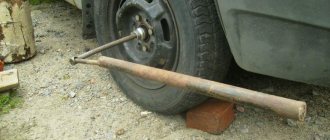
- Lever made of pipe (length of at least one and a half meters).
- Powerful socket wrench (450 mm).
- Head of the appropriate size.
Place the head of the wrench on the hub nut, insert the wrench and place the pipe on the handle. Gradually increasing the applied effort, we unscrew the part.
As experienced car enthusiasts say, few hub nuts can resist for a long time if you use a Zilov cylinder!
How to unscrew a broken bolt
What to do, what to use and how to unscrew it if a pin or bolt is torn off. Video tips on how to independently unscrew a broken bolt/stud in an engine or manifold. A reliable way to unscrew if the head of a bolt has been torn off Read more
Replacing the rear wheel bearing of a VAZ 2111
To replace the rear wheel bearing on VAZ 2110, 2111, 2112 cars you will need: a “30” socket, “10” and “15” keys, a hammer, duckbills and a long pipe as a lever. See details clearly Read more
A wheel hub is a part designed to mount a car wheel on an axle called an axle. Hub bearings are a key element not only of the hub, but also of the entire chassis of the machine. Read more
How to unscrew a hub nut - the delicate way
- Tubular socket wrench - “wrench”. The tool must be made of high-strength steel.
- Powerful screwdriver.
- Iron pipe.
- WD-40.
- Wire brush.
- Clean the threads from dirt using a brush with metal bristles. Now you should soak the hub nut with penetrating lubricant. For example, WD-40.
- We impregnate the hub with the penetrating mixture. You can rest for 10-15 minutes, and then you should put the wrench head on the nut and hit it with a hammer several times, gradually increasing the force of the blow. Just don’t overdo it: the point of this action is to slightly deform the nut, which will make it easier to remove. And immediately after the impacts, you should try to unscrew the hub nut on a VAZ or a car of another brand.
Precautionary measures
To prevent the process from ending in calling an ambulance, or at least applying bandages, follow these simple rules:
- use only serviceable tools;
- I remind you that the right-hand thread is unscrewed counterclockwise;
- make sure that the tool is securely fixed to the nut so that it does not break off at the most opportune moment;
- do not hesitate to use at least fabric gloves when working.
And of course, do not catch crows while working - be careful and careful.
How to unscrew a nut from a hub - Standard method
If the hub fastener was installed correctly and the car was regularly serviced, there will be no problems with dismantling work.
If they are “tightly” stuck to each other, you will need to apply quite a lot of pressure. As a rule, a special head (with an additional hole), a ratchet wrench, and a pipe at least 1 meter long (as a lever) are used. But how to unscrew it if the connection did not yield to a standard wrench and the effort of one person.
Chemicals as helpers in the fight against rust and scale
This option is quite effective. Under the influence of acids, all deposits are destroyed, after which nothing prevents the nut from being unscrewed. The most preferred here are hydrochloric, sulfuric or phosphoric acid. Less commonly used are lemon or vinegar.
Using hydrochloric acid is a very aggressive, but very effective way to unscrew a stuck nut.
Reasons for a jammed nut
Usually, unwinding difficulties are associated not with one defect, but with several. The causes of jamming, which lead to the impossibility of unscrewing nuts with torn edges, are:
- mechanical impact on the entire connection, which leads to deformation or breakage of individual elements);
- incorrect connection (changes in the angle of inclination when tightening with excessive force);
- using low-quality tools (using wrenches with worn edges leads to damage to the edges);
- the effects of corrosion;
- the occurrence of natural diffusion between parts (“welding” of connections).
The first two reasons appear as a result of careless operation or assembly of the mechanism. The following reasons are associated with the occurrence of chemical processes. This is due to the fact that the majority of fasteners are made from various grades of carbon steel without anti-corrosion treatment. As a result of contact with water and atmospheric oxygen, a chemical oxidation operation occurs with the appearance of oxide, which leads to jamming of the thread and destruction of the edges. Applying force when tightening increases the reliability of the threaded fastening, but leads to a decrease in the distance between parts and leads to a diffusion effect. As a result of these two factors, the friction force increases, creating an obstacle to unscrewing the nut.
After long-term operation, the magnitude of this force can exceed the specified strength indicators of the steel used. In this case, removing the screws without using special methods can be quite difficult.
What is a guitar truss rod used for?
Many beginning guitarists who do not understand how the instrument works generally misunderstand its structure. The neck of the guitar is not at all horizontally straight, as many people think. Moreover, it is not so much a perfectly even beam as an arc onto which the strings are stretched, like a string on a bow. If this part of the guitar were perfectly level, then the strings would lie on it and it would be impossible to clamp them. The anchor performs two tasks at once - it takes on the enormous load that a stretched string puts on the tree, and also keeps the neck in one position for more comfortable playing.
Accordingly, if changes occur to the guitar rod, this directly affects the ease of play, as well as the ability to perform songs in general. Two very common problems are directly related to a crooked neck
- This is one of the reasons why the strings rattle - that is, they ring against the saddles, and instead of giving an even, ringing sound, they get along, and sometimes don’t play at all.
- It becomes very difficult to clamp the strings - this is especially felt at the 5th fret and above. It becomes extremely difficult to play with the barre technique - the guitarist begins to spend much more effort than is required. This situation is also directly related to the fact that the guitar truss rod is overtightened and compresses the neck much more than required.
At the same time, the instrument may stop tuning and produce a note a little higher or lower than it should be.
How to fix this? This is exactly what this article is dedicated to.
How to unscrew
You can unscrew a nut with torn edges using the following methods:
- mechanical (using ready-made or homemade tools);
- chemical (use of various chemical compounds and specially developed compositions);
- thermal (heating the thread to the required temperature).
The mechanical method involves the use of the following methods:
- use of special union heads;
- increasing the applied force (for example, lengthening the lever to a standard wrench);
- periodic impact on the torn surface or change in direction of rotation;
- using the accentuated impact method (the determination of impact points depends on the size of the nut and the degree of wear);
- mechanical destruction of the corrosive layer to facilitate unscrewing the element with torn edges.
Special heads are used as a special tool that can unscrew a bolt with torn edges. Such tools include products of the UPC or SL class. Their inner surface is made in the shape of a complex hexagon, increasing the area of contact with the torn surface. Sometimes an ordinary gas wrench is suitable for solving this problem. If the tool is selected correctly, then the problem of how to unscrew a bolt whose edges are torn off can be solved quite easily.
If such a process is impossible or difficult to complete, the element with torn edges is simply cut off, for example, with a hacksaw or grinder. This method will require a complete replacement of fasteners.
Such liquids include strong acids, such as sulfuric and hydrochloric. You can use weaker acids, in this case the exposure time increases significantly, and you may not get the expected effect.
Currently, special fluids have been developed that can effectively reduce friction. Such products include WD-40. It is applied to the fastening site. After some time, it is possible to unwind without difficulty.
The thermal process helps to increase the distance between the threads of the nut and bolt, reducing diffusion and corrosion effects. At elevated temperatures, the friction force is reduced and the unscrewing process is simplified. The use of this method is limited by the design features of the part and the available capabilities (the presence of a welding machine or blowtorch).
Signs of need for replacement and diagnosis
How to unscrew a nut with torn edges + photo - video
In addition to the hum in the area of the front wheel, other signs may indicate the need to replace the bearing on a VAZ 2110. Even inexperienced drivers will notice deviations from the norm while the car is moving. The change in the trajectory of traffic around turns will be clearly visible. Due to the uneven ride, the front of the car will sway from side to side.
This is interesting: Car and hydrogen – what can they have in common?
To further check the condition of the wheel bearing, release the steering wheel on a level road. If the car skids to one side or the other, the part is worn out and requires replacement. You should not delay such repairs, since if the bearing is destroyed while driving at high speed, you will get an emergency situation and an uncontrolled skid, which can lead to an accident.
Reasons for tearing off edges
The desire to quickly replace failed parts secured with a threaded connection is not always feasible. Sometimes, when trying to unscrew a bolt from the unit body, the key begins to spin.
This is due to the tearing of the edges on the head of the hardware when exposed to increased load. And the reason for this may be the following factors:
- sticking, which is caused by the diffusion of atoms during a long connection;
- displacement of the parts being connected relative to the axis of the holes, which leads to jamming of the screw;
- tugging during installation (increased load);
- using the wrong tool during assembly (for example, to tighten a bolt whose head size is 14 mm, a 17 mm wrench is used, and a screwdriver is inserted to eliminate the gap);
- corrosion that has eaten away the surface of the head.
How to unscrew a hub nut - 10 ways
Wheel nuts secure the hub and bearing to the drive shaft or axle. When carrying out diagnostics and repairs, when it is necessary to remove the hub, you cannot do without unscrewing the lock nut.
It is necessary to unscrew the nut when carrying out the following types of work:
- replacing front bearings;
- replacing rear bearings;
- wear of bolts, threaded rods;
- brake system repair;
- replacing the CV joint of a front-wheel drive car;
- adjusting the bearing, checking the tightening torque;
- types of repairs when it is necessary to free the drive shafts;
Which way does the hub nut unscrew?
Yes, you may very well be one of the lucky ones who won't need any extra effort as the problem with unscrewing the hub nut may simply be a matter of going in the wrong direction.
So, we take the wrench and, when your car is far from new, try, if the nut does not lock, on the left wheel, unscrew the nut counterclockwise, and on the right wheel, unscrew it clockwise. In modern brands, it is usually necessary to unscrew the hub counterclockwise both on the left and on the right.
Before you start unscrewing the hub nut, do not forget that it comes off when the car is standing on the wheels and the stops are placed under them. On the side from which the nut will be unscrewed, a stop is securely installed.
Although if the nut is located deep and the brake disc is ventilated, then you can try to unscrew it (fixing it with a powerful screwdriver) and only after making sure that the car is securely secured. Remember about personal safety precautions: protect your eyes, do not overdo it, because in the spirit of enthusiasm you can accidentally get hurt or damage the car body.
Unfortunately, in most cases, it is not enough to use a wrench with a large lever; you have to use additional tools and special mixtures. Let's consider the other options.
It is not recommended to unscrew
Don’t try to “discover America” again; the methods listed above will help break the locknut in 99% of cases. The following methods should not be attempted:
- Cut using argon, oxygen or electric welding;
- Strong blows with a hammer or sledgehammer on the end surface;
- Jumping on a lever;
- Impacts on the side, edges, base;
- Exposure of the part to open flame (for example, pour kerosene on it and set it on fire).
Security measures
To safely unscrew the hub nut, the following requirements must be met:
- Use proper tools and accessories;
- Firmly fix the body in its original position (handbrake, heel);
- Use special anti-slip gloves;
- If excessive force is used, do not place body parts under the car body if the wheel is jacked up;
- First we try to unscrew it using more gentle methods, trying to preserve the original locknut;
- The sequence of actions is defined in the operational map. It must be followed.
Classic methods
Essentially, standard dismantling methods involve two main methods.
You will need:
- jack to remove the wheel
- tool kit
- hydraulic jack to lift the engine, or replacing it with a “stump”
First way
In the first case, we will have to make significant physical efforts, therefore, you need to clearly focus on your own strength. We are talking about the need to put stones or special stops under the wheels that would not allow them to move during operation. The gearbox should, if possible, be set to maximum gear. The higher it is, the easier it will be for you to cope with the task. In third and lower gears, it will be almost impossible to make a turn with your hands. But everything is unscrewed by hand. To make this task easier for yourself, it is appropriate to use a lever that will reduce the necessary effort. In some cases, the length of the lever can reach one and a half meters.
Read more: Conditions for the use of firearms by police officers
Getting to the bolt is not always easy
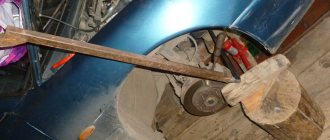
Second way
As for the second method, it involves placing the vehicle in neutral gear. Next, you need to install a suitable sized head on the bolt with a piece of pipe, which, in turn, rests on asphalt or concrete. Ordinary soil will not be able to hold it. But the bolt itself is already loosened by the starter.
This saves a lot of effort and makes it possible to complete the task the first time. The main thing is to take into account the reliable fixation of the pipe so that it does not jump out and damage anything around it.
Be careful not to lose the pulley key
But, in any case, the threads in this nut are correct, so you need to unscrew it counterclockwise, with some exceptions, which we will now look at.
The wheel nut won't come off, what should I do?
Wheel bolts attach the car wheel to the hub and every time you want to access the brakes, suspension, or change tires, you have to unscrew them.
Every driver needs the ability to unscrew a wheel, since no one is immune from punctures, and no one knows exactly when you will need to put on a spare tire. Unscrewing the bolts is not at all difficult, but if no one has touched them for a long time, they may rust, and then a couple of subtleties will help you cope with this task. UNLOCKING THE SIMPLE NUTS/BOLTS AT THE WHEEL
1.STEP: Place the vehicle on a level surface and apply the handbrake.
2. STEP: Remove the cap if you have one and locate the bolt heads
Depending on the configuration, your wheels may be protected by hubcaps, in which case you will have to remove the hubcap to access the bolts. Caps can be attached to metal clips, directly with bolts or other plastic fasteners.
- If the caps are attached with metal clips, use a flathead screwdriver or other flat metal object as a lever to pry them away from the disc.
- If the caps are secured with bolts, they can only be removed after you unscrew the bolts. If you try to remove them before then you will break the caps.
- If the caps are secured with plastic nuts, you will need a plastic puller. You can use a regular wrench, but be careful not to use too much force to avoid damaging the nuts.
3. STEP: Inspect the wheel bolts.
Car wheels are attached to the hub with four or six bolts, which are needed to center the wheel and securely fix it. On American cars, nuts and studs are more often used, but this does not change the process of wheel removal.
- Some vehicles use security bolts to protect owners from wheel theft. Usually one or more nuts are made secret, and they differ in appearance. In order to unscrew such a nut you need a special wrench. If you do not have such a key, later in the article you will find how to unscrew such a nut without a key.
4. STEP: Using a wheel wrench, remove the bolts.
A wheel wrench should be included with your vehicle, as should a jack and a spare tire. The wrench should fit the wheel bolts perfectly and usually you won't need another tool.
- The wheel key can be straight or cross-shaped, such keys are called “cross.” A cross wrench will allow you to develop more force since you can turn it with both hands.
- If the bolts will not come off due to rust, excessive torque, or any other reason, read the next section. It provides some tips on what to do if you cannot unscrew the bolts
5. STEP: Loosen the bolts while the car is with all wheels on the ground.
There are many ways to fix threads:
Before unscrewing the hub nut, it is advisable to read the instructions for routine maintenance of your car. It indicates the method of fixation, the direction of the thread and other nuances.
- Changing the geometry of the nut (one side is oval). Anyone who has repeatedly unscrewed such a nut has seen that the threads gradually become unusable;
- Punching after tightening. This solution is not suitable for replaceable units, since this will damage the screw part. However, many car manufacturers fix the hub nut in this way so that it does not unscrew while driving;
- Hairpin. The most reliable method of fixation. The nut does not unscrew on its own, and the thread does not deteriorate. For some reason, not all car designers use this simple method;
- The retainer is a “shoulder-groove”. A common method, more reliable than core punching, but detrimental to carvings. Longitudinal grooves (one or two) are made on the threaded connection of the axle shaft. The CV joint nut has the same number of collars, which bend into grooves after tightening. It is almost impossible to unscrew the nut without damaging the thread;
- A variety of fixing paints and adhesives. Not used on hub connections.
Since the connection is in unfavorable conditions (especially if the boot cap is lost), the nut does not unscrew the first time. An inexperienced driver panics, starts turning the nut in the wrong direction, uses attachments on the wrench in the form of a meter-long pipe, and as a result breaks the thread. The consequences are a forced replacement of a still-living CV joint.