After replacing the wheel bearing, an important moment comes - tightening. You need to lock it not with your “bare” hands, but with the help of a special device - a torque wrench. Since the service life of the equipment and the quality of control of technical means directly depend on the completeness of the tightening.
Each car has its own torque on the wheel bearings. This is clearly described in the operating instructions. If for any reason the manual is lost, you should use the Internet or contact your nearest auto repair shop for clarification.
Adjustment
Checking its functionality and adjusting it is carried out as follows:
- Raise the front wheel using a jack;
- Remove the wheel;
- Using a chisel, remove the protective cap on the front hub bearing;
- Remove the brake pads;
- The indicator holder should be secured to the steering knuckle;
- Place the leg of this indicator against the hub, as close as possible to the adjusting nut;
- Rings of spanners are placed on the studs and the nuts are tightened. While holding them, the hub rotates and moves in the axial direction;
- Using the indicator, the movement or gap indicator is determined. If it is more than 0.15 millimeters, the gap must be adjusted;
- Reinstall the wheel without using the protective cap. Secure it with two bolts screwed in diametrically;
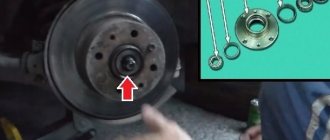
- Using a chisel, straighten the flange on the bearing nut and remove the nut with a 27mm (socket) wrench;
- Using a torque of 2.0 kg-cm, tighten the new adjusting nut;
- Loosen the nut, then tighten it again, but now with a torque of 0.7;
- Slowly release the adjusting nut 25 degrees and turn the wheel in a vertical plane. There should be a slight play;
- Check the gap. Its indicators should be in the range from 0.08 to 0.02 millimeters;
- In this position, lock the nut with the collar caulked in special grooves. They are located on the steering knuckle at the end of its axle;
- Remove old grease from the protective cap and apply new one. About 25 grams. Experts recommend using Litol 24, although there are worthy alternatives;
- Install the protective cap on the bearing;
- The wheel is installed in its rightful place.
Such diagnostics with repair elements will extend the life of your wheel bearing. If the adjustment does not allow the gap to return to the required parameters, the bearing should be completely replaced.
Video text
HOW TO CORRECTLY TIGHTEN THE HUB NUT OF VAZ 2109, 2114, 2110, 2112? VAZ hub nut tightening torque
Front wheel hub mounting nut Thread M20x1.5
Tightening torque, N•m (kgf•m) 225.0–250.0 (22.5–25.0)
Rear wheel hub bearing nut Thread M20x1.5
Tightening torque, N•m (kgf•m) 190.0–225.0 (19.0–22.5)
When repairing their front-wheel drive car, for example changing the CV joint, wheel bearing, or dismantling the gearbox, many drivers have to unscrew and tighten hub nut . But this is not as simple as it seems from the outside, and the nut must be tightened to a certain torque, otherwise there is a risk of the bearing turning on the hub and its subsequent repair. In addition, most torque wrenches sold in stores are not designed for the high tightening torque that the hub nut requires. In this short article we will look at the importance of this seemingly simple operation, and how to do it without a torque wrench.
In the 80s of the last century, tapered roller bearings were finally abandoned, and even on our domestic cars (front-wheel drive) double-row ball (or roller) bearings (or single-row with a thrust shoulder) began to be installed. And finally, there is no need for precise adjustment of tapered bearings, in which for many, adjusting the required clearance was not an easy task.
Indeed, in modern non-tapered bearings, the axial clearance is set by the bearing manufacturer (we read about bearings and their markings here) and no adjustments are required when assembling the unit. But many people do not attach importance to the correct tightening of such bearings, or rather the hub nuts, but in vain.
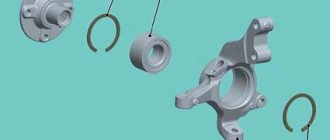
VAZ 2108 hub assembly with a double-row bearing 1 - halves of the inner race of the bearing, 2 - outer race of the bearing, 3 - balls, 4 - bearing separator, 5 - CV joint tip (trunnion), 6 - washer, 7 - nut.
For example, let’s take the hub unit, common on our front-wheel drive cars (VAZ 2108), with a double-row ball bearing (its marking is 6-256907E2S17), shown in the figure on the left. If you tighten the hub nut 7 on the thread of the end of the CV joint, then the halves of the inner race of the bearing will close completely and further convergence of the ball raceways will be impossible. And in this clamped state, the axial clearance in the bearing will be approximately 0.06 - 0.08 mm.
This means that hub nut 7 must hold the halves of the inner race of the bearing long enough (and provide the required clearance of 0.06 - 0.08 mm), that is, throughout the entire service life of the bearing. This means that the nut should not allow the distance between the halves of the cage to increase and the required clearance to be violated. And the more correct the tightening torque of this nut, prescribed by the factory, the longer the required clearance in the bearing will be ensured.
General rules for using the tool
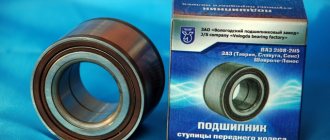
Wheel bearing Lada granta, kalina, priora, which one is better to choose
The tool itself is a rod with a handle at one end and an indicator mechanism at the other. At the working end of the handle, a socket head or a connecting socket for a horn attachment (wrench or union attachment) is installed.
The keys are equipped with indicator and adjustment mechanisms, both with and without overtightening protection.
Next, we will consider the types of torque wrenches that are most often used in work.
Click type
Often motorists purchase just such a key because of the high measurement accuracy, durability and the presence of a convenient scale with adjustment. It is impossible to tighten the thread with such a wrench, since a fuse is provided.
The main thing is to know how to properly work with a product of this type. The bottom line is that it is necessary to set the required value of the maximum force (tightening torque) in advance.
Next, the connection (bolt or nut) is tightened as usual until a clearly audible click appears. This sound signals that the required parameter has been reached. It is noteworthy that the device will then go into the “slip” mode and it will not be possible to tighten the connection.
Video: “How to use a click key”
How to use the scale:
Torsion bar type with pointer arrow
Such keys have a characteristic feature - large overall dimensions. Directly at the handle itself there is a scale on which the necessary measurements are made. It is not possible to pre-set this wrench; the tightening result is achieved after the fact.
Recommended for use only in machines and mechanisms where an average level of tightening accuracy is provided.
When using a pointer tool, the handle moves relative to the scale in the direction of application of force. The arrow remains motionless.
To make measurements as accurately as possible, you must perform the following steps step by step:
- Find in advance the place on the scale that the shooter should reach at the moment of applying maximum effort;
- Tighten smoothly and consistently, reaching the specified position on the scale;
- If additional force is necessary, the tool is removed, tightened with a regular wrench and checked again.
Video: “How to use an arrow key”
vazoved
I drive a LADA VESTA CROSS, Moscow
Then there will simply be no one to pay the fines! This is a Korean 7 in 1 car tablet video recorder for Android..
I forgot about fines and Yandex Navigator.
There is FULL HD shooting, radar detector and GPS with 32 satellites. I got it at a reasonable price for just a few thousand here >>>> MORE...
Torque electronic device
The use of this tool is justified when assembling equipment that requires high tightening accuracy. Information is displayed on the LCD display (tightening torque in Nm). The advantage of the models is the ability to save settings during operation.
Data installation is carried out according to the instructions using special buttons. It’s convenient and quite simple, and the time savings are huge. It is beneficial to use such devices on an assembly line when it is necessary to perform a repetitive operation many times.
Signals when the specified tightening torque has been reached with high accuracy. There are also special electronic adapters that are installed on the ratchet wrench.
Adjusting and checking rear wheel roller bearings
Changing the front wheel bearing on a Lada Kalina with your own hands
This procedure is performed in the following order:
- Raise the rear axle of the car, remove the wheel and axle shaft.
- We get to the bearing nut by removing the outer nut and lock washer, and loosen it by turning it a third of a turn.
- We turn the hub. It should rotate easily without touching the drum pads.
- Using a special spanner from the standard set, we tighten the bearing nut with a force of 7 to 10 kgf.m. In the process you need to rotate the hub. This will allow the rollers to fall into place.
- Next, you need to turn the bearing nut at an angle of 45 degrees and install the lock washer so that the pin located on the nut itself fits into its slot.
- Next you need to install and tighten the outer nut. The moment of force should be within 15-20 kgf.m. To twist, you need to use the same head. At the end of the procedure, the hub should rotate freely without making any extraneous sounds.
- Reassemble the wheel in reverse order and fill with oil.
Checking the quality of bearing adjustments is carried out in the field. To do this, you need to drive about 10 kilometers and check the hub. If it gets very hot (temperature over 70 degrees Celsius), then you should repeat the adjustment procedure and check the temperature again.
FakeHeader
Comments 13
I tightened it with a torque wrench and set it to 200 n.m. According to the book from 190 to 210
On P2 they are adjustable and loosening is necessary so that the bearing has a slight play, which will disappear when it warms up during movement, otherwise it will “burn out” and jam, the service life will decrease quickly. And here I think about the tightening torque of the CV joint (you can look at the approximate tightening torque on other brands by analogy). And so, of course, you don’t have to pull to break off the CV joint or rip off the nut))), but you already have to be a jock or have a 3 meter wrench)).
On P2 it was written to tighten with a certain force and then unscrew by 10 or 20 degrees) but who knows, you need to read the book)
Tighten it as much as possible, it’s not scary.
the maximum can be different, but it’s probably still too much, it’s completely impossible, then there is a certain amount of force with which to tighten it.
On the second generation of sports it is not adjustable, if you have play that you can feel with your hands, then just change it. I changed it for myself, installed the original on one side of the hub assembly, and then slowly bought the original bearing, disassembled the old hub and pressed in a new bearing, and then changed the other side. By the way, the bearing is KOYO in the original, if that :). I bought the hub for 6300 rubles (maybe more expensive now), and the bearing was about 3 thousand.
View Queue
Queue
Wheel bearing tightening torque
Determining which wheel bearing is humming
Designer's Handbook, a useful site for a mechanical engineer
In a car, wheel bearings are subject to extreme loads: high temperature changes, different environmental influences, and also, in the effect of absorbing impacts from uneven roads, drive, brakes and steering - different dynamic loads. In these circumstances, wheel bearings should be inspected regularly
In this case, it is necessary to pay attention to the fact that the wheel must rotate without play, with acceptable noise, and minimal friction.
Some modern wheel bearings are equipped with a multi-pole magnetic ring, so magnetic fields must be avoided when storing and mounting such bearings. Otherwise, they may become unusable.
The CX company supplies such bearings with a metal protective cover made of special alloy steel.
It protects the multi-pole ring from unwanted demagnetization and must be released immediately before installation.
Also, when working with such bearings, it is necessary to inspect for correct installation.
The bearing must be mounted in such a way that the pole ring faces the speed sensor sensor.
The trend of integration will lead to the fact that in the future, similar structural elements of the car, such as the number of expression sensors and parts of the drive shaft, will become components of the wheel bearing. A couple of years ago, SKF and GKN showed a close overall development, where the wheel bearing and the axle joint housing are one complete one. The advantage of this highly integrated module is ease of installation, reducing the number of non-suspended mass elements, which increases comfort, safety and reduces the required braking force. But that's not all.
FAG intends to bring the wheel bearing to the intermediate link between the wheel and the chassis with elements for changing the traction force of the engine.
Also very interesting is the development of SKF, which allows air supply to the wheels, which makes it possible to adjust the pressure in the tires.
With this type of wheel bearings there is a great potential for tasks combined, first of all, with increasing vehicle safety.
The drive axles use ball so-called diagonal bearings. From their name it is clear that the balls are not placed in half of the body, but are removed into the country. Thanks to this, they accept lateral loads well, but in this case it is necessary to expect more wear.
A decisive factor for the longevity of diagonal ball bearings is the perpetual tightening tension, which is closely dependent on the geometry and accuracy of the component parts, as well as on the tightening torque of the central nut.
At the end of the series of articles devoted to bearings, we will look at the methods and features of replacing these parts. This is one of the most common operations on the service; here, it would seem, everything has been known for a long time. But this is where technology violations most often occur, caused both by ignorance of these very technologies and the gap in the experiment, and by the lack of an appropriate tool. The former slogan “Without a sledgehammer and a chisel, you are not a mechanic, but...” no longer applies.
So let’s start from the beginning.
The backlash must be taken in accordance with the manufacturer's requirements. The last one is that which cannot be canceled directly related to safety.
This is the torque specified by the manufacturer for tightening the hub nut.
It is also important: when screwing on the wheel nut, the wheel hub must turn. In this case, the conical rollers should take the appropriate position in close driving roads
If there are no requirements for the amount of play, bearing manufacturers recommend that the hub nut be tightened (loosened) in a similar manner so that the lock washer can be moved radially with a screwdriver.
But at the same time, it is necessary to avoid cutting the component parts (the principle of leverage).
It is also necessary to remember that the correct installation of the bearing play is important for the functioning of the ABS sensor, since for this reason, violations in the brake system are not uncommon.
To summarize, it is necessary to see that even if the current development of wheel bearings implies less busy workshops for service stations, this topic remains an extremely good source of income for free workshops. First of all, because in the segment of cars 2 and 3 (5 - 15 years) there is the highest potential for repairs due to wear and tear.
Designer's Handbook - Everything any designer needs! 2008-2017
SpravConstr.ru
Features of tightening the hub nut
Not understanding how hard to tighten the wheel nuts
It's better not to take this job. If you overtighten them, a breakdown will occur, and if you don’t tighten them, then spinning may occur and the seat under the bearing will deteriorate. Anyone who is not confident in their knowledge can use a spring cantor, but you can do it in a simpler way. Ratchet drivers most often cannot provide sufficient force, and the tools designed for this are expensive.
To prevent damage and perform the job correctly, for broaching
It is recommended to use a lever that is a meter or a little longer. If a fine thread pitch on a car hub may require a force of 20 Nm, plus it will be necessary to turn the key another 90°, in total such efforts will give a very decent tightening torque. Anyone who remembers physics can make a simple calculation. To do this, you need to know your weight and the length of the lever. A value of 20 Nm is equal to a force of two kilograms with a lever length of a meter.
Force, then with what torque to tighten the hub nut
, depends on the individual characteristics of the vehicle. Torque recommendations for even the same bearing often vary. They depend on the quality of the metal of the hubs, the strength of the nuts, axles, and threads. Usually 19-23 kgf/m is enough. If the bearing weakens and the gap reaches 0.06-0.08 millimeters, this will significantly affect the reduction in the service life of the entire mechanism.
Experts who have worked in car repair shops for many years recommend tightening the hub nuts every 15-20 thousand kilometers. In this case, it will be useful to loosen them a little by one or two turns. It is best to have the car raised with a jack. To carry out this process, many advise using a tubular spanner, because it has thick walls and there is room for a wrench, and it is more powerful. Thanks to a special adapter, you can use a pipe.
Modern cars are equipped with crimp nuts that do not need to be locked. They have belts and they will press themselves into the grooves of the axle. You don’t need to put all your hundred kilogram weight on the key; it’s actually twice as hard as necessary. Knowing exactly what torque to tighten the hub nut
you can avoid losing a wheel on the way, before this a knock will occur when turning, and the car may fly into a ditch.
The front wheel bearing torque is the force with which the hub nut is tightened. Units of measurement – N*M (or kgf*m). The front bearings have internal axial clearance, which is necessary for proper operation of the bearing, namely:
- preventing angular displacement of rings;
- reduction of friction of rolling elements and raceways;
- correct distribution of internal stresses on separators and cages.
- compensation of thermal expansion.
- increasing the contact angle for axial loads.
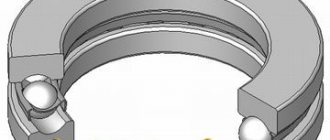
In turn, the axial internal clearance of a double-row ball bearing is the amount by which the inner rings move relative to the outer one. In order for the axial clearance to be within the tolerance, the ball bearing (or roller) is adjusted, this is done by correctly tightening the hub nut.
Familiarize yourself with the mounting and arrangement of the bearing with the front hub, as well as with the design of the wheel ball bearing.
The video also shows the process of adjusting the backlash by the locknut tension level:
Are you here
By correctly determining with what force to tighten the hub nut and stopping in time, you can avoid stripping the threads and the need to perform expensive repairs, taking into account today's prices for nuts. Craftsmen perform this work using a special torque wrench. Since a wheel bearing is a rather capricious product and additional equipment is not always at hand, it is very important to know the answer to this question.
Before work, it doesn’t hurt to determine what type of it is installed, for example, it can be conical or roller.
Matiz replacement of front wheel bearing/hub/steering knuckle/brake disc
— Wear-to-failure, in other words, the regulated service life expires; — Moisture, and similarly dirt inside due to damage to the oil seals; — Drying or other leakage of lubricant, missing lubrication, wear from friction; — Improper repair of the front suspension, as it is also called a bad previous change; — Malfunction of adjacent parts of the front suspension on the Daewoo Matiz.
Preliminary operations when repairing the hub assembly:
- Place the car on a level surface, provide lighting;
- Engage first gear, release the handbrake;
- Install wheel chocks under the rear chassis;
- Clean the wheel or mechanism being repaired from dirt;
- Familiarize yourself with the structure and location of wheel roller bearings in the mechanism, and with the part numbers:
- Prepare a set of tools according to the list:
— A set of wrenches and sockets with a ratchet; — Pipe for extending the wrench; — Vise — Jack; — Screwdriver, pliers; — Mandrel or socket head with an outer diameter of 37-40 mm. - Hammer, chisel. — A torque wrench for tightening the hub nut to the required torque.
- First, loosen the wheel bolts, then remove the hub locknut.
- Later, we lift the car with a jack, install a support under the body, for the safety of work.
- We immediately move on to dismantling the brake caliper. Find the two caliper mounting bolts and unscrew them.
- Now we disconnect the brake hose, which is held on a special mount at the rack.
Adjusting Wheel Bearings
Home » Repair Tips » Adjusting Wheel Bearings
The bearings that are installed on car wheel hubs wear out over time. We will try to independently adjust these components and change products.
The bearing adjustment procedure involves the following stages:
- First, the car is placed on a level site, secured with a handbrake. At the same time, you can place anti-recoil devices.
- Then we lift the axle from behind using a jack.
- We remove the axle shaft of the car to clarify the rotation of the wheels. Having discovered difficulties, we find out the source of the disease. There may be “sticking” at the oil seal and contact at the brake pads.
- Next, unscrew the locknut and remove the stop washer. When we slightly unscrew the fastening nut on the bearing, we will re-check the rotation on the wheel. Adjustment procedures are permitted if the component moves easily.
- Let's use a torque wrench to tighten the nut. The force on the structure should not exceed 100 Nm (at the same time we turn the wheels). Then the rollers will be evenly placed on the bearings.
- Unscrew the nut again. To maintain the rotation angle, we make turns on the washer by a couple of positions and holes. We mount the stopper nut, controlling the entry of the pin into the slot.
- We tighten the locknut, maintaining a force of up to 200 Nm.
- When making adjustments, we control the free rotation of the wheel and the absence of axle play.
- We install the axle shaft with spring washers. We re-tighten our nuts to secure the studs.
- We lower the wheel until it touches the ground. We make a trip and test the equipment. Sometimes, when moving, the hub begins to heat up, reaching 700 degrees. Then the adjustment procedure will have to be repeated.
Now we try to pull out the hub on the rear wheel when we change the bearing.
We carry out the manipulations:
- Let's turn the flange by tightening the mounting bolts on the hub (in contact with the bracket). We act through the hole on the body part - we compare it with the bolts of the element.
- Then we remove the fasteners holding the mechanism.
We also advise you to read: Vote, did you like the article?
(2 votes, rating: 5.00 out of 5)
Assembly
– that’s it, we begin the process of assembling the rear hub bearing on the VAZ 2109, 2110. To do this, we put the hub on the axle (by removing the bolt with which we tightened the cages);
– tighten and tighten the central nut (be sure to install a new one), not forgetting to put the thrust washer;
– put on and screw on the brake drum and wheel;
– check the rotation (there should be no extraneous noise);
– if all is well, lower the car from the jack;
– tighten the wheel and the central nut (the tightening torque of the hub is approximately 20 kgm, this is quite a strong tightening, if you don’t have a torque wrench, you need to use a lever of at least a meter to tighten the nut with a force twice the tightening force of the wheels);
– tighten the hub nut and tighten the wheels.
Table of tightening torques for threaded connections
When choosing a torque wrench, the required tightening torque should be 25-30% less
than the maximum for your key. Otherwise, working under maximum load, the key will quickly lose accuracy and fail.
Screw tightening table
| Bolt nut | Thread | Strength class | ||
| 8.8 | 10.9 | 12.9 | ||
| 22 | M 14 | 138 Nm | 194 Nm | 235 Nm |
| 24 | M 16 | 211 Nm | 299 Nm | 358 Nm |
| 27 | M 18 | 289 Nm | 412 Nm | 490 Nm |
| 30 | M 20 | 412 Nm | 579 Nm | 696 Nm |
| 32 | M 22 | 559 Nm | 785 Nm | 941 Nm |
| 36 | M 24 | 711 Nm | 1000 Nm | 1196 Nm |
| 41 | M 27 | 1049 Nm | 1481 Nm | 1775 Nm |
| 46 | M 30 | 1422 Nm | 2010 Nm | 2403 Nm |
| 50 | M 33 | 1932 Nm | 2716 Nm | 3266 Nm |
| 55 | M 36 | 2481 Nm | 3491 Nm | 4197 Nm |
| 60 | M 39 | 3226 Nm | 4531 Nm | 5443 Nm |
| 65 | M 42 | 3991 Nm | 5609 Nm | 6727 Nm |
| 70 | M 45 | 4992 Nm | 7012 Nm | 8414 Nm |
| 75 | M 48 | 6021 Nm | 8473 Nm | 10150 Nm |
| 80 | M 52 | 7747 Nm | 10885 Nm | 13092 Nm |
| 85 | M 56 | 9650 Nm | 13582 Nm | 16279 Nm |
| 90 | M 60 | 11964 Nm | 16867 Nm | 20202 Nm |
| 95 | M 64 | 14416 Nm | 20300 Nm | 24320 Nm |
| 100 | M 68 | 17615 Nm | 24771 Nm | 29725 Nm |
| 105 | M 72 | 21081 Nm | 29645 Nm | 35575 Nm |
| 110 | M 76 | 24973 Nm | 35118 Nm | 42141 Nm |
| 115 | M 80 | 29314 Nm | 41222 Nm | 49467 Nm |
| 130 | M 90 | 42525 Nm | 59801 Nm | 71761 Nm |
| 145 | M 100 | 59200 Nm | 83250 Nm | 99900 Nm |
The strength class marking is indicated on the bolt heads.
For products made of carbon steel of strength class - 2, numbers are indicated on the bolt head through a dot. Example: 3.6, 4.6, 8.8, 10.9, etc. The first number indicates 1/100 of the nominal tensile strength, measured in MPa. For example, if the bolt head is marked 10.9, the first number 10 means 10 x 100 = 1000 MPa. The second number is the ratio of the yield strength to the tensile strength, multiplied by 10. In the above example, 9 is the yield strength / 10 x 10. Hence, Yield strength = 9 x 10 x 10 = 900 MPa.
The yield strength is the maximum working load of the bolt!
For stainless steel products, the steel marking is applied - A2 or A4 - and the tensile strength - 50, 60, 70, 80, for example: A2-50, A4-80.
The number in this marking means 1/10 of the tensile strength of carbon steel.
Conversion of units of measurement: 1 Pa = 1N/m2; 1 MPa = 1 N/mm2 = 10 kgf/cm2. Limit tightening torques for bolts (nuts).
Table of bolt/stud diameters
| English measurement system ( inches ) | Metric ( mm ) | ||
| Bolt nut) | Thread | Bolt | Hairpin |
| 1.1/4“ | 3/4“ | 32 | M 22 |
| 1.5/16“ | 7/8“ | ||
| 1.3/8“ | 13/16“ | ||
| 1.7/16“ | 7/8“ | 36 | M 24 |
| 1.1/2“ | 1“ | ||
| 1.5/8“ | 1“ | 41 | M 27 |
| 1.11/16“ | 1.1/8“ | ||
| 1.3/4“ | |||
| 1.13/16“ | 1.1/8“ | 46 | M 30 |
| 1.7/8“ | 1.1/4“ | ||
| 2“ | 1.1/4“ | 50 | M 33 |
| 2.1/16“ | 1.3/8“ | ||
| 2.3/16“ | 1.3/8“ | 55 | M 36 |
| 2.1/4“ | 1.1/2“ | ||
| 2.3/8“ | 1.1/2“ | 60 | M 39 |
| 2.7/16“ | 1.5/8“ | ||
| 2.9/16“ | 1.5/8“ | 65 | M 42 |
| 2.5/8“ | 1.3/4“ | ||
| 2.3/4“ | 1.3/4“ | 70 | M 45 |
| 2.13/16“ | 1.7/8“ | 75 | M 48 |
| 3“ | 2“ | ||
| 3.1/8“ | 2“ | 80 | M 52 |
| 3.3/8“ | 2.1/4“ | 85 | M 56 |
| 3.1/2“ | 2.1/4“ | 90 | M 60 |
| 3.3/4“ | 2.1/2“ | 95 | M 64 |
| 3.7/8“ | 2.1/2“ | ||
| 100 | M 68 | ||
| 4.1/8“ | 2.3/4“ | 105 | M 72 |
| 4.1/4“ | 2.3/4“ | 110 | M 76 |
| 4.1/2“ | 3“ | 115 | M 80 |
| 4.5/8“ | 3“ | ||
| 4.7/8“ | 3.1/4“ | ||
| 5“ | 3.1/4“ | ||
| 5.1/4“ | 3.1/2“ | 130 | M 90 |
| 5.3/8“ | 3.1/2“ | ||
| 5.5/8“ | 3.3/4“ | ||
| 5.3/4“ | 3.3/4“ | 145 | M 100 |
| 6“ | 4“ | 150 | M 105 |
| 6.1/8“ | 4“ | 155 | M 110 |
| 165 | M 115 |
How to change the front wheel bearing Matiz 0.8
Preparatory operations for repairing the hub assembly:
- Place the car on a flat surface, provide lighting;
- Engage first gear, release the handbrake;
- Install wheel chocks under the rear chassis;
- Clean the wheel or mechanism being repaired from dirt;
- Familiarize yourself with the structure and location of wheel roller bearings in the mechanism, as well as the part numbers:
- Prepare a set of tools according to the list:
— A set of wrenches and sockets with a ratchet; — Pipe for extending the wrench; — Vise — Jack; — Screwdriver, pliers; — Mandrel or socket head with an outer diameter of 37-40 mm. - Hammer, chisel. — A torque wrench for tightening the hub nut to the required torque.
Instructions for removing and replacing the old wheel bearing
- First, loosen the wheel bolts, then remove the hub locknut.
- Then we lift the car with a jack, install a support under the body, for the safety of work.
- We immediately move on to dismantling the brake caliper. Find the two caliper mounting bolts and unscrew them.
- Now we disconnect the brake hose, which is held on a special mount at the rack.
- We remove the ABS sensor plug (if equipped), then remove the brake caliper. Place it aside so that it does not interfere with further disassembly.
- Then unscrew the hub nut completely.
- We move on to the steering tip, using pliers, remove the cotter pin nut.
- Now unscrew the tip nut, having previously treated it with penetrating lubricant (WD-40).
- Then we will use a tip remover to press it out.
- Using the installed device, we compress the steering tip mount.
- Loosen the fastening of the ball joint with the pin.
- Now use a screwdriver to open the connection and disconnect the fist from the ball.
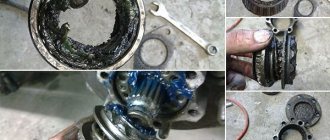
- The removed rotary housing contains our faulty roller bearing, which needs to be removed and replaced. First, use a screwdriver to remove the dirt seal.
- Now we knock the hub out of the rotating mechanism using a mandrel with a hammer. The internal components of the product (separator with rollers) will remain on the trunnion.
- We remove the small ring of the tapered roller bearing, clamp the hub in a vice, and then use a claw puller (or cage puller) to pull it off the axle.
- We remove the internal component of the second roller bearing, already from the rotary block, it can be removed easily.
- The external components of the product will remain in the rotating mechanism; they are clamped by the fit.
- If you don’t have a cup puller and a press, then use a chisel to remove the clips, trying not to damage the seating surface inside.
Installation and replacement of the front wheel bearing in the Daewoo Matiz hub
- Prepare spare parts for replacement. Next, clean and lubricate the hole to make pressing easier.
We place the outer ring on the hole, evenly, without distortions
CAUTION: ROLLER UP (CONE) ONLY. Next, we use the old outer element of the product as a mandrel for pressing. Place the mandrel on the end and carefully press the clip into the body.
- We perform the same operation on the other side.
- Avoid joint distortions. The pressing diagram is shown below.
- Now lubricate the small cage with thick grease and put it inside on one side.
- We insert the outer oil seal with the iron casing into the structure and press it inside the housing.
- We put on the brake disc. Now we move on to pressing the hub, first we attach the pin into the bearing hole. We do this without distortion.
- Then we turn the structure over with the axle shaft down and take a mandrel or socket head.
- Carefully press the axle shaft into the bearing according to the diagram.
- Next, we put the spacer ring on the hub axle (from the kit).
- Now we lubricate the small race of the second product and attach it to the axle shaft.
- We press in the clip using the method known to us.
- A correctly assembled structure looks like in the photo.
- An external oil seal with a casing is placed on top.
- We screw the hub to the brake disc and tighten it in a “cross” pattern.
- Now we move on to attaching the assembled structure to the strut and CV joint. We install the remaining elements in the reverse order.
Installation and dismantling procedure
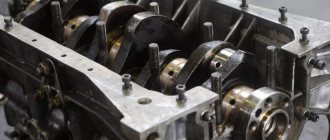
The part called the cylinder head is attached to the cylinder block with 10 screws. They are unscrewed with a 10mm socket wrench. The procedure for dismantling the cylinder head is shown in the first photo.
Reversal sequence (1-10)
The standard screw length is 9 3 mm. If the screw has been pulled out to at least 95 mm, it is replaced with a new one (AvtoVAZ requirement).
During installation, a different scheme is used (photo 2). Each screw is lubricated with machine oil, otherwise the efforts will be reduced to nothing.