Sign of a faulty wheel bearing VAZ classic
A faulty bearing usually produces extraneous sounds in the form of a hum or grinding sound, and the wheel can also hang on such a bearing due to wear or due to a poorly tightened wheel nut.
To diagnose a bearing, it is enough to hang the wheels (or each separately) and rock the wheel in different directions. If there is play when rocking in all planes (wheel rotation left and right and tilt up and down), the wheel bearing may need to be replaced. But the backlash can also be due to tired silent blocks or ball bearings. To exclude a suspension malfunction, you need a second person who will check whether the wheel wobbles together with the steering knuckle or walks separately from it. If the wheel moves separately from the steering knuckle, then the wheel bearing is definitely faulty (in this case, tightening the wheel nut may briefly save the situation).
A sign of a malfunction may also be extraneous sounds when the wheel rotates (usually a hum, sometimes a grinding sound) or its uneven rotation.
You can also determine a faulty bearing by an excessively heated wheel (for example, if the front right wheel disc is much warmer than the front left one). But you can’t compare the temperature of the rear and front wheels because... They have brakes of different designs.
And so, let’s summarize everything we’ve read. The wheel bearing is replaced if:
- The wheel dangles separately from the steering knuckle.
- A hum and grinding noise is heard when the wheel rotates.
- The wheel does not spin evenly.
- The wheel rim gets very hot.
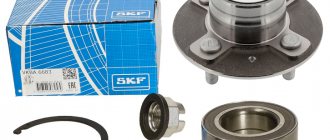
Wheel bearings SS20 for VAZ 2101-2107, 2121, 2123, 2131
Description
The wheel bearing is one of the most heavily loaded suspension elements. Wheel bearings allow wheels to rotate and the vehicle to move as a whole. In addition to the perception of loads directly from the wheel rolling on the road, shock and thermal loads are added. Through the hub bearing, all forces arising in the contact patch between the wheel and the road are transmitted to the suspension.
That is, the reliability of the suspension and the car depends on the correct choice of front and rear wheel bearings. The main problem when replacing wheel bearings is the large number of low-quality fakes on the market that last no more than 2-3 thousand km, as well as violation of installation technology and incorrect adjustment of clearances.
Malfunctions of wheel bearings manifest themselves in the form of hum, knocking and play when the car is moving, clicks when starting and stopping. As raceways, rolling elements and cages wear, rolling resistance increases and this is accompanied by increased noise and heating of the bearings.
You can determine the malfunction of the wheel bearings yourself. To do this you need:
- Check ease of rotation. Spin the suspended wheel with a sharp jerk and evaluate the noise level emitted by the bearing during rotation. The wheel run-out time is also estimated.
- Determine the presence of play in the hub bearing. On a suspended wheel, applying a load with your hands in the vertical and horizontal planes, check for swing (play) in the bearing. By applying force along the axis of rotation of the wheel, you can estimate the axial clearance.
SS20 wheel bearings will help you avoid problems with low-quality spare parts. The reliability and durability of SS20 bearings is achieved through:
- accuracy of geometric dimensions in the design and production of a product;
- use of high quality steel;
- achieving the required level of surface roughness;
- use of high-tech equipment.
The manufacturing precision of wheel bearings, surface roughness and rolling elements are the key aspects that influence the level of mechanical losses in the bearing and, ultimately, determine the noise class.
During production, the service life of the hub bearings is checked selectively from the batch before failure on a stand that simulates real loads on the bearing. As part of a comprehensive quality assessment, bearing runout is checked with an assessment of the reduction in speed at two stages from 100% to 70%, and the drop in speed from the initial stage to a complete stop. At the same time, the vibroacoustic parameters of the freewheel bearing are checked.
A whole range of serious checks at all stages of the production process allows us to guarantee the buyer the high quality and reliability of SS20 wheel bearings.
SS20 hub bearings have the SS20 branding and additional protection against counterfeiting, which will provide car owners with confidence and safety on the road, and protect them from possible financial and time losses when using counterfeits.
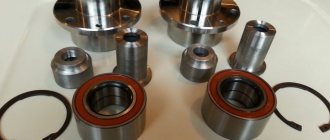
Front wheel bearings for VAZ 2101-07 and 2121, 2123 are supplied as part of repair kits. The SS20 front hub repair kit contains all the washers, oil seals, rings, nuts, bearings and special high-temperature complex lithium grease for bearings required for replacement.
The high quality of the lubricant ensures a service life of up to 300,000 km in the wheel bearing assembly. The amount of grease is calculated to ensure reliable lubrication of the bearings throughout their entire service life. The operating temperature range of the lubricant is from –40°С to +180°С.
We draw your attention to the process of adjusting the clearance in the hub bearings. The durability of the unit largely depends on the correctness and quality of this operation, therefore, we offer you step-by-step instructions (included in the delivery kit) that will allow you to adjust the clearance in the wheel bearing unit, both during initial installation and during further scheduled maintenance.
Modifications
The table shows recommended retail prices for the set in Samara
- SS52101 Front wheel bearing (repair kit)
- VAZ 2101 VAZ 2102 VAZ 2103 VAZ 2104 VAZ 2105 VAZ 2106 VAZ 2107
1 year 21010-3103025-01, 21010-3103020-01
- VAZ 2121 VAZ 2131 Chevrolet Niva
1 year 2121-3103020-11
- VAZ 2121
1 year 2121-2403080
- Chevrolet Niva
1 year 2121-2403080, oil seal 21102301035
- Chevrolet Niva
1 year 2121-2403080, oil seal 21102301034
ss20.pro
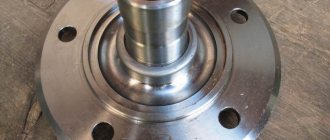
Where is the wheel bearing located?
Having read the name itself, you can already understand that the bearing is connected to the hub, and so it is located in its inner part, usually when replacing this bearing, people remove the brake disc together with the hub, because separating the brake disc is only a waste of time, but changing the bearing on the installed hub will not work at all, so it will need to be removed (without removing the brake disc) and then replaced.
When should you replace a wheel bearing?
When will it start to hum, but the whole point is that it is very difficult to determine when you drive a car all the time, because the bearing will start to hum strongly only when it has actually all broken down and become unusable, so checking this way is not an option, for more For an accurate check, you will first need to hang the wheel (First the right front, then the left, it doesn’t matter, both wheels need to be checked) and after that, turn it by hand, it should spin without any jamming and hum (extraneous sound), there should be no (Only the pads can touch the brake disc, but this sound will be completely different, you can distinguish how the bearing hums and how the pads rub), for more details on how to check it, see the video below, it will be said about this hum, and more about how to determine by rocking whether the bearing has become unusable or not yet.
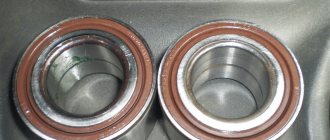
Front wheel bearings VAZ 2107 dimensions
The table shows the dimensions for the front wheel bearings of a VAZ classic car.
| Installation location | Bearing type | Size, mm | Quantity |
| Front wheel hub (outer support) | Roller, conical, single row | 19,5*45,3*15,5 | 2 |
| Front wheel hub (inner support) | Roller, conical, single row | 26*57,2*17,5 | 2 |
Seven generator bearings
Rear bearing of VAZ 2107 generator (rectifier side)
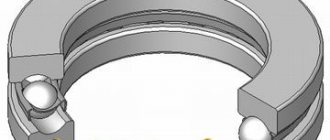
The generator bearing on the drive side is ball, radial, closed, single row with double-sided seal - 2RS.
View of the rear bearing 6-180201U of the VAZ 2107 generator:
Design of the rear bearing 6-180201U of the VAZ 2107 generator:
Designation of the generator support bearing on the rectifier side:
- By designation VAZ - 24940220;
- According to the designation of the bearing plant - 6-180201U (6201 2RS).
Generator rear bearing dimensions:
- Outer diameter D - 32 mm;
- Inner diameter d - 12 mm;
- Thickness B - 10 mm.
| Technical characteristics of bearing 6-180201U for VAZ 2107 generator | |
| Accuracy class | 6 |
| Separator | steel |
| GOST | 8338-75, 8882-75, 520-2011 |
| Country of origin | Russia |
Generator front bearing (drive side)
The front bearing 6-180302U of the generator is ball, radial, closed.
View of the front bearing 6-180302U of the VAZ 2107 generator:
Design of the front bearing 6-180302U of the VAZ 2107 generator:
Generator front bearing designation:
- By designation VAZ - 24940230;
- According to the designation of the bearing plant - 6-180302U.
Alternator front bearing dimensions:
- Outer diameter D - 42 mm;
- Inner diameter d - 15 mm;
- Thickness B - 13 mm;
- The width of the outer race (C) is 13 mm.
| Technical characteristics of the front bearing 6-180302U of the VAZ 2107 generator | |
| Accuracy class | 6 |
| Separator | steel |
| GOST | 9592-75, 28428-90 |
| Country of origin | Russia |
| Weight | 0.084 kg |
| Manufacturer | GPZ 4 |
How to replace a wheel bearing on a VAZ 2106, 2107?
We determined that it was the wheel bearing that was faulty, bought a new one and are preparing the tools for the job:
- Hammer
- Pliers
- Socket wrench set
- Impact screwdriver (that you can hit without breaking)
- Mandrel for pressing in new bearing races
- Head 27 with a large wrench (for the hub nut)
Removing the wheel bearing
First of all, remove the cap covering the hub nut. Next, we align the rolled edges of the hub nut and unscrew it.
ATTENTION : the right wheel has a reverse thread on the hub nut!!!
We hang the wheel and unscrew the brake caliper.
You can remove the hub along with the brake disc.
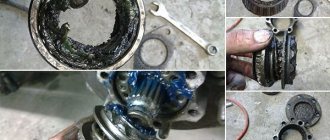
We take out the ring separating the seporators.
We take out the internal and external separators and knock out their clips.
We clean the hub from old grease and dirt.
Installing a new wheel bearing.
Installation occurs in the reverse order of removal.
Carefully through the mandrel (an old clip as a last resort), we press in new clips, having previously lubricated their walls with motor oil or lithol.
Install the separating ring.
We generously lubricate the internal separator with lithol, put it in place and close it with an oil seal. We fill the hub a little less than halfway with lithol and place it on the steering knuckle.
Lubricate the outer separator and put it in place.
Now tighten the hub nut, but not all the way. We install the brake caliper and screw the wheel.
When all the old parts have been replaced with new ones, you need to adjust
Installing new bearings
- We clamp it in a cleat. We take a new bearing race (ring) and push it into the housing. We use a flat board, a pry bar - any strong object with a flat surface.
- We install it exactly, relative to the plane of the hub, so that it does not become distorted and fits exactly into the seat. From above, with light blows of a hammer, drive the ring as deep as possible through the pry bar. We try to tap evenly so that it fits evenly into the groove, without distortion.
To recess it all the way, you can use an old ring, using it as a mandrel. At the same time, you need to place it relative to the new holder with a larger diameter to make it easier to pull out. In addition, there are special soft metal rings of different diameters designed for pressing bearings.
If the front wheel bearing of a VAZ 2107 is being replaced in the garage, but there is nothing similar at hand, then for complete pressing we use the tool that was used to remove the old races from the hub body. Also, carefully tapping along the entire perimeter of the ring, press it in until it stops.
- For the outer bearing race, just use a block of wood. We insert it accurately into the body so that it does not warp, place a piece of wood on top and tap it with a hammer until it is completely installed in the seat. There is no need to use the old bearing ring here.
- We generously lubricate the cages of new bearings with a special heat-resistant grease.
Litol-24 and solid oil are not suitable; they may not withstand high temperatures and become liquid and lose their lubricating properties. We apply the same lubricant to the inside of the hub housing. In the “Murzilka” for repairs they advise using Litol, but practice shows otherwise.
- We insert the inner bearing into the race. We close it with a cuff with a locking ring. We evenly tap it on top through the spacer so that it fits into its seat without distortion.
- We put the finished hub with the bearing on the steering knuckle axis and install the washer. We also apply lubricant before tightening the hub nut. After replacing the front wheel bearing, it is advisable to use new adjusting nuts, since the old ones will be difficult to lock.
- Install the brake disc on the hub. Don't forget about the spacer ring (washer). We insert the guide pins through it, lubricating them with nigrol or “graphite”. We tighten them, pressing the caliper into the brake disc.
We adjust the free play of the wheel bearing, we will discuss how to do this correctly in the article: Wheel bearing play - causes of occurrence and adjustment of the wheel bearing of the VAZ 2107. We counter the nut, along its outer edges we carefully press the metal with a chisel opposite the grooves of the steering knuckle axis.
- We collect grease into the protective cap and install it in place. We return the caliper with brake pads to the disc.
Video on how to change wheel bearings yourself:
Another way to replace the wheel bearing
So, not even 2 years had passed since the bearing on one wheel began to hum, and on the second there was a slight crunching noise when braking. I will try to explain in detail but briefly and in pictures what and how. First, remove the wheel.
Removing the hub cap
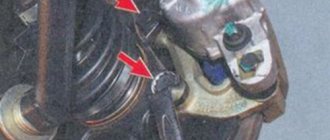
We unscrew the caliper, not forgetting to bend the fixing plates of the bolts, highlighted in yellow (and by the way, be prepared to replace them, they often break)
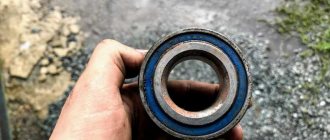
And remove the hub assembly. I dreamed without problems, although sometimes it gets stuck. It is better to knock it out through a block. In this photo, the working surface of the shaft is highlighted in yellow where the oil seal actually sits. I had a decent amount of wear in this place, as a result of which the oil seal quickly failed and water got inside during the season as a result and the bearing did not pass for a long time. By the way, this is also noticeable by the grease’s brownish color (presence of rust).
The axis is relative, the road is 700 - 800 rubles. So I take a new oil seal, remove the spring and cut it about a centimeter from the side where it is widely highlighted in yellow in the photo. I screw the spring into the spring and put it on the oil seal. I think with such an oil seal it will be enough for more mileage.
We pry out the old oil seal with a large screwdriver or a wrench, remove the spacer ring and pull out the inner seal.
And using a mandrel or an unnecessary shaft, we knock out the outer one on both sides.
We clean out the old grease and use the old wallpaper to hammer in the new one. We only knock out the old one back.
We place the inner spacer washer on both sides and carefully hammer in the oil seal.
And fill it with lubricant. The ABC says Litol 24 Front wheel bearings 0.4 l Front wheel hub cap 0.25 l.
We naturally wipe off the old grease from the axle and put on the hub, install the washer and tighten the nut with a little force.
We fasten the caliper without forgetting to bend the locking plates.
We put the cap on lightly to prevent debris from getting in and screw the wheel on. Since the nut is tightened with little effort, we turn the wheel 90 degrees in one direction or the other so that the rollers find their place. Then loosen the nut until the wheel spins freely. We lower the car to the ground and pump the wheel to see if there is any play, that is, we try to catch the moment so that the wheel rotates relatively freely and there is no play in the bearing.
I visited and, as it is written in the alphabet according to the tightening torque, to be honest, it’s complete crap. And we core the nut so that it doesn’t unscrew.
We hammer in the cap and tighten the wheel completely.
After a short break-in, we check again for the presence of play and, if necessary, make adjustments. In one bearing there were shells on rollers, on the other there was a scratch on both the outside of the mirror, apparently some piece of metal had hit it. shavings.
And the fastening of the hood pillar also broke, so we had to improvise. I cut out a metal plate, drilled holes and screwed it on.
I screwed the nuts from below in such a simple way
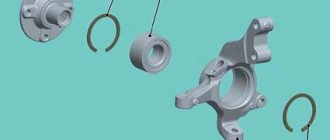
Replacement features
The front hub of the VAZ 2107 car has a pair of roller bearings, one of which is called internal, and the second external. The manufacturer recommends replacing these products in pairs, on both front wheels of the car. We will find out further what the replacement of the parts in question is.
Algorithm for replacing a faulty bearing
The work is performed in almost the same sequence. As for many other VAZ models (classics):
The vehicle is fixed;
The caliper is removed (it is possible without disconnecting the brake hoses);
Use a bayonet screwdriver to pry up the protective cap that covers the hub nut, remove it;
Unscrew this nut, remove the separator and washer, dismantle the hub along with the brake disc;
Remove the ring placed between the outer and inner bearings;
Using a suitable size drift and hammer, knock out the clips.
Now you can proceed to installing a new bearing and assembling the hub. The operations are performed in reverse order.
Before starting assembly, it is imperative to remove dirt and old lubricant residues and wash the parts (using special cleaning fluids).
The outer races are removed from the new bearings in a vice. Internal ones, using special spacers (for example, an old clip), are pressed into place.
Installing new bearings
The inner bearing cage is lubricated and installed in place. Then, the spacer ring. Next, the oil seal is pressed in (be careful not to damage it during installation).
The brake disc is put on and secured with studs.
The assembled unit is put in place. Then the separator of the second bearing (external) is lubricated and installed, the washer is inserted, and the nut is tightened until it stops.
The wheel is put on and the nut is unscrewed until slight play occurs. Then it is locked in this position.
We put new grease into the previously cleaned cap and put it in its original place.
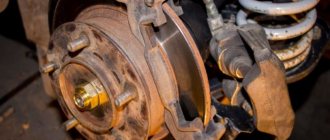
Fault diagnosis
To check the wheel bearings of the VAZ 2107 front hub, you must perform the following steps:
- The front wheel is hung on a jack, having previously taken appropriate safety measures: putting the handbrake on, wheel chocks under the rear wheels;
- A reliable stop is installed under the lower arm and the car is removed from the jack. For additional safety, it is recommended to install a stop under the body to protect against a possible fall if the lever slips from the stop. This step is often overlooked, although it is very important for correct diagnosis.
- Holding the top and bottom of the wheel with your hands, make movements away from you/towards you. There should be no play or knocking.
- It is necessary to spin the wheel. If there are problems with the bearings, knocking, humming, and grinding noises may occur.
Steering gear worm bearings
Bearing of the upper support of the steering gear worm
Bearing of the upper support of the steering gear worm, ball, angular contact
Designation of the upper support of the steering gear worm:
- According to VAZ classification - 2101-3401122 or 2101-3401129;
- According to the bearing plant classification - 996905-01 or 996805-97.
Dimensions of the upper support of the steering gear worm:
- External diameter (D) - 47 mm;
- Internal diameter (d) - 28 mm;
- Height (width) (B) - 13.40 mm.
Steering worm lower bearing (lower support)
Bearing of the lower support of the steering gear worm, ball, angular contact
Designation of the lower support of the steering gear worm:
- According to VAZ classification - 2101-3401123 or 2101-3401129;
- According to the bearing plant classification - 996905-01 or 996805-97.
Dimensions of the lower support of the steering gear worm:
- External diameter (D) - 50 mm;
- Internal diameter (d) - 28 mm;
- Height (width) (B) - 20.20 mm.
Replacing bearings
The procedure is no more complicated than others associated with repairing a VAZ 2107 car. After hanging it on a jack and removing the wheel, the replacement is performed directly.
First, remove the caliper by unscrewing its mounting bolts. It is not necessary to remove the brake hose; it is enough to carefully hang the caliper so that it does not interfere with operation. Next, you need to use a flat-head screwdriver to pry up the cap covering the nut and remove it. By unscrewing the hub nut and removing the washer and separator, you can remove the hub with the brake disc. Then everything is simple:
- We take out the oil seal;
- Remove the separator;
- We take out the ring separating the inner and outer bearing;
- Using an extension of the required size and a regular hammer, knock out both clips.
Installing new bearings and assembling the hub occurs in the reverse order. Before assembly, it is necessary to remove old grease by thoroughly washing all parts.
- We press in the races of new bearings;
- Lubricate and install the internal separator;
- Insert the ring;
- Press in the oil seal.
All that remains is to put the hub in place and screw on the caliper. After inserting the pre-lubricated outer bearing cage and thrust ring into place, tighten the hub nut until it stops. By gradually loosening the nut, we achieve free rotation of the wheel with complete absence of play. Thus, the bearing operates in normal mode, which means it is in this position that the nut needs to be locked.
We remove the used lubricant from the protective cap and apply new one, after which we put it on the hub. We put the wheel in place and screw it on, and remove the car from the jack. The job is done, the fault has been successfully fixed, the replacement has been completed. After a short run, it is recommended to check the hub for play and, if necessary, adjust it.
How to repair a car
In this article we will look at how to change the rear wheel bearing of a VAZ-2101, VAZ-2104, VAZ-2105, VAZ-2106, VAZ-2107, Classic and how to check the rear wheel bearing of a VAZ.
It was time to change this bearing a long time ago, but for some reason I only got around to it now. On the highway the car still behaves normally, but on the off-road the rear of the car began to wobble, and it began to creak when cornering.
The easiest way to check the rear wheel bearing is to press the outside of the wheel with your foot to wiggle it (you will hear a distinct thud). The wheel will simply dangle.
You can buy bearings for about 260-300 rubles. There are more expensive ones, but who cares, we take those that are cheaper.
One thing can be said, if you drive carefully, these spare parts will last a long time, if you don’t drive carefully, you will gouge everything, even those spare parts that cost 100 rubles more. The most important thing to understand is that careful driving extends the life of any part and the car as a whole. The bearing must be well filled with grease.
Now let's start removing the wheel and see how to change the rear wheel bearing of a VAZ-2101, VAZ-2104, VAZ-2105, VAZ-2106, VAZ-2107, Classic. Changing the rear bearing is very easy, not like the front wheel bearing.
1. We begin to remove the wheel. We tear off the bolts when the wheel is on the ground, it’s more convenient. And there is no need to put it on the handbrake, since you will have to remove the brake drum.
2. When you lift the car with a jack, be on the safe side. The picture shows that the car rested against the jack and the safety stump. If the jack falls out, the box will rest against a stump. Even if the box bends, it’s okay, but you will remain alive.
We knock out the bearing (the blows should fall on the inner race, since the outer race is very thin and will crumble).
6. All that remains is to hammer in the new bearing. In order for the bearing to seat well, lubricate the walls of the cage with oil. Align the wheel bearing as level as possible. And carefully hammer the bearing evenly, the main thing is that it does not warp. If the bearing is installed level, it will easily go into place. Install the retaining ring and screw it back on.
If you hit the hub, the inner part of the bearing race will come out, this cannot be allowed. Therefore, we score with light blows using a pipe. All that remains is to tighten the nut so that nothing dangles. The bearing must be tightened, the tighter the better. Tighten tightly and loosen a little, and seal.
8. All that remains is to install the wheel. The wheel will no longer dangle. 2 years should be enough.
Replacing the rear wheel bearing of a VAZ-2101, VAZ-2104, VAZ-2105, VAZ-2106, VAZ-2107, Classic can be done with your own hands, it is not difficult.