Welcome, friends, to the DIY auto repair website. The braking system of cars consists of a whole group of components, each of which takes on a specific function. In this case, one of the most important elements is the brake master cylinder. Thanks to its action, the force applied to the system takes the form of hydraulic pressure.
Malfunctions of the main brake cylinder
Malfunctions of the master cylinder can lead to a number of negative consequences. For example, the brakes may become less effective or fail. To avoid these problems, every driver should know how to recognize and fix the problem.
How does GTZ work?
The operating principle of the GTZ is based on the ability of a liquid to maintain its “shape” under the influence of a certain pressure. In this case, the devices structurally consist of a 2-section main cylinder, each section of which has its own hydraulic circuit.
Front-wheel drive vehicles consist of circuits that connect the braking systems of the rear and front wheels in a criss-cross pattern. For example, the right rear wheel is connected to the left front, and the left rear is connected to the right front.
Things are different on rear-wheel drive cars, where the contours are formed differently. So, one of the circuits works on the two front wheels, and the second on the rear wheels.
The GTZ is mounted on the housing of the vacuum amplifier. In this case, the working fluid is poured into a 2-section tank located above the main cylinder. The connection of the tank with the GTZ is ensured thanks to special holes.
To simplify maintenance, the walls of the tank were made of translucent plastic, which allows you to visually keep the level of the working fluid under control. As soon as the level drops below the normalized value, the sensor gives a signal to the control panel and the light comes on.
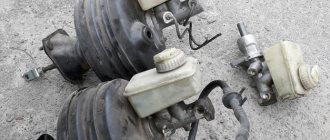
In the GTZ housing itself there are two pistons, which are mounted one after the other. The first has a free location, and the other, on the contrary, is fixed and touches the rod part of the vacuum amplifier.
In order to increase reliability, the pistons are sealed with rubber cuffs. The pistons are returned to their original position using special springs. By the way, they are the ones who hold the pistons in their original position.
As soon as you press the pedal, the vacuum booster is pressed in through the rod. Moving along the cylindrical cavity, the rod closes the hole for compensation. As a result, the pressure in the 1st circuit increases, driving the 2nd piston. The result is an increase in total pressure in the 2nd circuit.
At the moment the pistons move, empty areas are formed, which are filled with the working composition. Brake fluid is supplied through a special hole. The movement of the pistons is carried out until the return spring fulfills its functions.
GTZ disassembled
In each of the circuits, the pressure level increases to a maximum, which brings the mechanism into working condition. After the car stops and the pedal is released, the pistons return to their original position. In this case, the pressure level in the circuit is equalized and becomes similar to atmospheric pressure.
The missing air is drawn in through a special hole for compensation. When the piston moves in the opposite direction, the working fluid is squeezed back into the tank.
The advantage of a loop system is that if one loop fails, the other continues to perform its functions. For example, if there is a leak, it will manifest itself as a deeper “sink” of the pedal, but the brake performance will still remain at a high level.
About checking the GTZ
Malfunctions of the master cylinder may require repair or complete replacement. It is recommended to start checking the brake cylinder with an external inspection. It is necessary to carefully check it for external defects and leakage of brake fluid. After a visual inspection, you need to check the operation of the brake pedal. To do this, you need to press on it and make sure that it does not jam or fall through.
As for the master cylinder, it can not only wear out, but also become rusty from the inside over time. This often happens due to the fact that the brake fluid contains oxygen and water in certain quantities.
The cylinder is designed in such a way that if brake fluid leaks from the first section, the other will remain in working condition. That is, the first piston will pass through its own section and give movement to the second piston, which in turn will create the necessary level of pressure for the operation of its own section.
If the second section leaks
, then the first trigger will look completely different. When the piston operates in a good section, the piston from the faulty one is drawn into operation. That, in turn, moves forward unhindered and rests against the movement limiter, thereby blocking the outlet. In turn, the pressure in the first section increases, which entails braking of the wheel mechanisms.
As a result, when you press the brake pedal, it falls through. In this case, braking efficiency is observed only at the end of the pedal stroke.
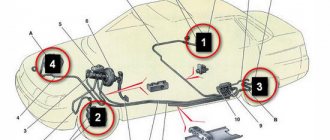
Main malfunctions of the turbocharger and brake system
In order to diagnose the breakdown in time and fix it, it is important to know the signs of a malfunction in the master cylinder.
1. Severely worn pads or a leak of working fluid in the brake system can cause a decrease in its level. As a result, operation of the vehicle is prohibited until repair work is completed.
It is important to carefully examine the condition of the brake system pipes, assess the condition of the turbocharger, check the working cylinders, connecting hoses and calipers. If a leak is detected, the damaged unit must be replaced.
2. If the turbocharger becomes jammed or fails, braking efficiency may decrease, and the risk of “softening” the brake is high. This occurs due to a decrease in working fluid in the system or air entering it. The situations described above are also possible when the liquid boils.
Possible malfunctions of the master brake cylinder. List of problems and methods of action
Let's find out what could be causing your brake master cylinder to fail.
First of all, its breakdown occurs due to the fact that the brake fluid is unevenly distributed inside the mechanism. The cylinder itself consists of two working sections, each of which is responsible for braking one of the front wheels, as well as the rear one, located on the opposite side. You should know that in rear-wheel drive cars the picture is completely different: the sections are responsible for the operation of the brakes, which are located along the axes.
The work of the GTZ itself begins from the moment the pedal is pressed. If a vacuum booster is provided in the design of the car, then the brake cylinder contains 3 chambers, one of which converts pressing the brake into pressure, which makes it lighter. By pressing the pedal, a certain load is transferred to the piston section, which forces the brake fluid to press on the caliper. This, in turn, compresses the brake discs through the pads.
Diagnostic features
The first thing you need to pay attention to is the readings on the dashboard. As a rule, they react to a malfunction earlier than you are able to diagnose it during operation. So, if there are problems in the brake system, then the corresponding lamp should light up on the dashboard.
When the first signals of a malfunction appear in the brake system, the first thing you need to pay attention to is inspecting the brake cylinder (there should be no obvious signs of leakage on it).
In addition, pay attention to each of the brake circuit outputs, joints, and so on. After an external inspection, check the pressure in the brake system (this can be done using a special pressure gauge).
The pressure obtained during the measurement process is compared with what the car manufacturer recommends. If the measurements show a serious difference, then we can talk about the failure of one of the circuits. It is also worth checking the tightness of the circuit, but this work can only be done with special equipment.
As practice shows, one of the main reasons for the breakdown of the gas turbine engine is its depressurization. This is easy to notice by the appearance of a leak and a characteristic odor. Damage to the housing, failure of the return spring, wear of the cuffs (sealing and inlet) or the assembly mirror - all this is a reason to replace the master cylinder.
Knowing how to identify a faulty brake master cylinder can help you identify the problem early, fix it, and eliminate any risk to life. Good luck on the roads and of course no breakdowns.
Problems that arise with the brakes while traveling are considered critical and must be corrected immediately. The culprit of the malfunction is often the main cylinder, installed in the engine compartment and rigidly connected to the pedal. To find out the cause of the breakdown and repair the unit yourself, you need to know the structure of the brake master cylinder (MBC) and its principle of operation. During the diagnostic process, it is necessary to distinguish and filter out problems with other elements of the system.
The structure of the master brake cylinder and 5 main signs of its failure
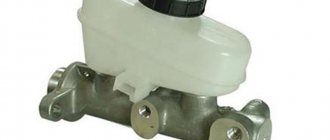
When purchasing a car, every person realizes how complex a mechanism he will have to operate. All mechanisms and elements have their own design purpose. In particular, the brake master cylinder (MBC) is responsible for converting pressure on the brake pedal into hydraulic pressure, which starts the braking process of the car. This functionality is provided by the supply of hydraulic fluid, which has a high boiling point. Every motorist needs to know the design of the GTZ in order to correctly understand the causes of failures.
Maximum brake reliability and an increased level of safety in modern cars is achieved by installing 2-section master cylinders. Since the intra-cylinder circuits are practically independent of each other, it is partially ensured that the brake remains operational in the event of depressurization of one of them. The single-chamber system has actually gone into oblivion due to the impossibility of distributing mechanical force to all chains so that the car does not lose controllability.
How does the GTZ function?
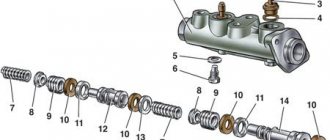
The unit consists of the following parts:
- metal housing with holes for supplying brake fluid, pedal rod and connecting the expansion tank;
- 2 pistons with rubber seals;
- 2 return springs;
- guide bushings;
- end plug with gasket.
An expansion tank is attached to the top of the main distributor body, where excess fluid goes through compensation holes. Inside, the element is divided into 2 cylinders with separate pistons standing on the same axis.
The blind end of the housing is closed with a threaded plug; on the other side there is a flange for attaching to the vacuum booster. The brake pedal rod is attached to the first piston. The brake circuit pipes are connected to the lower holes - separately for the front and rear wheels.
The operating principle of the master brake cylinder looks like this:
- When you press the pedal, both pistons simultaneously move forward and push fluid into the circuit tubes. Under its pressure, the wheel cylinders are activated, compressing the pads on the discs.
- Part of the liquid that does not have time to pass into the tubes flows into the expansion tank through special bypass holes.
- When the driver releases the pedal, the springs push the pistons back, returning them to their original position. Liquid from the tubes and reservoir refills the cylinders.
- To compensate for the expansion of the liquid (for example, from heating), another pair of holes is provided leading to the expansion tank.
The operating principle of the GTZ in simple words
The process is activated by pressing the brake pedal. The result of mechanical force is a load inside the cylinder, carried out using a rod. It directs the pistons along the desired path, overcoming the force of the return spring. The movement of the pistons is accompanied by the closure of the compensation channels, which causes the opening of the bypass channel and sealing of the entire circuit.
At the same time, pressure is created that drives the caliper. Part of the liquid flows into the pipelines, activating the vehicle, the other pushes the second piston, which, when moving, performs the same functions.
The calipers compress the brake discs with the help of the pads, and the car stops. The pistons return through the compensation hole to the initial position after depressing the brake pedal. The initial mode of the pistons inside the circuits is established by the action of springs. Having returned to their original position, the pistons again open the compensation channels, thereby equalizing the pressure in the vehicle. The waste liquid slowly flows back into its reservoir.
Symptoms of problems
The fluid brake system consists of many parts that can become unusable: pipes, wheel cylinders, calipers, drums and pads. Typical signs of a faulty master cylinder:
- After pressing the pedal, the car stops slowly. The reason is that the cuffs of one or two pistons have lost their tightness - they have cracked or “floated”.
- To slow down, you need to press the brake pedal hard. The phenomenon occurs due to swelling of the rubber of the piston seals.
- The brake pedal travel is too short. The fluid inside the cylinder has nowhere to go because the compensation hole is clogged. Another option is that the passage is blocked by a swollen rubber seal.
- A common symptom is pedal failure, the brakes coming on at the end of the stroke. This indicates complete wear of the cuffs; as a result, liquid penetrates behind the piston and rushes into the expansion tank - the cylinder “bypasses.”
- The pads do not release the brake discs and drums and get very hot when driving. Options: one of the pistons is jammed or the bypass hole is clogged.
The listed symptoms of a GTZ malfunction are similar to malfunctions of other elements. Pedal failure also occurs when a large amount of air enters the tubes or loss of fluid in one of the working cylinders. Sluggish deceleration and increased force on the pedal are often caused by a breakdown of the vacuum booster - a cracked membrane or a lack of tightness at the joints of the hose that takes off engine vacuum.
There are signs that clearly indicate the performance of the main hydraulic cylinder and the malfunction of other elements:
- during braking, the car pulls to the side - the problem lies in a certain circuit or wheel;
- jamming of the brake mechanisms of one wheel;
- creaking and squeaking when braking;
- heating the discs and pads on one wheel.
If you eliminate these symptoms, it will become easier to check the brake master cylinder in a garage. This also includes obvious brake fluid leaks and the knocking sound of worn calipers.
Causes of malfunction in the GTZ device
If there is a leak in one of the circuits, the pressure between the primary and secondary cylinders is lost. This leads to the fact that the GTZ functions as if it had only one circuit. The pusher will begin to move both pistons in the good circuit until the piston of the faulty one reaches the end of the cylinder body. Accordingly, the required pressure will be ensured in the depressurized chamber. If the idle mechanism is properly adjusted, the vehicle will effectively slow down the vehicle even in conditions of its inferiority.
Here are some signs of a malfunction in the GTZ device:
- depressurization of the cylinder is determined by the presence of a leak in the body and a specific smell;
- brake pad wear is characterized by a characteristic squeak and leakage of brake fluid;
- jamming of the regulator, which distributes the brake force. In this case, it is necessary to clean the cylinder body. There is a low threshold of sensitivity of the brake pedal; it has to be literally “sunk” into the floor;
- the pedal falls to the floor - this damage occurs due to non-working pistons. If they are not able to generate the required pressure, then the pads cannot compress normally;
- An increase in the brake pedal travel is a sign that the vehicle has become airy. Operating a car in this condition is dangerous, since there is a high risk of overheating the vehicle to the point of boiling. Pumping will help eliminate this problem.
Diagnostics and repair
From the signs listed above, it is easy to understand that in most cases there is only one source of problems - rubber products that have become unusable. The cuffs crack and swell, as a result they leak liquid and close the discharge holes. Hence the recommendation: all “rubber bands” of the brake system should be changed at intervals of approximately 100 thousand km, without waiting for critical wear.
Reference. Many auto mechanics express the opinion that after replacing the cuffs, the main hydraulic cylinder will not last long. The statement is true if the car owner purchased cheap, low-quality spare parts or installed new o-rings in the cylinder, where internal wear has formed in the walls.
Before checking the GTZ for operability, make sure there are no other faults:
- Inspect the wheel assemblies from the inside for leakage of brake fluid from the working cylinders.
- Check the integrity of the expansion tank and the fluid level in it.
- Start the engine and at idle speed, press the vacuum take-off pipe to the amplifier. If the engine speed has increased noticeably, there is an air leak and the master cylinder is most likely working.
A clear symptom indicating a breakdown of the main hydraulic cylinder is drops of brake fluid on the body . If you discover a leak, feel free to dismantle the unit and disassemble it to look for the cause. Another common problem - fluid flowing through the seals - is diagnosed as follows:
- Open the cover of the expansion tank and place an assistant in the driver's seat.
- Listening to sounds in the tank, give the command to an assistant to press the pedal.
- If the pedal moves easily and gurgling is heard in the reservoir, liquid is entering there. The reason is that worn cuffs are unable to create pressure in the circuits; liquid seeps through the leaks and enters the container.
Also, problems with the GTZ are indicated by jamming or too little pedal travel. Sit behind the wheel, press it several times, and start the engine while holding the pedal with your foot. If it sinks to the floor or does not budge, disassemble the hydraulic cylinder.
Checking the brake master cylinder
A full check of the gas turbine engine for operability is carried out using a special high-pressure pressure gauge (0–250 atm). Using connecting fittings of the appropriate diameter, they are connected to the outlets of the master cylinder instead of tubes. A working turbocharger should create a pressure of up to 180–200 atm when the pedal is pressed. (bar). If the measurement results are lower, the cylinder is worn out and requires replacement or repair.
Brake Pressure Measuring Kit
The cost of a set of pressure gauges with adapters is about 15,000 rubles, so not every service station has it. Without a pressure gauge, you need to check the gas turbine engine using indirect signs. For diagnostics you may need the following materials and tools:
- brake union wrench (split or clamp), usually 10, 11, 12 or 13;
- a bottle of brake fluid (if there are leaks, the level is below normal);
- bolts with threads similar to the threads of the GTZ tube fittings.
For a full check, you will also need an assistant who will press the brake pedal during the diagnostic process.
How to understand that the brake cylinder is not working: technique
- Inspect the wheel brakes and lines . Make sure that the problem is on the GTZ side and that the actuators are in order.
- Inspect the brake master cylinder . Insufficient fluid level in the expansion tank and the presence of brake fluid leaks on the GTZ or VUT housing are an obvious sign of depressurization. If there is not enough fluid, but no signs of leakage are visible, add fuel fluid and check the operation of the brakes. Perhaps the GTZ is working properly and the culprit is a leak somewhere in the line.
- If there are GTZ leaks, look where they occur. To search, you need to clean the cylinder body of the fluid (for example, with gasoline, solvent or alcohol), ask an assistant to pump the pedal, and in the meantime, look where the fluid leaks appear.
Determining a GTZ malfunction using the example of a Hyundai Accent: video
- Start the engine and pass the VUT hose . If, after squeezing the hose, the engine speed changes, the problem is not in the GTZ, but in the vacuum booster.
- Start the engine (on old cars without VUT you can not start it) and press the brake pedal firmly . If it stays in one position, the GTZ is normal and maintains pressure properly, and if it sags smoothly, the cylinder is probably releasing the fuel fluid into the tank.
- Look at the behavior of the liquid in the tank during operation . On a working turbocharger, when you press the pedal there should be no extraneous sounds, and the fluid level should drop slightly. If it remains unchanged, gurgling is heard, bubbles are visible - the piston cannot create the required pressure and the cylinder releases the fuel fluid back into the tank, which means it is not working. When you press the pedal, the level should drop and remain at that level until released. If it increases when the pedal is pressed, the GTZ does not hold pressure and bypasses fluid.
- Plug the outlets of the turbocharger and check whether it holds pressure . To do this, you need to unscrew the brake pipes from the cylinder, and in their place screw in bolts with similar threads. After this, add fluid to the reservoir to the normal level and press the pedal. If the foot feels resistance and the pedal does not move further, the cylinder is properly holding pressure. If the pedal is pressed smoothly or fails altogether, the piston bypasses fluid, the turbocharger is faulty.
If after carrying out the manipulations it becomes clear that the brake cylinder is not working properly, you need to remove the turbocharger and disassemble it for troubleshooting, which will allow you to determine the true cause of the malfunction.
How to check a removed brake master cylinder
To dismantle and diagnose the GTZ you will need:
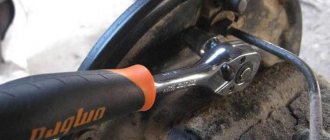
- split or clamp wrench for brake pipes;
- a large (from 10 cubic meters) syringe for pumping out fuel fluid and an empty container for draining brake fluid;
- a key for disconnecting the turbocharger from the VUT (most often at 13, 14 or 17) and keys for disassembling the turbocharger;
To disassemble the brake master cylinder for diagnostics, you need to:
Disassembling the brake cylinder to determine the breakdown: video
- Pump out or drain the brake fluid from the expansion tank.
- Disconnect the brake pipes from the GTZ outlets.
- Unscrew the brake cylinder from the VUT.
- Remove the GTZ from the car.
- Unscrew the bolt plug (if any) in the front part of the GTZ and/or remove the stopper in the rear part (from the VUT side).
- Inspect the inside of the VUT for leaks; if there are traces of fuel fluid there, the cylinder is clearly faulty.
- Remove the pistons from the turbocharger, having previously disconnected their retainers - bolts or pins.
- Wipe the pistons with a dry cloth, inspect them for wear, and assess the condition of the seals.
- Wipe the inside of the cylinder body, inspect its mirror for burrs, holes, traces of corrosion and other defects.
- Measure the gaps between the pistons and the cylinder walls, compare them with factory tolerances.
- Inspect bypass windows, openings and outlets for blockages.
Based on the results of inspection of the GTZ parts, conclusions can be drawn about further repairs. If there are signs of wear on the rubber sealing cuffs, you can limit yourself to a small repair kit. If there is wear on the pistons, you need to buy a repair kit consisting of pistons and rubber bands. If the GTZ body itself has burrs, cavities, traces of corrosion and other defects inside, the assembly will have to be replaced.
After diagnosing the GTZ and rebuilding or replacing it, after installing it on the car, you should add brake fluid to the reservoir to the maximum mark and bleed the brakes.
Symptoms of a GTZ malfunction
When the device fails, the driver may notice the following signs:
- Reduced efficiency when braking.
- Depressurization of the brake system.
- Wear of seals.
You can check the performance of the master cylinder in a simple way - with the engine off, you need to hold down the brake pedal. After this, the VAZ 2114 should be started, leaving your foot on the pedal. If it fails, then the system is working properly. In another case, diagnostics and sometimes restoration of the tightness of the connection are required. Of course, you can use a repair kit, but then the parts will wear unevenly. The best solution would be to completely replace the unit.
IMPORTANT! Malfunctions of the master cylinder can also negatively affect the operation of the power plant. This manifests itself in a decrease in dynamics, fluid leaks, and also in a decrease in acceleration. In this case, experienced motorists clamp the vacuum hose while the engine is running. If after this there are signs, then it is necessary to change the brake booster.
Purpose, types and design of car brake systems
Regulating the speed of the machine, stopping it and keeping it stationary is done using the brake system - this is its purpose. In transport, three types of brake system drives are used: hydraulic, pneumatic and mechanical.
Passenger cars are equipped with a hydraulic drive. Liquid is used as a working agent. Commercial vehicles - buses, trucks, semi-trailers - use a pneumatic system. The force is transmitted to the actuators by compressed air. The mechanical drive is obsolete and is not used in the main system. An element of this drive has been preserved as a hand parking brake.
Modern cars use redundancy. In a dual-circuit system, when one of the circuits depressurizes, the second one works as an emergency one, and in a single-circuit system, emergency braking is carried out using a hand brake.
The main components of the hydraulic drive are listed below:
- Brake pedal with pusher.
- A vacuum booster connected by a tube to the engine suction manifold.
- Master brake cylinder.
- Tank equipped with a float level switch.
- Metal tubes connecting the master cylinder to the wheel brakes and pressure regulator.
The master cylinder piston is driven by the pedal pusher, creating pressure in the tubes. The fluid transmits pressure to the pistons of the wheel brake cylinders.
The vacuum booster is divided in half by a diaphragm, one chamber communicates with the atmosphere, and the other with the engine suction manifold. The pressure difference in the chambers creates a push to the diaphragm - this allows you to press the pedal with less effort. When the engine is stopped, the vacuum booster does not work, so coasting is not allowed.
The rear wheel pressure regulator delays the operation of the rear brakes - simultaneous blocking of all wheels causes the car to skid. Additionally, the regulator sets the pressing force of the pads to the drum.
The brake mechanism of the front wheels is disc type. The pads are inserted into the caliper. When braking, the fluid pushes the cylinder pistons - the pads are pressed against the disc on both sides. Friction slows down the speed of rotation of the wheels. After the influence on the pedal stops, the pads return to their original position due to the beating of the disc.
The rear wheel mechanism is drum type. When pressure arises in the cylinder, the pistons press on the pads, which are pressed against the inner surface of the drum. The pads return to their original position under the influence of springs after the pressure drops.
The vehicle's immobility on a slope is ensured by the manual parking brake. When the brake lever is raised 3-4 clicks, the cables are tightened, pressing the pads against the drum, and the rear wheels are blocked.
Required tools and materials
Replacing the master cylinder should only begin if the necessary tools and materials are on hand. It's worth starting with the tools:
- Pliers.
- Head on "18".
- Keys for "17", "13" and "10".
- Metal brush.
- Device for removing fittings.
- Tool for tensioning springs.
As for materials, these include only liquid for the system.
Of course, it is worth purchasing a new brake unit. An oilcloth or other clean covering should be laid out near the work area. Parts should be placed there during the process. The unit must be purchased directly for the VAZ 2114, since there are differences with the 2109 and 2111.
Signs and causes of clutch master cylinder malfunction
Even a simple design of the clutch slave cylinder cannot serve as a guarantee against various malfunctions that prevent it from effectively performing its functions:
- Insufficient volume of working fluid. While operating the vehicle, it is necessary to check the fluid level in the clutch expansion tank from time to time. If the level drops below o, it is necessary to add brake fluid to the system. A decrease in the volume of fluid in the hydraulic drive can occur as a result of a violation of the integrity of the master cylinder cuff or when the line is depressurized at the joints. To eliminate such a malfunction, it is necessary to identify and eliminate the leakage of the hydraulic clutch hydraulic fluid.
- Depressurization of the line can lead to air entering the system. Such a malfunction disrupts the normal operation of the clutch and can be expressed in “under-squeezing” of the mechanism, which is accompanied by an uncharacteristic sound and vibration of the gearshift lever when changing gears. Air can enter the clutch hydraulic drive through microcracks in the tubes as a result of wear of moving elements or leakage of connections. To restore the functionality of the system, it is necessary to identify areas with the defects listed above, eliminate them and pump the line to displace air from it.
- Pumping of working fluid through the working cylinder occurs as a result of wear on the cuffs or when there is wear on the cylinder piston. To eliminate the malfunction, it is necessary to replace worn components.
If any signs of malfunction of the clutch master cylinder are detected, it is necessary to diagnose not only this unit, but the entire system. Troubleshooting in the early stages allows you to limit yourself to replacing individual parts.
The most significant malfunctions include defects in the cylinder surface - scuffs, scratches, corrosion, etc. When they are identified, it is most often necessary to replace the clutch master cylinder assembly.
Since the brake fluid used in the clutch hydraulic drive has good penetrating ability, if defects appear on the surface of the master cylinder, it will quickly leak even through micro-cracks, so installing new seals will not eliminate the leakage.
The brake master cylinder repair kit includes cuffs and a working piston. Replacing these elements will not eliminate the problem if there are scratches on the surface of the clutch cylinder itself. Taking this circumstance into account, the main circulation system should be checked periodically in order to identify malfunctions at an early stage and prevent critical wear of the part. The appearance of defects in this unit may be indicated by a decrease in the liquid level in the expansion tank caused by its leakage.
At the same time, the clutch pedal itself begins to move worse, and disturbances when switching gears caused by improper operation of the clutch hydraulic drive become noticeable. Due to a malfunction of the main circulation system, the pedal often falls and moves more slowly.
If the signs described above are present, you should carefully inspect the main fluid pump for leaks, check the level of the working fluid and its quality. The presence of streaks on the cylinder body or wet spots on the cuffs indicate a lack of tightness of the clutch hydraulic drive.
Malfunctions in the operation of the main circulation system can be caused by clogged ventilation holes in the expansion tank cover. The clutch drive device is designed in such a way that it maintains a constant volume of fluid. When the pressure in the system increases or at high temperatures, the level of the working fluid increases and then gradually decreases.
To adjust the fluid level, special holes are equipped in the cover of the clutch expansion tank. If the ventilation of the hydraulic drive is clogged, it begins to malfunction. In this case, the clutch pedal will be depressed quite tightly, and its return to its original position will be slower.
Read with this
The process of replacing the turbocharger and brake fluid
When the tools, new mechanism and fluid are prepared, you can begin dismantling the old VAZ 2114 spare part:
- The first step is to disconnect the negative terminal from the battery. Replacing the master cylinder involves completely removing the old brake fluid - this is best done with a syringe;
Advice! When assembling the system, motorists often confuse brake pipes. To make your work easier, it is recommended to sign them with a marker. This applies to any parts in the VAZ 2114 car.
- Once the threads have been removed, dismantling the main unit can begin. Using the “18” socket, you need to remove the nuts that attach the main cylinder to the amplifier;
The vacuum booster may also need to be replaced. In this case, remove the fitting and turn the main unit to the side. After this, you need to unscrew the hose and go into the interior of the VAZ 2114 car, where the pin locking bracket is located. After removing all the fasteners, you can install a new fluid pressure booster.
Procedure for replacing the front brake cylinder on a VAZ 2110-2112
Video instruction
The video was made using the example of a VAZ 2110 car and is equally suitable for both 2111 and 2112. The only way the car parts may differ externally is the brake discs: ventilated or not, as well as their sizes.
Photo report
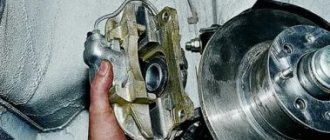
First of all, we will need to remove the front wheel of the car, after first lifting the car with a jack. After this, using a hexagon, you need to unscrew the two bolts securing the caliper bracket.
Now you can remove the bracket and remove the pads:
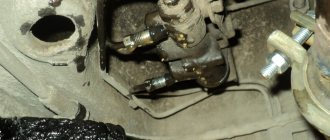
Then you can rip off the brake hose with a wrench, but you don’t have to unscrew it completely.
Next, we unscrew two more bolts securing the cylinder to the caliper, having previously bent the two locking plates under them using a screwdriver.
And we move the cylinder to the side, since nothing else holds it.
The hose can now be unscrewed completely by turning the brake cylinder itself several times counterclockwise.
To avoid excessive losses of brake fluid, it is advisable to fix the hose as high as possible, and always with the fitting facing up. You can also substitute a container if liquid suddenly leaks out.
A new front one costs about 500 rubles, so this price is quite acceptable. But the assembled caliper already costs about 2,000 rubles, which is already significant if you suddenly have to change the entire assembly. Installation of this part occurs in the reverse order.
Diagnostics
First, we pay attention to the parameters of the control devices on the dashboard inside the car. If there is a problem with the braking system, the indicator will light up. Then we inspect the master cylinder body to see where the brake fluid is leaking. We pay special attention to the junctions of the pipeline and circuit outlets. During the inspection of the case, we identify mechanical damage (if any). Then we measure the pressure in the circuits. To do this, we attach a pressure gauge to the holes on these devices.
We compare the measurement results with the control parameters specified by the manufacturer in the vehicle repair and operating instructions. A difference in measurements will indicate a circuit failure. We can only check the tightness of the master brake cylinder on a special stand.
What malfunctions can occur and their signs
To avoid becoming involved in a traffic accident due to a faulty master cylinder, we must have an understanding of possible problems and their symptoms. Let's name some of them.
If the pads wear excessively or the brake fluid leaks, the level drops. In this case, the vehicle cannot be operated until the fault is corrected. We need to very carefully check the working and master cylinders, brake pipes and hoses, and calipers to identify any leaks. We replace the part that is faulty. If the automatic drum brake adjustment system jams, a low brake pedal appears. The pedal travel can be restored manually, but this symptom will appear as the pads wear out. To eliminate the malfunction completely, we must replace or clean the automatic adjustment system.
Low braking efficiency and a soft brake pedal occur if the brake system is depressurized or is not completely pumped and air has appeared in it. These signs also appear in the event of a breakdown of the turbocharger, and when the working cylinder jams or it overheats and the liquid boils in it. If the brake pedal, on the contrary, is too hard, it means that the brake booster, vacuum hose or vacuum booster control valve is faulty, which violates the tightness of the system.
The brake pedal has a long travel when the drum brakes are not adjusted, there is air in the system or the brake pads are worn out. This symptom is very dangerous, since in a difficult situation braking will be ineffective. If the pedal sinks to the floor, it means that one of the cylinders is worn out or the hydraulic system is depressurized. This is a very dangerous situation.
A grinding noise during braking indicates a pad worn down to metal, rubbing against the brake disc. To eliminate this defect, we need to replace the pads and bore the working surface of the disc or replace this part. If a whistle or squeal appears when braking, it means that poor quality pads are installed. To eliminate the malfunction, we simply replace them or clean the caliper and apply special lubricant. The reason for this phenomenon may also be vibration of the pads and caliper. In this case, we replace or bore the discs and then polish them.
Sometimes braking is uneven and not very effective. This happens when brake fluid or grease gets on the working surface of the pad. We fix this problem by eliminating the leak and replacing the pads. If the car moves to the side when braking, most likely the brakes are poorly adjusted, one of the cylinders has failed, or the brake pads are dirty or oily. A possible cause is uneven wear on the pads or discs.
It is clear that any malfunction must be eliminated. We can do some things ourselves, but to fix more complex breakdowns we will have to turn to specialists. But in any case, we need to make a diagnosis, and we must know how to check the brake master cylinder.