A properly functioning braking system in any vehicle is the key to the safety of the driver, passengers and other road users. The functioning of the brakes and their effectiveness directly depends on the operation of the master cylinder. Despite the rather long service life of this unit (100–150 thousand km), some of its elements fail much earlier, resulting in the need for repair of the product.
- Purpose and functions
- Principle of operation
Video: how the master cylinder works
- GTZ malfunctions
Checking the brake master cylinder
- Removal
Video: replacing the GTZ repair kit on a “classic”
- Video: how to bleed the brake system on a “classic”
Main cylinder. Removal and installation
1. Disconnect the flexible hoses from the master cylinder and close the hose openings and fittings on the cylinder to prevent fluid from leaking from the reservoir and preventing dust, dirt and foreign matter from entering the cylinder.
2. Disconnect the steel pipes from the master cylinder that carry fluid to the front and rear brakes, first unscrewing the pipe nuts.
3. Remove the cylinder by unscrewing the nuts securing it to the clutch and brake pedal bracket.
4. Install the master cylinder in the reverse order of removal.
5. After installing the cylinder, bleed the brake system to remove air from it.
Hydraulic brake master cylinder
1. Having unscrewed the locking screws 7 (see Fig. Main cylinder of the hydraulic brake drive), remove all the parts in the order shown in Fig. Brake master cylinder parts.
2. Assemble the cylinder in the reverse order of disassembly.
3. Lubricate the parts with brake fluid. When assembling, use tool 67.7853.9543.
Before assembly, wash all parts with isopropyl alcohol; Dry them with a blast of compressed air or wipe them with a clean cloth, avoiding contact with mineral oil, kerosene or diesel fuel, which could damage the seals.
ATTENTION: The time for washing the sealing rings in isopropyl alcohol is no more than 20 s, followed by blowing with compressed air.
The cylinder bore and the working surface of the pistons must be completely clean without rust, marks or other defects. An increased gap between the cylinder and pistons is unacceptable.
Each time you disassemble the cylinder, replace the seals with new ones, even if they appear to be in good condition.
Check the elasticity of the piston spring, the length of which should be: under a load of 35+7 N (3.5+0.7 kgf) - 36 mm, under a load of 63.5+10 N (6.35+1.0 kgf) - 21 mm, in a free state - 57.5 mm.
Checking the master cylinder for leaks
Master cylinder leak test diagram
1. Install the master cylinder on the stand and connect it to the stand elements as shown in the figure.
2. Open valves 1 to bleed the stand and, moving the master cylinder pistons several times to their full stroke length, bleed the system.
3. Then close valves 1.
4. Rotating flywheel 5, slowly move the pistons of the main cylinder until the pressure, controlled by pressure gauges 2, reaches 12.5 MPa (125 kgf/cm2). In this position, block the master cylinder pusher. The specified pressure must remain constant for at least 5 s.
5. In cases of fluid leakage or failure to maintain constant pressure within 5 seconds, replace the cylinder piston seals.
Source
Bleeding the brake system of VAZ 2106
Bleeding the brakes is done to remove air trapped in the brake system. It is easy to determine the presence of air: the brake pedal is initially pressed too softly, and after several presses it suddenly acquires an unusual “hardness”. These are signs of an air lock.
Sequencing
First of all, it should be said that it is best to bleed the brakes with an assistant. But with some skill, this can be done alone.
- First, check the brake fluid level. The tank must be filled to the upper marks.
The reservoir must be filled with liquid to the level of the upper edge of the mounting plate - The fitting on the rear brake drum is unscrewed, a rubber hose is inserted in its place, and the other end of the hose is lowered into a plastic bottle.
The fitting is slightly unscrewed and a hose is inserted into it, with the other end lowered into the bottle - After this, the assistant sitting in the cab should press the brakes two or three times and then hold the pedal down for one minute.
- At this moment, the fitting is unscrewed so that brake fluid flows out of it through the hose. Air bubbles will be visible in it.
- After some time, the brake pedal will finally fall to the floor, which will be reported by the assistant. As soon as this happens, tighten the fitting and repeat all the above steps. This must be done until liquid with bubbles stops flowing from the hose.
- When the leaking brake fluid becomes normal, the bleeding procedure should be done with other wheels.
Disassembly and assembly of the main brake cylinder VAZ 2107, VAZ 2105, VAZ 2104, Lada Zhiguli, Classic
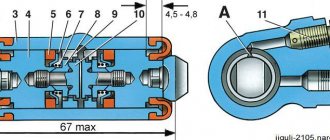
Main cylinder of the hydraulic brake drive of VAZ 2104, VAZ 2105, VAZ 2107: 1 - plug;
2 — cylinder body; 3 — rear brake drive piston; 4 — washer; 5 — front brake drive piston; 6 - sealing ring; 7 — locking screws; 8 — piston return springs; 9 — spring plate; 10 — pressure spring of the sealing ring; 11 — spacer ring; 12 — inlet; A - compensation hole (gaps between sealing ring 6, spacer ring 11 and piston 5) Parts of the master cylinder for the Lada Classic brake drive: 1 - cylinder body; 2 — lock washer; 3 - fitting; 4 - sealing gasket; 5 - sealing washer; 6 — piston lock screw; 7 — piston return springs; 8 - cup; 9 — pressure spring of the sealing ring; 10 - sealing ring; 11 — spacer ring; 12 — rear brake drive piston; 13 — washer; 14 — front brake drive piston
Unscrew the locking screws 7 and remove all the parts in order. Assemble the cylinder of a VAZ 2107, VAZ 2105, VAZ 2104 in the reverse order of disassembly. In this case, lubricate the parts with brake fluid. When assembling, use tool 67.7853.9543.
Auto repair school - Do-it-yourself car repair
Jun 13, 2022 VAZ 2101, VAZ 2102, VAZ 2105, VAZ 2106, VAZ 2107, Zhiguli, Classics by admin
There are two main reasons to replace or repair a brake master cylinder (MBC). First, it's leaking. Traces of brake fluid leakage are clearly visible on the vacuum booster or, in the absence of vacuum, in the car interior. The second reason is a “soft” and ineffective brake pedal. The second reason becomes relevant only after checking the serviceability of the working brake cylinders of the rear and front wheels, and all brake pipes and hoses. If you are faced with similar problems and you are the happy owner of a VAZ-2101, VAZ-2104, VAZ-2105, VAZ-2106, VAZ-2107, Classic car , then this article on replacing and repairing the brake master cylinder will be of interest to you. I can immediately say that this work is not difficult, it only requires your desire, time and attentiveness. So, read on and get down to business with confidence)))
In this case, everything is simple with spare parts. If you have a standard VAZ master brake cylinder , then we buy a repair kit from Balakovo (photo 1). In the event that the main brake cylinder has already been changed and a GTZ from Fenox or Basalt , then we are looking for repair kits from these manufacturers in the car markets (photos 2 and 3). The fact is that the Belarusian manufacturer (Phenox), and subsequently Basalt, changed (or, as the engineers of these enterprises believe, improved) only one cuff (responsible for the tightness of the cylinder), see photo 4 (standard on the right, Phenox on the left). It is because of this cuff that you need to buy a branded repair kit. True, it is worth noting the excellent set of repair kits from Basalt (these repair kits are suitable for the Phoenix); the manufacturer, as they say, took care of the little things.
Plus, replacing or repairing the GTZ means further pumping and replacing all the brake fluid. So, we buy brake fluid without fail. Although there is only 0.4 liters of fluid in the brake system, I recommend taking 0.8-1 liters of DOT-4 brake fluid . If you wish, you can also bleed the clutch))).
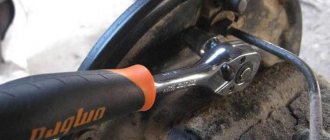
By tool... To replace and repair the master brake cylinder on VAZ-2101, VAZ-2104, VAZ-2105, VAZ-2106, VAZ-2107, Classic cars you will need - keys for 10, 12, 13, a small screwdriver, a special key for unscrewing the brake pipe fittings.
Now let's get to work! Description and photo report of the replacement and repair of the main brake cylinder on VAZ-2101, VAZ-2104, VAZ-2105, VAZ-2106, VAZ-2107, Classic cars :
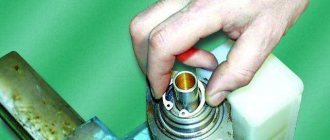
Use a blower or syringe to remove the brake fluid from the brake cylinder reservoir. Using a ten key, unscrew the nut securing the plastic tank (photo 5). Use a special wrench to unscrew the brake pipe fittings (photo 6). The ends of the brake pipes can be plugged with rubber plugs (photo 7).
Next, use a 13mm wrench to unscrew the two nuts and disconnect the master brake cylinder from the vacuum brake booster (photo 8). We remove the reservoir from the mounting bracket and remove the brake master cylinder from the car.
Further, read only those who are planning to repair the master brake cylinder, and not change it entirely))).
For convenience, we can disconnect the brake reservoir from the GTZ. After this, you can unscrew the locking screws one by one. First, unscrew the first locking screw from the cylinder plug, unscrewing the second screw, hold the piston from “ejecting” (photo 9).
The front brake drive piston will “pop out” from the cylinder without any problems. But the second piston (rear brake drive) with cuffs will have to be shaken out from the brake cylinder. We lay out everything that we managed to get from the brake cylinder sequentially. The picture you should get is the same as in photo 10. The components of the GTZ mechanism are shown in more detail in photo 11 and figure 12. This should help you correctly assemble the parts of the main brake cylinder.
The structure of the main brake cylinder of VAZ-2101, VAZ-2104, VAZ-2105, VAZ-2106, VAZ-2107, Classic cars : 1 - cylinder body; 2 — lock washer; 3 - fitting; 4 - sealing gasket; 5 - sealing washer; 6 — piston lock screw; 7 — piston return springs; 8 - cup; 9 — pressure spring of the sealing ring; 10 - sealing ring; 11 — spacer ring; 12 — rear brake drive piston; 13 — washer; 14 — front brake drive piston.
After the insides are taken out, we inspect the condition of the mirror in the cylinder itself (photo 13). If there are traces of corrosion, deep scratches and cavities on the mirror, the GTZ should be thrown into scrap metal. Since further repairs will have a short-term result, and the cylinder will work for another week, two or a month, and will remind itself again.
If everything is ok with the cylinder, then you can start replacing the cuffs (photo 14). After all the cuffs have been changed, you can fill the pistons with springs into the housing, having first lubricated the cuffs with brake fluid. Install the locking screws. Using a screwdriver (simulating pressing the pedal) we check the operation of the cylinder.
We fix the tank pipes and install the GTZ on the car. We do not tighten the brake pipe nuts, pour brake fluid into the reservoir and wait until it begins to pass through the fittings. At first, the liquid will come out with air bubbles, and when the liquid comes out without bubbles, you can tighten the fittings. Under favorable conditions, the brake system does not need to be bled after this. And if you still have to bleed the system, it will be much easier to do.
Something like that!)))
When using an article or photographs, an active direct hyperlink to the website www.avtorem.info is required!
Did you like the article? Share it on your page!
Repair of the main brake cylinder on a VAZ 2107
A serviceable brake system of a VAZ 2107 car is the key to the safety of both the driver and passengers. It is for this reason that special attention should be paid to it, and if the slightest sign of malfunction appears, repairs should be started immediately.
The main brake cylinder on the VAZ 2107 is one of the main elements of the car’s braking system. It may have two main faults. The first is expressed in the appearance of a fluid leak from the main brake, the second in a decrease in the efficiency of the system, which can only be determined after checking the workers. In most cases, both faults can be eliminated by simple repair of the main brake, which consists of replacing the sealing collars and boot. However, in some cases, only replacing the cylinder can solve the problem.
First, you need to disassemble the brake cylinder and determine whether it is advisable to repair it. To work you will need a minimum of tools:
- The key for 10 is normal;
- Special key for 10, for pipes;
- Key to 13;
- The screwdriver is flat.
Bleeding brakes VAZ-2107
There is not even the slightest bit of exaggeration in the statement that identifies the braking system as the most important system of any vehicle. Failure to operate the elements that make it up is fraught with not even unpleasant, but rather tragic consequences. Effective braking is, of course, more important than good acceleration or a high degree of maneuverability. How to achieve this? The article we bring to your attention is devoted to the answer to this question.
The basis for the stable and reliable functioning of a car’s braking system is regularity and completeness of inspections, the purpose of which is to monitor the technical condition of its elements, as well as timely identification of causes and elimination of detected problems.
A peculiarity of carrying out repair and restoration work on the elements of the brake system is the necessity of mandatory removal of air from the brake system circuit, which inevitably enters it (the circuit) during the process of replacing system units with new ones.
Why does air entering a car's brake system need to be removed? The essence of the problem is that the brake fluid used as the working fluid of the brake system has certain physical properties, one of which is good compression resistance. Air trapped in the brake fluid is highly compressed, significantly reducing the effectiveness of the brakes. And now from theory, let's move on to practice.
What is needed to bleed the brakes of a VAZ 2107
1.1 Process logistics To ensure continuity of the technological process, you will need:
- Some brake fluid to add to the brake system.
Attention! The brake fluid used to fill the brake system must have physical and chemical properties similar to those of the fluid in the brake system. Ignoring this requirement can lead to an aggressive reaction between components and, as a result, to the destruction of rubber pipelines, cuffs and seals.
- A hose, preferably transparent, that allows you to visually control the passage of brake fluid with air (item 2).
- Socket (open-end) wrench “8” for unscrewing the caliper fittings (item 1) and the working brake cylinders. On some modifications of the “seven”, to perform this modification you will need a “10” key.
- Container (the volume of which is at least 0.5 liters) for draining the brake fluid (item 3).
In addition to tools and accessories, you cannot do without an assistant. Its presence will save you not only time and effort, but also a certain number of nerve cells. For ease of operation, it is recommended to remove the front wheels.
Attention! The rear wheel pair must have a rigid support. Otherwise, the brake fluid supply will be blocked by the rear brake circuit pressure regulator.
Bleeding the brake system
Let's proceed directly to pumping. Before describing this generally technically simple process, we note that it is almost identical for all the “classics” of the Volzhsky Automobile Plant. In other words, bleeding the brakes of a VAZ 2106 is similar to bleeding the brake system of a VAZ.
- The bleeding procedure should begin from the contour of the rear wheel pair, more precisely from the wheel farthest from the main elements of the braking system - the rear right one. Next, the following manipulations are performed:
- The assistant sits in the cabin and, having made several presses on the brake pedal (the pedal stops in the upper position), fixes it in the pressed state.
- Place the hose onto the fitting of the working brake cylinder, then unscrew it (the fitting) half a turn using a spanner or open-end wrench set to “8” (to “10”).
- Monitor the passage of brake fluid with air bubbles through the hose.
- As soon as the movement of liquid and air stops, tighten the fitting.
The structure of the main elements of the brake system of the VAZ 2106
Let's consider the features of the design and operation of all the main parts that provide vehicle braking.
Main brake cylinder
The braking system on the VAZ 2106 is divided into two circuits: primary and secondary. This is done so that if the front brakes break down, the driver can use the rear ones and vice versa. Both the primary and secondary circuits are equipped with hydraulic cylinders that push the pistons out of the shoes. And the pressure in this entire system is created by the master cylinder. After braking begins, the piston in this cylinder begins to move, pumping fluid into the primary circuit (or into the secondary circuit - it all depends on which brakes the driver used).
The master cylinder creates fluid pressure throughout the entire brake system.
The fluid reaches hydraulic cylinders through hoses, from which pistons extend, pressing on the pads. In general, in the main cylinder of the “six” there is not one, but two powerful pistons placed in special sealing containers. The main piston is connected to the main brake pedal rod, and the additional one is connected to the main one and begins to move after it. When there is no longer a need to brake, the driver removes his foot from the brake pedal. After this, return springs come into play, removing the displaced pistons to their original positions until the next braking.
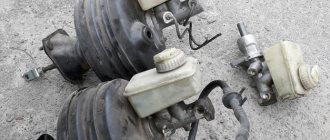
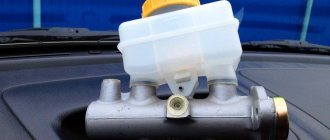
Under the hood of the VAZ 2106 there is a reservoir, a vacuum booster and a master cylinder, assembled into a single system
If you open the hood of a VAZ 2106, the main brake cylinder can be seen under the vacuum booster, with which it forms a single system. And next to this cylinder there is a small tank, divided by a partition into two unequal halves. This reservoir stores a small reserve of brake fluid. If a leak begins in some circuit, then liquid will flow into the system from this tank for some time, replenishing the losses. If the fluid supply runs out before the leak is found and repaired, the brakes will fail and the driver will be in mortal danger.
Video: how to change the main brake cylinder on a classic
Vacuum booster
The vacuum booster is an intermediate link between the pedal and the main brake cylinder. As soon as the brake pedal is pressed, its pressure reaches the vacuum booster through several small levers. This device is a sealed housing divided into two halves by an elastic membrane.
The vacuum amplifier is a simple housing with a diaphragm inside
The engine exhaust manifold pipe is connected to one half. When the engine starts, the pressure in this half decreases greatly (and a real, deep vacuum is not formed there, it is just an area of very low pressure, but in everyday life the amplifier is still called a vacuum amplifier). The second half of the intensifying chamber has access to the atmosphere at normal pressure.
It is the vacuum booster that transmits the driver’s force to the master brake cylinder
When the pressure in one half of the chamber is very low and normal in the other, the elastic membrane gradually begins to bend to where the pressure is low and put pressure on the pusher. And it causes displacement of the piston in the main brake cylinder.
Video: we disassemble the vacuum booster ourselves
Working cylinders
As mentioned above, the brake wheel cylinders must use their pistons to cause the pads to move. The cylinders on the “six”, installed at the front and rear, are not very different in design. They consist of sealed housings with retractable pistons. Each piston is contained in a sealing container. This is necessary in order to prevent brake fluid from leaking while the cylinder is operating.
The front working cylinder of the VAZ 2106 consists of a housing and a piston, which comes out of its container during braking
The difference between the front and rear cylinders is only in the force application pattern. The working cylinders in the front calipers (those with discs) press on the pads so that they move and clamp the brake disc. And the cylinders of the rear drum brakes press on the C-shaped shoes so that they move apart and rest against the inner wall of the drum.
The rear working cylinder presses on the brake drum walls from the inside
Brake pads
The principle of operation of the “six” brake pads is absolutely the same for all wheels. When the pads work, they simply convert one type of energy into another. The driver sees an obstacle, presses the brake pedal, and the pads come into contact with the brake disc or the inner wall of the brake drum. Friction appears at the point of contact, which causes rapid heating. That is, the kinetic energy generated when the wheels of the car rotate is converted into thermal energy, which warms up the brakes. The result of this transformation is that the machine stops.
The front pads on the VAZ 2106 are flat
A special protective material is attached to the working surface of the pads, which has an increased coefficient of friction. And its hardness is significantly lower than the hardness of the brake disc. To obtain such properties, manufacturers use various composite materials, the main filler of which is sawdust of soft metals, such as copper. The pads on the front wheels are flat and they compress the brake disc from the outside. On the rear wheels, the pads are C-shaped and rest against the walls of the brake drum from the inside.
The rear pads on the VAZ 2106 are C-shaped, following the internal contours of the brake drum
Brake hoses
Brake hoses, along with the pads, are the most important element of the VAZ 2106 brake system. It is through the hoses that the brake fluid is supplied from the master cylinder to the brake working cylinders. During the trip, the life of the driver of the “six” and his passengers literally depends on the reliability of the hoses, so the requirements for them are very strict. Brake hoses on the “six” are made only from high-quality rubber and tool steel. They must have the highest wear resistance, corrosion resistance and be immune to the effects of various chemicals that are sprinkled on roads in icy conditions.
Brake hoses are subject to the highest technical requirements
In addition, all hoses are checked for:
- high pressure. The minimum pressure that a VAZ 2106 brake hose must withstand is 200 bar. At this load, no leakage should occur;
- gap The hoses are stretched with a pressure of 1200 bar. A high-quality product should not tear;
- bending and volumetric expansion.
Only after going through all these procedures are the parts installed on the car.
Brake pedal
The pedal is the main control element of the brake system of the VAZ 2106. It is located under the steering column, next to the gas and clutch pedals, and is used as a lever that allows the driver to transfer muscle force to the main brake cylinder.
Using the pedal, the driver controls the car's braking system
A correctly adjusted pedal must have a free play reserve of 4–6 cm . After the foot pressing the pedal has passed this distance, the car should begin to brake smoothly. If this does not happen, then one of the breakdowns mentioned above is present.
Video: Long brake pedal travel - what could it be
labavto.com
The brake master cylinder (MBC) is one of the main elements of the brake system, which determines how safe the vehicle will be used. The driver is obliged to ensure that it is in good condition. If malfunctions are detected, action must be taken immediately. Negligence and delay in repairs can lead to an accident. You can identify faults and repair the VAZ 2107 GTZ yourself.
GTZ: device and purpose
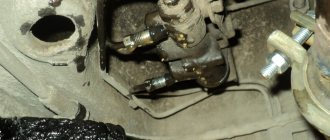
The VAZ 2107 is equipped with a hydraulic brake system consisting of two circuits. When one of the circuits fails, the other continues braking. This improves traffic safety. The master cylinder changes the pressure in the circuits depending on the position of the brake pedal. The GTZ is located on the rear wall of the engine compartment. It can be found under the expansion tank of two sections, which is filled with brake fluid (TF). It looks like an oblong cylinder with holes for connecting brake hoses.
The GTZ housing contains 2 pistons with sealing collars. They are located sequentially one after another. The first one moves due to the influence of the pedal pusher on it and serves the contour of the rear wheels. It forces a second piston to move, which acts on the two brake circuits of the front wheels. Springs that are located between the pistons return them to place when the driver releases the brake pedal.
GTZ performs the following functions:
- distributes the fuel fluid over two brake circuits, which separately serve the front wheels;
- transmits the force of the brake pedal using fluid to the working cylinders (WC);
- directs excess fuel fluid to the expander;
- returns the pedal and rod to their initial position when the driver no longer presses the pedal.
To avoid problems with the brakes during further operation, for replacement you need to buy an original product, preferably from a Tolyatti plant with article number 21013505008.
Diagnostic methods and possible malfunctions of the GTZ
The need to diagnose HTC arises when the following symptoms appear:
- an indicator lights up on the dashboard warning of insufficient brake fluid level;
- in order to brake, you need to press the pedal hard;
- large free play of the pedal, sometimes it falls through;
- when braking sharply, the car moves away from the direction of travel;
- the car slows down, the pedal is depressed as much as possible;
- leakage of fuel fluid from the tank.
First, the area under the gas turbine engine is inspected for drips. They are usually visible on the side member and vacuum booster. If the tank body is intact, you need to remove and repair or replace the GTZ.
To identify malfunctions of the master cylinder without diagnosing other parts of the brake system, you need to perform the following steps:
- plug the outlet openings of the dismantled removed pipes with wooden choppers or pegs;
- Next you need to press the pedal several times.
If the GTZ is working properly, after several presses the chambers will fill with liquid and it will be impossible to press the pedal. On the faulty element, the sealing cuffs allow liquid to pass through, and it flows back into the expander, and the pedal continues to fail. To confirm a malfunction of the turbocharger, you need to unscrew the nuts on the cylinder and move it away from the vacuum booster; the fuel fluid will flow out of the hole.
Main breakdowns of the GTZ
The master brake cylinder of the VAZ-2107 constantly contains fluid, which can leak out if it breaks down. There are two malfunctions in total - leakage of fluid from the turbocharger, as well as a significant drop in the efficiency of the braking system. Usually, all breakdowns are eliminated by repairing (replacing) the master cylinder and bleeding the system.
To repair the cylinder, you will need to replace almost all of its components: boots, cuffs, and, if necessary, pistons. But sometimes repairs are impractical, so it is better to completely replace the mechanism. If there is significant wear on the inner walls of the cylinder, this will lead to loss of tightness even when new o-rings are installed.
GTZ malfunctions
The VAZ 2101 brake system has many parts that can fail due to wear, poor quality or untimely maintenance. The following characteristic symptoms of problems can be identified:
- slow stopping of the vehicle after pressing the brake pedal. One of the reasons is that the lip seals of the pistons have become unusable, which led to a loss of tightness;
- high pedal effort. This problem appears when the cuffs increase in size, for example, when installing a low-quality repair kit;
- The brake pedal has a short stroke. The working environment, i.e. the brake fluid, has nowhere to go due to the fact that the compensation hole is clogged. In addition, the canal may be blocked by swollen cuffs;
- The car only brakes when the pedal is pressed to the floor. This indicates a complete failure of the lip seals when the liquid goes into the tank and not into the system;
- Brake pads do not move away from the discs and drums, causing them to become hot while driving. The reason lies in the jamming of one of the pistons or the formation of a blockage in the bypass hole.
If the seal is lost, liquid begins to flow out of the cylinder
These symptoms may also appear in the event of problems with other parts of the braking system . For example, a pedal may fail if there is no fluid in one of the wheel cylinders or if air gets into the system. Therefore, for a final diagnosis, it is necessary to pay attention to additional features of the car’s behavior. For example, there are certain signs that clearly indicate problems with other components of the brake system, and not with the GTZ:
- pulling the car to the side when braking;
- jamming of the brake mechanisms on one of the wheels;
- the appearance of sounds uncharacteristic of normal brake operation (creaking, squeaking, grinding);
- heating of brake pads or discs on one wheel.
Checking the brake master cylinder
The most common cause of GTZ problems is wear of the seals. When replacing cuffs, you need to take into account that repairs only make sense if the piston and cylinder walls do not have wear. Otherwise, replacing the rubber seals will not bring any results and soon you will still have to install a new part. Before you start checking the main hydraulic brake drive, you should make sure that there are no problems with other elements of the system:
- Inspect the wheels from the inner surface to identify any leaks of brake fluid from the brake fluid brake system.
- Check the integrity of the tank and hoses connecting it to the gas turbine engine, as well as the presence of fluid and its level.
Fluid leaks on the inside of the wheel indicate a leak in the brake system.
A clear sign that there is a problem with the master cylinder is the appearance of liquid on the unit body . A working mechanism should always be dry without a hint of leakage. If the hydraulic drive has lost its seal, it must be dismantled for further disassembly and repair. You can determine that the gas turbine engine bypasses fluid, i.e., it does not enter the system, but returns to the expansion tank when you press the pedal:
- Open the tank lid.
- An assistant is seated in the driver's seat. The engine does not start.
- Your partner presses the brake pedal, and you listen to the sounds coming from the reservoir.
- If gurgling is heard from the container, and the pedal is pressed lightly, it means that the liquid is entering the tank instead of the system. The malfunction lies in the wear of the seals, which are unable to create the necessary pressure in the cylinder circuits.
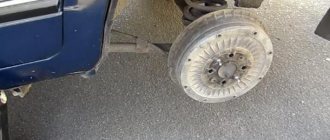
Replacing the front wheel brake cylinders
Remove the front brake caliper from the car and secure it in a vice. Remove the connecting tube of the working cylinders.
Using a screwdriver, press the spring-loaded clamp and use a soft metal drift to knock out the wheel cylinder from the caliper.
If the new cylinder does not have a lock, we replace it with the old one.
Install the cylinder in the reverse order of removal.
After installing the caliper on the car, bleed the brake system (see Replacing brake fluid and bleeding the brake system).
Front brake repair
Repair of the front brakes should begin with an inspection; first of all, we try to turn the hub by hand; if the cylinders are not jammed, then you will succeed. Next, you can remove the brake pads; to do this, remove the corkscrews and take out the guide pins.
Removing the brake pads
After pulling out the fingers, we try to push the brake cylinder inside using a screwdriver; if you succeed, then the cylinder is in normal working condition and if there are no leaks and the boot is intact, there is no need to go in there. If the cylinders do not yield under the force of a screwdriver, then they need to be repaired or replaced, and I had such a situation.
The boot is torn, the cylinder is jammed
We see how the pads are worn unevenly:
Unevenly worn brake pads
If it is necessary to repair the brake cylinder, then you need to unscrew the hose and remove the caliper by unscrewing the two bolts with a “17” key. Once removed, you must carefully knock the brake cylinder out of the caliper. This must be done carefully, since duralumin cylinder bodies are prone to cracks. I knock the cylinders out of the caliper through a piece of wood.
After the cylinder is removed, it must be cleaned of dirt. Next, you need to remove the piston from the brake cylinder, this can be done using a compressor, pumping pressure into the cylinder (do this very carefully!), I used a wheel wrench.
The cylinder is knocked out of the caliper
Cylinder without boot
We remove the piston from the brake cylinder of the VAZ 2101
Thanks for subscribing!
Piston removed, sea of dirt inside
The pistons were removed, but despite all efforts one cylinder had to be replaced with a new one
After removing the pistons from the cylinders, we wash and clean the brake cylinders from dirt, especially paying attention to the cleanliness of the groove under the sealing ring inside the cylinder; it is often forgotten by oxide from the duralumin cylinder and the piston jams. After everything is cleaned, insert a new o-ring, be sure to lubricate it with clean brake fluid and insert the piston into place. Next, put on a new boot and insert the cylinder into the caliper.
Next, you can put the caliper on the car and secure it by tightening the fasteners well; in the factory version of the caliper mounting, there are locking washers under the mounting screws, which will also not be superfluous. Next, you can install the new pads in place and screw on the brake hose. It is very important that when installing new brake hoses, install new brass O-rings under the hose. If these are included with the hoses, this is very good; if they are not, then be sure to purchase them, since they are practically disposable and new rings contribute to a reliable seal. At this point, the repair of the front brakes of the VAZ 2101 can be considered complete.
Removing the master cylinder
Before dismantling, you will need to drain the fluid from the expansion tank and remove the pipes. Then you will need to do the following:
- Using a special “10” wrench, loosen all pipes.
- Unscrew the tubes completely using a regular key to “10”. It is advisable to place a rag underneath so that the brake fluid does not get on the body parts.
- After disconnecting the GTZ from the system, it is necessary to unscrew the nuts using a wrench set to “13” that fasten it to the vacuum booster housing.
This completes the dismantling. The brake cylinder must be replaced in exactly the reverse order. But if it is possible to make repairs, disassemble the cylinder.
Replacing front brake hoses
We hang and remove the front wheel.
Using pliers, remove the bracket that secures the brake hose in the body bracket.
While holding the hose tip from turning with a 17 wrench, use a 10 wrench to unscrew the brake pipe fitting.
We remove the brake hose from the bracket, and put a protective cap on the bleeder fitting on the brake pipe to prevent brake fluid leakage.
Using a 10mm wrench, unscrew the bolt securing the bracket that secures the brake hose and remove it.
Using a 14mm socket, unscrew the bolt securing the brake hose and remove the hose.
Install the new hose in the reverse order of removal
We replace the copper sealing washers with new ones.
After replacing the brake hose, bleed the brake system (see Replacing brake fluid and bleeding the brake system).