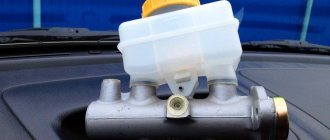
Master brake cylinder or GTZ (in English main brake cylinder or master cylinder) is a part of the car braking system that converts the energy of pressing the brake pedal into pressing force of the brake mechanisms.
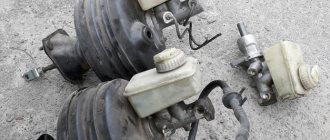
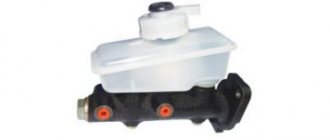
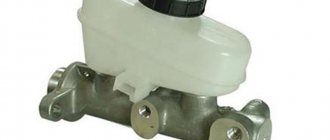
photo gallery:
The GTZ has a cylindrical metal body, with outlets for the flow of hydraulic fluid. It is this that is the main component of the system and controls the forces of the cylinders of each individual wheel. Therefore, it should not be confused with wheel brake cylinders: on drum brakes they look like barrels that push the brake linings apart, and on disc brakes they are located in the calipers (caliper piston).
Why is GTZ needed?
The GTZ converts the energy of pressing the brake pedal into the energy of compression of the brake fluid. And the force is transmitted very quickly through the system.
Its task is to provide braking force in at least one of the circuits of the braking system. If one part of the system fails, another circuit always remains operational. This allows the car to brake, although not as effectively.
In modern cars, the GTZ works in tandem with the ABS system - the latter regulates the braking force on the wheels by controlling the pressure through the main brake cylinder.
Symptoms of problems
The general technical condition of the car (including the brake system) can be checked using a personal diagnostic adapter - a car scanner. These types of devices are widespread and have a wide price range. We would like to draw your attention to the budget model of Korean production Scan Tool Pro Black Edition.
At a cost of about 2 thousand rubles. This scanner is capable of fully diagnosing your car (engine, gearbox, transmission, abs, srs and much more), which will pay for itself in 1-2 trips to the service station. The adapter is quite easy to use, has Russian-language software and is compatible with most cars produced in 1993. The device will also be useful when buying a used car, as it can show its real mileage and VIN.
Types of GTZ
The main brake cylinder can be one- or two-section . But the first type is practically no longer used today - these were, for example, on GAZ-53 trucks.
Single-section GTZ from a GAZ 53 car
Two-piece master cylinder for Honda Accord
Also, the main brake cylinders may differ in the presence or absence of a brake booster. But again, all modern cars are equipped with vacuum brake boosters.
Therefore, the vast majority of cars that are in use today are equipped with two-section GTZs with vacuum brake boosters.
Checking the brake master cylinder
A full check of the gas turbine engine for operability is carried out using a special high-pressure pressure gauge (0–250 atm). Using connecting fittings of the appropriate diameter, they are connected to the outlets of the master cylinder instead of tubes. A working turbocharger should create a pressure of up to 180–200 atm when the pedal is pressed. (bar). If the measurement results are lower, the cylinder is worn out and requires replacement or repair.
Brake Pressure Measuring Kit
The cost of a set of pressure gauges with adapters is about 15,000 rubles, so not every service station has it. Without a pressure gauge, you need to check the gas turbine engine using indirect signs. For diagnostics you may need the following materials and tools:
- brake union wrench (split or clamp), usually 10, 11, 12 or 13;
- a bottle of brake fluid (if there are leaks, the level is below normal);
- bolts with threads similar to the threads of the GTZ tube fittings.
For a full check, you will also need an assistant who will press the brake pedal during the diagnostic process.
How to understand that the brake cylinder is not working: technique
- Inspect the wheel brakes and lines . Make sure that the problem is on the GTZ side and that the actuators are in order.
- Inspect the brake master cylinder . Insufficient fluid level in the expansion tank and the presence of brake fluid leaks on the GTZ or VUT housing are an obvious sign of depressurization. If there is not enough fluid, but no signs of leakage are visible, add fuel fluid and check the operation of the brakes. Perhaps the GTZ is working properly and the culprit is a leak somewhere in the line.
- If there are GTZ leaks, look where they occur . To search, you need to clean the cylinder body of the fluid (for example, with gasoline, solvent or alcohol), ask an assistant to pump the pedal, and in the meantime, look where the fluid leaks appear.
Determining a GTZ malfunction using the example of a Hyundai Accent: video
If after carrying out the manipulations it becomes clear that the brake cylinder is not working properly, you need to remove the turbocharger and disassemble it for troubleshooting, which will allow you to determine the true cause of the malfunction.
How to check a removed brake master cylinder
To dismantle and diagnose the GTZ you will need:
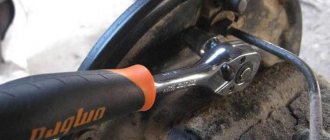
- split or clamp wrench for brake pipes;
- a large (from 10 cubic meters) syringe for pumping out fuel fluid and an empty container for draining brake fluid;
- a key for disconnecting the turbocharger from the VUT (most often at 13, 14 or 17) and keys for disassembling the turbocharger;
To disassemble the brake master cylinder for diagnostics, you need to:
Disassembling the brake cylinder to determine the breakdown: video
- Pump out or drain the brake fluid from the expansion tank.
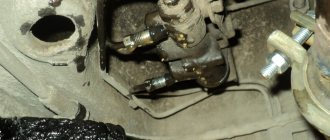
- Disconnect the brake pipes from the GTZ outlets.
- Unscrew the brake cylinder from the VUT.
- Remove the GTZ from the car.
- Unscrew the bolt plug (if any) in the front part of the GTZ and/or remove the stopper in the rear part (from the VUT side).
- Inspect the inside of the VUT for leaks; if there are traces of fuel fluid there, the cylinder is clearly faulty.
- Remove the pistons from the turbocharger, having previously disconnected their retainers - bolts or pins.
- Wipe the pistons with a dry cloth, inspect them for wear, and assess the condition of the seals.
- Wipe the inside of the cylinder body, inspect its mirror for burrs, holes, traces of corrosion and other defects.
- Measure the gaps between the pistons and the cylinder walls, compare them with factory tolerances.
- Inspect bypass windows, openings and outlets for blockages.
Based on the results of inspection of the GTZ parts, conclusions can be drawn about further repairs. If there are signs of wear on the rubber sealing cuffs, you can limit yourself to a small repair kit. If there is wear on the pistons, you need to buy a repair kit consisting of pistons and rubber bands. If the GTZ body itself has burrs, cavities, traces of corrosion and other defects inside, the assembly will have to be replaced.
How does GTZ work?
Inside the metal casing of the GTZ, two pistons are placed one behind the other. When the driver presses the brake pedal, the force is transmitted through the pusher to the vacuum brake booster. That, in turn, pushes the GTZ rod. The rod directly rests on the first piston of the main brake cylinder, which, by compressing the brake fluid, creates pressure in the primary circuit. At the same time, the rod continues to move and the second piston creates pressure in the second circuit. Brake fluid is supplied to the voids left after the movement of the pistons. It comes from a compensation tank installed on top of the GTZ. By creating pressure in the brake system, the GTZ thus transfers compression energy to the wheel cylinders. This causes the brake pads to be pressed against the brake rotor or the drum pads to expand inside the brake drum. The car slows down.
When the driver removes his foot from the brake pedal, the rod returns to its original position. The pistons also return to place thanks to return springs. The pressure in the system decreases, and the brake fluid displaced by the pistons returns to the reservoir.
To prevent brake fluid from flowing between the pistons or leaking out of the GTZ housing, rubber cuffs are used in its design.
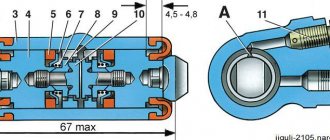
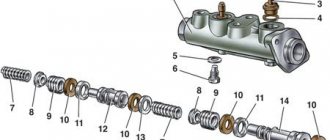
Design
Brake master cylinder design:
- Brake booster rod.
- Retaining ring.
- Primary circuit bypass hole.
- Compensation hole of the primary circuit.
- The first section of the tank.
- Second section of the tank.
- Secondary circuit bypass hole.
- Secondary circuit compensation hole.
- Return spring of the second piston.
- Master cylinder housing.
- Cuff.
- Second piston.
- Cuff.
- Return spring of the first piston.
- Cuff.
- Outer cuff.
- Anther.
- First piston.
Scheme of work
To ensure that the vehicle can slow down even in the event of leaks, the hydraulic braking system is always divided into two separately operating circuits. This is why all modern brake cylinders have a two-piece design with two pistons. Even if it is impossible to create pressure in one circuit and the piston moves freely, then in another the gas turbine engine can provoke successful braking.
The circuits connect to the wheels in different ways, depending on the manufacturer and type of drive. The most common operating scheme options:
- Parallel 4+2 , when one circuit works on all four wheels, and the second - only on the front ones (insures the first).
- Parallel 2+2 , with separate circuits for both axles (common for rear-wheel drive vehicles).
- Diagonal 2+2 , when one circuit works on the right front and left rear wheels, and the second - vice versa. If one of the circuits fails, the second will allow both sides of the car to brake.
What happens if one of the circuits loses its seal?
Even despite the loss of tightness of one of the circuits, the second circuit will remain in working order. Let's say a leak occurs in the first circuit, then the first piston moves without resistance along the cylinder to the second piston. And the second piston, moving, will create the pressure necessary for the operation of the brake mechanisms in its circuit. Just keep in mind that free play in the pedal will be added due to a malfunction of the primary circuit.
If a leak occurs in the second circuit, then the operation of the first circuit will occur like this: both pistons will move until the second piston reaches the end and only then pressure will be created in the first circuit that can bring the circuit into working condition. Here, too, the brake pedal travel will be increased, but the braking system will still work.
Signs of GTZ failure
There are several signs of problems with the GTZ.
- Traces of brake fluid leaks . First of all, on the vacuum brake booster, located directly under the brake cylinder. The reason is the wear of the low pressure collar cuff.
- A brake pedal that is too indicates that the system has become depressurized and pedal force is not transmitted because the brake fluid is not compressed. This happens due to wear on the piston cuffs or the walls of the turbocharger itself, as a result of which it cannot pump the brake fluid.
- The brake pedal may jam when blockages clog the compensating hole of the turbocharger.
- The brake pedal may stick if the GTZ pistons are stuck. The reason is contaminants that appear in the brake fluid over time. That is why it needs to be changed regularly.
- The brake pedal does not return if the return springs can no longer return the GTZ pistons to their place. Although physical damage to the pedal itself is also possible.
There are also indirect signs, one of the reasons for which may be a faulty turbocharger. Among them are uneven wear of the pads and the car pulling to the side when braking.
Device
The design of the front caliper and the rear brake cylinder of a VAZ car differ in the appearance of the body and main parts. The disc brake device consists of the following main parts:
1 - Piston. 2 - Boot. 3 - Sealing collar. 4 - Caliper body. 6 - Air fitting. 7 - Springs that press the pads. 12 - Pads.
The drum brake uses the following parts:
2 - Bleeding fitting. 3, 11 - Anther. 4, 10 - Piston. 6, 9 — Piston seal. 7 - Housing.
Main malfunctions of the GTZ and their causes
The most common malfunction is wear of the rubber components of the GTZ . Gaskets, seals and cuffs simply wear out over time. In this they are helped by various contaminants that sooner or later accumulate in the brake fluid.
GTZ rod with worn rubber components
Signs of wear on one of the rubber seals of the GTZ
The brake cylinder mirror may also be subject to wear and deformation. This occurs as a result of cavitation of the brake fluid and the presence of contaminants in it.
Another malfunction can cause a loss of pressure in the system as a result of leaks. Brake fluid can leak through any other parts of the hydraulic brake system. This is the result of physical damage to the components. And although the loss of pressure is not directly a malfunction of the turbocharger, it leads to the fact that the brake master cylinder cannot perform its functions.
Emergency mode
It is worth noting the high reliability of the system. And even if there is a malfunction of the master brake cylinder (VAZ is no exception), the car will brake properly. This provides a second emergency circuit. If there is a leak in the first, the piston will move in the cylinder until it comes into contact with the second. And then it will begin to move, ensuring proper operation of the brake mechanisms. But if there are leaks in the secondary circuit, the operation of the mechanism will be slightly different. The first piston will push the second one until it hits the top of the metal housing. Next, the pressure level in the primary circuit increases and the car begins to brake. And despite the fact that the system operates in emergency mode, the car will have time to brake if necessary.
If there is a leak in the second circuit, the brake master cylinder operates differently. The first piston pushes out the second, after which it moves to the top of the metal housing. The pressure level in the primary circuit increases. The car starts to slow down. Of course, having such malfunctions of the master brake cylinder, operating the car without repair is simply dangerous. But getting to the nearest garage or service station is possible.
Checking and servicing the GTZ
GTZ repair kit for Lanos
The brake master cylinder is a maintenance-free part. Although a repair kit can be used to repair it if the rubber seals wear out. The relevance of its use is determined after assessing the efficiency of the cylinder and assessing the wear of components after complete disassembly.
Checking the GTZ is carried out as follows.
- Check for signs of leaks or external damage to the housing.
- Checking for leaks .
- The cylinder mirror is checked for damage, cavities or oval shape of the cylinder.
- Checking the gap between the pistons and the cylinder for compliance with factory parameters.
Also, for the GTZ to operate correctly, timely replacement of high-quality brake fluid is necessary (on average, once every two years or every 60,000 km). Brake fluid is very hygroscopic, so over time, air bubbles appear in it, which can cause cavitation and destruction of cylinder elements.
During operation, dust, impurities, and metal shavings appear in the liquid, which can also damage the GTZ. Therefore, it is important to change your brake fluid on time and choose quality products.
Low quality fluid leads to swelling of rubber elements and serious deterioration in the performance of the gas turbine engine!
Diagnostics and repair
From the signs listed above, it is easy to understand that in most cases there is only one source of problems - rubber products that have become unusable. The cuffs crack and swell, as a result they leak liquid and close the discharge holes. Hence the recommendation: all “rubber bands” of the brake system should be changed at intervals of approximately 100 thousand km, without waiting for critical wear.
Reference. Many auto mechanics express the opinion that after replacing the cuffs, the main hydraulic cylinder will not last long. The statement is true if the car owner purchased cheap, low-quality spare parts or installed new o-rings in the cylinder, where internal wear has formed in the walls.
Before checking the GTZ for operability, make sure there are no other faults:
- Inspect the wheel assemblies from the inside for leakage of brake fluid from the working cylinders.
- Check the integrity of the expansion tank and the fluid level in it.
- Start the engine and at idle speed, press the vacuum take-off pipe to the amplifier. If the engine speed has increased noticeably, there is an air leak and the master cylinder is most likely working.
A clear symptom indicating a breakdown of the main hydraulic cylinder is drops of brake fluid on the body . If you discover a leak, feel free to dismantle the unit and disassemble it to look for the cause. Another common problem - fluid flowing through the seals - is diagnosed as follows:
- Open the cover of the expansion tank and place an assistant in the driver's seat.
- Listening to sounds in the tank, give the command to an assistant to press the pedal.
- If the pedal moves easily and gurgling is heard in the reservoir, liquid is entering there. The reason is that worn cuffs are unable to create pressure in the circuits; liquid seeps through the leaks and enters the container.
Also, problems with the GTZ are indicated by jamming or too little pedal travel.
Sit behind the wheel, press it several times, and start the engine while holding the pedal with your foot. If it sinks to the floor or does not budge, disassemble the hydraulic cylinder. To replace or repair the master brake cylinder, you need to remove the unit from the vehicle. Work is carried out in the following order:
- Suck out the liquid from the tank with a syringe. If the cuffs are leaking, press the pedal several times and suck out the excess fluid.
- Remove the expansion tank.
- It is not necessary to drain all brake circuits. Substituting a small container, unscrew the nut of the first tube and carefully move it to the side, plugging it with a wooden stick.
- Repeat the operation with the second tube, unscrew the fastening of the GTZ flange and remove the unit.
Further actions depend on the design of the master cylinder. If the element is completely disassembled, change the rubber seals. Otherwise, you will have to replace the pistons assemblies. Pre-wash the body and all openings with alcohol; do not use gasoline. After assembly, add fluid and bleed the brake system to remove air.
Source
Selection and purchase of GTZ
It is best to select a GTZ based on the car’s VIN code, although you can get by with the make, model and type of engine. The part does not have different options to choose from, so the only option to choose from is the manufacturer. Choose reliable brands, because the operation of the GTZ is critical to your safety. The website partreview.ru has good reviews for products from the brands TRW, ATE and LPR.
As mentioned above, sometimes you can get by by replacing parts of the GTZ repair kit. But if the housing itself or components not from the repair kit are worn out or damaged, the entire master brake cylinder is replaced.
Related terms
- ABS (Anti-lock braking system)
- Vacuum brake booster
Why is pumping needed?
Before starting work, you should determine the purpose for which the procedure is being carried out. It helps remove air from the hydraulic system. The reasons for the formation of air in the system include:
- any intervention (for example, during repairs) in the brake system; caliper overhaul;
- depressurization of the system during repairs;
- damage to hoses;
- replacing the brake fluid and reducing it to the minimum level in the brake cylinder;
- reuse of liquid.
Excess air can be detected when braking. Vehicles will be characterized by a sharp stop with increased braking. Pressing the brake pedal will be “soft” with increased travel. If you notice such “behavior” in your vehicle, you should urgently pump it - it is not safe to drive a car in this condition.
Bleeding involves removing air from hoses, calipers and tanks. Actually, it is necessary for the brakes to work smoothly. If there is air in the master brake cylinder, or it has been replaced, then it must be bled first.
What will you need?
Those who have had to pump the GTZ know that it is difficult to do it alone. It is indeed inconvenient to carry out bleeding on your own, so I advise you to involve an assistant in this matter, whose main task will be to press the brake pedal. You will also need automotive tools (spanners, including a bleeder wrench), fresh brake fluid and a hose.
Before you begin, I always recommend checking for damage to the hoses and tubes. If there are any, you should first replace them and then continue. Repairing a car with your own hands requires certain skills and abilities, but it is much cheaper than service stations, the main thing is to know a few rules and follow the algorithm. In order for pumping to be carried out correctly and successfully, it should be done according to a certain algorithm.
Bleeding instructions
I would also like to give some tips that it is advisable to follow for a successful procedure:
- It is important to ensure that the liquid in the tank does not run out. If the indicator approaches the minimum value, it should be topped up. Before you start pumping the liquid, there should be at least half of it.
- After removing air from the main brake cylinder, you should begin bleeding the working cylinders.
- You should use the brake fluid that is already poured into the system, or the one recommended by the manufacturer if you do not know which one is filled. Another option is possible: drain the one that is in the tank and pour a new one. Otherwise, serious problems may arise in the further operation of the system.
- You should also check to see if there are leaks anywhere.
- There is no need to start the engine.
- ABS, if installed on a car, should be disabled.