Brake bleeding is required in the following cases:
You noticed that the brake pedal has become “softer” and its travel has increased. You have repaired or serviced the brake discs, replaced the brake pads, or completely tuned the brake system.
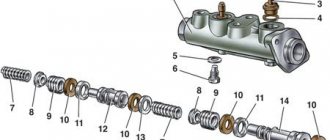
In these cases, it is definitely necessary to bleed the brake system to remove air. Procedure for bleeding the brakes
As always, you have a choice of how to level up. You can contact a car service. There you will be bled using a brake bleeder. A modern and efficient unit designed to remove air from the brake system. The professional brake bleeding device is equipped with adapters that allow it to work with many existing models of cars and trucks.
The second option is to bleed the brakes yourself. In principle, the procedure for bleeding the brakes is the same for any system. You will need a simple homemade device for bleeding the brakes from a syringe, tubes (hoses) and a plastic container. Options for pumping yourself: two people or one person, i.e. you yourself.
Scheme for bleeding the brakes: you should start from the wheel that is located at a far distance from the GTZ.
- rear right wheel mechanism;
- front left wheel mechanism;
- rear left wheel mechanism;
- front right wheel mechanism.
Bleeding the brakes with a partner
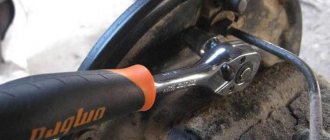
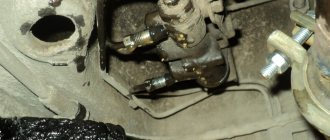
Remove the plug that covers the brake bleeder fitting and put a transparent hose on it. We lower the free end of the hose into a container partially filled with brake fluid.
The partner presses the brake pedal with intensity 3-4 times and leaves it pressed. You slightly unscrew the bleeder nipple until the brake fluid begins to be forced into the container. You can determine the presence of escaping air by the bubbles in the liquid in the container.
After this, tighten the bleeder fitting and repeat this procedure in the same order on the other wheels. Replace or add brake fluid of the type recommended by the car manufacturer. If after bleeding the brake pedal is still “soft”, check the wear of the brake pads, or repeat the bleeding procedure again.
Bleeding brakes without a partner
This task is quite labor-intensive, but sometimes this happens. As a device for bleeding the brakes, you will need: a brake fluid reservoir cap identical to yours, a syringe and a container. Here's the design:
We seal the syringe into the reservoir cap using a “sealant”, then screw this device onto the brake reservoir, having first filled the syringe with brake fluid. We unscrew the fitting at the outlet of the circuit that is to be pumped. We install a container to collect the leaking brake fluid. Then use a syringe to inject brake fluid.
Another way to bleed the brakes without an assistant will require you to have a block or other support. After filling the brake reservoir, you pump the brake pedal several times and hold it depressed. Then perform the standard procedure: unscrew the fitting and wait until the flow of brake fluid becomes slightly uniform. Close the brake bleeder screw.
Release the brake pedal and repeat the procedure. After bleeding the brakes, add brake fluid of the required grade. All. You can go for a test drive of the brake system, while observing safety precautions.
Also:
1. Unscrew the cap on the brake fluid reservoir. 2. I add brake fluid to the reservoir until it is full and screw on the cap of this device. 3. We connect the pump tip (on the hose) to the inflated spare tire. Now, if there is a compressor, I connect it directly to it, and set the pressure in the system to 3 bar. 4. We carry out pumping as indicated in the first post.
The features of this pumping boil down to monitoring the brake fluid in the reservoir.
Continuing the topic, answering the question about the need for a running engine when bleeding brakes with ABS. There is no difference, it has been checked several times, I bleed with the engine running and consider this bleeding to be correct, some simply remove the fuse responsible for the ABS and bleed, others do this with the engine not running. Excerpt from an article on bleeding the brake system with ABS.
Bleeding brakes with abs
Thanks to technological progress, almost all modern cars have a braking system with ABS function. The automatic locking system protects the vehicle's wheels from locking during emergency braking by controlling their rotation speed. Thus, the wheel sensors transmit impulses to the ABS electronics unit, the reaction of which regulates the entire braking process.
Monitoring the health of the car, including the brake system, is very important. Bleeding ABS brakes is necessary to remove excess air from the hydraulic drive, which could get there during repairs or replacement of brake fluid. The presence of air in the mechanisms is unnecessary, because it negatively affects the operation of the brakes. You can determine the need for bleeding yourself by pressing the brake pedal several times. If, when you press the pedal, you feel it is too smooth and moves harshly, then it is necessary to restore the tightness and bleed the brake system of your car. This can be done both with the help of specialists and on your own. Use only new brake fluid, and only one that meets the technical specifications of your car.
Hydraulic system - bleeding Audi 80 B3. Chassis. Brake system
1. If any parts in the brake system are removed or disconnected, or if the fluid level in the master cylinder drops noticeably, it is inevitable that air will enter the system.
Removing this air from the hydraulic system is essential to the proper functioning of the brakes, the process of removing air from the system is known as bleeding. 2. There are many individual kits for self-pumping. It is recommended to use one of these kits whenever possible, as they greatly simplify the pumping procedure.
3. If you do not have either of these kits, you will need to prepare a clean reservoir and a suitable length of clear plastic tubing that can fit tightly over the bleeder fitting, and you will also need the help of another person.
4. Before starting pumping, check that all hard tubes and flexible hoses are in good condition and all hydraulic connections are tight. Be very careful not to allow hydraulic fluid to come into contact with the vehicle's paint, otherwise serious damage will occur. Immediately wash off any spilled liquid with cold water.
5. If hydraulic fluid is lost from the master cylinder due to a system leak, identify and correct the cause before proceeding.
6. To bleed the system, clean the area around the bleeder fitting. If the hydraulic system has been partially disconnected on one circuit and the necessary precautions have been taken to prevent further loss of fluid, only that portion of the system will need to be bled. However, if the entire system must be bled, the following sequence must be followed:
- (1) Brake master cylinder only on ABS models
- (2) Right rear brake wheel cylinder or caliper
- (3) Left rear brake wheel cylinder or caliper
- (4) Right front caliper
- (5) Left front caliper
7. When bleeding the rear brake wheel cylinders or calipers on models with a brake pressure regulator, an assistant should push the regulator lever all the way back.
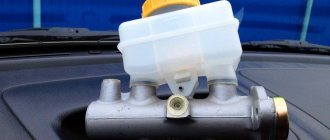
8. Remove the filler cap of the additional brake system reservoir and top up the fluid level (photo). Check the fluid level periodically during bleeding and top up as necessary.
9. With all bleeder fittings clamped, quickly pump the brake pedal several times to build up initial pressure in the system.
10. If using a custom bleeder kit, connect the bleeder tube to the bleeder fitting, and then open the screw half a turn (photo). If possible, position the unit so that it can be seen from the vehicle, then press the brake pedal to the floor and release it slowly. The included one-way valve will prevent exhaust air from returning to the systems at the end of each stroke. Repeat this step until liquid flows through the pipe without air bubbles. Now tighten the bleeder fitting and remove the outlet pipe.
11. If you do not have a custom bleeder kit, connect one end of a plastic tube to the bleeder fitting and lower the other end into a reservoir containing enough clean brake fluid to keep the end of the tube submerged at all times. Open the bleeder valve half a turn and have an assistant press the brake pedal to the floor and then slowly release it. Clamp the bleeder valve at the end of each downward stroke to prevent the removed air from returning to the system. Repeat this step until liquid flows through the pipe without air bubbles. Now tighten the bleeder fitting and remove the outlet pipe.
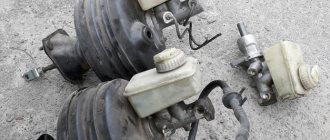
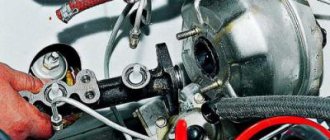
How to check the vacuum brake booster of an Audi 80 B3
By this age, the check valve usually no longer holds and it may be bleeding instead of the vacuum seal. This video shows in detail how to replace the vacuum brake booster on Audi cars. So, I think so, with a torn vacuum seal this wouldn’t happen?
The whole story with the vacuum cleaner ended the next day, when, after starting the engine, I again felt the power of the brake booster. Audi 80 1.
How can I replace the original main brake barrel cap of an Audi? When you press the brake pedal, the engine starts to work unstably, the car starts to shake. This video shows one of the options on how you can check the vacuum booster before you install it. If the speed drops when you press the brake several times, it means the mixture is lean!
Checking the operation and replacing the check valve of the vacuum booster:
This video shows one of the options for how to check a vacuum booster before you install it. Vacuum brake booster. If the vacuum seal is normal, when the engine starts, the pedal pressed all the way down will fall a little. Therefore, I would like to know how to check it to make sure that this is the case.
With the purchase of a vacuum gauge, this problem will be found in 2 minutes; check the check valve or valves that are located on the entire vacuum system. As a result, they found some kind of rubber band that approximately matched the diameter and stuck it between the vacuum seal and the GTZ.
VIDEO: Signs of a faulty vacuum booster and its replacement
Repair of vacuum seal Passat B3. A week later I finally found the spare part I needed and this time I decided with my father to go and install it on my own without the help of professionals.
Maybe the chip with the green plugs came out of the vacuum seal and that’s why it’s causing problems. With a bun, everything is simpler - you install a beam assembled from a machine with 3A, for example. We throw out the sorcerer Audi 80 V4 92g sedan drum brakes VD nonsense. After pumping for short distances, I accelerated and braked, there were no problems, I drove on again, the same parsley. When you press the gas while driving, the car either picks up speed too slowly, or slows it down and then sharply increases it - accompanied by a strong push.
This video tells how I prepare an Audi 80 B3 for winter. Apparently the hole in the rubber inside the vacuum seal is still small, so it’s still working.
Didn't get through?
I decided to dedicate the first entry in my blog to a problem that I faced for another four years. A simple way to find the cause of vibration and care for your car before winter. Sorry for the sound.
How to bleed the brakes on an Audi A6 C5 after rebuilding the calipers. Why check the vacuum seal and the GTZ, when to check? I wrote to see if they were the problem, but you muttered irrelevantly and avoided the question.
Vacuum brake booster behaves strangely
A method for disassembling a VAZ vacuum brake booster at home and the principle of its repair. You must log in or register to post a message.
What to do if the heater only works in the fourth position Audi Vacuum system Audi 80 Keihin 1, Audi 80 B3 engine NE 1.
Assembled according to the diagrams found online. The vacuum is checked simply: The new non-original one cost too much, about kilorubles. Using a small torch, unscrew any nut. How to check the vacuum seal on an Audi
Source: https://ofisusluga.ru/audi/kak-proverit-vakuumniy-usilitel-tormoza-audi-80-b3.php
Bleeding the brakes alone
This process is labor-intensive, but some people resort to it. In this case, devices for pumping can be a cap from the brake fluid reservoir (similar to yours), a container, or a syringe.
- The syringe must be hermetically built into the lid of the tank intended for the fluid using a “sealant”, then it is screwed onto this tank, drawing brake fluid into the syringe.
- The fitting located at the outlet of the pumped circuit is unscrewed. A container is installed into which the flowing liquid will be collected. Then this liquid is injected with a syringe.
The second method of pumping the brakes individually involves using a block or other stop.
- After adding fluid to the brake barrel to 100%, you need to pump the brake pedal several times and lock it in the depressed position.
- Then a standard type of process is performed: the fitting is unscrewed, after which it is necessary to wait until the flow of escaping brake fluid becomes uniform and weak. Then you need to tighten the brake system fitting.
- Release the brake pedal and repeat the entire procedure again.
- Add the correct brand of liquid. Then you can test drive the brakes with caution.
Brake bleeding sequence
The process of pumping brakes on an Audi A6:
- the ignition key is turned to the “0” position;
- Two electrical connectors are disconnected on the brake fluid reservoir cap.
Bleeding the left front wheel system
The procedure consists of the following steps:
- put the transparent hose on the fitting and unscrew the fitting on the caliper one turn;
- the brake pedal is pressed all the way and held in the pressed position until the fitting is screwed in;
- the brake pedal is released;
- The procedure is repeated until the air is completely released.
Air is removed from the brake circuit of the right front wheel in a similar way.
Bleeding the rear circuit
Working with the rear circuit (right rear wheel) consists of the following steps:
- a transparent hose is put on the fitting, the fitting should be unscrewed one turn;
- the brake pedal is pressed all the way, and the ignition key must be set to position “2”;
- keep the pedal pressed and let the liquid flow out until we no longer see air bubbles in the hose;
- again, don’t forget to look at the brake fluid level;
- After the air is completely released, close the fitting and release the pedal.
Bleeding the left rear wheel:
- similarly to the steps described above, put the hose on the fitting and unscrew it one turn;
- the brake fluid flows out as a result of the pump operation until the air bubbles disappear, and the brake pedal does not need to be pressed;
- the pedal is pressed halfway through its travel and held in this position until the fitting is tightened;
- then the pedal is released, wait for the hydraulic pump to stop completely;
- set the key in the ignition switch to position “0”;
- The connectors on the tank lid are connected and, upon completion of work, the entire system is checked for leaks.
As one might understand, bleeding the brakes on an Audi sixth model is not a complicated process, since the steps are similar to the procedure on well-known cars of the VAZ family.
That is, the VAG COM manual is not factory? That is, the sequence of operations for bleeding a brake system equipped with ABS, prescribed in VAG programs, is bullshit? After all, screenshots of the VAG COM program are posted and not the nonsense of, so to speak, “experienced” people from the Internet.
In general, everyone decides for themselves how to properly pump the brakes. I will only say one thing: if there is air in the valve body, then dance with tambourines or ukuleles around the car, but without the appropriate software you will not expel the air from the valve body, because the valves are closed. This is the same as trying to blow into a container that is tightly closed with a lid.
Registration 08/26/2013 Address Kazakhstan, Yablok city. was Age 41 Messages 2,489 Diary Entries 1
| Thank you: |
| Received: 254 Sent: 510 |
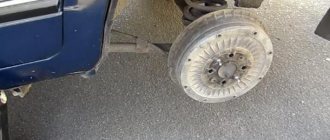
Setting the hand brake on a car with brake drums
In order to adjust the handbrake, the first step is to remove the wheel. The next step is to lift the wedge of the self-propagation mechanism upward. This is done using a screwdriver, which must be inserted into one of the holes in the wheel bolt, and lift the wedge.
Having made these simple movements, the next step will be to turn the cable tension coupling, and do not forget to systematically turn the drum by hand. When it feels like the pads have moved towards the drum, you will need to tighten the handbrake and then release it. Do this procedure a couple of times.
When you tried to spin the drum, and it turned out easily, you need to turn the tension clutch a couple more turns.
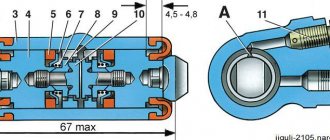
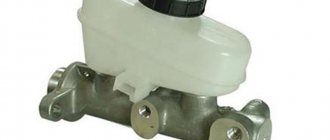
How to bleed the master brake cylinder
The optimal option for pumping the GTZ is to pump each section separately - releasing air through the nuts.
The best option is to pump each section of the turbocharger separately - releasing air through the nuts. But, for example, on the VAZ 2108 and the like it is difficult to ensure that the sections are pumped separately. Therefore, they often do it simpler - pour brake fluid into the reservoir attached to the cylinder (there are plugs in the holes for the tubes). Place the turbocharger on the studs of the vacuum booster without tightening the nuts. The tubes are screwed tightly, after which the cylinder is finally secured. As a rule, this is enough. But the most scrupulous car owners can bleed the entire brake system - so to speak, “for the soul.”