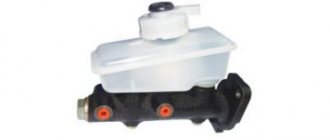
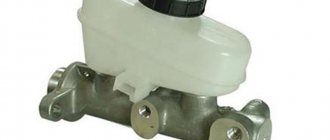
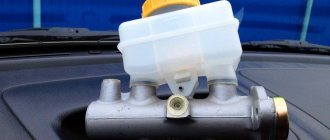
The brake master cylinder is considered the most important element of the braking system. It is thanks to him that the force applied to the brake pedal is converted into hydraulic pressure. Most modern vehicles are usually equipped with a two-section type of device. Moreover, each of the sections in them functions with a specific hydraulic circuit. For example, in cars with front-wheel drive, each of these circuits combines the braking system of both the front and the opposite rear wheel. But on cars with rear-wheel drive, everything happens a little differently. In them, one circuit is responsible for the operation of the front wheels, and the second, respectively, for the operation of the rear wheels. The GTZ itself is installed on the cover of the vacuum booster. Under the main cylinder there is a two-section tank, which is connected to it by special holes. To monitor the liquid level in the tank, it is made of transparent material.
Common GTZ malfunctions
Like any other mechanism, the GTZ has its own characteristic problems. One such problem is excessive pad wear and brake fluid leakage. As a result, the liquid level drops. If such a violation occurs, operation of the vehicle is prohibited until the problem is completely eliminated. In such a situation, you should definitely check the working and master cylinders, hoses and brake pipes, as well as the brake calipers for leaks. If a leaking part is found, it must be replaced. If the violation concerns the automatic drum brake adjustment system, this may be accompanied by a low brake pedal. In this case, you will need to restore the pedal travel manually. To completely eliminate the problem, you will need to completely clean the automatic adjustment system. Also, the problem can often be caused by depressurization of the brakes.
Fault diagnosis: how to do it?
As a rule, if there is a problem with the brake system, a corresponding signal appears on the dashboard. After detecting the indicator, the motorist must visually check the master cylinder body for problems. In this case, you need to inspect it for leaks, and also pay special attention to the places where the pipeline and circuit outlets connect. After completing this activity, you should measure the pressure in the circuits using a pressure gauge. after which the measurement results must be compared with control parameters, which are usually contained in the vehicle operating instructions. If there is a difference in these readings, then this will be a sure sign of a violation. As for the tightness of the device, it can only be checked on a special stand. Therefore, in this case, you will have to seek help from specialists.
Select the vehicle modification to search for the brake master cylinder
Engine: volume – 1.4 l., power – 90 hp, type – petrol, model – VAZ-11194. Drive: front. Year of manufacture: 2008-present time
Engine: volume – 1.4 liters, power – 88 hp, type – petrol, model – VAZ-11194. Drive: front. Year of manufacture: 2008-present time
Engine: volume – 1.6 liters, power – 82 hp, type – petrol, model – VAZ-21114. Drive: front. Year of manufacture: 2004-present time
Engine: volume – 1.6 liters, power – 84 hp, type – petrol, model – VAZ1110. Drive: front. Year of manufacture: 2010-present time
Engine: power – 82 hp, type – electric motor. Drive: front. Year of release: 2013-present time
In the next step, for an expanded selection, you can enter the vehicle's Vin code to go to illustrated catalogs, where you can find the layout of parts down to the bolt and duplicates that are not in the catalog of analogues.
After installing VUT from 21214
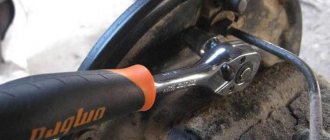
, after reading the advice, it was decided to switch to an axial design and install a GM bypass valve to replace the sorcerer.
Thousands of topics have already been written on the transition from diagonal to axial braking circuit. So, catch another one, but this time from Kostya... I installed everything exactly according to this scheme:
And so we take the GTZ from Kalina, produced by DAAZ
and just stick it in place of the GTZ 21214. I specially measured all the dimensions, they are completely identical except for the threads and the number of outlets, which is precisely why we took the Kalinovsky GTZ.
Perhaps the question needs to be answered. Wouldn’t it have been easier to plug one line on the 21214 GTZ? Or just swap the tubes, and similar questions... simpler BUT, THE ESSENCE OF INSTALLING THE GTZ FROM KALINA IS THE POSSIBILITY, IF NECESSARY, TO GO WITH MINIMUM ALTERATIONS (just grind 2 new fittings) TO THE VACUUM MAN ABOUT BMW OR LUCAS 10 INCHES OR MORE...
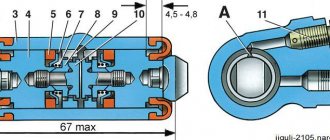
Well, having made sure that the correct GTZ was purchased, we put it in its rightful place (all the necessary drawings of the fittings are at the end of the article)
When the under hood was finished, we move under the bottom to the sorcerer.
It has a yellow entrance and a white exit. In the original, it is screwed directly into the GTZ. We measure and make drawings (all necessary drawings of fittings are at the end of the article)
and run to the turner, whoever was more cunning ran in advance))) We cut all this happiness through a tee, I bought new short tubes in advance
Here are the promised drawings of the necessary fittings: - adapters for GTZ viburnum/priors
Well, now about the feelings:
- goodbye sorcerer - the wheels on the same axle began to seize both at the same moment, there is over-braking of one of the wheels, pump the brakes, there is air in the system!
— I can’t say anything intelligibly about reducing the braking distance because I installed it together with a brake brake
— be sure to more carefully monitor, compared to the diagonal scheme, the condition of the braking system
Symptoms of a GTZ malfunction
The GTZ, or master brake cylinder, is one of the most important elements of the braking system, since it is thanks to it that the car slows down after the driver presses the brake pedal.
Modern cars are usually equipped with two-section gas turbine engines, which form two circuits that operate independently. This system allows the brake system to remain operational even if one of the circuits fails or loses its seal.
The operation of the GTZ varies depending on the location of the drive. On front-wheel drive vehicles, the first circuit controls the operation of the front right and rear left brake pads, the second - the front left and rear right. On rear-wheel drive cars, the first circuit controls the operation of the front brake pads, and the second circuit controls the operation of the rear brake pads.
Helpful information:
You can get professional advice when selecting a product and detailed information on all your questions by calling (calls within Russia are free).
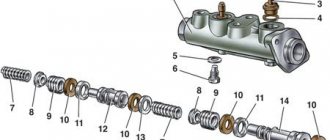
Let's find out what could be causing your brake master cylinder to fail. First of all, its breakdown occurs due to the fact that the brake fluid is unevenly distributed inside the mechanism.
The cylinder itself consists of two working sections, each of which is responsible for braking one of the front wheels, as well as the rear one, located on the opposite side. You should know that in rear-wheel drive cars the picture is completely different: the sections are responsible for the operation of the brakes, which are located along the axes.
The work of the GTZ itself begins from the moment the pedal is pressed. If a vacuum booster is provided in the design of the car, then the brake cylinder contains 3 chambers, one of which converts pressing the brake into pressure, which makes it lighter. By pressing the pedal, a certain load is transferred to the piston section, which forces the brake fluid to press on the caliper. This, in turn, compresses the brake discs through the pads.
Overview of individual elements
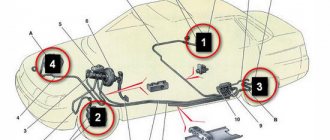
Diagram of the Kalina brake system:
Brake system diagram
| 1, 5, 13, 16 | Brake mechanism of the Kalina front wheel, including pads, caliper, disc, cylinder |
| 13, 16 | Brake mechanism of the Kalina rear wheel - pads, drum, cylinder |
| 2, 6, 12, 17 | Hoses going to the cylinders |
| 3, 7, 11, 18 | Tubes |
| 4 | Brake Master Cylinder (Brake Master Cylinder) |
| 8 | GTZ tank |
| 9 | Vacuum brake booster (VUT) |
| 10 | Brake pedal |
| 14 | Fluid pressure regulator in the TC of the rear wheels |
| 15 | Regulator knob |
GTZ and brake pedal
The main brake cylinder has not undergone any changes compared to previous Lada models like the VAZ-2110. It is attached to the vacuum brake booster and the force from the brake pedal is transmitted through the VUT.
On top there is a tank with two sections and with measuring notches to control the liquid level. A sensor located in the reservoir lights up an indicator on the dashboard when the brake fluid level drops.
Tubes extend from the GTZ to both circuits. It is due to the main cylinder that the fault tolerance of the entire structure increases. When the vacuum booster rod enters the cylinder and pushes the first piston, the primary circuit pressure increases and the brakes are applied. Due to the pressure, the second circuit also operates synchronously, providing uniform force on both axes.
Master brake cylinder
Since the car is front-wheel drive, the circuits are located diagonally, evenly distributing the force in case of failure of one of the circuits. For rear-wheel drive vehicles, the contours are divided into axles:
- first circuit – front axle;
- the second is the back.
The contours are not distributed to the rear and left sides, because braking will be uneven and the car may skid.
The brake pedal is standard. The exact same one is installed on many Lada cars, there are no differences. It is attached directly to the vacuum booster.
The brake pedal article number is 1118-3504010. Price around 300 rubles;
GTZ article number – 1118-350501082. Costs about 1500-2000 rubles.
VUT
The vacuum brake booster, like power steering, is designed to reduce the amount of force applied. The driver of a car without VUT would have to press the brake pedal hard, reducing safety and driving comfort.
The vacuum unit works due to the difference in air pressure that creates force. It consists of two chambers - atmospheric, into which ambient air enters, and vacuum, connected to the exhaust pipe of the engine.
Vacuum brake booster
Structurally, the VUT consists of the following components:
- chambers – atmospheric and vacuum;
- pedal pusher;
- check and follow-up valves;
- return spring;
- hydraulic cylinder rod;
- separation membrane;
- mechanism body.
The design of the VUT has not changed since the VAZ-2108, so any one will do, starting with this car.
Article number VUT – 11180-3510010-11. You can buy it for about 2500 rubles.
Lines and hoses
The tubes are interchangeable with Granta. There are 4 of them in total. The first two stretch from the main brake cylinder and go to the front wheel mechanisms. The second go from the GTZ to the pressure regulator next to the rear axle. They cost a little - 100-300 rubles.
Brake hoses
There are four brake hoses on the Kalina, and they stretch from the cylinders to the pipes going to the GTZ and VUT. The prices are similar - about 200 rubles.
Pressure regulator
The unit was borrowed from a VAZ-2108 car. The essence of the work is to adjust the fluid pressure in the brakes on the rear axle. Correction is made depending on the load on the rear axle.
Pressure regulator
Article – 21080-3512010-00. It costs around 1500 rubles.
Brake cylinders for front and rear wheels
The brake cylinder is the final element of the system that runs from the pedal pressed by the driver to the disc itself. When the pressure in the line increases due to the incompressible fluid, the cylinder piston presses the pads against the disc, performing braking. The piston is located in the caliper, and to remove it, the caliper must be removed.
The main disadvantage of brake cylinders is the possible ingress of fluid and oxidation. A soured piston will not move; you will have to remove the wheel and caliper to change the cylinder. There is no point in cleaning it. If the boot lets liquid through, a similar phenomenon will happen again.
The TC deteriorates if the pads are not changed for a long time. The piston will extend to a maximum depth not intended by the manufacturer and may become misaligned.
Brake cylinder (rear)
The rear and front RTCs are completely different. In the brake mechanism of the Kalina front wheel, the RTCs press the pads against the disc. The front ones, like many elements, come from the VAZ-2108, but the rear ones were installed from the VAZ-2105. The front ones also differ on the sides (right or left). In the Kalina rear wheel brake system, the working cylinder presses the pads against the drum.
The article number of the front right RTC is 21080-3501044-82. Price approximately 600 rubles;
The article number of the front left RTC is 21080-3501045-82. Costs about 600 rubles;
The rear RTC article number is 21050-3502040-00. The price is approximately 400 rubles.
ABS
ABS – anti-lock braking system. The Kalina braking system with ABS prevents wheel locking, maintaining controllability and reducing the braking distance. This system also controls the braking of each of the 4 wheels, maintaining stability by changing the fluid pressure in the RTC. When cornering, the braking force on each side is also controlled and different to avoid the vehicle skidding.
The ABS system itself on Kalina consists of:
- speed sensors and rotors on both axes;
- hydraulic unit;
- electronic part;
- hydromodulator;
- solenoid valves;
- return pump.
ABS system on Kalina
The speed sensor is similar to an electric motor. When the wheel rotates, an electrical signal is generated to the control unit, by the frequency of which the unit understands the speed of this very wheel. Then the microcontroller calculates how much the braking force on the wheel needs to be reduced or increased and sends a signal to the hydraulic modulator. It regulates the fluid pressure in the cylinders. If the pressure is too low, excess brake fluid goes back into the turbocharger.
One of the disadvantages of the ABS of this car, like many others, is the possible failure of the electrical part of the control unit. Bad roads and shaking may destroy the soldering (or the soldering from the factory was initially of poor quality), and the ABS will fail. If liquid gets into the block, a short circuit occurs, oxidation and subsequent rotting of the components. The main thing is not to hesitate and immediately take it to a service center or manually clean the board and solder the questionable elements. ABS repairs are carried out by automotive electricians.
Dashboard indicators
Sensors related to the brake system:
- ABS system status indicator. Lights up when there is a system malfunction.
- Brake system indicator. Lights up when the fluid level is low or there is another malfunction of its components. Located next to the ABS lamp.
- ESC indicator. Since the information is based on ABS sensors, it can also be classified as a brake system. Flashes when the system is activated or lights up when there is a malfunction. The inscription ESC OFF indicates that the system is disabled.
- Handbrake indicator. Lights up when the car is on the handbrake.
The instrument panel of the Kalina was changed only once. In the second generation, it looks a little different, but the sensors are approximately the same, the on-board computer display has only slightly increased, and the fuel level and coolant temperature have moved to the BC.
About checking the GTZ
Malfunctions of the master cylinder may require repair or complete replacement. It is recommended to start checking the brake cylinder with an external inspection. It is necessary to carefully check it for external defects and leakage of brake fluid. After a visual inspection, you need to check the operation of the brake pedal. To do this, you need to press on it and make sure that it does not jam or fall through.
As for the master cylinder, it can not only wear out, but also become rusty from the inside over time. This often happens due to the fact that the brake fluid contains oxygen and water in certain quantities.
The cylinder is designed in such a way that if brake fluid leaks from the first section, the other will remain in working condition. That is, the first piston will pass through its own section and give movement to the second piston, which in turn will create the necessary level of pressure for the operation of its own section.
If the second section leaks
, then the first trigger will look completely different. When the piston operates in a good section, the piston from the faulty one is drawn into operation. That, in turn, moves forward unhindered and rests against the movement limiter, thereby blocking the outlet. In turn, the pressure in the first section increases, which entails braking of the wheel mechanisms.
As a result, when you press the brake pedal, it falls through. In this case, braking efficiency is observed only at the end of the pedal stroke.
Failure of the gas turbine engine and its replacement
One of the common reasons why the brake master cylinder fails is its depressurization. In practice, this is noticeable to the naked eye: the brake cylinder will constantly leak, leaving a characteristic mark and a specific smell. The level of brake fluid in the reservoir will continuously decrease. All these signs indicate the need to repair the gas turbine engine and prevent irreparable consequences.
Depressurization of the brake cylinder
is a good reason to replace it with a new mechanism. Malfunctions of the master brake cylinder such as damage and severe wear of the piston seals, inlet collar, piston return spring, as well as scuffing and severe wear of the mechanism mirror indicate mandatory repair or complete replacement of the turbocharger.
Your life and safety depend on the proper operation of the braking system. Therefore, when the above symptoms appear, it is necessary to urgently eliminate the malfunction so that there is no sudden brake failure on the road.
Service
Maintenance consists of inspecting all components and replacing them in case of wear. All service looks like this:
- checking the brake pedal travel;
- checking and possible adjustment of the parking brake (Kalina has a handbrake from “nine”, so it must be tightened often);
- inspection of all tubes and hoses;
- inspection of the condition of brake discs, drums and pads;
- checking the brake fluid level and replacing it approximately every 40 thousand kilometers.
Maintenance of the brake system must be carried out every 10 thousand kilometers.