Manufacturing of brake pipes in Moscow
Production of brake pipes for cars, quickly (from 15 to 30 minutes) In production, high-quality materials are used, the pipe is produced. All you need is a sample fitting and the exact length of the tube. If it is not possible to bring the car to us, bring the maximum number of fragments of the old pipe; there are no catalogs for the length and type of tip, so the line is made strictly according to the sample; if the old one is irretrievably lost, you will have to bring the corresponding parts (hoses, calipers, master brake cylinders) .
We manufacture and replace brake pipes not only in critical situations when a leak has occurred, but also for preventive purposes. Serviceable brakes mean your safety and peace of mind.
To avoid ending up in a situation where the brake line is damaged, you need to diagnose the brake system in advance. Often, the car owner does not consider it important to apply for such a service as “Brake system diagnostics”, limiting himself to general diagnostics of the chassis. In our car service center, technicians always examine pipes for corrosion and wear, regardless of the primary task. We have already prevented trouble many times.
Keep an eye on the condition of the brakes. Pay attention to the braking distance, brake fluid level, leaks and stains under the car. This will help you avoid an unpleasant situation.
GTZ malfunctions
Main malfunctions of the main brake cylinder:
- wear of rubber sealing elements;
- formation of scratches and rust on the inner surface of the GTZ;
- air entering the GTZ.
During braking, the temperature in the working cylinders increases greatly, which leads to strong heating of the brake fluid. After 1–2 years, the properties of the fluid begin to change, which leads to increased wear of the rubber seals. After all, particles of metal oxides and hydroxides, as well as microscopic fragments of rubber seals, get into the liquid. As a result, the seals, and often the inner surface of the turbocharger, wear out, which leads to brake fluid leaks.
If there is even a small leak somewhere in the brake system, the fluid level in the reservoir will continually drop. When a critical value is reached, air may enter the GTZ, which will greatly reduce braking efficiency. The more air, the worse the system works. In some cases, the brakes only work after 4–5 presses of the pedal.
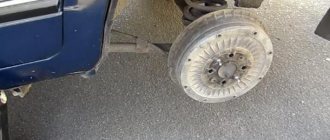
Replacing brake pipes, manufacturing
If a motorist was faced with the task of replacing pipes, he cannot always buy them promptly; as a rule, brake hoses and pipes are supplied to order. And you need a car today!
Our service center specialists have all the necessary equipment for precise molding of tubes and production of strong and durable connections. The quality of the final product boldly competes with the original from German and Japanese manufacturers!
There are a number of other reasons why you should contact us:
•Recognized experience and quality
• First class equipment
• Specialized consumables
• 5 years warranty
RANGE
Tube sets for brake systems of different car manufacturers
With such kits at our disposal, we can even select the correct pipe for your car without custom manufacturing. It is taking into account the design features of a particular car.
And when we need to make a complex fuel line or brake pipe, we have the following arsenal at our disposal:
COPPER
| Outer diameter of the tube. | Wall thickness. | Pipe outside diameter in inches. | Available in the following lengths. |
| 3.50 mm | 0.90 mm | 5m, 10m, 15m, 20m, 25m, 30m, 40m, 50m | |
| 4.50 mm | 0.90 mm | 5m, 10m, 15m, 20m, 25m, 30m, 40m, 50m | |
| 4.75 mm | 0.90 mm | 3/16″ | 5m, 10m, 15m, 20m, 25m, 30m, 40m, 50m |
| 5.00 mm | 0.90 mm | 5m, 10m, 15m, 20m, 25m, 30m, 40m, 50m | |
| 6.00 mm | 0.80 mm | 5m, 10m, 15m, 20m, 25m | |
| 6.35 mm | 1.00 mm | 1/4″ | 5m, 10m, 15m, 20m, 25m |
| 8.00 mm | 0.80 mm | 5/16″ | 5m, 10m, 15m, 20m, 25m |
| 10.00 mm | 1.00 mm | 5m, 10m, 15m, 20m, 25m | |
| 12.00 mm | 1.00 mm | 5m, 10m, 15m, 20m, 25m |
STEEL WITH PVC COVER
| Outer diameter of the tube. | Wall thickness. | Available in the following lengths. |
| 4.76 mm | 0.71 mm | 5m, 10m, 15m, 20m, 25m, 30m, 40m, 50m |
| 6.00 mm | 0.71 mm | 5m, 10m, 15m, 20m, 25m |
| 6.35 mm | 0.71 mm | 5m, 10m, 15m, 20m, 25m |
| 8.00 mm | 0.71 mm | 5m, 10m, 15m, 20m, 25m |
|
|
| Assortment of tips for terminating fuel and brake lines | Assortment of brake bleeder fittings |
| Gearboxes | Tees | Tube adapters | Adapters |
| Fastening lines to the body |
We produce brake pipes of any length and any configuration. Brake pipes for passenger cars and commercial vehicles.
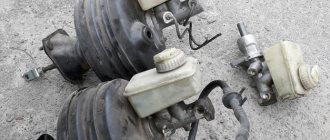
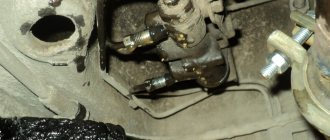
Dismantling and repair of GTZ
After dismantling the GTZ, it is necessary to carefully inspect it for fluid leaks. If the rear oil seal is damp or damp, most likely some of the brake fluid has entered the VUT and is corroding its membranes. It is necessary to pump out the liquid from the VUT using a syringe and a thin tube.
To disassemble the GTZ, drain the liquid from it, then carefully clamp it in a vice so that the holes for installing the tank are at the bottom. Remove the locking screws that prevent the pistons from returning too far. Remove the GTZ from the vice and use a puller to remove the retaining ring from the VUT side. Pull out the first piston and spring. Often the second piston comes out with difficulty, so you have to either knock the gas turbine engine on a wooden block, or plug one of the holes in the far cylinder using a suitable bolt and connect a compressor with a pressure of at least 6 atmospheres to the second hole. When removing the pistons, be sure to remember how the rubber seals are installed and how the pistons are located, this will greatly help during assembly.
Carefully inspect the inner surface of the GTZ. Any scratches lead to a decrease in braking efficiency and are therefore unacceptable. If scratches are found on the inner surface, the body or the entire GTZ must be replaced. After making sure that the internal surface of the GTZ is not damaged, buy the appropriate repair kit. When choosing a repair kit, give preference to products that are manufactured by partner enterprises of major automakers. Often original repair kits from one brand or model fit another.
Remove all old rubber seals from the pistons. Wash the pistons with water and dry with compressed air. Install new seals from the repair kit. Before installing, be sure to lubricate them with brake fluid, this will make them easier to fit into place and prevent damage. Do not confuse the direction of installation of the cuffs. Before assembling the GTZ, wash its body with water and detergents, dry it with compressed air and lubricate it generously with brake fluid. Do not use gasoline or other petroleum products for flushing; if you do not wash them off properly, they will corrode the rubber seals. Reinstall the pistons, tighten the retaining bolts, and insert the rear oil seal and retaining ring.
Brake tube quality
Due to the fact that new customers began to ask questions about the material used to make brake pipes, citing garage technicians that the use of copper is dangerous in the braking system, we inform you: we use special, certified consumables for repairs and manufacturing, this applies to both the pipes themselves and and fittings and tools.
Repairing the brake system is not a hack job for us, but a serious area since 2000. We still see most of our clients today. Not a single complaint about the quality of the tubes has been recorded. The quality of the material is excellent! The tubes are not made of pure copper, but of a special alloy that does not oxidize, does not react with other metals, and has high strength and wear resistance.
Brake master cylinder device
The basis of the GTZ is a cast iron pipe with a polished inner surface, in which the pistons move. When the driver presses the brake, a rod attached to the pedal activates the VUT. The VUT rod presses on the rear piston of the GTZ, which closes the compensation hole and creates pressure in the brake pipes.
As it moves forward, the rear piston increases pressure in the front chamber both through the vias and with the help of a spring that connects it to the front cylinder piston. The piston of the front cylinder begins to move, closes the compensation hole and increases the pressure in the front chamber and brake pipes.
Operating principle of the brake system
The operating diagram of the hydraulic drive of this system is simple: a depressed pedal that acts on the vacuum booster (if provided), or directly on the main brake cylinder, the latter, creating pressure on the hydraulic fluid, sends it through the pipes to the working rollers that release the brake pads.
It follows that the main unit in this diagram is considered to be the main cylinder; to understand how to repair the main brake cylinder with your own hands, you need to study all its components.
avtoexperts.ru
The GTZ is an integral part of the brake system, which performs one of the key tasks - converting the force applied to the brake pedal to generate pressure in the system. The GTZ interacts through the “vacuum valve” rod with the brake pedal directly. The task of the GTZ is to evenly distribute pressure across all circuits.
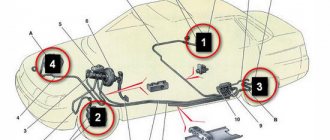
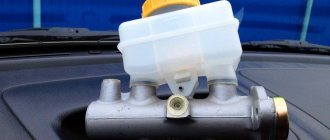
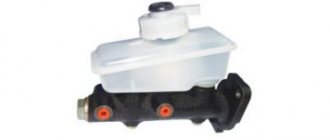
In the photo: master brake cylinder of VAZ 2110
The brake cylinder is located on the brake “vacuum reservoir” cover. A brake fluid reservoir is mounted above it. The sections of the tank and the GTZ are interconnected by bypass holes, and are responsible for a specific section in the system. The reservoir itself is designed to replenish the loss of “brake fluid”. Visually, the tank has a transparent body, with a scale for monitoring the liquid level. In addition to the scale, sensors installed in the tank are used to signal the liquid level, displaying information on the “tidy”.
Location of GTZ
Types and design of GTZ
Structurally, gas turbine engines are divided into the following types:
• Single-circuit.
• Double-circuit.
For clarity, we will consider the design and principle of operation using the example of double-circuit GTZ. They are more popular than their predecessors. The latter were installed mostly on cars of the last century (various models of Moskvich, Zhiguli, GAZ, GAZ-53, 33 (first modification) trucks, etc. The dual-circuit system is considered more effective in terms of braking. Now it is equipped with Most of the modern cars are both domestic (Lada Kalina, Priora, “Ten” family, “Samar”, Granta, Vesta, Xray) and foreign (Renault Logan, Volkswagen Polo, KIA RIO, Hyundai Solaris, Opel Astra, Vectra, Chevrolet Lanos, Aveo, Cobalt, etc.) The advantages of a dual-circuit brake cylinder system are that if, for example, one circuit fails, the brakes on one pair of wheels are lost, but another circuit remains in the “battle” another pair of wheels, and therefore brakes, of which there are none.
Each of the circuits is responsible for a specific pair of wheels. So, if the car is rear-wheel drive, that is, there is a division, the first circuit is responsible for the front pairs of wheels, the second for the rear ones.
However, if we are talking about a front-wheel drive vehicle, then the distribution of responsibility occurs diagonally: L.P./P. Z. and P.P./L.Z.
The brake master cylinder has two main types:
• With bypass hole directly in the cylinder body.
• With bypass valve in the piston.
GTZ device
GTZ, where bypass valves are installed on the piston, are used for installation on cars with ABS systems. The fact is that in addition to bypass valves, such devices include valves to maintain excess pressure in different circuits, which is especially important when ABS is operating.
To make it clear, pistons are placed one behind the other in the brake cylinder body. The first piston is acted upon by a rod from the brake booster while the second piston is secured, essentially "free" and moved by increasing pressure or "direct" force from the other piston. In order for the pistons to “move” tightly along the cylinder, cuffs are installed at the edges. There is an additional seal in the space between the pistons. In addition, the device includes two springs, a travel stop, locking rings and a plug.
Principle of operation
From the pedal, a force is supplied to the first piston of the GTZ through the “vacuum chamber”, from which it begins to move. When moving, the holes in the cylinder are blocked, thereby increasing the pressure in the current section. Then, due to the pressure of the first section, the second piston begins to move, similarly blocking the hole of its “block”, increasing the pressure in it. When the desired pressure is reached, the machine slows down. Next, the springs “pull” the pistons back. Passing again through the same holes, the pressure decreases to its original value. Excess brake fluid used in operation is returned to the reservoir.
Operating principle of the master cylinder
In cases where there is a leak in the system of one of the circuits, the operation of the unit continues, but with some changes, including operational efficiency. If the leak occurs in the first “compartment,” then the first piston will move until it hits the second. Then, moving together until the plug, they will create pressure in the second “compartment”. But, if there is a leak in the second “block”, then the pressure in the first will not rise until both pistons meet and hit the plug. Only then will the pressure in the primary circuit increase and the brakes will apply.
Signs, malfunctions and resource
Let's talk about the signs and malfunctions of the GTZ. So:
1. Pedal dips. Serious damage is often due to the fact that the pistons do not work and, accordingly, do not generate the required pressure. As a result, the pads (especially if they are drum brakes) cannot compress sufficiently. It requires disassembling the part and purchasing the necessary spare parts or the unit as a whole.
Brake cylinder disassembled
2. Soft pedal. This often indicates that some air has accumulated in the system. The solution is simply simple - you need to bleed the system. To do this, unscrew the relief valve and press the pedal until “clean” liquid, without bubbles, flows out of the holes.
Pumping the GTZ
3. Depressurization of the cylinder. If you notice that the fluid is disappearing, the effectiveness of the brakes has decreased, inspect the outputs from the circuits, fittings, and connections. There should be no leaks, otherwise we determine what caused the leak: cuffs, elastic bands, or the body itself has cracked. If the latter, it is better to buy a new part. If there is a leak through the gaskets, then it is enough to get by with a “repair kit”.
brake fluid leaks
4. Piston jamming. Sometimes it happens that the “vacuum valve” rod breaks off during braking, and the pistons “wedge”, and therefore it is problematic to move the car. To solve the problem, you will need to completely disassemble the unit, draining the brake fluid.
5. Boiling of the brake fluid. Everyone has probably heard about routine fluid changes (depending on the class of car and model, the replacement period is about 40,000 km or two to three years). Boiling occurs due to the fact that a certain percentage of water accumulates in the liquid (usually 3-5% per year), which means the temperature load threshold decreases (from an average of 200 to 140-150 degrees). During boiling, part of the liquid, due to saturation with air, returns to the container; as a result, very little of it remains in the GTZ. As a result, “pedal failure”.
6. The cuffs are worn out, the return spring is broken. Many car enthusiasts for a long time cannot find the reason why the brakes “jam”, even while driving. As a rule, the reason lies in failed seals or springs. They begin to leak fluid, do not return the pistons to their original position, and the effectiveness of the brakes decreases. Sometimes even pieces of rubber that come off get into the channels and under the pistons, blocking their movement.
GTZ spring
7. Development of pistons and cylinder. It is not uncommon that after long-term operation, failure to replace the cuffs in a timely manner, wear forms on the pistons, as well as in the cylinder itself. The solution is to purchase a repair kit and replace the entire pistons with rubber bands. However, first check the condition of the cylinder; if it is worn out, then it is better to buy a new part; polishing and boring is not the best idea. Acceptable production is considered to be 0.15 mm.
Brake cylinder repair kit
The service life of the GTZ may vary depending on the model and make of the car. As a rule, “original” parts last at least 100,000 km, even on domestic cars. On some foreign cars, GTZs “survived” up to 250,000 km. The old Japanese models - Corolla, Land Cruiser - are often distinguished by their durability.
Conclusion
As you can see, the device is technologically quite complex, and the principle of operation seems incomprehensible to many. But, in fact, everything is simple, and the driver’s attention to this unit is required to a minimum, but still one should not forget about prevention. Change various seals, springs, in fact, these are consumables. Depending on the nature of the drive, they may not “survive” up to 100,000 km. Also, do not forget about the brake fluid replacement schedule.
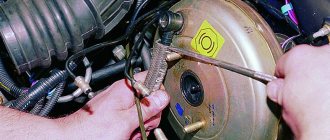
Replacing the drum
How to replace the brake master cylinder? All actions are carried out as during its repair. Pump out the hydraulic fluid from the reservoir, disconnect all the pipes from the housing, disconnect the roller itself from the vacuum booster or car body and from the brake pedal. Installation of the master cylinder is carried out in the reverse order. After completing all repairs, you should bleed the brakes. Bleeding is carried out according to the following scheme: rear right and left wheels and then the front ones. After bleeding, the brake pedal height is adjusted.
We also recommend watching videos on the topic:
Related publications:
- Types of brake pad wear sensors and how they work
- How to change brake fluid?
- Procedure for replacing brake discs
- Minimum brake disc wear thickness
- How to lubricate calipers: guides and cylinders
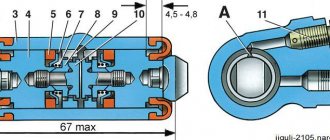
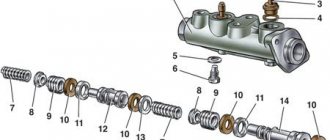
↑ Parts of the brake master cylinder
1 - cylinder body; 2 — lock washer; 3 - fitting; 4 - sealing gasket; 5 - sealing washer; 6 — piston lock screw; 7 — piston return springs; 8 - cup; 9 — pressure spring of the sealing ring; 10 - sealing ring; 11 — spacer ring; 12 — rear brake drive piston; 13 — washer; 14 — front brake drive piston.
Unscrew the locking screws 7 and remove all the parts in the order shown in Fig.
The principle of operation of the braking system
The operation of a hydraulic drive is based on the property of a liquid not to be compressed by external influences. Thanks to this, the liquid perfectly performs the role of a force transmitter without any losses, but provided that there is no gas in its composition.
The principle of operation of a hydraulic brake system is very simple: the driver presses the brake pedal, thereby beginning to act on the brake fluid located in sealed pipelines. Since it does not compress, the force leads to its movement through pipelines, the ends of which are connected to working mechanisms. Because of this, the pressure in the cavities of the mechanisms increases, and the pistons of the mechanisms come out of their seats, pressing the pads against the discs or drums - the movement slows down. When you stop pressing the pedal, the pressure drops (the fluid returns) and the pistons of the mechanisms return to their original position.