Cars admin26.02.2020
Mechanical chain tensioner. This is the first “tuning” part that should be installed in a car of the Niva family. An engine from the 60s of the last century, with an oil pump that is designed to drive oil on a 1.2 liter engine, not exceeding the speed threshold of 4000 rpm. What do AvtoTAZ designers do? They hang a hydraulic chain tensioner on the poor little oil pump and also, to make it not at all boring, 8 hydraulic supports. What do we have as a result? A small furry northern animal that crept up very close. Russia produces tanks and missiles well, but everything that the “designers” contribute to the design of the Fiat engine is rejected by it.
Problems that arise with the hydraulic tensioner
- cold weather, about 20 degrees below zero, the engine starts. Engine oil is cold and thick. The chain rattles terribly and finally jumps 6 teeth (as the autopsy showed), the curtain for the engine has dropped.
- normal weather. At idle, the hydraulics “whistle,” the chain “murmurs,” there’s simply not enough oil pressure.
- off-road conditions. The car is sideways on the mountain, oil is leaking from the oil receiver. The first thing in line that lacks it is the hydraulic tensioner and hydraulic supports. The engine begins to make death grunts.
How to install an injector on a Chevrolet Niva (with photo)
- The car is installed on the inspection hole. Wheel chocks are placed under the rear wheels and the hand brake is applied.
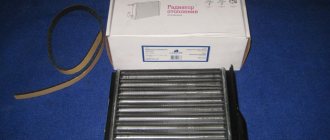
- The car hood is opened, unscrewed and the fan is removed. The radiator is also unscrewed and carefully moved to the side (it is not necessary to drain the coolant from there).
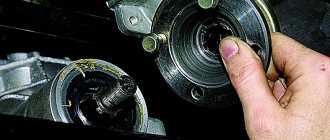
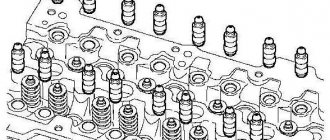
- Access to the engine valve cover is provided. Its fastenings are unscrewed with an open-end wrench, then it is carefully removed. There is access to the timing chain and the upper camshaft sprocket. The shaft pulley is rotated with a special wrench until the mark on the camshaft sprocket aligns with the protrusion on the timing case.
The mark on the timing case is aligned with the mark on the camshaft sprocket
The tension roller is removed, the chain can be removed
The mark on the crankshaft sprocket is precisely aligned with the DPKV core
Mechanical chain tensioner. Main manufacturers.
The photo shows three main options common in Russia. The first product is made by the people and on the forums of the ANC “auto pilot”. The second product is manufactured by Rusmash, usually called the pilot. The third tensioner belongs to the designer Isaev, colloquially Isay. My team and I personally have installed several dozen of each type of tensioner on cars, so I have the right to talk about statistics and operating features. Something from behind the scenes. The first two tensioners belong to the pen of one person. Designer Igor Medvedev. On motor forums under the nickname Rhodes-M. As far as I know, patents for these inventions or utility models are registered in his personal name. I work together with this person on other projects, so the information about the designs and manufacturing features is first-hand.
Autopilot. Principle of operation. Rack. Of the three, this is the undisputed leader. I have not noticed any shortcomings in operation. Cars with mileage of more than 150 thousand have already arrived where I installed autopilots from the very first batches. It is very convenient to work when replacing the camshaft; it does not need to be removed from the cylinder head. Flaw. It is difficult to find an “original” that has passed quality control. Medvedev left and the quality of input immediately dropped greatly. The cost of production has become cheaper.
Pilot. The operating principle is a toothed rack. Good quality tensioner. The big brother of "autopilot". Stable quality. It is also possible to work without removing it from the cylinder head. The main disadvantage is the huge percentage of fakes on the market. This tensioner was the first successful design, and the Chinese grabbed it. If Autopilot is completely impossible to find, then Pilot is very difficult to find “original”. Based on the St. Petersburg market, I estimate the prevalence of counterfeits for this tensioner at 70%. I work with Rusmash directly, so this as a “minus” is insignificant.
Isaiah. The operating principle is a clock spring. To avoid questions and insinuations, I contacted the designer directly and in 2015, we installed several dozen of them. The main disadvantage of the product, which the designer passes off as its advantage, is that there are no precision parts. When the rod doesn't move out too much, everything is fine. When the chain is worn out and the rod goes beyond half, it “walks” quite a lot. If we are talking about a production engine without “pretensions” for tuning, this may be acceptable. If the engine is “more serious” this is unacceptable. The tolerance for axial “walking” of the chain and sprockets in the timing tract is only 0.3 mm.
conclusions
As you can see, to carry out this work you do not need to have any special knowledge or tools. Therefore, you can handle this kind of work yourself if necessary . If you follow these recommendations, it is impossible to carry out such repairs incorrectly.
The gas distribution system of any engine must work correctly. If problems occur in its operation, this leads to premature wear of the motor and numerous breakdowns. To accurately adjust the timing, special marks are used, according to which the shafts in the engine are aligned. We will tell you about the correct placement of marks on a Chevrolet Niva car in this article.
Chain tensioner. Installation.
When replacing the hydraulic chain tensioner and installing a mechanical tensioner, I always remove the valve cover, and after “pulling out” the pin, use a ratchet wrench to make one full revolution of the crankshaft. This way you can avoid one “mean” moment. A slack chain can come out of the grooves of the tensioner and chain guide shoe, and if this is not noticed and corrected, very unpleasant consequences are possible (this applies to a single-row chain). Also, as a result of the first revolution, the primary slack of the chain is selected and, as a rule, the rod immediately comes out one or two more clicks, relative to the first shot.
All winter I listened to how this bastard is slowly but surely killing the chain, because until the car warms up to at least 50 degrees, the hydraulic tensioner sabotages its work, the chain clicks so badly. I read about automatic tensioners, monitored the reviews and decided to use “Isai”, there was also the “Pilot” option, but it’s not like they are not praised, but simply rare... but there were no bad reviews about “Isai”))). And then on Easter the car simply said - I won’t drive it anymore... The power dropped from the word “completely”, I just wanted to get out from behind the wheel and push it up the slightest hill. The debriefing made it clear that the chain guide had shattered into four pieces, and the chain had jumped two (!) teeth, judging by the marks. Well, the marks are set (moreover, it turned out that in order to find the lower one, the one on the shaft, you need to perform a feat because you can’t see it at all), the lower one was marked with an additional mark drawn with a needle file). And the time has come to replace the hydraulic tensioner with an automatic one.
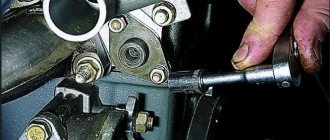
For those who decide to take such an action, I will say right away - Guys! Don't repeat my mistakes, drain the antifreeze and remove the thermostat! To get under it and unscrew the top nut securing the tensioner, you need to have about thirty centimeters of fingers... and then it’s advisable to screw it back in as well.
For the last week, in the mornings I have been confused by the sound of the engine starting when it was first started. And now the problem was diagnosed “by ear” (it’s just not the first time!).
The hydraulic chain tensioner (factory) has failed. And this is the second breakdown. As a result, the chain hits the shoe while the tensioner builds pressure. Hence the sound. It will end the same as last time - the shoe breaks, it will fall somewhere... in general, I don’t want to wait for this miracle event.
There is a desire to change the tensioner to a mechanical one. And do it yourself. I already know a lot about the car, I’ve done it. But I have no experience with the tensioner.
I ask anyone who is “in the know”, who has installed a mechanical tensioner, to tell me how, give advice, maybe links to hardware. If you don't mind, please repost. Somewhere before the end of the week I will study what it is, I plan to change it over the weekend. Afterwards I will post the report as expected.
Thanks in advance to everyone who responded!
Preparatory work
In order to create the necessary space to carry out work, you will have to perform a number of actions.
- Remove the air filter and close the carburetor neck with a plug.
- Disconnect the choke cable, electrical wire, and hoses. We move them to the side.
- Remove the fan, pump pulley and generator belt.
- We remove the sump protection and the engine boot, and clean the front engine cover.
- Now you need to put the Chevrolet Niva on the parking brake and place wheel chocks under the wheels. Then engage fourth gear. Now let's start the analysis.
- Loosen the ratchet nut by striking the wrench sharply with a hammer.
- Remove the valve cover, bend the lock washer of the camshaft gear bolt, loosening it by hitting the wrench with a hammer. Turn off transmission.
- Rotate the crankshaft pulley, align the marks on it and the front engine cover, and then align the marks on the camshaft gear and bearing housing.
Replacing the chain drive
7. Then remove the casing covering the motor. To do this you will have to remove several bolts. We remove the sedative. Unscrew the screw securing the oil supply pump. There is no need to remove the screw. It should only be loosened and left in place.
8. We begin to remove the tension element mechanism. We remove the MM line, remove the pressure sensor, after which you can remove the tensioner itself. 9. Remove the screw on the camshaft gear. We remove the gear. After this, remove the timing chain. At this point, the parsing process can be considered complete. Now let's assemble the mechanism. 10. We take the purchased oil seals and begin to install them in place of the old ones. First of all, we change the crankshaft oil seal. After removing the old component, clean the installation location and install a new oil seal. First, it is recommended to lubricate the new oil seal with engine fluid, for example. 11. Now we take the chain in our hands and also begin to lubricate it. After this, we put the drive on the crankshaft gear, the oil pump and then the camshaft. This sequence must be followed. When tensioning the chain, you need to ensure that the alignment of the marks is not disrupted.
12. Install the tensioner and carefully tighten the nuts securing it. We tighten the screws on the sprockets and check the alignment of the marks again. To do this, turn the crankshaft to the right again. 13. Replace the alternator belt. If the old belt is in good condition, then it is quite possible not to change it. 14. Lubricate the gasket that we will install on the cylinder head and install it. Don't forget to clean the seat from traces of the old gasket. We put the head in place and carefully tighten all the fasteners. We install all other parts in reverse.
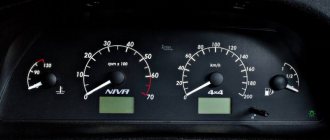
Now let's check the operation of the mechanism. To do this, start the engine and listen to how the engine operates. By hearing it is quite possible to determine whether everything was done correctly or something went wrong. If the sound is familiar, rustling, then everything is done correctly. If there is a characteristic grinding sound, the procedure must be repeated.
When is it time to change?
As you know, the timing chain is a more reliable element of the gas distribution mechanism than the belt. Unlike a belt, it does not wear out so quickly and the likelihood of it breaking is quite low. However, sooner or later, every owner of a Niva Chevrolet faces the question of the need to replace the chain and set the marks according to the standard.
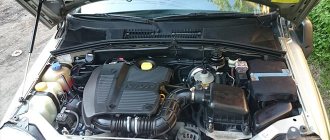
Niva Chevrolet car
As for the timing, the manufacturer does not regulate the frequency of replacing the mechanism chain on a given car model. As a rule, this happens no earlier than after 100 thousand km. But if, during operation of the internal combustion engine, a sound appears that was not there before, this may cause the chain to stretch. If the chain cannot be tensioned using the usual method, this may indicate the need to replace it.
Phase diagnostics may also indicate the need to change the chain. If the mark on the camshaft sprocket does not match the one on the bearing housing, the element should be replaced. Likewise, if chips have formed on the bushings.
In addition, if you find cracks directly on the chain itself, then this, of course, also indicates the need to replace the component.
Purpose
The first gear on the gearbox is engaged, allowing you to avoid spinning when unscrewing the crankshaft gear bolt. The fastener is removed with a lock washer.
To prevent the bolts from falling into the engine sump, use a deep-head wrench or unscrew the bolt by hand. Remove the chain tensioner using a screwdriver. It should be replaced in case of tension or tension, during scheduled maintenance, after a thousand km.
To do this, you need to loosen the fastening of the lock washer, and then remove the bolt from the camshaft sprocket using a 13mm wrench. After this, the gearbox must be set to speed 1 so that the bolt securing the crankshaft gear does not turn.