A breakdown of the stove fan on a Chevrolet Niva is perhaps the worst thing that can happen to a driver who is far from home in thirty-degree frost. However, such a turn of events can be avoided. The main thing is to pay attention in time to the characteristic signs indicating that the stove fan will soon fail. And after that, you can replace the device yourself without exposing yourself to the risk of frostbite.
- 2 Signs of malfunction of the Chevrolet Niva heater fan
- 3 Replacing the heating fan fuse
3.1 Sequence of actions
- 4.1 Replacement sequence
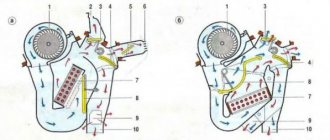
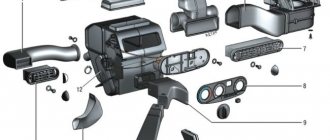
Location of the heater fan on the Chevrolet Niva
The heater fan is located in a special niche under the cabin filter, just below the windshield of the car. Under its impeller there is an electric heater motor connected to the on-board electrical network and to the vehicle's safety unit.
The Chevrolet Niva heater fan impeller is located under the cabin filter and is marked with the number 15
If the owner of a Chevrolet Niva decides to replace the heater fan, then it can be removed in two ways: through the interior of the car, partially disassembling the dashboard, or through the hole in the cabin filter (but before that you will have to remove the filter itself, of course). The second method will be discussed below, since it is considered the least labor-intensive and even a novice driver can use it.
Why do you need to change the faucet?
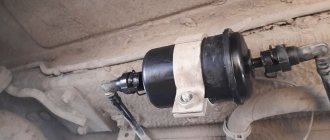
In Niva cars, as in classic Zhiguli models, the heating intensity of the interior is controlled using a special tap. It is installed on the coolant supply pipe leading to the heater radiator. The stove tap is made in such a way as to open and shut off the flow in just half a turn of the rod. Thanks to this, the faucet can be controlled using a rod attached to a lever on the center console.
In reality, no one uses the heater valve as a regulator; more often it is used to cut off the heater from the Niva engine in the summer. This is where the following problems arise:
Source
Signs of malfunction of the Chevrolet Niva heater fan
There are several typical signs by which a driver can understand that something is wrong with the fan. Here they are:
- the fan does not rotate. It’s impossible not to notice this, because the car’s interior suddenly becomes unusually quiet. This problem occurs when fuse F18 in the safety block, which is responsible for the electrical circuit of the fan motor, fails. In addition, the winding on the fan motor itself may be damaged. For example, the insulation on it may be broken, after which the adjacent turns short-circuit;
The adjacent turns on the Chevrolet Niva fan winding shorted and the motor burned out
- reducing fan speed. It is much more difficult to notice such a malfunction. With this breakdown, the electric motor of the stove continues to work, but not at full power. An experienced driver with good hearing will understand that the heater fan has begun to make a different noise. This means that the rotation of the shaft is greatly hampered by worn brushes or a commutator. The problem is that a motor with such a breakdown consumes more current. And this, in turn, can damage fuse F18;
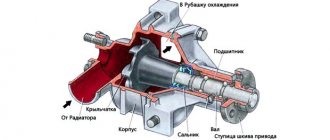
- fan creaking. It occurs when the bearings in an electric motor wear out. Moreover, as the bearings deteriorate, the creaking gradually increases, turning into a grinding sound. If the driver does nothing, the fan will simply stop and fuse F18 will burn out. In the event of this breakdown, the car owner will have to replace the entire electric motor, since it is not possible to find bearings for it on sale.
Replacing the stove Lada 2131 (VAZ 2131)
Dear friends, today we will tell you how to independently remove and install the electric motor of the stove fan on the Niva VAZ-21213 and VAZ-21214. The procedure is quite simple; we only need two screwdrivers, a Phillips screwdriver and a flathead screwdriver with a thin blade. The reason for removing and replacing the heater motor may be its squealing due to wear on the bushings. Often even new heater motors suffer from this problem, so when replacing the heater motor, we recommend that you install a bearing motor. To get to the motor we need to remove the lower part of the stove body, and to get to it we need to remove the shelf, the radio panel and the decor on the tunnel.
In general, let's get started, and start by removing the storage shelf under the glove compartment, pick up a Phillips screwdriver and unscrew the following screws:
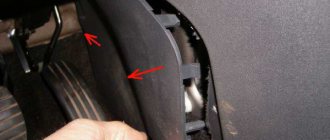
We move the shelf to the side. Then we move on to the decorative trim on the tunnel, it is also held in place by screws, they are located in this way, see the photo below:
Carefully remove the chips from the cigarette lighter, put the tunnel decor aside, we don’t need it for now. Now let's move on to the tape recorder panel. To begin, use a flat screwdriver to pry up the buttons one by one:
Carefully remove the terminals from them and move all the buttons to the side. We recommend labeling the terminals, this will speed up the assembly process and help avoid mistakes!
Gently pull the plastic nozzles of the stove levers towards you, they will come out with force:
Now again we take the Phillips screwdriver in our hands and unscrew the fastenings of the radio panel to the dashboard on both sides:
Then use a flat screwdriver to pry the panel from above and carefully remove
Now we have access to the stove body. But first, we unscrew the rotation relay to remove the minus chip of the heater fan from it:
Now we are interested in the metal latches of the stove, here they are in the photo, there are only 4 of them, two on each side:
They can be removed either by hand or by prying them with a screwdriver. Be careful, they are springy and can fly away in an unknown direction, to the land of lost things
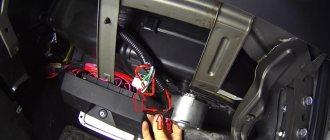
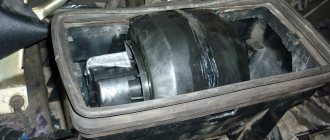
After this, the lower part of the stove body falls into our hands and is calmly removed, we gain access to the culprit of the action - the stove motor:
It is also held on by two metal latches; it is more convenient to pry them off with a screwdriver:
After this, disconnect the motor wiring and remove it from the stove body
We remind you that the stove motor is essentially unrepairable and if it “squealed” then the bushings are damaged and then only a replacement is needed. Ideally, straight to the bearing. When assembling and installing, do not forget to put rubber spacers on the motor, otherwise vibration will occur. We perform assembly in reverse order. So you have learned how to independently remove and install the heater motor on the Niva VAZ-21213 and VAZ-21214. Good luck to everyone on the roads and fewer breakdowns.
Modernization of the Niva stove
Before installing the fan, I asked myself some questions, some were answered by this site and many others. The rest was figured out during repairs and visits to auto stores of different models. To upgrade the air intake, you will need all the remaining material that you cut, so don’t throw away the plastic and use a ruler and caliper before work.
What was and what has become.
The partition crashed from part photo number 1
Shown here is the location of the drainage system in case of rain.
Sealing rubber from VAZ 2104
Inside, before foaming, I sealed the edges with foil tape (does not corrode).
Let's start installing the fan control resistor at four speeds. We make a hole in the bottom cover (so that the resistor fits and does not touch the fan)
We make a lid from plastic leftovers to cover the resistance.
Cut a hole for the resistor itself (resistance)
And the final photos.
Installing the engine from the VAZ 08 stove on the Niva VAZ 21213
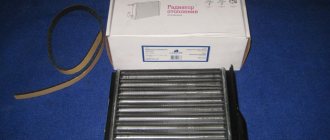
Removal of the interior heater radiator and its activation valve on a VAZ 2121 and Niva 2131 is carried out to replace it if its seal is broken, that is, for subsequent repairs or complete replacement with a new one, as well as to replace the valve. To carry out repair work, prepare a standard set of tools and perform the following sequence of actions:
- Drain the cooling system with the heater radiator valve open.
- Next, remove the hoses from the heater pipes and the seal.
- We remove the heater fan.
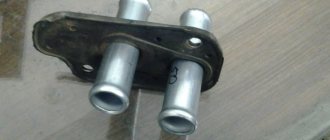
- We take out the radiator with the tap, and then use a ten key to unscrew the two bolts securing the tap itself.
- We remove the tap.
- Next, remove the nuts of the tank mounting bolts from the grooves of the tank.
- On the opposite side, unscrew the two bolts and remove the outlet pipe along with the rubber sealing gasket.
- Carry out the necessary replacement, then assemble and install in the reverse order.
At this point, the repair work to remove the heater radiator, its tap and pipe on the VAZ 2121 and Niva 2131 cars has been completed.
Sources
- https://www.vazdriver.ru/snyatie_i_zamena_i_ustanovka_ventilyatora_pechki_na_nive_vaz21213_i_vaz21214.html
- https://spike.su/index.php/Pechka-NIVA.html
- https://remont-vaz2106.ru/kak-snyat-radiator-otopitelya-s-kranom-vaz-2121-niva-2131
Other details
The standard heater radiator and thermostat are also replaced.
Preference is given to three-row copper radiators. They are more efficient in operation and leak less often. The thermostat is replaced with an analogue one or its thermal insert is modified. Do-it-yourself modification of the stove on Niva 21213 with your own hands is quite labor-intensive and takes a lot of time. To modify the heating system of this car, you can find ready-made kits on sale that make this work easier. The procedure is presented in the video “Remaking the stove on Niva 21213 with your own hands: video instructions.”