Causes of poor stove performance
The Chevrolet Niva has a system that simultaneously performs the functions of heating in winter and cooling in summer. This system consists of several components, among which are the radiator, control unit, pump, pipes, tap and others. The failure of any components favors the emergence of a situation in which the car owner begins to claim that the stove on his Niva Chevrolet does not work at all.
In this regard, it is important to understand that the heater will not blow well, even if microcracks appear in the pipes, if the additional or main resistor fails. An excessively dirty radiator can also act as an obstacle to proper heating of the interior.
Algorithm of actions
If there are no problems with resistors, continue to explore other mechanisms
Check the antifreeze level; it is very important that it corresponds to the indicators indicated in the technical documentation for the car. If you detect a lack of coolant, add to the required level
Be sure to check the level again the next day. If you find that the level has dropped again, then you will have to look for the source of the leak. Often the culprit is old pipes that have lost their elasticity. For this reason, small cracks appear on their surface, through which antifreeze easily leaks. By the way, a lack of coolant not only prevents proper heating of the interior, but can also cause serious engine damage. For this reason, it is important to replace leaking pipes in a timely manner.
If the control unit turns out to be problematic, you can only dismantle it. It is unlikely that you will be able to repair it yourself, since this requires you to have the appropriate knowledge, as well as the necessary instruments and devices. For this reason, you will have to use the services of auto repairmen.
It would be a good idea to check the cabin filter, which, if excessively dirty, provokes an increase in current strength, as a result of which the fuses blow. Without them, not a single device powered by electricity can function.
The reason that there is no or very weak heating air entering the interior of your car may be a “clogged” heating system. Experienced car owners recommend flushing the entire system. Such washing will not be superfluous, especially in cases where you purchased your “iron friend” not at a car dealership, but from your own hands. You don’t know what the appeal was to the car, to its technical part before you. You do not have information about what you previously poured into the radiator, or whether you used additional additives. Improper use of chemical components can provoke extremely undesirable consequences.
Do not regret the time spent searching for the cause of the failure. Even if you cannot identify the problem yourself, you will gain excellent practical experience, you will understand how to get to certain components of the car, which will later act as a real priceless treasure for you.
This is interesting: Replacing heater valves on a BMW E34/E39: we do it quickly, accurately and with our own hands
Faucet replacement process
Those car owners who have an amazingly developed engineering sense, and whom nature has endowed with design abilities, immediately notice that the weak link in the Chevrolet Niva heating system is the fan. They are also particularly unhappy with the design of the air ducts. It is for this reason that it is initially recommended to modernize these two components. Those who have already walked this path argue that it is completely unreasonable to stop at the achieved result, since, in addition, even the stove faucet is unable to do its job as efficiently as possible. The reason for this is its small internal cross-section. In such a narrow space, the coolant cannot move quickly, and accordingly, it is impossible to count on quickly heating the interior. It’s even worse when the heating becomes ineffective due to the failure of this tap. In this case, it becomes necessary to carry out certain repair work, during which many people have a question about how to replace the heater tap on Niva 21214. We will help you understand this issue.
Read more: Audi 80 carburetor conversion
Replacement algorithm
So, if you have a critical situation in which the stove faucet needs to be replaced, you will, of course, first need to decide which faucet is most suitable for you in this case. Experienced craftsmen recommend giving preference to cranes from foreign cars. They benefit from a longer service life as well as high operating efficiency.
By the way, if you want to minimize your financial expenses, and also not subject yourself to labor-intensive actions in the future, it is best to pay attention to cranes from budget Volkswagen or Opel models. So, after you have not only decided, but have already purchased the desired replacement option, you can begin to take immediate action.
Initially, you should disconnect the hose from the pipe. This action is quite difficult, since the hose sits tightly on the pipe. If you move incorrectly, your hand may slip and you may be injured. For this reason, we recommend that you wear gloves to avoid such unfortunate consequences.
Now, using a screwdriver, unscrew the screws that secure the seal, pressing it against the partition. After removing the screws, lightly pick up the seal and remove it completely. It will be more convenient for you to carry out the following steps from inside the car; they consist in the fact that you need to loosen the clamping screw of the faucet using an open-end wrench.
Next, remove the cable from the faucet lever. All that remains is to unscrew the fixing elements holding the radiator. They can be either screws or nuts. Now you can remove the tap; all that remains is to remove the pipe, freeing it from the fixing nuts.
Now the work ahead is to install a new crane. All actions are performed in exactly the same way, only in reverse order. We recommend that you use a little trick when attaching the radiator. Simply tightened nuts fall out almost instantly. To avoid this, take plasticine, place nuts on it and tighten them. When assembling, be careful with the cable. You cannot reduce its length, otherwise it will be difficult to perform some actions with the stove, in particular, adjusting the temperature or speed of the warm air flow.
So, don't be afraid to do some things yourself to improve the performance of certain parts of your vehicle. If you strictly follow our recommendations, you will be able to enjoy the results achieved.
For what reasons is the Chevrolet Niva crane replaced?
The heating valve in the car serves the site, so it is necessary to change it for both technical and financial reasons. If a faucet breaks, it is thrown away, and the causes of the malfunction may be as follows:
- Violation of tightness. When the elements rub, they wear out and therefore no longer fit together as they should. As a result, various smudges appear, which are very noticeable.
- Internal oxidation of elements. In summer, the stove tap is closed for a long time, so during this period its elements oxidize and stick to each other. So, opening the tap without breaking it is almost impossible.
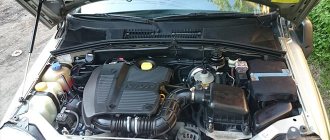
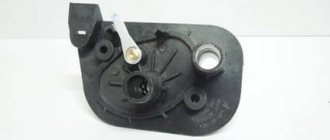
On a Chevrolet Niva, the heating valve for the heater is located in the wall of the engine compartment, so when you open the hood of the car, you will see a pipe that goes to the valve adapters from the radiator.
To get to it, you need to dismantle the torpedo in the cabin on the passenger side.
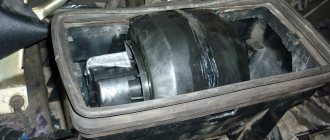
The stove valve is mounted in a special niche in the engine compartment
If the tap has been replaced, then it is better to install new pipes along with it, because during operation they have probably already lost their elasticity.
The principle of installing the stove tap
Before replacing the heating tap on the stove, you need to perform preliminary work:
- remove the glove box;
- partially drain the coolant.
Antifreeze is drained as follows:
- We carry out all work only on a cooled engine, so as not to accidentally get burned. On the left side under the motor we place a bowl or any other plastic container.
To dismantle the stove tap, you need to drain the antifreeze
- If possible, open the tap as far as possible.
In order to drain the antifreeze, you must fully open the stove valve. - We prepare a meter-long hose, use a key set to “13” to unscrew the plug on the cylinder block. We substitute the hose and insert one end into the basin.
To drain the coolant, you need to unscrew the plug on the cylinder block
- Lightly hold the hose with your hand and little by little open the cap located on the expansion tank. We do this work carefully, as the stream of antifreeze will gradually increase.
In order to remove the heater valve, it is necessary to completely drain the antifreeze.
- Loosen the clamp on the carburetor heating pipe and remove this part from the fitting.
- After all the coolant has flowed out, screw the plug into the block and tighten it well.
The glove box can be removed by unscrewing all the screws that hold it in place. Some of them are located deep in the part, others - under the tank lid.
Location of the Niva Chevrolet heater valve
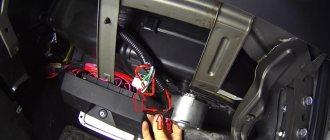
The heater valve is located on the left side of the central dashboard, where the gas pedal is. There are two sectors for controlling the interior heater. In your situation, the cable may have become loose.
New cable and old loose one.
The following two tabs change content below.
- About the expert:
I'm just sick of cars. I try to study in detail every car I have owned. I enjoy driving at night on city streets. I try to do my own repairs on my cars!
Try to crawl up to the faucet and turn it with your hands so that the valve closes.
Heater valve under the hood
Under the hood.
The mechanism itself is located under the hood.
Replacement frequency, how much and what kind of fluid is needed
- loss of coolant properties. You can check the quality of the antifreeze used using a test strip, which is sold in the same places where the liquid itself is sold. Place the strip in the expansion tank, then pull it out. The strip comes with a color scale, according to which you can understand how much longer the car can be used before replacing the coolant;
- change in color of the coolant to tan or red. This means that rust has appeared in it;
- the appearance of sediments, flakes and dense formations in the liquid.
The coolant for the VAZ 21214 Niva injector should have a freezing point no higher than -40 degrees. Typically, the manufacturer fills in TOSOL TS-40 (manufacturer in Dzerzhinsk). When replacing antifreeze, it can be replaced with antifreeze with G12 approval; it is safer for the entire cooling system. You can also use original Lada G12 antifreeze, which is suitable for all cars of this manufacturer.
Antifreeze volume table
| Model Niva | Engine capacity | Antifreeze volume | Original/recommended fluid |
| VAZ 21214 | 1.7 | 10.7 | Lada G12, TOSOL TS-40 |
| VAZ 21213 | 1.6-1.7 | 10.7 | |
| VAZ 2121 | 1.4-1.8 | 10.6 | |
| VAZ 2131 | 1.7 | 10.7 |
Heater and radiator: replacement, algorithm
Timing marks on a Chevrolet Niva car
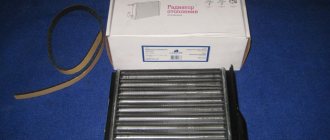
Once a leak is detected, you can immediately buy a new radiator and clamps. Touch the stove pipes in advance - if they are “oak”, it is also advisable to change them.
Replacing the radiator is simple. To carry it out, you do not need to remove the entire dashboard, as in some VAZ cars of the previous family.
Algorithm of actions:
- Remove antifreeze or antifreeze from the cooling system. To replace the radiator, simply drain some of the liquid.
- Unscrew the expansion tank cap and the pipe from the throttle assembly. Instead, put on a hose and lower its end into a container.
- After the liquid has drained, carefully bleed the system.
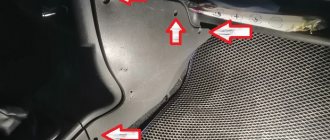
Remove the glove box. Unscrew all the bolts on the side trim and the wall of the box itself. Don't forget to disconnect the wires from the button and backlight.
Unscrew the passenger foot warmer air duct and remove it together with the intermediate air duct.
Drill a hole in the bottom of the old radiator and lean a hose against the body, the other end of which is lowered into a container. Drain any remaining fluid from the radiator.
Unscrew the radiator mount, loosen the pipe clamps and move them to the side. Remove the radiator.
Install the new radiator, put the pipes on it and carefully tighten them with clamps. Reassemble in reverse order.
When installing the radiator, it may wrinkle a little - this is not critical.
For greater tightness, experts recommend wrapping the heater around the periphery with foam rubber; this is an example of a factory installation.
With this installation, all warm air will be directed into the air ducts.
Why do you need to change the faucet?
In Niva cars, as in classic Zhiguli models, the heating intensity of the interior is controlled using a special tap. It is installed on the coolant supply pipe leading to the heater radiator. The stove tap is made in such a way as to open and shut off the flow in just half a turn of the rod. Thanks to this, the faucet can be controlled using a rod attached to a lever on the center console.
In reality, no one uses the heater valve as a regulator; more often it is used to cut off the heater from the Niva engine in the summer. This is where the following problems arise:
If you do not shut off the fluid flow in the summer, then the interior of the VAZ-21213 will become very hot. In the Chevrolet Niva, the faucet is missing as a weak link, and the stove is constantly heating up. The design of a regular Niva is not designed for this and the problem needs to be solved somehow.
The situation is the same in the other two cases, and due to a leak, harmful antifreeze vapors will accumulate inside the car. Since the design of the heater valve does not provide for its repair, the part only needs to be replaced.
This is interesting: Replacing the rear axle gearbox seal of a VAZ 2107
Heater diagram
If the temperature with a fully warmed-up engine is within degrees, we look for the reasons for the lack of air in the legs in the heater design. A feature of the stove on a Chevrolet Niva is the absence of a heater radiator tap, that is, antifreeze circulates in a full circle in winter and summer and passes through the heater radiator.
Taking this fact into account, the factory somewhat complicated the design of the air ducts and air dampers - there are two of them in the Chevrolet Niva. One works for frontal airflow, the second is responsible for supplying air to the feet of the front and rear passengers and the driver.
It is with this damper that problems arise that we will try to solve. We take out the central air duct and the air duct that conducts air to the driver’s feet.
Unscrew 2 screws on the radiator.
And we begin to assemble in reverse order. If during assembly you have a couple of extra screws left, then you have assembled everything correctly! If you have any questions or maybe I forgot to add something, please contact me, I’ll be happy to help.
Niva Chevrolet Shaitan Cyclone in the legs, revision!
The selection of the stove operating mode, temperature and air flow direction is made using the stove control unit located on the center console. Heating system with air conditioning The principle of operation of a car heater with air conditioning is similar to that described above. However, its design is significantly different. Instead of an intermediate heater housing, an air conditioner evaporator is installed, hidden by a plastic casing.
When the air conditioner is turned on, air is supplied to the cabin through the evaporator using a damper. The design of a car heater with air conditioning is somewhat different: To carry out high-quality repairs, you first need to understand the reasons and identify the faulty element of the system.
The stove does not heat the footwell. There may be several reasons why the stove does not direct air to the feet. First you need to find out whether this mode is turned on correctly.
Due to the design features of the damper system, the direction of air to the legs is carried out as follows: Set the fourth rotation speed of the stove fan. Set the heater mode switch to the upper vertical position.
Switch the mode controller one position to the left. After this, air should begin to flow into the legs. If this does not happen, the procedure should be repeated several more times.
If the mode still does not turn on, you should check the following components: Coolant leakage If antifreeze leaks from the cooling system without visible streaks on the radiator and pipes, you need to pay attention to the condition of the heating system
The main signs of a coolant leak through the heater are: Typically, the leak occurs through the heater radiator. To verify this, you need to remove the lower part of the center console.
DIY heater replacement
If traces of moisture are detected in the area of the stove body, it is recommended to replace the radiator. If a coolant leak is detected through the heater radiator, it should be replaced. Before replacing the heater radiator, you should check the tightness of the heater pipes and their connections.
The stove does not warm up the air well. Often the stove does not warm up the interior effectively enough. Instead of hot air, slightly warm or even cool air comes from the deflectors.
This usually happens for the following reasons: Before the decisive step of removing and replacing the heater, you should pay attention to the heater core. It may well be that the reason for the non-working state lies precisely in this
In a Chevrolet Niva car, the stove can be installed and removed without any problems, the main thing is to follow the procedure. Radiator The radiator of the Niva-Chevrolet stove is a sensitive topic and deserves separate consideration.
The standard heating system in this car does not always work well and produces little heat. The standard radiator begins to leak over time, and you have to replace it.
But don’t rush, maybe it makes sense to clean it or solder it? But if there is no option other than replacement, then that’s what you should do.
Before replacing the radiator, you need to understand the existing types of such devices. Types of radiators Radiators are made from two types of materials: Each has its own pros and cons. An aluminum radiator heats up quickly, is inexpensive and has good rigidity with low weight.
What is a stove tap, its functional features and location
The stove tap is a metal part that resembles a regular water tap. Antifreeze (coolant or coolant) constantly flows through it.
In the Chevrolet Niva, the coolant can flow through 2 cooling circles: winter and summer. The heating tap gives the driver the opportunity to switch to one of them. For example, with the onset of summer, when the tap is fully open, it is almost unbearable to be inside the car due to the heat, so it is closed for this period of time, and with the onset of cold weather, the tap is opened again. Due to active use, the part eventually becomes unusable and leaks coolant.
It is very easy to determine whether a part is faulty - lift the cover in the Chevrolet Niva interior. If there are obvious signs of leakage, the unit must be replaced.
In the diagram you can see where the heater tap is located and the circulation of antifreeze in two circles
It is best to replace the metal faucet of the stove with a ceramic one, which will increase its service life several times.
Where is the heater valve located on a Chevrolet Niva - Automaster
Most motorists today are dissatisfied with the operation of the stove on the Chevrolet Niva. There are many complaints: from the build quality of the device to the unsatisfactory functioning of certain parts, one of which is the stove tap. This element can be replaced even in a garage.
What to put in place
Before rushing to the store for a new part, you should first disassemble the assembly and make sure that the faucet is to blame for all the troubles. It often happens that the seal between it and the heater radiator, where the rubber gaskets are located, leaks. They become limp and begin to leak coolant. The cause of jamming may be the rod attached to the element.
Also interesting: Soundproofing the Niva: advice from the experts
Faucets made of metal or ceramic are available for sale. In terms of price, they are approximately the same; in terms of reliability, motorists praise ceramic ones more. In addition, you need to purchase 2 new gaskets and high-temperature sealant (usually red).
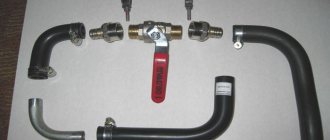
For reliability, some VAZ-21213 owners prefer to install a regular plumbing faucet with a diameter of 15 mm (DN 15), connecting it to the stove with flexible pipes. The option is reliable, since plumbing fittings are more durable than car parts. But then it’s better to forget about convenient controls, because every time you have to dive under the glove box on the front passenger side to open or close the valve. It is also installed on the engine side, under the hood, resulting in the same “conveniences”.
Types of radiators
Radiators are made from two types of materials: copper and aluminum. Each has its own pros and cons. An aluminum radiator heats up quickly, is inexpensive and has good rigidity with low weight. However, such a device cannot be repaired, since it is very problematic to solder it. Aluminum also does not retain heat well, so it cools quickly.
Copper radiators are more expensive, but have their own positive characteristics:
- Unlike aluminum ones, they last longer because copper does not corrode.
- They maintain the set temperature for a long time, despite the fact that they heat up slowly. In the Niva SUV, the stove requires heating more space than in conventional sedans. This is why you should choose a high-quality radiator.
The downside of a copper radiator is one thing: acquiring parts of acceptable quality is not very easy. A copper device is more expensive than an aluminum one. Its price is in the range of 2000–2500 rubles.
Factory (standard), ball or ceramic valve, which is better?
Among car owners on various forums, discussions constantly arise about which heater tap is better. Most often, battles unfold between two options: ball or ceramic. Almost no one doubts that a standard valve based on a rubber membrane is not reliable, more often than others it leaks, “sticks” and is especially susceptible to acidification. As proof of this, see the images above, where the reason for the replacement is a jammed faucet and a fluid leak.
Ball or ceramic?
Ceramic heater tap
A ball valve, in principle, is also not bad; the undoubted advantage of such a valve is its greater throughput compared to a ceramic one (when open, the passage hole is equal to the internal diameter of the pipe). At low temperatures this is especially noticeable, but the likelihood of souring is higher for a ball valve than for a ceramic one.
Preparatory stage
To change the heater tap, you need to perform 2 preliminary operations: partially drain the coolant and remove the glove box.
Antifreeze is drained in the following sequence:
- The operation is carried out on a cooled engine to avoid burns. Under the engine on the left side (in the direction of movement) you need to place a basin or a cut plastic canister.
- Fully open the stove tap (if possible).
- Having prepared a 1 m long hose, unscrew the plug on the cylinder block (key 13), move it to the side and place the hose directed into the basin.
- Hold the hose and smoothly open the expansion tank cap. Be careful as the antifreeze stream will become larger.
- Loosen the clamp of the carburetor heating pipe or the injector throttle valve block and remove it from the fitting.
- When the fluid has drained, screw the plug back into the block and tighten.
The glove box is removed by unscrewing several screws holding it in place. Some of them are located immediately under the glove compartment lid, the other part is in the depths of the box.
My account
After removing the glove compartment, access to the heater valve opens. A rod is attached to the crane lever using a clamping bracket. Use an open-end wrench size 7 to loosen the nut located on the bracket.
The traction cable is removed from the crane lever. Using an open-end wrench, the fastening of the rod is loosened. Using a 10mm socket, unscrew the two bolts securing the faucet to the wall of the engine compartment. The mounting bolts of the heating tap are unscrewed with a 10 mm socket wrench. The heater tap is removed from its niche and replaced with a new one.
The heating tap is removed from its seat. The tap is assembled and installed in the reverse order. Initially, you should disconnect the hose from the pipe. This action is quite difficult, since the hose sits tightly on the pipe. If you move incorrectly, your hand may slip and you may be injured.
For this reason, we recommend that you wear gloves to avoid such unfortunate consequences. Now, using a screwdriver, unscrew the screws that secure the seal, pressing it against the partition.
To dismantle the stove faucet, it is necessary to drain the antifreeze. Open the faucet as far as possible. We substitute the hose and insert one end into the basin. To drain the antifreeze, you need to unscrew the plug on the cylinder block. Lightly hold the hose with your hand and gradually open the cap located on the expansion tank.
We do this work carefully, as the stream of antifreeze will gradually increase
In order to remove the stove valve, it is necessary to completely drain the antifreeze. Loosen the clamp on the carburetor heating pipe and remove this part from the fitting. After all the coolant has flowed out, screw the plug into the block and tighten it well. Antifreeze leakage from the stove In used cars, coolant often begins to leak from the stove. The reason for this is usually wear and tear on the pipes or a malfunction of the heater tap.
Since antifreeze circulates under pressure, all connections must be tight. However, during prolonged use, hoses and gaskets lose their elasticity and burst. After inspecting the heating system and identifying the leak, the worn part is replaced with a new one. When making repairs, you should not use clamps made in China due to their poor quality.
Due to loss of elasticity, the stove pipes crack over time and leak antifreeze. The coolant can also leak from the heater radiator itself. In this case, it will have to be replaced with a new one.
Replacing a Chevrolet Niva Chevrolet heater core
The stove does not heat well. To diagnose the malfunction, turn on the ignition, start the stove and try to change the intensity of the air supply. If at the first three speeds the air is not supplied or is supplied cold, the cause of this is a faulty resistor that needs to be replaced.
The reason for the inability to switch speeds is the failure of the resistor. If the resistor is OK, the diagnosis continues. If it is low, add antifreeze to normal and check it after a few days.
If the level has noticeably decreased, you should pay attention to the hoses and pipes, wear of which is usually the cause of coolant leakage. One of the reasons for poor heating of the interior by the heater may be a low level of coolant in the system. If the control unit malfunctions, it will have to be removed
Faucet replacement process
Repairing the unit at home is only possible if you have the appropriate tools - it’s easier to contact a car service center.
Another reason for the stove stopping may be a dust-clogged cabin filter.
In this case, the load on the electric motor increases, which, in turn, leads to failure of the heater fuse. In this case, it should be washed. This is true when purchasing and operating used cars. However, it can sometimes fail. Replacing the heater cable Sometimes it is not possible to change the position of the heater damper.
The reason for this is a broken cable. To replace it, you will need a standard set of tools and a headlamp. Replacing the cable is carried out as follows. The driver's seat moves back. The handles are removed from the damper control panel and the screws are unscrewed.
The panel is dismantled on the left side at the location of the driver's feet. To access the cable, you will need to remove the heater control mechanism. The latches securing the cables are removed. The recirculation damper mechanism is dismantled and the cable is removed.
Each end must be twisted into a ring and securely fixed. Using a cable, the position of the air supply flap is changed. Assembly is carried out in the reverse order.
Replacement frequency, how much and what kind of fluid is needed
- loss of coolant properties. You can check the quality of the antifreeze used using a test strip, which is sold in the same places where the liquid itself is sold. Place the strip in the expansion tank, then pull it out. The strip comes with a color scale, according to which you can understand how much longer the car can be used before replacing the coolant;
- change in color of the coolant to tan or red. This means that rust has appeared in it;
- the appearance of sediments, flakes and dense formations in the liquid.
The coolant for the VAZ 21214 Niva injector should have a freezing point no higher than -40 degrees. Typically, the manufacturer fills in TOSOL TS-40 (manufacturer in Dzerzhinsk). When replacing antifreeze, it can be replaced with antifreeze with G12 approval; it is safer for the entire cooling system. You can also use original Lada G12 antifreeze, which is suitable for all cars of this manufacturer.
Antifreeze volume table
| Model Niva | Engine capacity | Antifreeze volume | Original/recommended fluid |
| VAZ 21214 | 1.7 | 10.7 | Lada G12, TOSOL TS-40 |
| VAZ 21213 | 1.6-1.7 | 10.7 | |
| VAZ 2121 | 1.4-1.8 | 10.6 | |
| VAZ 2131 | 1.7 | 10.7 |
Main stove malfunctions
The causes of the malfunction can be listed in a small list:
- A breakdown of the control unit has occurred.
- Mechanical or operational damage to the radiator surface.
- Failed additional resistor.
- Radiator pipes damaged by external factors or worn out by prolonged use.
- Faulty heater valve.
How to determine what kind of breakdown occurred? Let's look at several different signs by which you can determine the cause of the malfunction and understand where to start repairing the stove.
The heater does not heat the footwell
Repairing the stove also does not require great skills in the Chevrolet Niva model. In rare cases, we replace the heater radiator in the Chevrolet Niva model. The Chevrolet Niva heater has a simple device. To fix a breakdown, you must first measure the temperature of the fluid in the system. This action will show where the problem may be. When the engine heats up to 90 degrees without problems, but there is still no heat, then there is a malfunction in the cooling system. The damper should be in good order. Adjust the dampers using the following sequence of actions:
- The engine needs to be heated until you can feel the heat with your open palm.
- The extreme value of the switch is set.
- The knob that regulates the air direction is turned to the upper position, then without delay it must be set to “10” o’clock. These manipulations will help heat get into the bottom of the car.
These steps are repeated until the result is achieved, since this problem mainly arises due to assembly defects. Backlashes prevent the free movement of air and setting the required damper position immediately
It is worth noting that if warm air does not blow inside the car, then you need to pay attention to the cooling system itself. You can also repair the stove in a specialized center for the Chevrolet Niva model
Antifreeze leak from the stove
Wear of rubber hoses, breakdown of the heater valve, all this leads to fluid leakage. Liquid circulation in the system occurs under pressure, which requires one hundred percent tightness of the connections. During use, all connecting tubes and gaskets may become unusable as they lose flexibility and cracks appear. Such breakdowns are usually quite easy to detect. Pipes that have become unusable are replaced. Replacing the stove pipes in a Niva Chevrolet is a fairly easy procedure. The edges of the joints can be coated with sealant before assembly. It is recommended to avoid low-quality, cheap Chinese-made clamps for tightening; they will not provide strong adhesion and tightness of the connections.
The stove does not heat well in the Chevy Niva
Stove repair is not required in new Chevrolet Niva models. The cause of poor performance can be determined after diagnostics. For example, if when changing the air supply force at three speeds you do not notice any changes, or no heat is supplied at all, then most likely the resistor is faulty and needs to be replaced with a working one.
If replacement does not solve the problem, you need to continue diagnosing
If the coolant level drops a day after topping up to the level, you need to pay attention to the condition of the connecting hoses. If necessary, replace with new ones
It is better to fix a breakdown of the heater control unit at a service station, because the specialists working there have the necessary specialized tools needed in this case.
A clogged cabin filter can also cause the stove to stop working. Obstructed circulation increases the load on the vehicle's electrical circuit, thereby leading to blown fuses.
When purchasing a secondary market car, it is recommended to immediately flush the heating system, so as not to have to repair the stove in used Chevrolet Niva models.
Procedure for installing a new part
Due to the fact that the heater radiator is located above the engine, part of the coolant does not flow out of it when it is emptied. And even more so it is full when the old tap is stuck closed. So before disassembling the unit, you need to stock up on a plastic bag without holes: it is convenient to place it in places with limited access.
Also interesting: Bleeding Chevrolet Niva brakes: step-by-step instructions
Disassembly and removal of the tap are carried out in the following order:
- From the engine compartment, you need to loosen the clamps of the pipes leading into the cabin, and then remove them from the fittings.
- Unscrew the screws holding the sealing gasket (key 8) and remove it.
- From the interior of the Niva, you need to get to the tap and disconnect the rod by unscrewing the clamping bolt (key 7). Place a plastic bag to catch the remaining antifreeze.
- Loosen the bolts securing the faucet to the stove (key 10), unscrew them and pull out the part along with the metal pipe. If the heater radiator is copper, of the old type, then instead of bolts there will be nuts.
- Separate the metal pipe from the old faucet by unscrewing 2 nuts (10 wrench). Remove the traction mount from it.
The rod mount and pipe must be installed on the new element using fresh gaskets coated with sealant. Then the crane is mounted in place and the unit is reassembled.
Taking this opportunity, it wouldn’t hurt to check the tightness of the connection of the second pipe to the radiator and, if necessary, change the gaskets there. It is also recommended to install new clamps on the hoses.
To avoid air locks when filling the system with liquid, you need to fill it slowly until antifreeze flows from the carburetor heating pipe. In this case, the heater valve must be open.
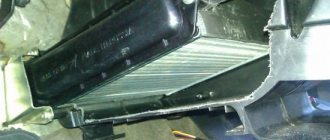
When disassembling the heater, a large number of tree leaves and insect remains were found in the air intake casing and in the honeycombs of the heater radiator grille, which also reduced the efficiency of the heater. Therefore, after cleaning and flushing the heater core, I took measures to prevent the radiator from clogging.
To do this, I bent a wire frame to the size of the air intake inlet, covered it with a nylon mesh with a 1x1 mm cell, and installed it at the bottom of the rubber seal of the air intake inlet. It was perfectly fixed there in the fold, like an accordion, without additional fastening.
All work to modify the heater took me about 4 hours of time and did not cost a penny of additional costs. Unfortunately, during work I didn’t think to take a photo, but from the attached drawing and picture everything should be clear. I'm happy with the result, now the stove heats better.
How to remove and install the stove tap
To replace a part, you must initially prepare the appropriate consumables, as well as tools:
- open-end and socket wrenches;
- pliers;
- flat screwdriver;
- a five-liter tank into which you will need to drain the liquid from the radiator;
- new faucet.
After preparing the necessary tools, you can begin replacing the tap, and the sequence of actions should be as follows:
- We install any container with a volume of about five liters under the radiator and unscrew the cap on it. Wait approximately 10 minutes until all the coolant has drained.
- Next, open the hood of the car and loosen the pipe clamp on the tap pipe.
- We take pliers, carefully bend them and pull out the short cotter pin.
Remove the heating tap clamp using pliers
Unscrew the screws securing the seal using a 7" wrench
Remove the sealing plate from the faucet
In order to get to the stove tap, unscrew the nuts and remove the glove box
Using an open-end wrench, loosen the nut fastenings to remove the traction cable
Unscrew the heating tap mounting bolts
A pipe is installed on the part, as well as rod fastenings; in this case, new gaskets must be used, which are pre-coated with sealant.
Sealing plates are coated with sealant to reduce the risk of coolant leakage
The tap is put in place as follows:
- We tighten the two nuts on the pipe with the rod using a “10” wrench.
- We put the part in place and tighten the fastening bolts located on the tap.
- We install the rod and tighten the clamping bolt using the key to “7”.
- We tighten the self-tapping screws that hold the sealing gasket with an “8” wrench.
- We insert the pipes into the fittings and tighten the clamps.
The new heating tap is installed in the reverse order
Check whether the second pipe is tightly connected to the radiator; if not, then replace the gaskets there too. In addition, we strongly recommend installing new hose clamps.
When filling the system with liquid, fill it slowly to avoid air pockets. Antifreeze is poured in until it begins to flow out of the pipe. Moreover, the heating tap must be open.
Antifreeze must be poured into the heating system carefully, avoiding the formation of air pockets.
Interior heater repair
The stove in the Chevrolet Niva is considered one of the most reliable components of the car. However, it can sometimes fail.
Replacing the heater cable
Sometimes it is not possible to change the position of the heater damper. The reason for this is a broken cable. To replace it, you will need a standard set of tools and a headlamp. Replacing the cable is carried out as follows.
- The driver's seat moves back.
- The handles are removed from the damper control panel and the screws are unscrewed.
- The panel is dismantled on the left side at the location of the driver's feet. To access the cable you will need to remove the heater control mechanism
- The cable fastening latches are removed.
- The recirculation damper mechanism is dismantled and the cable is removed.
- A new cable is installed. Each end must be twisted into a ring and securely fixed. Using a cable, the position of the air supply flap is changed
- Assembly is carried out in reverse order.
- The functionality of the mechanism is checked.
Replacing the interior heating control unit
A faulty control unit can also cause the interior heating system to not operate correctly. Its dismantling, necessary for repair or replacement, requires the following procedure.
- The negative terminal is disconnected from the battery.
- All handles are removed from the heater control mechanism. To do this, you need to carefully pull them towards you. All handles are removed from the heater control mechanism
- Use a flat-head screwdriver to remove the air circulation lever. Use a flat screwdriver to remove the air circulation lever
- Use a screwdriver to pry up and then remove the block lining. Use a screwdriver to pry up and then remove the block lining
- Under the cladding, use a Phillips screwdriver to unscrew two self-tapping screws. Two self-tapping screws are unscrewed under the cladding
- The control unit is removed.
- Remove the connector with the wires going to the speed switch.
- The block of wires that provide illumination of the unit is disconnected. The connector with wires is removed from the control unit
- If there is an air conditioner, all hoses coming from the vacuum switch are disconnected.
- Use a screwdriver to remove the bracket holding the damper cable braid and other similar elements.
- All rods are disconnected from the control unit.
- A new or repaired device is installed in the reverse order.
After dismantling, the control unit is repaired or replaced with a new one.
Replacing stove pipes
If a coolant leak is detected, the pipes along with the clamps should be replaced. The work is performed in the following sequence:
- The coolant is drained from the system.
- The screws securing the glove compartment are unscrewed and it is removed.
- Use a Phillips screwdriver to unscrew the clamp of the lower pipe. The hose is removed carefully - the antifreeze should not get on exposed skin. If difficulties arise, the pipe should be rotated around its axis.
- The second pipe is removed in the same way.
- New hoses are installed and tightened with clamps. If antifreeze leaks, the stove pipes are replaced with new ones.
Video: dismantling the stove pipes on a Chevrolet Niva
Replacing the stove fan
If the fan does not turn on or if strange noises appear when it is turned on, then the electric motor is most likely faulty.
The most common reasons for its failure are:
- Lack of voltage on the electric motor due to poor contact.
- Visible damage to the motor wires due to chafing.
- The 25 A fan fuse located in the fuse box number F18 has failed.
- Failure of one of the resistors, manifested in the absence of one of the speed modes.
- No ignition.
- Deterioration of the armature and brushes of an electric motor as a result of long-term continuous operation.
If the electric motor malfunctions, it will need to be dismantled.
In any of the above situations, the electric motor will need to be removed.
Heating system fan repair
To diagnose a malfunction, the electric motor is connected directly to the battery. If it works, the problem should be looked for elsewhere. Otherwise, the electric motor is removed for repair or replacement. It is located under the glove compartment panel in the cabin. After dismantling, the electric motor is disassembled and inspected.
The heater motor may not work due to internal contamination.
The design of the electric motor is quite simple. The reason for its stopping may be contamination, wear-out of the armature, bushings or brushes.
The cause of failure of the electric motor may be wear out of the brushes or armature.
The electric motor is cleaned and reinstalled or replaced with a new one.
Heater radiator repair
The main signs of a malfunctioning heater radiator are as follows:
- Coolant accumulates under the floor mat on the driver's side;
- there is a smell of coolant in the cabin;
- when heated, a greasy film forms on the glass, which cannot be washed off with water;
- the stove does not heat the interior well;
- The coolant level in the expansion tank decreases.
If any of the signs are detected, the stove is diagnosed, based on the results of which a decision is made to repair or replace the radiator. More often, car owners install a new radiator. In this case, the system is completely freed from coolant.
When the heater radiator fails, it is usually replaced
Replacing a radiator on a car with air conditioning is a rather complex process that requires special equipment and appropriate skills.
Video: replacing a heating system radiator
Repair and replacement of stove tap
The need to repair the stove tap arises when a leak appears or it is impossible to close or open it completely. The fact is that in the summer the tap is closed, and its elements stick to each other. When you try to turn it off, the tap breaks. Usually it is replaced with a new one.
If the stove valve fails, replace it with a new one.
The tap is replaced as follows:
- When the engine has cooled down and the heater tap is fully open, the coolant is drained.
- The traction cable and glove compartment are removed. To remove the traction cable, use an open-end wrench to loosen the nuts
- The clamps securing the pipes are loosened and removed.
- The tap is removed.
When replacing, it is recommended to install a ceramic faucet with an extended service life. The cost of such a product is within 900 rubles.
Chevrolet Niva heater valve: where is it located, how to replace + video » AvtoNovator
The first one is needed to unscrew the fastening screws, and the second one is needed to pry the assembly itself out.
stove Niva Chevrolet
In this case, the refrigerant changes from a gaseous state to a liquid state. The plastic coupling will ensure reliable fixation of the new air duct tube. Insert the new air duct tubes into the couplings and secure them.
The device of the stove of the Niva Chevrolet car. The Chevrolet Niva is equipped with a liquid-type heater. Heating system "Niva...
On the heater side, a plate is removed that sets the direction of air supply. This is how the owner will be able to find out for himself the design features of the devices with which the new Chevrolet Niva is equipped. Turn the airflow direction knob to exactly 12 o'clock.
With proper diagnosis, this will not be difficult. The external control unit for the stove includes three rotating controllers and one slider in the Chevrolet Niva heating system. Dismantling is carried out in the following order: The tap pipes themselves are mounted in the partition of the engine compartment.
In addition, there is a four-speed air supply switch. Before turning on the air conditioner, the heater fan is turned on, and the temperature control knob is set to minimum. Almost the entire air conditioning system is located in the engine compartment.
Only the evaporator is brought into the cabin between the heater and the electric motor, providing heat exchange between the incoming air and the refrigerant.
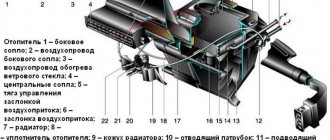
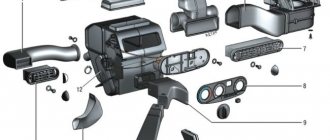
Heater and air conditioner diagram, where 1 - heater housing; 2 — inlet pipe of the heater radiator; 3 — heater radiator outlet pipe; 4 — air conditioner evaporator housing; 5 — evaporator outlet pipe; 6 — evaporator inlet pipe; 7 — fan housing; 8 - control cable for the external air supply damper. The refrigerant, when moving through the evaporator tubes, absorbs heat and passes into a gaseous state.
The evaporator fins are cooled, and the fan directs cold air into the cabin and reduces the temperature.
Gaseous refrigerant from the compressor under pressure enters the condenser, cools and turns into a liquid state. After this, the liquid is supplied to the receiver, and from it to the evaporator reducer, where it again turns into a gaseous state. Basic stove malfunctions Stove malfunctions can be very different.
Heater diagram
The most common reason for its failure is: Warm air does not enter the lower part of the cabin Before starting repairs of the stove, you should check the temperature of the coolant. Perhaps the problem is not in the interior heater, but in the cooling system.
With the help of damper position regulators, warm air is directed to different parts of the cabin. First, the dampers should be adjusted. To supply hot air to your feet, follow these steps: The engine warms up until the warm air can be felt with your hand. Consequently, it is almost impossible to open the tap without breaking it.
Chevrolet Niva 2012, 80 l. With. — self-repair
Installation of a new unit is carried out in reverse order. The most common purpose of such tuning is to improve the air supply to the driver and front passenger footwells. To do this, additional air ducts are installed and the shape of the damper drive strip is adjusted. For this modification you will need: You must work with the plastic of the heater housing very carefully, as it is quite fragile.
The steps are performed in the following order: Select tubes suitable for the role of additional air ducts. You can use plumbing pipes as additional air ducts. Remove the side trims on the center console on both sides.
Air flows in the cabin are distributed by air ducts, which are located under the instrument panel and under the floor tunnel lining, and under the floor upholstery to supply air to the feet of the rear passengers.
To control the distribution of air flows, use the distribution regulator handle on the center console of the instrument panel, as well as the regulators and guides of the central and side deflectors on the instrument panel.
To heat the interior, move the temperature control knob to the hot red zone. In this case, the outside air is directed using a damper through the heater radiator, which is integrated with the engine cooling system.
Remove the screws of the tie rod brackets. Disconnect the rods from the heater damper levers. Unscrew the screw of the bracket securing the recirculation flap drive rod and remove the lever bracket and disconnect the wiring harness block from the heater electric fan switch.
Heater diagram First of all, we want to orient you that the Niva already has a liquid-type heater installed, which allows you not only to supply warm air into the car interior, but also to cool the running engine, preventing it from overheating. It's no secret that overheating the engine entails extremely undesirable consequences.
An electromagnetic clutch is built into the compressor pulley, which engages and disengages the compressor shaft from the pulley according to signals from the engine control system controller. Refrigerant vapor from the compressor under high pressure enters the condenser located in front of the radiator of the engine cooling system. Passing through the honeycombs of the condenser, the refrigerant is cooled by the counter flow of air and with the help of fans of the cooling system.
Source: https://iaarus.ru/niva-shevrole/sistema-otopleniya-shevrole-nivy.html
LADA 4×URBAN Niva air conditioner and heater with cabin filter.
You will need: flathead and Phillips screwdrivers.
Also interesting: Niva tuning for off-road use from a professional
1. Remove the window handle: remove the latch by prying it with a screwdriver between the latch and the washer.
2. Remove the door handle: take out the plug, prying it off with a screwdriver, and then unscrew the three fastening screws.
3. Remove the inner handle trim: pry it off with a screwdriver.
4. Remove the door trim (depending on the configuration and year of manufacture):
- Unclip the 8 plastic clips around the perimeter (two on each side and four on the bottom).
- Unscrew the door trim fastening screws around the perimeter (phillips screwdriver).
There are slight differences in the process of dismantling the door trim of the new model (different door handle and location of fastening screws).
Procedure:
- Remove the door handle: take out the plug, prying it off with a screwdriver, and then unscrew the two fastening screws.
- Remove the inner handle trim: pry it off with a screwdriver.
- (For rear door trim) Remove the window handle: remove the latch by prying it with a screwdriver between the latch and the washer.
- Unscrew the door lock.
- Unscrew the screws securing the casing (4 on top under the plugs and 3 on the bottom).
- Remove the door trim by unclipping the rivets around the perimeter.
Dismantling the stove
The stove is dismantled as follows.
- The negative terminal is removed from the battery.
- Remove the dashboard, performing the same steps as when replacing the control unit.
- The screws securing the heater to the cross member of the instrument panel are unscrewed.
- The stove is pulled out from its installation location.
Removing the stove from a Niva Chevrolet car is quite simple