The heater valve is used to regulate the flow of coolant through the radiator. In the warm season, there is no need to heat the interior, so the tap is most often in the closed position.
With the arrival of cold weather, we again remember the possibility of adjusting the temperature in the cabin, but sometimes we encounter unexpected problems: the heater tap (when liquid passes through it) can leak, oxidize and even jam (if not used for a long time). This part cannot be disassembled or repaired, so to restore the heating system, all that remains is to replace the stove tap .
What to put in place
Before rushing to the store for a new part, you should first disassemble the assembly and make sure that the faucet is to blame for all the troubles.
It often happens that the seal between it and the heater radiator, where the rubber gaskets are located, leaks. They become limp and begin to leak coolant. The cause of jamming may be the rod attached to the element. Faucets made of metal or ceramic are available for sale. In terms of price, they are approximately the same; in terms of reliability, motorists praise ceramic ones more. In addition, you need to purchase 2 new gaskets and high-temperature sealant (usually red).
For reliability, some VAZ-21213 owners prefer to install a regular plumbing faucet with a diameter of 15 mm (DN 15), connecting it to the stove with flexible pipes. The option is reliable, since plumbing fittings are more durable than car parts. But then it’s better to forget about convenient controls, because every time you have to dive under the glove box on the front passenger side to open or close the valve. It is also installed on the engine side, under the hood, resulting in the same “conveniences”.
Lada 4×4 3D IROQUOIZ › Logbook › Inspection of the cooling system, replacement of the heater valve
All the domestic cars that I bought before (2 Volgas and a Niva) required a refurbishment of the cooling system from the moment of purchase, this Niva was no exception. I started by flushing because I didn’t know what kind of antifreeze was in there? This means that the new one must be filled in cleanly. Drained, green, clean without debris or dirt.
And the washing began. First, I changed 3 simple tap waters, our water is good, soft. Filled it up, started it up, turned on the fan 3 times, drained it. Then I filled it with distilled water and rolled it around a bit, drained it and took everything apart. During all these manipulations, I lost the drain plug from the block, damn it.
Well, here’s what you’d expect. All the pipes are cracked, the aluminum is oxidized, the clamps are rotten, every connection is sweating, etc.
The stove faucet is also snotty and dripping.
While I've disassembled everything under the hood, let me think I'll tighten the tensioner, I don't have a hydraulic one yet. I looked - yeah, something unfamiliar, I googled it - it turned out to be an original VAZ, automatic, so let it stand and work.
Looked inside the cooling system - beauty! Never before have I had such a clean engine from the inside.
The THOMSON thermostat seems to be set at 80 degrees right off the assembly line.
I cleaned off all the oxides and sanded the pipes a little with fine sandpaper. And no sealant! The point of smearing it is when it turns into sticky snot and gives no effect other than dirt!
Everything is completely ready for assembly.
I started with the stove tap. I use exclusively ceramics from LUZAR, article number LV0101
, the kit includes everything you need, but I left the bolts and washers from the factory.
I also bought an additional gasket 21010-8101332-10
for the second radiator pipe - it was not useful.
Before removing the old faucet, I dismantled the shelf, this is much more convenient. Installing a new one took 10 minutes, everything was quick and accessible. Why do people swear at him so much...
I started assembling the cooling system itself from the deepest connection, fortunately I removed the throttle, and all the pipes were removed, there is access. Gates hose 3225-00051
internal diameter 10 mm, galvanized clamps Norma
S12-22/9C7W1
2 pcs.
Then I collected all the pipes. Engine kit LUZAR LPK 01213
+ clamps Norma
S30-45/9C7W1
7 pcs.
– for all pipes and Norma S35-50/9C7W1
1 pc. – clamp of the lower pipe at the block.
Next, I left the original tank, just washed it. Branch pipe of PJSC “BRT” 21214-1303095-01
+ Norma
S16-27/9C7W1
2 pcs., but I replaced one on the radiator with 12-22, it was in stock.
While I was poking around I discovered a torn-off bracket for the manifold screen, just a note. May rattle during operation.
Well, I started working on the stove pipes. Also LUZAR, article LPKh 01214
and clamps Norma
S16-27/9C7W1
4 pcs.
Pipes from 21214 will fit on 2121-213, but vice versa - not. You cannot install 213 pipes on 21214
, because it will run into a black plastic twist, which is what I had and the pipe was all dented and burst.
Well, a new plug 21010-1305026-00
took her place.
I prefer to pour the first and main portion of antifreeze through the upper pipe, so about 6 liters enter the engine this way, and the rest through the expansion tank and radiator.
Antifreeze filled 10 l SINTEC LUX G12 756665
and 1 l SINTEC LUX G12
613500
as many as 2 pcs. I took it and was scared by the manuals, which say that the Niva holds 10.7 liters, almost like the Volga, damn it. No matter how much I filled it, there was no way until only 9.5 liters fit somewhere. Maybe the manuals and volumes were written for old copper radiators, which have a larger volume? How much antifreeze does anyone have?
Expenses:
Cooling system pipes (set) – 565 RUR; Worm clamp 30x45 7 pcs. – 210 rub.; Worm clamp 35x50 – 30 rub.; Heater pipes (set) – 145 rub.; Worm clamp 16x27 mm 4 pcs – 120 RUR; Expansion tank pipe of PJSC “BRT” – 75 rubles; Worm clamp 16x27 mm 2 pcs. – 50 rub.; Worm clamp 12x22 mm 2 pcs. – 50 rub.; Heater tap – 245 rubles; Heater tap gasket – 15 rubles; Antifreeze drain plug from the block - 20 rubles; Antifreeze (10 l.) – 1040 rubles; Antifreeze (1 l.) 2 pcs. – 290 rub.
Source
What is a stove tap, its functional features and location
The stove tap is a metal part that resembles a regular water tap. Antifreeze (coolant or coolant) constantly flows through it.
In the Chevrolet Niva, the coolant can flow through 2 cooling circles: winter and summer. The heating tap gives the driver the opportunity to switch to one of them. For example, with the onset of summer, when the tap is fully open, it is almost unbearable to be inside the car due to the heat, so it is closed for this period of time, and with the onset of cold weather, the tap is opened again. Due to active use, the part eventually becomes unusable and leaks coolant.
It is very easy to determine whether a part is faulty - lift the cover in the Chevrolet Niva interior. If there are obvious signs of leakage, the unit must be replaced.
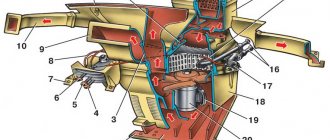
In the diagram you can see where the heater tap is located and the circulation of antifreeze in two circles
Why do you need to change the faucet?
In Niva cars, as in classic Zhiguli models, the heating intensity of the interior is controlled using a special tap. It is installed on the coolant supply pipe leading to the heater radiator. The stove tap is made in such a way as to open and shut off the flow in just half a turn of the rod. Thanks to this, the faucet can be controlled using a rod attached to a lever on the center console.
In reality, no one uses the heater valve as a regulator; more often it is used to cut off the heater from the Niva engine in the summer. This is where the following problems arise:
If you do not shut off the fluid flow in the summer, then the interior of the VAZ-21213 will become very hot. In the Chevrolet Niva, the faucet is missing as a weak link, and the stove is constantly heating up. The design of a regular Niva is not designed for this and the problem needs to be solved somehow.
The situation is the same in the other two cases, and due to a leak, harmful antifreeze vapors will accumulate inside the car. Since the design of the heater valve does not provide for its repair, the part only needs to be replaced.
Lada 4×4 urban Niva air conditioner and heater with cabin filter.
You will need: flathead and Phillips screwdrivers.
1. Remove the window handle: remove the latch by prying it with a screwdriver between the latch and the washer.
2. Remove the door handle: take out the plug, prying it off with a screwdriver, and then unscrew the three fastening screws.
3. Remove the inner handle trim: pry it off with a screwdriver.
4. Remove the door trim (depending on the configuration and year of manufacture):
- Unclip the 8 plastic clips around the perimeter (two on each side and four on the bottom).
- Unscrew the door trim fastening screws around the perimeter (phillips screwdriver).
There are slight differences in the process of dismantling the door trim of the new model (different door handle and location of fastening screws).
Procedure:
- Remove the door handle: take out the plug, prying it off with a screwdriver, and then unscrew the two fastening screws.
- Remove the inner handle trim: pry it off with a screwdriver.
- (For rear door trim) Remove the window handle: remove the latch by prying it with a screwdriver between the latch and the washer.
- Unscrew the door lock.
- Unscrew the screws securing the casing (4 on top under the plugs and 3 on the bottom).
- Remove the door trim by unclipping the rivets around the perimeter.
Read news about the new field
- Air conditioning Niva Chevrolet - design and repair
- What tire size is available for installation on Niva, available versions and recommendations
- Mud tires for Niva 4x4: radius 15 and 16 - which one is better to install "
- All about the Valet button and how to disable it yourself on alarm systems of different brands
- Niva Lynx buy in Samara - prices for the new Lada “Bronto” (Niva Pickup) | cost and equipment
- Air conditioning Niva Chevrolet - design and repair "
- Niva Chevrolet installation of air conditioning - Auto magazine MyDucato
- Instrument panel Niva Chevrolet designations. Improving the Chevrolet Niva dashboard
Also interesting: What to choose: Chevrolet Niva or UAZ Patriot
Blown engine head gasket
The thing is that the motor is not a monolithic structure; it has a block head and the block itself. They are connected through a special gasket. If this gasket is broken (and this happens, for example, due to poor broaching), then the coolant will go into the cylinders or the muffler (white thick smoke will come out of the muffler). Thus, there will not be enough coolant in the system (possible air pockets) and therefore the stove will heat poorly! It is urgent to change the head gasket, otherwise you can kill the engine through overheating.
These are probably all the main reasons when the stove does not heat well! On a personal note, I would like to note that in most cases this is a thermostat malfunction (about 70%). So the first thing to check is to change it.
Now let’s watch a short useful video.
And that’s all, read our AUTOBLOG.
(27 votes, average: 4.00 out of 5)
How to replace a faucet on a VAZ 2101-2107 “classic”, “Volga”, “Niva”, “Oka” (work order)
The operations for replacing the heater valve on different cars are very similar and differ mainly in the need to dismantle some parts to gain access to the failed valve.
Note: the heater faucet from the Zhiguli also fits the Volga, Niva, and Oka cars.
Next, we will consider in detail the replacement of the tap on VAZ 2101-07 “classic” cars.
According to the instructions, before proceeding with the removal of the pipes, it is necessary to drain the liquid from the engine cooling system. This operation can be omitted, given the fact that the stove radiator and pipes are located above the level of the main radiator. It should be taken into account that some of the coolant will still leak out, so you need to have a small container on hand.
Use a screwdriver to loosen the clamps and remove the hoses from the heater radiator pipes. Do not forget to place a container under the hoses to drain the coolant leaking from the pipes.
Using a key “8”, unscrew the two screws and remove the seal from the radiator pipes.
In the car interior, remove the instrument panel shelf. For convenience, remove the glove box body. On VAZ 2104, 2107 with an instrument panel with side air ducts, it is also necessary to dismantle the air duct by unscrewing the nut to “10” and prying the latches around the perimeter with a slotted screwdriver.
Using a key set to “7”, loosen the screw and disconnect the heater tap drive rod (1).
Preparatory stage
To change the heater tap, you need to perform 2 preliminary operations: partially drain the coolant and remove the glove box.
To carry out all the work, you do not need to have any special tools; a regular set of keys, screwdrivers and pliers is enough.
Antifreeze is drained in the following sequence:
The glove box is removed by unscrewing several screws holding it in place. Some of them are located immediately under the glove compartment lid, the other part is in the depths of the box.
How to replace the stove valve on Niva 21214 - car portal automotogid
Reg.: 01/02/2008 Threads / Messages: 1 / 13 From: Ukraine. Kharkov Age: 60 Car: VAZ2121{amp}amp;1982
Reg.: 07/15/2008 Messages: 39 From: Donetsk Age: 33 Car: 21214i 2007 color: deep sea.
Reg.: 03/15/2009 Messages: 1310 From: Odessa Age: 30 Car: 21213. 2003 130 thousand passed. HBO Lovato.
Reg.: 08/23/2007 Threads / Messages: 5 / 4030 From: Dnepropetrovsk, Ukraine Age: 34 Car: 21213 96
31″ tires, ShNiva clutch, subframe, expedition vehicle, Gen 80A, air filter 3302, linted bi-xenon, Weber 32DGAS carb, SRPM, wide welded bridge, vertical shock absorbers ShN, ZDT, VUT Omega-B, etc.
Reg.: 03/15/2009 Messages: 1310 From: Odessa Age: 30 Car: 21213. 2003 130 thousand passed. HBO Lovato.
Reg.: 06/27/2007 Messages: 1765 From: Moscow Age: 51 Car: 21213, 1999
Reg.: 08/23/2007 Threads / Messages: 5 / 4030 From: Dnepropetrovsk, Ukraine Age: 34 Car: 21213 96
31″ tires, ShNiva clutch, subframe, expedition vehicle, Gen 80A, air filter 3302, linted bi-xenon, Weber 32DGAS carb, SRPM, wide welded bridge, vertical shock absorbers ShN, ZDT, VUT Omega-B, etc.
Reg.: 03/15/2009 Messages: 1310 From: Odessa Age: 30 Car: 21213. 2003 130 thousand passed. HBO Lovato.
Reg.: 08/23/2007 Threads / Messages: 5 / 4030 From: Dnepropetrovsk, Ukraine Age: 34 Car: 21213 96
The ball one (it comes with 2108999 from the factory) suffers from a leak along the axis, the ceramic one with two slots does not leak, does not sour, but there is an opinion that it has a smaller cross-section, etc. But I washed the stove with a faucet under the water supply and I can say with authority that a ceramic faucet easily passes such a pressure that a standard pump will not create, not an ATE-1 electric pump with 1800 hp.
Also interesting: Niva Chevrolet front hub repair
The standard pipe from the water supply created a stream of 3 meters in both directions and the tap was not a hindrance, although I read about reducing the cross-section and thought about removing it when flushing, now I’m sure that this tap is more than complete, especially since Luzar says that the maximum design quantity is in the slurry pumped through the stove is equal to = 1000 lch, for comparison, I checked how a new pump from a gazelle pumps, produced by KZATE (which is 1400 lph) and a short-circuiting one, produced by ATE-1, and so both hit about 30 cm, and the water supply by 3 meters, with the same diameter of the pipes, the difference, as they say, is obvious.
31″ tires, ShNiva clutch, subframe, expedition vehicle, Gen 80A, air filter 3302, linted bi-xenon, Weber 32DGAS carb, SRPM, wide welded bridge, vertical shock absorbers ShN, ZDT, VUT Omega-B, etc.
Reg.: 03/15/2009 Messages: 1310 From: Odessa Age: 30 Car: 21213. 2003 130 thousand passed. HBO Lovato.
Drain the liquid from the cooling system with the heater tap open (see Replacing the coolant).
For clarity, operations carried out in the engine compartment are shown with the engine removed.
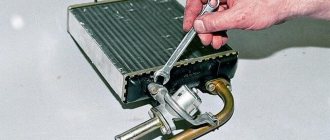
In the engine compartment on the front panel, using pliers, loosen the clamp securing the hose to the lower radiator pipe and remove the hose from the pipe (the hose from the upper heater radiator pipe was removed when dismantling the engine).
Using the “7” head, unscrew the two self-tapping screws securing the seal to the front panel
. and remove the seal. In the cabin we remove the storage shelf
Using a “7” wrench, loosen the bolt securing the crane drive rod clamping bracket...
...and remove the rod from the crane lever.
The heater valve is attached to the radiator mod. 2105 (aluminium) with two bolts, to the radiator mod. 2101 (brass) - two nuts.
Using a 1/4-inch square socket with a cardan joint, unscrew the two bolts securing the valve to the radiator
Removing the tap with pipe
Using a 10mm wrench, unscrew the two bolts securing the pipe to the tap
Install the faucet in reverse order
During disassembly, the lower nut securing the faucet to the aluminum radiator may fall out of the radiator tank socket.
When installing the nut in place, secure it in the socket with plasticine.
Removing the radiator of the VAZ-2121 stove
The procedure for removing the heater radiator on a VAZ Niva does not require any special skills or abilities. It is important to prepare the necessary materials and tools in advance. Most instructions for repairing car heaters contain a recommendation to drain the coolant before starting work. In practice, many car enthusiasts limit themselves to draining only that part of the antifreeze that is located in the radiator itself and the nearby pipes of the cooling system.
Preparing tools
To replace the radiator, you will need the following tools:
- pliers;
- slotted screwdriver;
- Phillips screwdriver;
- a set of markers for identifying wires;
- spanner set to “7”;
- socket wrench set to “10”;
- socket wrench set to “7”;
- socket wrench set to "10".
Procedure for dismantling the radiator
All operations must be performed in the following sequence:
- Unscrew the left self-tapping screw securing the storage shelf.
The self-tapping screw is unscrewed with a Phillips screwdriver
The right side of the shelf is attached to the upholstery
The central part of the shelf is unscrewed from the front panel
The right edge of the shelf moves down freely
There is a special spike on the left side of the shelf
The lower part of the panel is also fixed with a self-tapping screw
The process is shown on the right side, the left side is similar
The panel is moved to the side
The wire blocks are detached to remove the entire radio panel
After disconnecting the wires, the panel can be easily removed
Loosening the clamp is shown using the example of the lower pipe; a similar operation is performed with the upper
The screws are unscrewed with a socket wrench with a “7” head
The removed seal allows you to remove the radiator pipes from the engine compartment
The fastening nut is unscrewed with a “7” key
The rod is removed from the crane lever
The rod is disconnected from the fan casing
The staples are pryed off with a slotted screwdriver
The casing with the fan is moved to the side
After removing the fan, the radiator is carefully removed from its compartment
The tap and pipes are turned off with a key to “10”
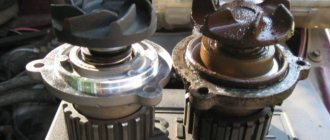
The removed tap is checked for leaks
The bottom nut often falls out and gets lost
Disconnect the outgoing pipe.
The two fastening nuts are unscrewed with a “10” wrench
After dismantling, you should carefully inspect the radiator for blockages in the grille and leaks from the tubes. Based on the results of the inspection, a decision is made on the possibility of repair or installation of a new radiator.
Video: installing a radiator
The process of replacing the heater radiator on a classic Niva has been studied far and wide by many car owners. In fact, the procedure is similar to the entire family of AvtoVAZ classics. However, caution and safety precautions should be observed when working. After completing the repair, before driving on public roads, you must make sure that all components and mechanisms of the vehicle are operating normally. Only then should you begin daily use of the machine.
If necessary, replacing the heater tap 21213 Niva is carried out quite quickly at the nearest service station. Naturally, you will have to pay for the procedure according to the car service tariff. Meanwhile, the operation is not so complicated and labor-intensive that it would be impossible to do without skilled auto mechanics. This simple part can easily be changed independently; even an ignorant car enthusiast will need no more than 2 hours.
For what reasons is a Chevrolet Niva crane replaced?
In a car, the heating valve is a maintenance-free unit, so it is necessary to change it for both technical and financial reasons. If the faucet breaks down, it is only thrown away, and the causes of the malfunction may be as follows:
- Violation of tightness. When the elements rub, they wear out and therefore no longer fit together as they should. As a result, various smudges appear, which are very noticeable.
- Internal oxidation of elements. In summer, the stove tap is closed for a long time, so during this period its elements oxidize and stick to each other. Consequently, it is almost impossible to open the tap without breaking it.
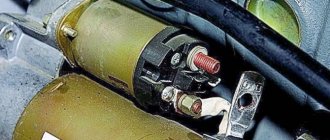
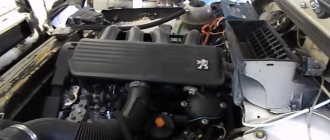
On a Chevrolet Niva, the heating valve for the heater is located in the wall of the engine compartment, so when you open the hood of the car, you will see a pipe that goes to the valve adapters from the radiator. To get to it, you need to dismantle the dashboard in the cabin on the passenger side.
The stove valve is mounted in a special niche in the engine compartment
If the faucet has been replaced, then it is better to install new pipes along with it, because during operation they have probably already lost their elasticity.
Let's sum it up
As you can see, on all modifications of the domestic Niva SUV, the interior heating system works extremely poorly, and this is mainly due to its design flaws. For this reason, vehicle owners have to constantly look for different ways to solve the problem, constantly upgrading the stove in the car.
As practice shows, it is not difficult to correct all the shortcomings and improve the interior heating. Any driver can carry out the procedure for independently tuning the interior heating system in a Niva-21213 car.
Procedure for installing a new part
Due to the fact that the heater radiator is located above the engine, part of the coolant does not flow out of it when it is emptied. And even more so it is full when the old tap is stuck closed. So before disassembling the unit, you need to stock up on a plastic bag without holes: it is convenient to place it in places with limited access.
Disassembly and removal of the tap are carried out in the following order:
- From the engine compartment, you need to loosen the clamps of the pipes leading into the cabin, and then remove them from the fittings.
- Unscrew the screws holding the sealing gasket (key 8) and remove it.
- From the interior of the Niva, you need to get to the tap and disconnect the rod by unscrewing the clamping bolt (key 7). Place a plastic bag to catch the remaining antifreeze.
- Loosen the bolts securing the faucet to the stove (key 10), unscrew them and pull out the part along with the metal pipe. If the heater radiator is copper, of the old type, then instead of bolts there will be nuts.
- Separate the metal pipe from the old faucet by unscrewing 2 nuts (10 wrench). Remove the traction mount from it.
Also interesting: Chevrolet Niva: off-road tuning - is it worth doing, why is it needed, what spacers to choose, instructions for performing the work
The rod mount and pipe must be installed on the new element using fresh gaskets coated with sealant. Then the crane is mounted in place and the unit is reassembled.
Taking this opportunity, it wouldn’t hurt to check the tightness of the connection of the second pipe to the radiator and, if necessary, change the gaskets there. It is also recommended to install new clamps on the hoses.
To avoid air locks when filling the system with liquid, you need to fill it slowly until antifreeze flows from the carburetor heating pipe. In this case, the heater valve must be open.
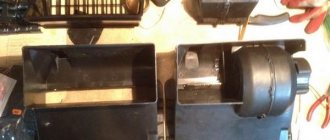
When disassembling the heater, a large number of tree leaves and insect remains were found in the air intake casing and in the honeycombs of the heater radiator grille, which also reduced the efficiency of the heater. Therefore, after cleaning and flushing the heater core, I took measures to prevent the radiator from clogging.
To do this, I bent a wire frame to the size of the air intake inlet, covered it with a nylon mesh with a 1x1 mm cell, and installed it at the bottom of the rubber seal of the air intake inlet. It was perfectly fixed there in the fold, like an accordion, without additional fastening.
All work to modify the heater took me about 4 hours of time and did not cost a penny of additional costs. Unfortunately, during work I didn’t think to take a photo, but from the attached drawing and picture everything should be clear. I'm happy with the result, now the stove heats better.
Typical radiator malfunctions
There are two main radiator malfunctions:
- Clogged grille and radiator tubes.
- Radiator leakage.
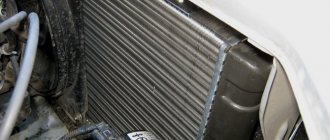
Since the Niva is often operated in difficult road conditions, the likelihood of contamination of the grille from dusty outside air is very high. Clogging of the cells reduces the heat transfer area of the radiator, and as a result leads to a decrease in the heat released from the air ducts into the passenger compartment. In such cases, the stove radiator is dismantled and washed under high pressure.
Clogged radiator tubes are also common. If the outlet pipe is barely warm or cold, then the radiator tubes are clogged. This happens for various reasons, including the entry of foreign objects into the cooling line during repair work. In such cases, the tubes themselves are also washed. To do this, it is not necessary to remove the heater radiator. It is enough to separate the radiator pipes from the cooling system and supply water under pressure into one of the radiator pipes.
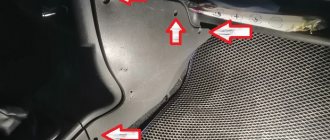
A leak in the radiator tubes can be determined by a coolant leak, which usually forms on the right side of the center console in the passenger foot area. As a rule, a leak is accompanied by the smell of antifreeze (antifreeze) in the cabin. Don't rely on the smell of antifreeze alone. Coolant vapor is very volatile and can be misleading as to the source of the leak. The smell of antifreeze also indicates a leak in the engine compartment.
The leakage of the heater radiator occurs due to natural wear and tear of the metal from which it is made. Constant cycles of heating and cooling, exposure to various chemicals and consumable liquids eventually lead to the destruction of the metal and the formation of cracks. Cracks in a copper radiator can be soldered. The aluminum radiator will have to be replaced with a new one.
Read news about the new field
- Air conditioning Niva Chevrolet - design and repair
- What tire size is available for installation on Niva, available versions and recommendations
- Mud tires for Niva 4x4: radius 15 and 16 - which one is better to install "
- All about the Valet button and how to disable it yourself on alarm systems of different brands
- Niva Lynx buy in Samara - prices for the new Lada “Bronto” (Niva Pickup) | cost and equipment
- Air conditioning Niva Chevrolet - design and repair "
- Niva Chevrolet installation of air conditioning - Auto magazine MyDucato
- Instrument panel Niva Chevrolet designations. Improving the Chevrolet Niva dashboard
Ball or ceramic?
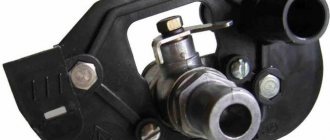
We recommend purchasing a ceramic faucet. The body of such a faucet is ordinary, but the locking element consists of two ceramic plates with slots that rotate relative to each other.
Ceramic heater tap
A ball valve, in principle, is also not bad; the undoubted advantage of such a valve is its greater throughput compared to a ceramic one (when open, the passage hole is equal to the internal diameter of the pipe). At low temperatures this is especially noticeable, but the likelihood of souring is higher for a ball valve than for a ceramic one.
Read news about the new Niva
- The modernized Lada Niva Legend (4x4) 2021 was shown on the Internet
- Lada 4×4 Bronto - sales stopped, new details » Lada.Online - all the most interesting and useful about LADA cars
- Description of the instrument panel Lada 4×4 (VAZ 2121, 2131) » Lada.Online - all the most interesting and useful about LADA cars
- Chevrolet Niva gasoline consumption per 100 km
- Buy LADA (VAZ) 2131 (4×4) 2022 in Rostov-on-Don, low price for Lada 2131 (4×4) 2022 on the Avto.ru website
- Fuses Niva 21214 injector «
- The new large Lada 4×4 Niva “Bigster” 2021-2022 based on the Dacia Bigster was shown for the first time. The SUV has changed beyond recognition
- New Niva Chevrolet Lux 2022 - review of GLC equipment
How much does a liter of 92 cost, and to what level is the price increase acceptable to you?
Niva Chevrolet heater tap where is the video
14 2000-09-18
News
- Indicator diagram Internal combustion engine diagram
- Scrap metal trailer for a car. Work on the frame.
- Maintenance (MOT) of the car body
- Where is the trunk release button located?
- Do-it-yourself car interior tuning: types, materials and work procedure
- Minimax car layout
- Tuning grants liftback Granta - what you can improve with your own hands
- All connection diagrams for daytime running lights Connection diagram for DRL on a VAZ 2107 injector
- Replacing torque rod bushings for VAZs
- Paper buses Complex paper bus patterns