Symptoms of a problem
A leak, one of the causes of which may be a faulty heater tap, is determined by two characteristic signs:
- Wet footprints appeared on the floor;
- In the cabin you can hear the characteristic smell of coolant - antifreeze or antifreeze.
Each of these signs indicates the need to inspect the condition of the unit to detect leaks in it. If the stove is not repaired in time, serious problems may soon arise, resulting in expensive repairs.
To find out who exactly is to blame for a coolant leak, lift the hood, arm yourself with a flashlight and carefully walk through all sorts of places. Since we are talking specifically about the faucet, in our situation it will be the culprit.
In addition to the faucet, hoses, pipes, and a radiator can be sources of leaks.
This is interesting: LED running lights - advantages and disadvantages
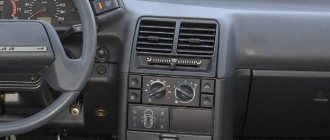
What is hidden under the panel in the car interior?
The “refrigerator effect” becomes most noticeable if you still continue to use old VAZ models with front-wheel drive: 2108, 2109, 21099. Let's try to figure out whether there is any possibility of replacing the heating system yourself. Despite the visual identity of the car models, there is still some difference in these VAZ units of the 8th and 9th models.
This difference is not fundamental. It’s just that in the process of evolution, unnecessary air ducts were removed from the design, the shape of the damper and the location of the radiator were changed. But this does not change the principle of operation. The interior is heated by air, a radiator connected to the engine cooling system is responsible for heating it, and the heater itself is located under the instrument panel in the car, which is higher in the VAZ 21099 due to some design features of the stove. With the help of connected air ducts, heat flows into the interior.
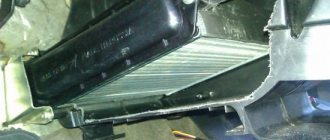
Radiator in the engine cooling system
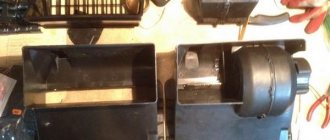
To force heated air into the cabin, a fan is located at the top of the heater, which rotates using an electric motor. The easiest way to access it is from the engine compartment. Heater radiator. which was mentioned above, is located in the VAZ 2109, 2108 and 21099 models near the heater itself.
Since heating is connected to the car’s cooling system, fluid circulation through the radiator occurs using the pump of this system. You can regulate its flow using the heater tap and various levers that affect the position of valves and dampers. Warm air enters the cabin through two central and two side nozzles, inside of which there are dampers that regulate the intensity of heating. The direction of flow is also changed by blades-blinds using levers in the cabin.
After the air in the cabin is heated, it is necessary to circulate it and maintain the set temperature. It is necessary to release the waste stream outside. In this regard, on VAZ 2108 models, hot air flows out through holes located in the central body pillars. On 9-model cars, these holes are located in the corners of the rear side windows and have rubber valves that prevent atmospheric air from entering the air ducts.
To force heated air into the cabin, a fan is located at the top of the heater, which rotates using an electric motor. The easiest way to access it is from the engine compartment. The heater radiator, mentioned above, is located in the VAZ 2109, 2108 and 21099 models near the heater itself.
Features of the VAZ injector cooling system
Cooling in cars 21093,2109,21099 is liquid, but you need to understand that the radiator is cooled by the flow of incoming air and a fan, which increases the cooling intensity. Also, part of the heat is removed by the car's interior heater radiator at low temperatures.
The expansion tank is designed to compensate for the volume of liquid when heating, to top up and control the level of antifreeze.
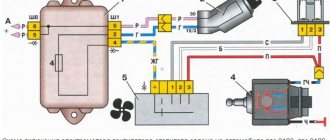
The temperature sensor provides control of the cooling system, allows you to monitor the engine temperature and regulate the operation of the fan.
The entire operating cycle of the cooling system is controlled using a power unit control system that takes into account all temperature parameters. It determines the optimal switching conditions and operating time of the structural elements of the system.
Bringing the radiator to life
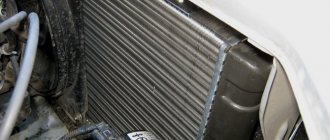
As a rule, it is not the entire system that becomes unusable, but only some part of it. The first signs that it is necessary to intervene are a specific smell in the cabin, the appearance of steam from the exhaust vents, and very rapid evaporation of coolant. First of all, you need to check the radiator. You should not bother with checks when the engine is running or has not yet cooled down. The problem most often lies in the radiator, in the area of the heater tap or in the electrical circuit. Let's look at these weak points in more detail.
Replacing a faucet or electric motor is not the first step; first you need to carefully inspect the radiator for leaks. Then you will have to remove it and check the tightness. The radiator is removed in the following order. First you need to disconnect and (preferably) remove the car battery, completely drain the antifreeze from the cooling system and disconnect the wires from the sensor that turns on the fan motor.
Replacing the electric radiator motor
It should be noted that it would not be superfluous to replace the rubber shock absorbers located on the radiator holders.
After the unit is removed, it is necessary to put tight plugs on the pipes or holes (except one) to which they are connected. Through the remaining inlet it is necessary to pump air into the radiator. Just be careful: do not allow air pressure to exceed 0.2 MPa. After this, lower the radiator into a bath of water, preferably so that it completely covers it.
The stove taps are all the same, but the heater radiators come in three types:
- copper;
- aluminum original (DAAZ);
- aluminum Chinese.
DETAILS: Fuses and relays VAZ 2106
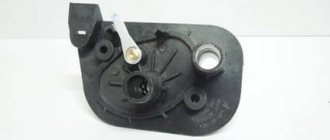
Stove heating valve
The best of them are original ones, produced in Russia, at the DAAZ plant. They have swirlers that ensure the interior is warmed up even at a coolant temperature of 60°. Copper radiators are stronger, they can be soldered in case of breakdown, but with them the interior warms up only at 80-85°. The worst option is Chinese radiators. They are very fragile, they do not have swirlers. With them, the cabin is warm only if you are standing in a traffic jam or turning the engine above 2500 rpm.
Now the main secret: why are car owners who have an interior with a high panel so lucky? Everything is very simple. First, they don't have to fiddle with choke and speedometer cables. Secondly, if you need to replace the heater radiator, just remove the steering casing, unscrew all the screws securing the torpedo and simply move its right edge further into the cabin. Everything is ready, you can remove the radiator.
There is also a radical way to provide access to the system parts: carefully cut off the bottom shelf of the panel and screw it back with screws. Now you can simply unscrew it whenever you need access to the stove. Assembling the interior heating system and dashboard must be done in the reverse order.
Similar news
The duration of its operation and the reliability of the entire system depend almost entirely on the properties of the new crane.
In total, there are three types of this unit on the Russian market. This means:
- standard, in other words native, used by the manufacturer;
- ball valve;
- clay
The first one is very cheap, but despite all this, it usually lasts for a rather short period of time. For this reason, it is worth choosing it only when the car owner does not have excess funds or if nothing else could be purchased.
How to replace a stove faucet. Simply and easily.
Replacing a heater valve takes less than an hour. For replacement you will need: a Phillips screwdriver, a wrench or a socket.
Replacing the heater valve for VAZ 2108-09.
If the heater valve on a VAZ 2108-09 is leaking, then watch this video. It carefully shows the process of replacing an old one.
- great reliability;
- strength;
- good throughput.
But the latter option may also turn sour over time.
Which one is better to choose?
Both the duration of its operation and the reliability of the entire system largely depend on the quality of the new crane.
In total, there are three types of this unit on the Russian market. This means:
- standard, that is, native, used by the manufacturer;
- ball valve;
- ceramic.
The first one is very inexpensive, but usually lasts a fairly short period of time. For this reason, it is worth choosing it only when the car enthusiast does not have extra money or if he was unable to buy anything else.
The ceramic model is more expensive and quite durable, but its disadvantage is its relatively low throughput. If you live in the southern regions, then feel free to take this option. Otherwise, a ball valve is ideal. This type of locking valve is different:
- great reliability;
- strength;
- good throughput.
However, the latter option may also turn sour over time.
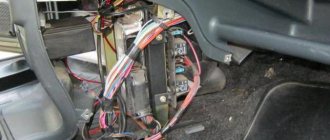
Self-replacement
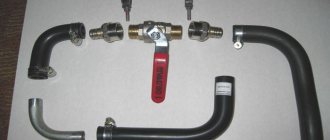
Like most repairs, this procedure is carried out on an overpass. Replacement requires the following tools:
- Container for draining coolant;
- Classic set of wrenches and screwdrivers;
- Sealant;
- WD – 40;
- New faucet with a set of rubber gaskets.
Operating procedure:
- 1. Display the VAZ 2109 car;
- 2. Place the prepared empty container under the motor and, opening the drain hole, allow the coolant to drain;
- 3. Next, you need to unscrew the pipes running from the engine to the heater. To do this, just loosen the fastening clamps. It happens that they do not give in, then it makes sense to use a “bucket” and clean the threads of the crane bolts;
- 4. Remove the pipes and drain the remaining antifreeze;
- 5. Remove the side trim of the dashboard in the car interior. Here, too, unscrew the pipes;
- 6. Then, using a 10mm wrench, loosen and unscrew the faucet fastening nuts. It's under the car. Continue working inside the car again and tighten the tap on the passenger seat side. Then remove the clamp. Disconnect the control cable;
- 7. The next stage is the installation of a new tap. First of all, it must be connected to the control cable. Now put the spring clip in place. Tighten the fasteners. When installing pipes, use sealant.
Having finished installing the new heater part, you need to pour coolant into the system and check how the replacement went as a whole.
Malfunction - characteristic symptoms
A leak, one of the causes of which may be a faulty heater tap, is determined by two characteristic signs:
- Wet footprints appeared on the floor;
- In the cabin you can hear the characteristic smell of coolant - antifreeze or antifreeze.
Each of these signs indicates the need to inspect the condition of the unit to detect leaks in it. If the stove is not repaired in time, serious problems may soon arise, resulting in expensive repairs.
To find out who exactly is to blame for a coolant leak, lift the hood, arm yourself with a flashlight and carefully walk through all sorts of places. Since we are talking specifically about the faucet, in our situation it will be the culprit.
In addition to the faucet, hoses, pipes, and a radiator can be sources of leaks.
You only need to replace the heater valve on a VAZ 2108-09 if you notice problems with its tightness. The most important sign of a leaking heater tap is the appearance of puddles of coolant in the car interior on the carpet in front at the passenger’s feet and a typical sweetish smell.
In most cases, replacing the heater tap on cars such as the VAZ 2108 and VAZ 2109 can be done by yourself to save money.
Common causes include a leak under the shift lever or valve diaphragm. In these two cases, it is not recommended to postpone replacement until later, because a leaking heater tap is not only a source of an unpleasant odor, but also a decrease in the required level of coolant.
Therefore, to make the task easier, let’s consider which option to choose for this part and clearly demonstrate how to do it.
The following signs indicate that the faucet is leaking:
- traces of water are found on the floor in the cabin;
- There was a corresponding smell of antifreeze in the car.
Having found one of the above symptoms, you must certainly examine the failed unit. It is important to realize that if the damage is not repaired on time, then the repairs will cost even more money, and it will most likely not be possible to do it yourself.
How to perform an inspection? It will be useful to get under the hood from the engine side. It must be emphasized that leaks can occur in different places in the cooling system, so it is useful to examine the entire system. It is more convenient to do this with a flashlight. Coolant, namely, often drips from:
- radiator;
- joints of hoses and pipes.
When it turns out that the faucet is the culprit of the malfunction, the owner needs to start replacing it as soon as possible.
See:
This requirement is even more pressing if it’s winter, because without heating in a car it will be very uncomfortable to move around and also unsafe if you have a long trip through a sparsely populated area.
This is interesting: VAZ 2109 starter relay - a small but important car mechanism
Execution of work
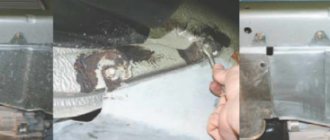
The car must be placed on a pit or ramp. Its wheels are fixed with stops. You should start working no earlier than the engine has cooled down. Don't forget to apply the handbrake! You will also need to disconnect the battery - it will be enough to remove the negative wire from it.
It will not be possible to do without draining the antifreeze. Therefore, the prepared container is placed under the hole intended for this purpose and, unscrewing the plug, wait until the coolant drains out completely.
Next, you need to disconnect the pipes connecting the engine directly to the mechanism that has become unusable. The fastening clamps on them are loosened. Use a brush to clean the threads on the two studs that hold the heater tap itself. As reviews indicate, without WD40 it is most likely impossible to easily remove a faulty unit.
Only after this can you completely unscrew the clamps and remove the pipes. Please note that sometimes some antifreeze remains in them. You should be prepared for this and have a vessel ready. To avoid getting your hands dirty, you should also wear gloves.
Having completed the work on the hood side, you need to go to the interior. It will also be impossible to do without removing the torpedo, or rather, its side panel. Having opened access to the remaining pipes, they are dismantled. In those situations when it turns out that they have completely retained their properties and do not need to be replaced, they will only need to be disconnected from the tap. And coolant often leaks from these pipes - be prepared for this.
After the tap has been rid of the tubes, we move again under the bottom of the vehicle. Here, using a 10mm wrench, unscrew the nuts holding the above element in place. Then, returning to the salon, they pull out the tap itself, removing the spring retainer. Only after this is it possible to dismantle the cable leading to the regulator.
When installing a new mechanism, do not forget to return the rod to its place.
Reassembly is carried out in reverse order.
As practice shows, quite often car owners leave the old gaskets behind when replacing the faucet itself. This should not be done under any circumstances. Even if the seals look good, they still have a very limited life and can quickly become unusable. The new ones are supplied complete and you won’t have to spend extra on them.
When returning the pipes to the tap, the joints should be treated with silicone sealant; this will allow you to forget about grooves for a long time.
Before filling the system with antifreeze, return the drain plug to its place.
In a VAZ-2109 car, replacing the heater valve is caused by two malfunctions: a coolant leak and a failure to switch the supply of cold to hot air due to souring. If the malfunction of changing heating modes is not critical and can wait, then puddles of antifreeze in the place where the valve of the VAZ-2109 stove is located indicate the need for immediate repair.
How to remove the stove on a VAZ 2109
Have you ever heard of a stove radiator? Well, if you have a car, you've just heard. Personally, I learned about the stove radiator only after two years of operation of my VAZ 2109 in 2001
Almost all this time I noticed that when the heater in the car was turned on, it smelled of a special smell, but did not pay attention to it
It was summer and when I got my dampness. “After winter the water will dry up.” I thought, but I was wrong. Then I noticed that the antifreeze began to leave the coolant barrel, and that was the last straw of my patience. All this time I was afraid to realize that I had a radiator.
How to choose a truly excellent VAZ 2109 radiator stove
When I walked into an auto parts store, I learned that there are several types: aluminum factory, aluminum not factory, and copper.
After consulting with friends who had not ridden for several years and were faced with the same problem, I learned:
- A copper radiator costs 2 times more than an aluminum radiator, but it does not get very hot.
- The factory radiator costs about 1000 rubles, and is worth getting because it is reliable and stays warm as expected. Its design is stronger than the original VAZ radiator, and has swirlers that slow down the coolant, which contributes to more heating of the radiator. With this radiator, you will begin to feel the warmth in the car as early as 60 engine degrees.
- A non-factory radiator costs 500 rubles, but it’s not worth buying. First of all, it doesn't get hot; secondly, it may leak immediately after replacement. Thirdly, it does not have swirlers, so the antifreeze passes through the radiator.
Radiator replacement steps
To replace the radiator of the VAZ 2109 stove, you do not need to remove the entire panel, since it is written with many instructions, I will tell you how to do this hemorrhoids a lot and with little time. So, let's begin:
If you have a Vaz 2109
, you need:
- Drain the antifreeze.
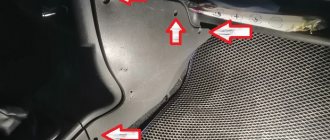
- Remove the panel trim.
- Remove the panel part from the speedometer.
- Remove the furnace trim (which is located under the gear handle).
- Remove the panel mounting screws.
- Pull the panel with the help of the assistant from the left edge.
- Unscrew the clamps that secure the nozzles to the faucet (be careful so that any remaining antifreeze can flow)
- Remove the 3 screws holding the heater cover in place (3 screws will be the problem.) Have a helper pull the panel more firmly
- That's all. You just need to take out the old radiator, which just goes into the space between the glove box and the store shelf, put the new one in and put everything back together)
And finally, some tips:
- Don't wait until winter, it's better to do it this summer.
- Before installing the new stove radiator, glue it to the edge with foam rubber, since the old one was inserted.
- After replacing the heater core, it is better to go to the overpass and stand up. Thus, there is less chance of a gateway in the radiator.
Tap selection
Before you begin replacement, it is important to select a new, high-quality faucet that can reliably serve the heating system of your VAZ 2109.
| Crane type | Peculiarities |
| Factory | This is a standard type of faucet that the VAZ 2109 is equipped with from the factory. Its main advantage is its affordable price. As for the reliability and frequency of jamming, here we are talking about obvious shortcomings. It is worth taking such a faucet as a replacement only if you could not find others |
| Ceramic | It is more expensive than the factory device, has high strength, but its throughput is lower compared to the third option. Low throughput rates can lead to the fact that the efficiency of the stove in winter will leave much to be desired |
| Ball | Excellent throughput, high reliability and durability. Alas, even such faucets turn sour, although their prices are higher than their analogues |
Article on the topic: Replacing the fuel level sensor on a VAZ 2114
Considering the features of the presented taps, the optimal solution would be ball or ceramic. The second option is more suitable for those who live in regions with not very severe winters.
Replacing the Heater Tap VAZ High Panel
I am replacing press VAZ-2109 oven high and low panel
As a rule of thumb, a faucet's insulation needs to be replaced if it starts to leak or gets stuck so that its controller stops moving. Old repairs are unlikely to be restored. Meanwhile, without this element, heating in the room will not be able to work properly.
How to replace a damaged stove valve on a VAZ-2109 car is described in this article.
Error is a characteristic
The following indications indicate that the faucet is leaking:
- traces of water were found on the floor in the cabin;
- the corresponding smell of antifreeze appeared in the car.
If you notice any of the above symptoms, you definitely need to find the faulty unit. It is important to understand that if you do not correct the damage in time, repairs will cost you a lot of money, and you most likely will not be able to do it yourself.
How to check? It is useful to get under the hood of the engine. It should be emphasized that leaks can occur in different places in the cooling system, so it is useful to consider all of these. It is more convenient to do this with a flashlight. Refrigerant, namely, often drips from:
- radiator;
- connection points for hoses and pipes.
If the fault is found to be the fault of the faucet, the owner must begin replacement as soon as possible.
This requirement is even more relevant if it is winter, because without heating it will be very inconvenient to move in the car, and also dangerous if the road continues through a sparsely populated area.
Which one is better to choose?
The duration of its operation and the reliability of the entire system practically depend on the properties of the new crane.
There are three types of this unit on the Russian market. Tools:
Why do breakdowns occur?
As noted above, the shut-off valves of the heater are a very vulnerable element of the VAZ-2109. If it fails, then it will not be possible to ignore the breakdown. First of all, on the floor, at the base of the passenger seat in the first row, a puddle forms under the carpet. In addition, leaking antifreeze emits a very characteristic odor, which should also suggest a malfunction of the stove.
Leakage occurs for three main reasons:
- use of low-quality cranes by a domestic automaker;
- oxidation;
- mechanical destruction.
The Volzhsky plant supplies its products with membrane-type locking fittings. This system has one inherent drawback - poor tightness. Even with careful use, such taps break very quickly.
- VAZ 2115 heater valve: replacement, where is it located
The second malfunction occurs due to the fact that the heating system is not used for at least 4-5 months a year. This period is quite enough for the valve casing and moving elements to become covered with sediment. As a result, his insides literally stick together. The owner of the car makes a significant effort to open it, and as a result the unit simply collapses. That is, a third type of breakdown occurs.
Removing a faulty device
...and remove the hoses.
DETAILS: Replacing the door lock cylinder of a VAZ 2109: algorithm of actions
First you need to determine whether your car has a low or high center panel. If the panel is low, then you are definitely out of luck. To remove it you will have to sweat.
- First, turn the front wheels so that they point straight ahead.
- Then open the hood, remove the negative terminal from the battery, remove the choke cable from the choke lever, and disconnect the speedometer cable from the gearbox.
- Remove the stove faucet handles.
- We take out, by pulling towards ourselves, the electric fan switch handle.
- Unscrew the 4 screws securing the beard trim and pull it towards you.
- We disconnect all the plugs, having previously marked or remembered which connectors they will need to be inserted into later.
- Unscrew the 4 screws securing the stove control panel.
- Unscrew the 2 screws securing the instrument panel visor and remove it.
- We squeeze the clamps of the instrument panel and remove it from the dashboard.
- Disconnect the speedometer cable, all plugs and fittings from the dashboard, and remove it.
- Pull it towards you and remove the handles for the headlight range control and the dashboard light switch.
- Unscrew the nuts securing the headlight range control and the dashboard light switch.
- Remove the steering wheel and steering column switches.
- Set the ignition key to position “0” and remove the connector with the ignition switch wires.
- Unscrew the fastening screws and remove the central panel.
Now we can get to the details of the interior heating system. We need to take them off.
Similar news
- Let's look under the hood again. If you have containers or extra money, drain the antifreeze from the system.
- We find hoses in the engine compartment going to the heater tap pipes. We remove them by loosening the clamps.
- Moving into the interior, we remove the hoses from the pipes under the dashboard. Unscrew the two nuts securing the stove tap and remove it.
- To the right of the stove body, unscrew the screw that holds the clamp of the heated glass flap rod.
- Unscrew the three screws securing the heater radiator and remove it.
- Now let's examine all the details. If we find faulty ones, we replace them.
Checking the functionality of the heater tap
If the cold or hot air supply modes do not switch, the cause may be a loose damper control cable or souring of the mechanism itself. How to open the tap of the VAZ-2109 stove in this situation?
To do this, you need to remove the side panel of the dashboard on the passenger side. Then check the condition of the cable and if this is the reason, then connect it back into place. You can also, without removing the panel, put your hand under the dashboard, where the VAZ-2109 heater tap is located, and move the VAZ-2109 heater damper lever to the desired position. If the lever does not give in, then most likely it has gone sour and must be replaced.
Recommended Actions
So, how to change the heater tap on a VAZ-21099? How easy is it to host a self-planned event?
Sometimes a problem with heating a car interior can be successfully corrected only if you understand how to adjust the faucet of the VAZ-21099 stove. In this case, you will need to remove the entire device to correctly determine the nature of the problem. What is the best way to proceed?
- Initially, you need to disconnect the hoses from the pipes located on the tap of the heater.
- The next step is to unscrew the faucet fasteners and remove it.
- The rods going to the part must be dismantled.
- After this, it is recommended to remove the trim panel located on the floor of the vehicle.
- The air duct located in the tunnel should be disconnected.
- Now you need to carefully remove the heater wires, unscrew the mounting nuts and remove the device.
After this, you can change the heater tap. Knowing where the heater tap is located on the VAZ-21099 and correctly determining its functionality, it will be easier to cope with subsequent tasks. All steps must be performed in reverse order.
Despite the ease of the task, you may still need the help of a friend. If guidance is provided, you can understand how to open the heater valve on a VAZ-21099 and make it work. In fact, it is possible to miss a small detail in the pipes and nuts, but fixing it is not so easy. It is not as easy for a beginner to find the slightest error as we would like.
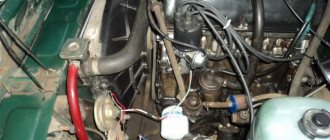
It is important to understand that the valve of the VAZ-21099 injector stove must be positioned correctly for successful heating of the car interior:
- an additional pipe is installed in the thermostat housing;
- A special plug for the water pump is placed in the housing.
As a result, liquid from the heating equipment will flow to the thermostat, and then continue its cycle. It is assumed that the thermostat will be included in the automatic cooling system, so there is no need to worry about overheating or excessive cooling of the engine.
In most cases, the question of how to change the used stove faucet is not so easy. However, it can be solved just as successfully as many other issues related to the heating system of a domestic vehicle. Only if you correctly replace the used faucet can you count on successfully heating the car interior and maintaining the most comfortable temperature.