The Solex carburetor (DAAZ) is one of the most popular devices in the list of carburetor metering systems, since with the right approach it is possible to flexibly configure carburetors of this type. For this reason, car enthusiasts install Solex carburetors on different engines, after which they are further adjusted, achieving the required fuel efficiency indicators, quality of mixture formation at power and other operating modes of the internal combustion engine.
We also recommend reading the article on how you can do carburetor tuning yourself. From this article you will learn about various ways to independently modify carburetor metering systems.
After installing Solex on the engine, it is often necessary to configure this device. To solve the problem, you can contact a service center, where a specialist in setting up the carburetor will perform all the necessary operations. You can also adjust the carburetor yourself. In this article we will talk about how to adjust the quality of the mixture on a Solex carburetor, how to adjust the fuel level and adjust the float chamber of the Solex carburetor, adjust the idle speed, etc.
Solex carburetor: setting and adjustment
Before starting the setup work, if it is necessary to adjust the carburetor air damper, the fuel level in the chambers, setting the idle speed and other manipulations, it is necessary to separately study the design of the carburetor system, the location of the jets and other basic elements (econostat, economizer, float, first and second chamber, dampers, etc.) You should also pay attention to how the cover is removed and the carburetor is disassembled.
We also recommend reading a general article about the structure and principle of operation of a carburetor. In this article you will learn about the main components of a mechanical dispensing device.
You need to start setting up by setting the fuel level in the float chambers. The recommended method is to set the specified level according to the position that the floats have in relation to the carburetor cover. All manipulations are carried out using a separate template. Note that, as practice shows, this method cannot in any way be considered optimal, since when installing Solex on a car, it should be taken into account that the fuel pump on one specific vehicle may differ from the fuel pump on another car. There may also be other differences in the power supply system. The result is that the pressure on the carburetor needle (carburetor shut-off valve) is also different. Most often, after tuning according to the template, fuel enters the carburetor in large excess. In order to accurately set the gasoline level in the carburetor and adjust the Solex carburetor float successfully, you must follow the steps described below.
- Usually, immediately after installing Solex on different internal combustion engines with different displacements, even without preliminary adjustments, the engine should still start. The engine must be started, after which the power unit should run for about 10 minutes. When running at idle, you can lightly press the gas and increase the speed to avoid the engine shooting into the carburetor or exhaust system.
- Then the power plant can be turned off, after which it is necessary to remove the fuel supply hose. It is recommended to prepare a rag to remove any remaining gasoline that splashes after removing the said hose. The hose is removed so that after removing the carburetor cap, gasoline, which is under pressure in the hose, does not spill into the carburetor chamber. In other words, excess fuel entering the chamber can interfere with the accuracy of the measurements.
- Now you can unscrew the screws securing the carburetor cover, then you need to remove the cable that controls the “choke”. The next step is to carefully lift the carburetor cover. The specified cover should be lifted in a strictly horizontal position so as not to cause damage to the floats themselves.
- Next, you should prepare a ruler or caliper.
With these tools you need to measure the distance that is obtained from the fuel itself in the chamber to the adjacent surface of the carburetor cover. The indicated distance from the surface of the cover to the surface of the fuel should be about 2.5 cm. We add that the distance must be measured in both chambers. This distance may vary, taking into account that the collector is not in a strictly horizontal position. Based on the difference in distances in both cameras, an average value is selected. If the fuel level is insufficient or exceeds the required level, then the tongue of the floats must be very delicately bent for less or more filling. Then the excess gasoline must be removed from the chambers to more accurately determine the level obtained after adjustments at the next measurement. The carburetor should be assembled, after which the engine starts again. - After the engine has been started, it is necessary to illuminate the carburetor chambers with a test lamp or flashlight, observing the small diffusers. During the period from 30 seconds to 1 minute, fuel should not drip from the diffusers. If you notice even a small drop, then this indicates that there is an overflow in the chamber. Please note that you cannot accelerate while observing the diffusers; the engine should only run at idle. The fact is that an unexpected shot or sneezing into the carburetor while applying gas can lead to eye injury.
If no drops of fuel were noticed, then all that remains is to re-measure the fuel level in the chamber using the already known method. If the result is positive, this part of the setup can be considered complete. If the level again differs from the norm, then the level should be adjusted again. Note that setting the level with the engine turned off during manual pumping is not correct, since after starting the internal combustion engine the carburetor will still overflow, especially on engines where the return line has been blocked.
Solex carburetor: idle speed adjustment
The next step after adjusting the fuel level in the carburetor float chamber is to adjust the idle speed. To set up, you must first warm up the engine until it reaches operating temperature. After warming up, the unit should be turned off.
At the very beginning, you need to find the air-fuel mixture quality screw, which is rotated using a flat-head screwdriver. The specified screw is located in the hole, which is made in the lower part of the carburetor.
- The quality screw must be tightened until it stops. Screwing is carried out clockwise, and there is no need to apply force, as the thread can be damaged. After the screw stops, you should turn it back from the stop position by 4-6 turns.
- Now the engine should be started, the choke should be removed. Then you should set the minimum permissible speed by turning the quantity screw. Such minimum speed can be considered an indicator when the engine operates stably and steadily. Also, the vacuum in the vacuum advance fitting should be minimal. A fairly simple way to determine the vacuum is to close the tube that goes into the so-called vacuum advancer with your tongue. If the idle speed is in the range from 600-1200, the carburetor is fine.
- Next, the quality screw must be slowly tightened until the operation of the unit begins to lose stability. As soon as the engine begins to operate unstably, you should unscrew the screw back one or one and a half turns, catching the position when the motor is operating stably again
- We return again to the quantity screw, with which the idle speed should be set to 800-950 rpm. We set the speed screw at XX to about 850-900. If the engine stalls when setting such speeds, then you need to unscrew the quality screw.
- The quality and quantity screws are adjusted until the required idle speed is set, the vacuum in the advance tube will be minimal, and the internal combustion engine itself will be able to operate stably.
Please note that during the setup process you may encounter certain difficulties. For example, the operation of the engine may not change in any way when trying to tighten the quantity screw (normally, the speed should drop, the engine starts to run unevenly, then stalls as the screw is tightened). If this does not happen, then a large amount of fuel enters the idle channel, which cannot be blocked by the quality screw.
This problem arises for a number of reasons. First of all, a large idle jet can be installed. You should also pay attention to how tightly the solenoid valve or plug is screwed in. If the fit is not tight, excess gasoline may be sucked in bypassing the idle jet. Also, one should not exclude possible problems with the jet itself, as well as with its seat. To more accurately understand the reason, you will need to remove the solenoid valve wire with the engine running and idling. In this case, after removal, the unit should quickly stall. If this is the case, then the cause is most likely a large idle jet. The solution will require installing a smaller jet.
If the engine does not stall after removing the wire from the valve, then this problem may arise as a result of gasoline overflowing into the float chamber. It is also possible that when the internal combustion engine is running, fuel bypasses the jet or even the entire idle system. First of all, we again check that the level in the float chamber is set correctly. If everything is normal with the level, then the solenoid valve/plug should be unscrewed, after which you need to inspect the nozzle and its installation location. There should be no defects. If there are any, then the carburetor cap may need to be replaced. If no defects are found, then the jet is put on the valve, the O-ring is lubricated with engine oil, after which it is tightened with a wrench without effort.
Repair stages - what to turn and where to adjust?
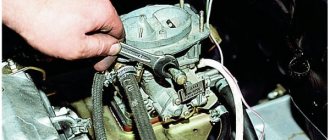
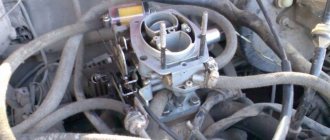
The carburetor in the VAZ 21083 is located under the air filter cover. To remove it, you need several keys. Before this, you need to open 4 latches. After this, loosen all the clamps that go to the carburetor. Next, disconnect the contact wire from the solenoid valve and unscrew the carburetor cap. You need to remove it in such a way as not to catch the walls of the floats in the chamber, because you can break them.
The floats in the carburetor chamber must be parallel to each other. If there are any deviations or inaccuracies in the operation of the floats, the fuel will be distributed unevenly throughout the chambers. The chambers have red marks on the body that indicate the permissible fuel level.
The jets inject fuel into the engine. Normal working jets have three holes. With very long operation and low-quality fuel, they wear out, as a result of which fuel is supplied in the wrong quantity. Adjustment of the jets must be done gradually. When replacing, they must be tightened firmly without using significant force.
When using a car regularly, timely cleaning of the Solex carburetor is very important. It is strongly recommended to carry it out at least once every six months. This will significantly extend the life of your carburetor and provide a more comfortable ride for your car.
Jets and accelerator pump
Owners of carburetor cars know that jets change, but they do not always understand why jets are needed and how their size affects the operation of the carburetor. Let's start with the fact that the engine sucks in air through a special hole made in a large diffuser. At the same time, a certain amount of fuel is drawn through the fuel nozzle. The engine displacement directly affects how much air the engine will draw through the diffuser in a certain time, as well as the amount of gasoline sucked in parallel with the air.
It is for this reason that large-volume engines have carburetors with small jets. Installing such a carburetor on an engine with a smaller volume will mean that the “original” jets in this carburetor will produce a mixture that is too lean for normal engine operation. To solve this problem, you should find jets from a carburetor, which was initially designed for a specific internal combustion engine volume or as close as possible to it. You need to select jets starting with the fuel jet, then select the air jet under the fuel jet. The selection is made from a group of jets for the first chamber, the second chamber is adjusted only after the first.
Now let's talk about the accelerator pump. The accelerator pump delivers additional fuel when the throttle valve opens, allowing for more efficient acceleration. The pump is activated using a special cam. On engines with a Solex carburetor installed, the indicated accelerator pump cam must be set to the largest one.
You should also pay attention to the so-called “spout” of the accelerator pump. When the valves are opened, fuel should flow in a clear stream and not drip even with a slight throttle opening. It is also important what position the nose occupies. The stream of gasoline must fall exactly into the area between the diffuser wall and the throttle valve, that is, the fuel is jetted directly into the manifold. The jet must not hit the diffuser or damper. If this happens, then after sharply pressing the accelerator pedal the car will not accelerate immediately, and a failure will occur. Self-refinement of the carburetor involves installing two spouts in the chambers to obtain better performance from the engine, or only one spout in the first chamber of the carburetor for a more economical mode.
History and design - what is remarkable about the VAZ 21083?
At the end of the 80s, when the first VAZ 21083 rolled off the assembly line, the carburetor type of engine had a monopoly - they had not even dreamed of VAZ injectors then. From the first days, this model received high ratings from drivers as one of the best in the VAZ series. However, then little thought was given to the price of gasoline, which cannot be said now.
The VAZ 21083 car has 2 doors, a very good streamlined shape, which is important when driving, and also handles well on the road. The main characteristics of this model are a 1.3 liter four-cylinder engine. Some models were produced with a capacity of 1.1 liters, but they did not perform very well. The production of such cars was more of a test nature, and only a few cars were produced.
VAZ 21083 has about 70 l/s in its engine and is capable of reaching speeds of up to 160 km/h. Due to its Solex carburetor, this car model is quite economical. Average consumption reaches 5.5–6 liters per 100 km. The carburetor is very technically well thought out and is not picky about fuel quality.
Solex carburetors were first used in France, where they got their name. At factories on the domestic market, this type of device was redesigned and some changes and improvements were made. Solex-type carburetors began to be installed on cars almost immediately with the first releases of this VAZ model.
The most noticeable change in the engine design was the installation of the carburetor not along, as in previous VAZ models, but across. It was necessary to change the design of the engine under the hood because it was necessary to improve and make the operation of the engine in the car more stable during large ascents and sharp descents. Later, this type of carburetor began to be used and installed on all VAZ cars.
Carburetor transition setting
While the engine is idling, the throttle valves are closed. A vacuum (vacuum) is formed under the dampers. Thanks to this vacuum, gasoline is sucked out through a small idle channel and nozzle, and the engine itself runs smoothly at idle. If you open the damper sharply, then the vacuum also weakens. Moreover, this vacuum is not enough for normal operation of the MDS (main dosing system) in the first chamber, and the idle system and accelerator pump are not yet capable of normalizing engine operation. In other words, when you sharply press the gas after idling, there is a delay in the response to pressing the accelerator pedal.
To minimize or completely eliminate this failure, a transition system is used in the carburetor device. This diagram is a hole-slot made above the throttle valve in the first chamber. At the moment you press the gas pedal, the slot-shaped hole appears in a zone of high vacuum, due to which intensive fuel suction occurs parallel to its supply through the idle jet.
Let's go back to the settings. After the carburetor has been installed, many cars experience a failure when starting from a stop, reactions to pressing the gas pedal are slow, and the engine may start shooting at the carburetor or stall. In such a situation, the transition system may be to blame. In order to normalize the operation of the carburetor, it is necessary to correctly select the cross-section of the “spout” of the accelerator pump and the size of the idle jet.
The fact is that it is during operation in the transition mode that fuel comes from both the accelerator pump and the transition system. As a result, the fuel-air mixture may become too rich or, conversely, lean, which does not allow the engine to operate normally and gain speed.
It is important to know that the nozzles in the first chamber do not need to be touched, and the indicated failures should not be attempted to be eliminated by replacing the nozzles of the main dosing system. To solve the problem, use a previously built carburetor to correctly select the idle jet and the accelerator pump spout. The selection must be made after the internal combustion engine has warmed up, the choke must be removed.
In practice it looks like this:
The level in the float chamber was previously set and the idle speed was adjusted. A warm engine idles normally without chugging. A stream of gasoline from the accelerator pump nozzle hits the manifold. Now you can sharply press the gas pedal. What is needed is the sharpness of the press, and not how hard the pedal was pressed (to the floor, half a stroke or ¼). Normally, the motor should immediately respond and spin up, that is, the speed increases without delays or failures. If the response to a sharp press on the accelerator is slow or there is a noticeable pause before the speed increases, then you should go to the settings.
To accurately determine the cause, you need to press the gas pedal again, but this time smoothly and not sharply. If in this case there is an even increase in speed (without pauses, dips or delays), then you should pay attention to the idle jet and the pump spout, since the main dosing system has nothing to do with the failure. If, when you gently press the gas, the engine spins up poorly, the unit itself begins to work jerkily, hums, vibrates strongly, etc., then the problem lies in the selection of jets for the first chamber. In other words, excessive enrichment or leanness of the mixture occurs after the carburetor switches to power mode after pressing the accelerator. An indirect sign of a too “rich” mixture during operation in transition mode is that the engine emits black smoke and the smell of gasoline comes from the exhaust system. The specified smoke and smell appear after sharp throttling.
To remove the dip, you must carefully select the idle jets to match the pump spout or vice versa. This is done until the delay disappears when you sharply press the accelerator pedal. In parallel with this, it may be necessary to re-adjust the idle speed, since replacing the XX jet will make changes to the operation of the idle system. Let us add that if the mixture remains lean and there is a dip, and the idle jet is too large and it is not possible to adjust the idle speed, then you can install a paired pump spout, after which both tubes are bent into the first float chamber.
Setting up the float chamber
This type of work allows you to adjust the optimal amount of gasoline in the float chamber. An incorrect level causes a decrease in power, uneven engine operation, and excessive fuel consumption.
- set of wrenches;
- thin probe (diameter 1 mm);
- pliers.
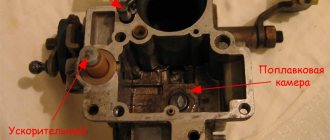
1. Remove the air filter and unscrew the carburetor cover.
2. Carefully remove the float chamber cover.
3. Check the condition and position of the floats. They should be parallel to the imprints of the side walls of the float bath on the gasket.
4. If they are displaced, we align them by bringing them together or spreading them apart.
5. Next, lay the lid horizontally with the floats up and use a feeler gauge to measure the distance from the bottom of the float to the gasket. It should be equal to 1 mm. If it is higher or lower, we continue further adjustment after installing the carburetor on the engine.
6. When fuel is pumped into the float chamber, its level should coincide with the red lines, as shown in the photo.
7. If the floats are set incorrectly, this level will be lower or higher. Simple adjustment is carried out by bending or bending the tongue of the floats, then closing the carburetor cover and pumping fuel.
For details on setting up the float chamber, see here
Adjusting the second chamber of the Solex carburetor
Let's start with the fact that when adjusting the carburetor, the second chamber is usually not touched, since often standard jets will be sufficient. The carburetor also has an econostat that can correct possible nuances. The econostat is a tube located in the second chamber at a slight angle.
The purpose of the econostat is that when the throttle is fully opened, the vacuum in the carburetor allows fuel to be sucked through the econostat. The econostat is activated when the engine is running at high speeds and allows the fuel-air mixture to be enriched. To refine the second chamber, which allows for “pick-up,” jets are installed to enrich the mixture. The selection of jets in this case is no different from the selection for the first chamber.
Setting up the launcher
- open-end wrench 7;
- open-end wrench 8;
- flat screwdriver;
- electronic tachometer or multimeter with its function.
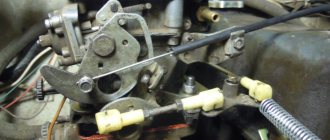
1. Remove the air filter from the carburetor. Pull the “suction” towards you as far as it will go. Next, you will need an assistant to start the engine. At this time, you are watching the starter flap, which should open slightly after starting.
2. If this does not happen, it means that the starter is not adjusted.
3. We begin the adjustment. Warm up the engine, turn it off and connect the tachometer as follows.
4. Pull out the choke and start the engine. The suction valve must be completely closed.
5. Next, use a screwdriver to press on the edge of the damper, opening it 30 0 .
8. In this position, holding the bolt with a screwdriver, tighten the locknut.
The adjustment process can be seen in this video
Let's sum it up
The steps described above for setting up and adjusting a Solex carburetor are basic. In other words, if you wish, you can adjust the carburetor yourself, based on this information. Note that the accuracy of the settings can be further checked on a gas analyzer, after which you can make the necessary adjustments yourself instead of constantly contacting specialists. Finally, we add that a dosing device of this type lends itself to various types of tuning, all kinds of modifications and improvements. For this reason, when choosing a carburetor for a VAZ, it is not for nothing that many car enthusiasts prefer Solex.
Idle setting
- flat screwdriver;
- electronic tachometer.
1. Start the engine, warm it up to operating temperature, and then turn it off. We press the “choke” all the way, opening the flap of the starter device as much as possible. We connect the tachometer using the same principle.
2. Start the engine, turn on all the lights and the heater fan at full power.
4. If in this way it was not possible to achieve the required speed, unscrew the quality screw to the maximum number of revolutions. Next, turn the quantity screw, setting the motor to 900 rpm. After this, use the quality screw to reduce the speed to 800 rpm.
Details in the video
Carburetor calibration data
| Options | 2108-1107010 | 21081-1107010 | 21083-1107010 | |||
| First camera | Second camera | First camera | Second camera | First camera | Second camera | |
| Mixing chamber diameter, mm | 32 | 32 | 32 | 32 | 32 | 32 |
| Diffuser diameter, mm | 21 | 23 | 21 | 23 | 21 | 23 |
| Main dosing system: | ||||||
| fuel jet marking | 97,5 | 97,5 | 95 | 97,5 | 95 | 97,5 |
| air jet marking | 165 | 125 | 165 | 135 | 155 | 125 |
| Emulsion tube type | 23 | ZC | 23 | ZC | 23 | ZC |
| Idle system and transition system | ||||||
| first chamber: fuel jet marking | 42* | — | 40* | — | 40* | — |
| air jet marking | 170 | — | 170 | — | 170 | — |
| Second chamber transition system: | ||||||
| fuel jet marking | — | 50 | — | 50 | — | 50 |
| air jet marking | — | 120 | — | 120 | — | 120 |
| Econostat: | ||||||
| conditional fuel jet flow rate | — | 60 | — | 70 | — | 70 |
| Power mode economizer: | ||||||
| fuel jet marking | 40 | — | 40 | — | 40 | — |
| spring compression force at a length of 9.5 mm, N | 1,5±10 % | — | 1,5±10 % | — | 1,5±10 % | — |
| Accelerator pump: | ||||||
| sprayer marking | 35 | 40 | 35 | 40 | 35 | 40 |
| fuel supply for 10 cycles (total for both chambers), cm3 | 11,5 | 11,5 | 11,5 | |||
| cam marking | 7 | — | 4 | — | 7 | — |
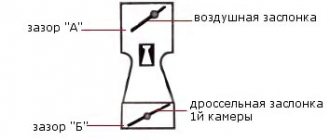
| Starting clearances: | ||||||
| air damper (gap B), mm | 3±0,2 | — | 2,7±0,2 | — | 2,5±0,2 | — |
| throttle valve (gap C), mm | 0,85 | — | 1,0 | — | 1,1 | — |
| Hole diameter for vacuum corrector, mm | 1,2 | — | 1,2 | — | 1,2 | — |
| Needle valve hole diameter, mm | 1,8 | 1,8 | 1,8 | |||
| Diameter of the fuel bypass hole into the tank, mm | 0,70 | 0,70 | 0,70 | |||
| Engine crankcase ventilation hole diameter, mm | 1,5 | — | 1,5 | — | 1,5 | — |
* Selected at the factory when setting up the carburetor.
How to check Solex
To ensure high-quality work on adjusting and tuning the carburetor, you should ensure that sand particles, etc. do not get on the throttle valves. If solid particles get into the carburetor, this can lead to an expensive overhaul of the internal combustion engine (due to some small thing).
After you have adjusted the carburetor correctly, you need to check the accelerator pump. When the throttle valve is opened slightly, the nozzle should spray gasoline. Here is the answer to the question: why does the car jerk when driving? If a stream of gasoline from the sprayer appears late, then this precisely leads to braking when you press on the gas and the car jerking.
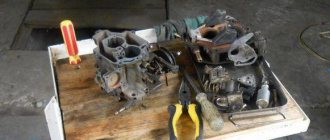
To clean the carburetor, it must be disassembled. First, we unscrew the fuel and air jets, as well as the emulsion tubes. If it is difficult to remember what is where in the carburetor device, then it is most convenient to photograph each step.
To determine whether the diaphragm is intact, unscrew the cap of the power mode economizer.
Signs of a broken carburetor diaphragm:
- The internal combustion engine does not stall when the screw is tightened.
- If you turn off the ignition, the engine continues to run for some time, that is, self-ignition occurs.
- Unstable operation of the internal combustion engine.
- Increased gas mileage during normal, moderate driving.
ECTO or EURO? What brand of fuel is best to fill in? ECTO fuel is not recommended for use in cars with high mileage.
After checking the integrity of the diaphragm, we clean the SOLEKS. For cleaning we use air pressure (a compressor or pump is needed). If the dirt is hard and does not fly off with a stream of air, then carefully clean the stuck dirt with copper wire. I use air pressure cleaning without damaging the surfaces of carburetor parts. After this, close the lid and now you need to lubricate all the rubbing surfaces of the carburetor parts. It should be lubricated after washing the outer part.
Signs of a carburetor malfunction
It is a well-known fact: the quality of fuel in our country leaves much to be desired. As a result, the carburetor may become clogged with oils, solid particles, etc.
In this case, one or more signs may be observed:
- significantly increased fuel consumption;
- the engine does not start “cold”;
- loss of dynamics;
- "triple" of the engine.
You can restore functionality yourself. If unsuccessful, you can remove it and take it to a mechanic, who, with an experienced eye, will immediately identify the errors and adjust it “by eye,” after which the car will at least start.
First, you can try adjusting the carburetor without removing it from the car.
Ways to eliminate air leaks
Air leaks can be eliminated only by replacing old fuel hoses coupled with careful sealing of the connections. Cleaning the VAZ 21083 carburetor is carried out without dismantling the unit. List of necessary tools and cleaning products:
- key to 10;
- crosshead screwdriver;
- minus screwdriver;
- syringe;
- 200 ml of acetone;
- a can of aerosol for cleaning the carburetor;
- repair kit
Algorithm of actions.
Unit adjustment
- Remove the air filter along with the filter element.
- We start the engine.
- We spray the aerosol into all visible openings of the carburetor and constantly rev it up.
- After visible traces of dirt have been removed, we pull out the choke so that the crankshaft speed is kept within the range of 2500-3000.
- We unscrew the solenoid valve and spray the resulting hole with spray, gas it and blow through the hole using a pump or compressor.
- After this, turn off the engine and tighten the valve.
- Next, remove the carburetor cover by unscrewing several screws.
- Using a syringe, remove all gasoline from the float chambers.
- Pour acetone into the chambers and leave for half an hour.
- We unscrew all the jets, having previously remembered where they were located, and send them into the remaining acetone.
- After half an hour, remove the acetone from the chambers using a syringe and wipe off the undissolved dirt with a minus screwdriver wrapped in a cloth.
- We remove the jets from the solvent and blow them out with a pump, then screw them into their original places.
- Disconnect the fuel supply hose, remove the plug, the O-ring and take out the fuel filter. We replace it. Then screw everything back.
- Pour 3 cm of gasoline into the float chamber, put on the carburetor cap and start the car again.
After cleaning the carburetor, the engine should stop stalling without revving up. If there are still dips in the operation of the power unit, the accelerator pump parts should be replaced.
- We carry out the operations described above in paragraphs 1-12.
- Use a minus screwdriver to remove the accelerator pump nozzle.
- Pour gasoline into the float chamber and turn the control lever of chamber 1. If a strong stream comes out of the hole where the sprayer was located, then only replace it.
- If the flow is weak, remove the accelerator pump cover and change all the internals.
- We assemble the unit.
This completes the repair. We wish you good luck and smooth operation of your car!
Return to contents
Required checks
It is necessary to check the tightness of the nuts attaching directly to the intake manifold. It is also worth checking the operation of the gas pedal drive. To do this, depress the gas pedal completely and see what position the throttle valves are in; they should be almost in a vertical position, that is, open.
The position of the throttle valves is adjusted by nuts with which the throttle cables are secured.
In some cases, you can also bend the gas pedal itself already in the cabin. Repairing a Solex carburetor will cost much less.
Video
This video shows how to clean a Solex carburetor
This video is about tuning the small diffuser of a Solex carburetor
This is a general video on improving the SOLEX carburetor.
With the development of the automotive industry, older models of carburetors were replaced by carburetors with the Solex brand. Unlike their counterparts, Solex delivers more accurately and helps the car develop more power. Such carburetors are installed on engines with a displacement of 1.5 liters, front-wheel drive VAZ cars, the Samara family: VAZ 2108; 2109, 21099, 2110.