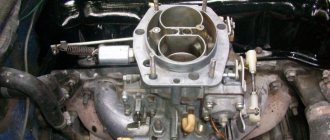
Despite the fact that the VAZ-2121 SUV was developed quite a long time ago, this car is still very popular. In 1994, the model was changed to VAZ-21213. Many people buy these cars because of their high cross-country ability, which can be the envy of some jeeps from famous brands. Others like reliability, unpretentiousness and high maintainability. A simple design and excellent off-road characteristics made this vehicle a vehicle for lovers of travel, hunting, fishing and tourism.
Niva cars 211213 are equipped with a 1.7 liter engine. It is carburetor, and is based on a VAZ-2106 engine. There is also a five-speed manual transmission and a proximity ignition system. The power system is equipped with a Solex 21073 carburetor for the Niva. Many novice car owners are intimidated by carburetors and everything connected with them. But a carburetor is not a death sentence. You just need to understand its basic structure, how to adjust it, and how to repair it.
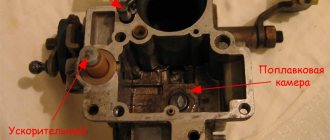
Float mechanism
The Solex 21073 carburetor, installed on the Niva, has a float chamber of two sections. They are located on both sides of the main cameras of the device. The system consists of two ebonite floats, which are mounted on a lever.
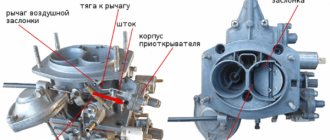
The latter swings on an axis pressed into the bosses of the device cover. There is a tongue on the bracket. The element presses the needle valve needle through a special ball. The float mechanism serves to adjust the level of fuel required for normal operation of the carburetor. The needle valve is a non-separable type. It is not being repaired. The valve body is mounted on a thread in the carburetor cap. The ball protects the needle from shock when the machine moves. If the chamber is empty (for example, if the driver is using LPG), then the floats will knock.
Main dosing systems
The first and second chambers are equipped with diffusers. There is one large and one small element. Spray devices are also made together with small diffusers. The latter are connected through channels to the emulsion wells, and they communicate through one channel with the float chamber. To ensure that gasoline flows in certain portions, the main fuel jets are located below in the emulsion wells. These same wells have special tubes. Each of them is equipped with an air jet at the top. Air is supplied to them from the neck of the device.
Operating principle of the main dosing chamber
Under the influence of vacuum that occurs in the engine cylinders, air is drawn through the filter. Next, oxygen is supplied to the first chamber. It passes through diffusers. Due to the fact that the air flow speed has increased, an even greater vacuum is created in the nozzle area.
Under its action, the fuel rises from the emulsion well from the atomizer. At the same time, air passes through the air nozzle into the emulsion tube and is then mixed with fuel. As a result, an emulsion is formed, which is sucked at high speed into the carburetor channels, where it connects with the air flow. The installed Solex 21073 carburetor on the Niva operates on this principle. Its design may vary depending on the modification. But the principle of operation of the systems is approximately the same for all devices.
Selection Basics
If we install, for example, Solex 21041 (volume 1.8) on a 1.5 engine. This carburetor has a 24x26 diffuser, fuel volume is 102.5, which is not enough for a 1.5 engine. We are looking for a match between the chambers and the diffuser. We find the closest option: Solex 21073. It has a 24x24 diffuser and a TJ - 107.5. And the first cameras are almost identical. By the way, if the diffusers are almost the same, and the engine volume is smaller, then the intake of gasoline will be less (the jet is rather poor). This means that we need fuel jets (fuel jets) from 110. Let’s get a few.
Next you need to decide
, what do you want to get: economical slowness or costly acceleration. Depending on the decision, we also select a fuel mixture: to adjust the enrichment or leanness of the air-fuel mixture (a lean mixture will lead to gasoline savings, but will affect the acceleration dynamics of the car).
Idle system
The device is equipped with an idle system. It is designed to allow the engine to operate at low speeds. At this moment, the vacuum in the diffusers is very small. Fuel cannot enter the main metering system. At idle speed of the engine, fuel is supplied under the throttle valve of the first chamber of the carburetor. There the vacuum is strong enough to form a stable combustible mixture.
Air is supplied through the main jet and the emulsion well of the first chamber. The fuel will then flow to the idle fuel jet. After this, it is mixed with air supplied from the XX air jet. Oxygen is supplied to this element through a special channel. This operating scheme allows the engine to ensure a smooth transition from load to idle and prevents fuel from leaking out of the float chamber.
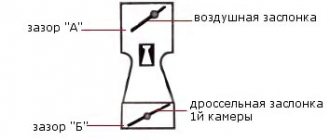
Scheme and principle of operation
The types and modifications of carburetors for a given car can be very different, but the principle of operation remains the same.
When starting the engine cold, the driver closes the choke to limit the flow of air and increase the amount of gasoline. This makes it easier to start and brings the speed necessary for stable operation.
Carburetor 21073 DaAZ device and principle of operation: diagram of the design and operation of the carburetor I - first chamber; II - second chamber; 1 — accelerator pump drive lever; 2 — adjusting screw of the starting device: 3 — diaphragm of the starting device; 4 — air channel of the starting device; 5 - solenoid shut-off valve; 6 — idle fuel jet; 7 — main air jet of the first chamber; 8 — idle air jet; 9 — air damper; 10 — sprayer of the main dosing system of the first chamber; 11 — accelerator pump nozzle; 12 — nozzle of the main dosing system of the second chamber: 13 — econostat nozzle: 14 — main air jet of the second chamber; 15 — air jet of the transition system of the second chamber; 16 — channel for balancing the float chamber; 17 - float chamber; 18 — needle valve; 19 — calibrated hole for fuel bypass into the tank; 20 — carburetor fuel filter; 21 — fuel supply fitting; 22 — power mode economizer diaphragm; 23 - fuel jet of the power mode economizer; 24 — ball valve of the power mode economizer; 25 - float; 26 — econostat fuel jet with tube; 27 — fuel nozzle of the transition system of the second chamber with a tube; 28 — emulsion tube of the second chamber: 29 — main fuel jet of the second chamber; 30 - outlet of the transition system of the second chamber; 31, 33 — throttle valves: 32 — slit of the transition system of the first chamber; 34 — outlet of the idle system; 35 — carburetor heating block; 30 - adjusting screw for the composition of the idle mixture; 37 — engine crankcase ventilation fitting; 38 - fitting for supplying vacuum to the vacuum ignition regulator; 39 — vacuum selection fittings for the recirculation system; 40 — main fuel jet of the first chamber; 41 — emulsion tube of the first chamber; 42 - ball valve of the accelerator pump; 43 — accelerator pump diaphragm.
During the warm-up process, air intake is increased to reduce speed and eliminate interruptions. Thus, the air damper opens completely and the amount of gasoline is reduced. Other methods of warming up are not provided for by the design.
Gasoline is supplied through the fuel filter to the float chamber, and then to the main metering system of the mixing chamber. The scheme for pumping air and mixing it with gasoline in the diffuser occurs due to the vacuum that occurs during the operation of the valve mechanism and pistons, compressing and pushing out the working mixture.
The second chamber system is designed to increase air flow to the nozzle when the engine is running under heavy load, when the speed is high.
To ensure that the engine runs stably at idle, and at low speeds to prevent it from stalling and eliminate interruptions, an idle system is provided. And to maintain the level of fuel used in the Solex 21073 carburetor, there is a whole scheme for the operation of the float system. Let's consider the operation of each system separately.
Troubleshooting
Car components do not last forever, and sometimes the installed Solex 21073 carburetor on the Niva fails. Repairing it must begin with diagnostics. It may be possible to get by with a simple adjustment. So, during operation, solid particles can enter the carburetor, which ultimately causes clogging of the jets. Low-quality gasoline leads to the formation of deposits on the walls of the channels in the device. This significantly reduces their cross section. Failure of carburetor systems can be diagnosed by the following symptoms:
- Increased fuel consumption.
- Difficulties in starting the engine. Reduced power and dynamic performance.
- Unstable operation at idle.
In this case, it is necessary to clean the installed Solex 21073 carburetor on the Niva. The adjustments that will be made after this will allow the device to work as it should again.
Theory
The engine sucks air through the diffuser, and a certain amount of gasoline through the fuel nozzle. The volume of air and fuel sucked in depends on the volume of the engine. Therefore, the trend is to install a small jet for a larger engine volume. And if you have to install a similar Solex 21073 carburetor on a small engine (for example, 1.5), then the standard jets are poor (that is, they give an unsaturated mixture).
Therefore, we can say that it all starts with the fuel nozzle - its selection and settings. Afterwards, for the second time, you need to pick up an air one for it. Start strictly with the first camera until you have set it up; it is not recommended to work on the second one under any circumstances.
Rule:
We select the jets according to the engine volume. And before starting the setup, it’s best to find a factory Solex that matches the volume of the unit on your car, and rearrange (or install the same) jets from it.
How to restore carburetor operation?
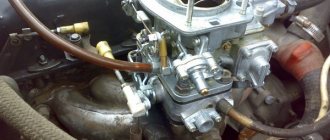
For repairs, most often you have to remove the device from the engine. First, remove the air filter. Then the fuel lines, air pipes, wires and cables are removed. then unscrew the fastening nuts.
It is best to disassemble the carburetor on a table or other convenient surface. The parts should be laid out in some order. This will help you not lose them. The process of adjusting the needle valve is performed using a special template. To wash the device, you must use special liquids. Replacement jets can be purchased at any auto stores. Often, disassembling and flushing the carburetor helps solve a lot of problems.
Adjustment
If the installed Solex 21073 carburetor on the Niva fails, repairs and adjustments help bring the device back to life. The settings allow you to restore optimal modes in which the motor will operate as efficiently as possible. Fuel consumption is at an average level. First of all, start the engine and warm it up a little. Next, you need to remove the fuel hose and the device cover. It is recommended to remove the latter with extreme caution so as not to damage the float. Next, using a measuring tool, measure the distance in each of the carburetor chambers. Measure from the mating surfaces to the edge of the fuel. This size should be approximately 24 mm. If this distance is less or more, then it is adjusted by bending the float. Then you need to start and warm up the engine again. When the level adjustments are successfully completed, you can proceed to adjusting the idle speed.
The engine is turned off. To set up, you will need a flathead screwdriver and a little time. There is a hole on the base of the device in which there is a screw that regulates the quality of the fuel mixture. It is twisted all the way. Then from the extreme position the same screw is unscrewed by about five turns. Then the engine is started. There is no need to use a suction. If you unscrew the “quality” screw, then the carburetor will change the engine speed. Then it is twisted again. It is required to rotate until the operation of the motor is stable and stable. When the engine starts to run smoothly, then the element is unscrewed no more than one turn. As a result, the idle speed will be set at 900. If the engine starts to stall, it is better to slightly increase the idle speed.
Solex carburetor: modifications
The basic design of these devices was developed by engineers from the French company Soleks.
The Dimitrovgrad plant later received a license to create it, and all other modifications were made by professionals right there. The popular Solex 21073 . Reviews about it are only positive. The mechanism is easy to customize and is highly reliable. DAAZ-2108 is designed to work with a 1.3 liter engine for VAZ 2108 and 2109. Solex 21083 has been modified for 1.5 liter power units. The same mechanisms were equipped with models from the first batches of the VAZ 2110 with a microprocessor-based ignition system. On classic VAZ models, Solex 21053-1107010 was installed. VAZ Niva models were equipped with the Solex 21073-1107010 mechanism. Now it has been replaced by an injector.
Results
Of course, it is clear that there is no limit to improvements. Sometimes they can even go to excess: drilling, for example, a throttle valve, polishing an MD, soldering epulsion tubes on a carburetor. But, as they say, what is in excess is unhealthy. But such a procedure, fascinating in its own way, like selecting the types of jets for a Solex 21073 carburetor, for example, is something quite necessary for the correct setup of the unit and its complete compatibility with the engine compartment. As a result, you get an economical car that responds well to gas.
The most common are Solex carburetors modifications 21053, 21083, 21073, 21041. They differ in calibration data, i.e. cross-section of large diffusers (BD), value and type of jets and other giblets, and are designed for a certain engine size and type.
21083 – “basic” modification of the carburetor with the smallest diffuser cross-section 21x23, designed for a transversely mounted “chisel” engine with a volume of 1.5 liters. It is especially popular because it can be used to make a Solex of any modification, as well as a unique one, machined to suit any value of diffusers, and so on. It is undesirable to install it on an engine with a volume of more than 1.5 liters - at high speeds it will choke the engine due to the small cross-section of the OBD. It is worth noting that 21083 prepares a lean mixture (due to the characteristics of the 2108 motor) and to obtain good dynamics on the UZAM engine, it is advisable to change the jets.
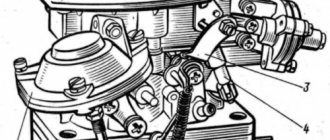
Device
The Solex 21073 carburetor is an emulsion type. Its modifications were initially installed on motors with contactless ignition. The device is distinguished by the presence of two chambers equipped with throttle valves, as well as dosing systems. The device also has transition systems for the first and second cameras. There is an idle system, but only for the first chamber.
See:
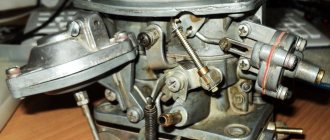
The mechanism consists of two halves. The lower one is more massive - and the upper one. This half is the body of the device itself, and the upper part is the cover for the carburetor. At the bottom of each chamber there are rotary-type dampers with a mechanical drive. At the top of the first chamber of the carburetor there is a damper for air supply. It is necessary to start a still unheated power unit. This part is activated by a cable that goes into the cabin and is connected to a lever responsible for the suction and to the starting vacuum system.
What is the difference between modifications 21081 and 21083
If you compare the two main modifications of Solex carburetors (21081 and 21083), used on front-wheel drive Sputniks and Samaras, then visually you will not find any differences between them. The difference exists only in the operating parameters of some of their elements.
Table: comparison of basic calibration data for Solex carburetors 21081 and 21083
| 21081 | 21083 | |||
| For 1st camera | For 2nd camera | For 1st camera | For 2nd camera | |
| Mixing chamber diameter, mm | 32 | 32 | ||
| Diffuser diameter, mm | 21 | 23 | 21 | 23 |
| Air jet of the main dosing system | 165 | 135 | 155 | 125 |
| Fuel jet of the main metering system | 95 | 97,5 | 95 | 97,5 |
| Idle air jet | 170 | 170 | ||
| Idle fuel jet | 39–44 | 39–44 | ||
| Air jet of the second chamber transition system | 120 | 120 | ||
| Fuel nozzle of the second chamber transition system | 50 | 50 | ||
| Economizer fuel jet | 40 | 40 | ||
| Accelerator pump cam number (size) | 4 | 7 | ||
| Throttle valve starting gap, mm | 1,0 | 1,1 | ||
| Air damper starting gap, mm | 2,7±0,2 | 2,5±0,2 | ||
| Needle valve hole diameter, mm | 1,8 | 1,8 | ||
| Vacuum regulator hole diameter, mm | 1,2 | 1,2 | ||
Operating principle
Solex 21073 works as follows. Gasoline will enter the float chamber using the inlet fitting; the fuel also passes through the mesh filter, where it is cleaned, and goes through the needle valve. The chamber with the float is two-sectional, and the sections are connected to each other. They will contain the same amount of gasoline. This design makes it possible to significantly reduce the effect of body tilt on the fuel level in this chamber.
This ensures more stable engine operation. As the chamber fills, the float, pressing part of the needle valve, blocks the access of fuel to the chamber. This maintains a constant level of gasoline in the mechanism. Next, from the float chamber, gasoline flows through the jets into the mixing wells. Air enters these same wells through special holes in the emulsion tubes or air jets. Next, gasoline and air are mixed in them. As a result, a fuel mixture is formed. It will get into the small as well as large diffusers of the device. This is the main dosing chamber. Depending on the operating mode of the engine, certain mechanisms and systems can be started in the carburetor. When the owner tries to start the engine when cold to enrich the fuel mixture, the starting device comes into play. Its driver starts this choke from inside the cabin.
Svetlov dynamics carburetor economy 21073 Solex - 1 part
For long-term operation of the carburetor
, it is required to carry out competent preparation.
This video
is familiar.
How to set up a SOLEX carburetor. Repair and diagnostics.
Preventative repairs, fuel level adjustment, carburetor assembly and pre-tuning
.
When the handle is pulled out to its maximum, the air damper of the first chamber is completely closed. At the same time, the throttle valve in the first chamber opens to the distance of the starting gap. It is adjusted using the adjusting screw on the Solex carburetor. Adjusting the gap will allow you to adjust the idle speed.
Replacement in every detail
Adjusting screws for the Solex carburetor 2108
Having selected the Solex carburetor jets by numbers, you can begin to replace them; unlike boring, it is quite possible to carry out this operation yourself at home. By the way, the reason is not always an incorrectly selected element; very often during operation, these parts wear out and become clogged, which leads to a change in the diameter and composition of the mixture with all the ensuing consequences. In addition, car owners in this way increase the power of their “iron horse” or, conversely, reduce gasoline consumption. In general, replacing jets is quite suitable in the category of vehicle tuning.
To remove the Solex jets, you will have to dismantle the engine and, of course, disassemble it. Before removing the power unit, be sure to disconnect the negative cable from the battery, and then remove the air filter housing. Prepare a clean rag and a solvent, such as white spirit, in advance to clean the surface of the motor from dirt. Now you need to find the place where the drive cable is attached to the air damper and slightly loosen the screw securing these parts. Do the same with the bolt securing the cable sheath. An open-end wrench is perfect for this purpose. After disconnecting the cable from the carburetor, remove the crankcase gas supply hose from the pipe.
Removing jets from Solex
To disconnect the fuel hose from the fitting, in addition to a wrench, you will also need a Phillips screwdriver. First, loosen the fastening clamp, then remove the hose and use an M8 bolt to plug the hole in the latter. It is necessary to remove the vacuum regulator hose. The wire terminal is also disconnected from the solenoid valve terminal. We take a flat-head screwdriver and use it to press out the end of the throttle linkage, and then remove it. Now it is possible to remove the return spring.
To remove the carburetor you need to prepare a spanner and open-end wrench set to “13”. The first to unscrew are 3 nuts, through which the part is attached to the inlet pipeline, and the second is the fastening nut. Take this opportunity to inspect the carburetor gasket; perhaps it could use replacement. If the unit will be removed for a long time, be sure to plug the inlet pipe with a rag. To replace the jets in the carburetor, it remains to remove the cover from it. Take a flathead screwdriver and unscrew these parts. First we remove the fuel jets, then the air jets. In the rings of the last parts you will find emulsion tubes; to pull them out, you should pry them off with a file.
Replacing the carburetor gasket
The main fuel element of the secondary chamber is designated by the letter “A”, and the primary one by “B”. Then we proceed to removing the air jets, marked “B” and “D” for the secondary and primary chambers, respectively.
Replacement should not be done blindly. Visually assess the condition of the jets. The presence of marks, scratches and irregularities on their inner surface is unacceptable, since these defects reduce throughput. Contamination of parts with resins also has a negative impact. Before installing new jets, it is advisable to check them on a special stand, so you can see how well the specified throughput of the elements corresponds to real indicators.
Installation of new Solex parts
If you have already started disassembling the carburetor, then it would be a good idea to study the condition of its other parts; perhaps replacing the jets is not the only need for this unit. We unscrew the accelerator pump screw and remove the latter along with the valve and o-rings. Then we remove the rings and diffusers of both chambers from their original location. To remove the channel from the accelerator pump, you need to unscrew the fixing screw.
Next, remove the fuel nozzle along with the housing and take it out. You can dismantle the diaphragm after you open its cover and remove the spring. Having unscrewed the bolted connections, we disconnect the carburetor body and the throttle valve. Now you have access to the thermal insulation element and cardboard spacers. Remove the cover along with the adjusting screw, then remove the latter with the sealing ring. All parts with defects must be replaced; the remaining parts are thoroughly washed in a special product. We blow out the jets and other holes with compressed air. Reassemble in reverse order.
Starting system
This mechanism is a special cavity that connects to the intake manifold. The device also has a diaphragm and a rod that is connected to the air damper. After the engine is started, a vacuum occurs in the intake manifold. It acts on the diaphragm rod, thereby opening the air damper. If the choke handle is returned to its normal position, this will reduce the starting clearances.
The gap parameters depend on the geometric characteristics of the lever and are not adjustable in any way. As for the throttle valve of the second chamber, when the choke is pulled out, it is in a locked state.
Additional Information
In general, in addition to the selection of jets, there are a lot of useful and interesting nuances of setting up the Solex, so that it works correctly and is combined with the engine of your carburetor car.
You should always start by setting the levels in the chambers. They are installed manually according to the positions of the floats themselves, depending on the unit cover (everything is done using special templates). And in vain you think, like many gullible Solex users, that everything is already on display from the factory. To avoid overflow and stress on the needle, we make the appropriate adjustments by bending the float tongues.
After setting the levels, you can start idling. It depends on the position of the screws for the quality and quantity of the mixture (torsion should be performed with the suction removed).
Idle system
This unit is necessary in order to supply the combustion chambers with a combustible mixture at the lowest speeds. Thanks to this system, the power unit will not stall when there is no load. Fuel will enter the system through the main jet into the first chamber. Through the XX jet, where it is then mixed with oxygen, the fuel enters the system through the air valve. This mechanism allows you to ensure stable engine operation at idle speed without load.
See:
Next, the combustible mixture will enter the first chamber through a special channel located under the throttle valve. The fuel mechanism leading to the XX exhaust port is closed with a quality screw. This is an adjusting screw that can be used to adjust and change the characteristics of the carburetor. The operation of the engine in idle mode on the Solex 21073 is also adjusted with this element. Due to it, the gap value of the throttle valve of the first chamber in XX mode is determined.
Advantages and disadvantages of tuning
The Solex carburetor is assembled from standard parts and assemblies from various manufacturers and is not subject to individual adjustment. But the cast body, made of aluminum alloy, diffusers, damper jets, as well as fasteners have unprocessed burrs, protrusions, and roughness. The task of tuning is to remove all obstacles to the movement of the air-fuel mixture by grinding, polishing channels and parts with which the fuel flow comes into contact, as well as modifying diffusers and adjusting jets in accordance with the individual requirements of the car enthusiast.
To perform the above work, it is necessary to remove the carburetor from the engine intake manifold and remove the cover. It is necessary to achieve complete alignment of all holes of adjacent removable parts. This is done using a scraper or file.
You need to remove the air damper and replace its round head screws with flat head screws. Then drill out the holes a little to “recess” the protruding parts of the fasteners. This will reduce hydrodynamic resistance during the passage of the air-fuel mixture. It is advisable to replace the needle valve with a valve with a rubber tip to prevent gasoline overflow.
All carburetor diffusers need to be polished, the technological ebbs on the bridges must be cut down and given a more streamlined shape. The flow rate of the fuel mixture in the mixing chamber reaches 120 meters per second, and any roughness will impede the flow of air.
Tuning the carburetor not only affects the throttle response of the engine, increases its power, but also significantly increases fuel consumption. Before assembling the mechanism after modification, it is recommended to wash all its parts with a special liquid for cleaning the carburetor, and then blow out the holes with compressed air.
The Solex carburetor is one of the best engineering developments successfully used on Russian Niva SUVs. Carburetor engines are repairable, easy to maintain and reliable. Tuning can significantly improve engine performance and increase its efficiency.
Setting the level in the float chamber
So, we looked at the Solex device. Adjusting the carburetor will help set the optimal mode when the engine will operate as efficiently as possible and at the same time fuel consumption will not be too high. First you need to start and warm up the engine a little. Then remove the fuel hose and carburetor cover. Then disconnect the suction cable and twist the cover off the device.
It must be removed as smoothly and carefully as possible so as not to damage the float. Then use a ruler or caliper to measure the distance in each chamber. You need to measure from the mating surfaces to the edge of the gasoline. This size should be about 24 mm. If it is larger or smaller, then the parameter is adjusted by bending the float. Then the device is reassembled, the engine is started and it is warmed up.
How to reduce fuel consumption on a Solex
If you notice that the engine begins to consume more fuel than it should, do not be lazy to check it. The rated fuel consumption for any vehicle can be found in its operating manual. It should be borne in mind that the amount of fuel consumed can be influenced by many factors, from the quality of the gasoline itself to the tire pressure, so before checking, take the trouble to diagnose the ignition system and also adjust the valves.
Flow check
Required tools:
- clean empty plastic bottle (2 l);
- a piece of gas-resistant hose (50–80 cm) with a clamp of the appropriate diameter;
- gasoline (1–2 l);
- marker;
- crosshead screwdriver.
Check procedure:
- We are looking for a flat section of the road (3 km) with good surface and low traffic intensity.
- Warm up the engine to operating temperature and turn it off.
- Using a screwdriver, loosen the clamp screw on the suction fitting of the fuel pump.
- We put one end of the prepared piece of hose onto the fitting. We fix the connection with a clamp.
- We pour a certain amount of gasoline into the bottle, measuring it out into 50 or 100 ml portions and making the appropriate marks on the bottle with a marker. We will use them to determine consumption.
- We lower the other end of the hose from the gas pump into the bottle.
- We start the engine and move along the road section at a speed of 60–70 km/h in fourth gear.
- After driving 3 km, we stop, look at the bottle, estimate the consumption and compare it with the passport data.
Idle adjustment
Many car owners, namely beginners, most often buy old cars and do not know how to adjust the carburetor correctly. As a result, loss of power, high fuel consumption, floating speed and other problems. After the level adjustment is successfully completed, the idle speed is adjusted. Before doing this, it is recommended to turn off the engine. To work, you will need a flat blade screwdriver and time. There is a hole on the base of the mechanism. It contains a screw responsible for the quality of the mixture. It is screwed in until it stops. However, you should not be too zealous.
Then, from the extreme position, the screw is unscrewed five turns. Next, the engine is started without choke. Unscrew the quality screw - carburetor 21073 will regulate the engine speed. Then the element is screwed in again. It is necessary to rotate until the operation of the power unit becomes as stable as possible. Rotate the screw slowly. When the engine becomes quieter, turn it out no more than one turn. As a result, the idle speed will be about 900. But if the engine stalls, they are slightly increased.