Gap "B", between the edge of the throttle valve and the wall of the first chamber of the carburetor, appears when the choke handle is fully extended and the air damper is closed (the starter is cocked and ready for use).
Gap “A” appears when the engine starts and the diaphragm trigger mechanism is activated between the edge of the air damper and the wall of the first chamber.
If the starting device malfunctions or is incorrectly adjusted, it is quite possible that a cold car engine will not start or will start, but with difficulty, and will “flood” the spark plugs.
— slotted screwdriver (3mm)
— open-end wrench (7mm)
— open-end wrench (8mm)
— tachometer (multimeter, autotester operating in tachometer mode) To make adjustments without removing the carburetor from the engine.
If there is no tachometer, you can try to adjust by ear, but this is only if you have already dealt with adjusting and tuning carburetors and can distinguish between 3000 rpm of the engine and 3500 rpm. Such an adjustment is possible in principle, but will be very approximate. It is easier to adjust the starting device by removing the carburetor from the engine.
- a set of round probes or pieces of wire with a diameter of 0.85, 1.0, 1.1, 2.5, 2.7, 3.0 mm, depending on the carburetor model.
Before making adjustments, we check to see if the starting device is in order and we are wrongly blaming it.
Checking the operation of the carburetor starting device 2108, 21081, 21083 Solex
1. Remove the cover of the air filter housing.
2. Completely close the air damper by pulling out the choke.
3. The assistant starts the engine, and we look at the carburetor from above.
If the carburetor starting device is working properly, then during start-up (after the first flashes) it will open the air damper at a small angle (starting gap).
starting gap "A"
If you do not observe such a phenomenon, then there are only two conclusions - either the trigger device is not adjusted, or its diaphragm is leaky.
You can also take into account such versions - the screws securing the cover of the starting device are not fully tightened, the plane of the cover is deformed for some reason and does not fit tightly to the body of the device, which depressurizes the entire system.
We carry out the adjustment as indicated below, tighten the screws, change the diaphragm, grind the cover or replace it with a new one.
Preparatory work
We carry out the adjustment with the engine not warmed up.
— Remove the air filter housing.
Removing the air filter housing on the VAZ 2108 engine
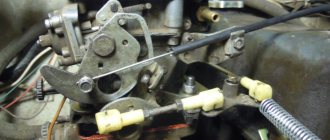
Adjusting the starting device of the Solex carburetor without removing it from the engine
1. Connect the tachometer.
tachometer connection procedure
If there is a tachometer built into the instrument panel, then you can use it. 2. Pull out the carburetor air damper drive handle (“choke”) until it stops.
the air damper of the carburetor 2108, 21081, 21083 Solex is completely closed (top view of the carburetor)
The air damper completely covers the cross section of the first chamber of the carburetor.
3. Start the engine.
4. Press the edge of the carburetor air damper with a screwdriver and open it 1/3 (30 0 ).
open the air damper of the carburetor 2108, 21081, 21083 Solex approximately 30 degrees (1/3)
screw for opening the throttle valve of the first chamber of the carburetor 2108, 21081, 21083 Solex
6. Release the air damper .
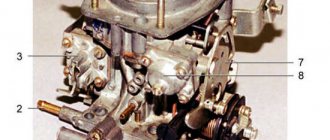
7. Use a slotted screwdriver to turn the starter adjusting screw, loosen its lock nut with an 8 mm wrench and reduce the rotation speed to 2800 - 3000 rpm.
carburetor trigger adjusting screw 2108, 21081, 21083 Solex
8. Hold the screw with a screwdriver and tighten the locknut. The adjustment is complete.
Adjusting the starting device on a removed carburetor
Before making adjustments, it should be recalled that on the Solex carburetor 2108, 21081, 21083, with the air damper completely closed, the throttle valve of the first chamber should be slightly open, the second chamber should be completely closed.
1. Remove the air filter housing.
Removing the air filter housing on the VAZ 2108 engine
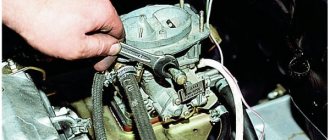
2. Remove the carburetor from the engine.
3. Turn the air damper control lever counterclockwise until it stops (the air damper is completely closed).
carburetor air damper 2108, 21081, 21083 Solex is completely closed
Setting up the float chamber
This type of work allows you to adjust the optimal amount of gasoline in the float chamber. An incorrect level causes a decrease in power, uneven engine operation, and excessive fuel consumption.
- set of wrenches;
- thin probe (diameter 1 mm);
- pliers.
1. Remove the air filter and unscrew the carburetor cover.
2. Carefully remove the float chamber cover.
3. Check the condition and position of the floats. They should be parallel to the imprints of the side walls of the float bath on the gasket.
4. If they are displaced, we align them by bringing them together or spreading them apart.
5. Next, lay the lid horizontally with the floats up and use a feeler gauge to measure the distance from the bottom of the float to the gasket. It should be equal to 1 mm. If it is higher or lower, we continue further adjustment after installing the carburetor on the engine.
6. When fuel is pumped into the float chamber, its level should coincide with the red lines, as shown in the photo.
7. If the floats are set incorrectly, this level will be lower or higher. Simple adjustment is carried out by bending or bending the tongue of the floats, then closing the carburetor cover and pumping fuel.
For details on setting up the float chamber, see here
Recommended Method
Level control technology includes a number of stages:
- We dismantle the housing of the air filter element. To do this, unscrew the fastening nut of the housing cover, unclip the latches, remove the cover, take out the filter and tighten the 4 nuts that secure the housing to the carburetor.
- Raise the body and disconnect the rubber pipes. We move the body to the side.
- Loosen the clamps securing the fuel pipes going to the carburetor and disconnect them.
- Remove the wire suitable for the idle speed solenoid valve;
- Disconnect the drive cable of the air damper (the “choke” handle);
- Unscrew the 5 screws securing the carburetor cover;
- Having removed the cover, we immediately determine the fuel level in the chambers by lowering a ruler or caliper into one of them until it stops (using its depth gauge). If the measurement shows a level of 25-26 mm, it corresponds to the norm and no adjustment is required;
If the amount of fuel in the chamber is lower or higher than normal, we perform a visual inspection and a series of measurements on the floats, and if necessary, we correct their position.
To carry out adjustment work, place the removed carburetor cover on a flat horizontal surface with the floats facing up.
First, we look at the position of the elements from above. The outer side surfaces of the floats are parallel to the special imprints on the gasket. Deviations can cause the floats to touch adjacent elements and surfaces, causing the fuel level to be incorrect. If necessary, adjust the position of the floats by bending their mounting arms. The next step is to measure the gap between the floats and the gasket. A rod with a diameter of 2 mm is useful here - this is how much the specified gap should be.
If it does not correspond, we bend the tongue of the floats, with which they act on the locking needle. After this adjustment, we check the total height of the floats, which is normally 34 mm. If this is not the case, check the gap again, adjust it if necessary and measure the height again.
The last stage of setup is determining the working stroke of the floats. To do this, place a caliper near the float, mark the distance from its lower corner to the surface of the cover, then lift the float with your hand and mark where the lower corner is.
A working stroke of 15 mm is considered normal; if it differs, it is adjusted by bending the tongue.
Setting up the launcher
- open-end wrench 7;
- open-end wrench 8;
- flat screwdriver;
- electronic tachometer or multimeter with its function.
1. Remove the air filter from the carburetor. Pull the “suction” towards you as far as it will go. Next, you will need an assistant to start the engine. At this time, you are watching the starter flap, which should open slightly after starting.
2. If this does not happen, it means that the starter is not adjusted.
3. We begin the adjustment. Warm up the engine, turn it off and connect the tachometer as follows.
4. Pull out the choke and start the engine. The suction valve must be completely closed.
5. Next, use a screwdriver to press on the edge of the damper, opening it 30 0 .
6. Using a 7 key, rotate the throttle position adjustment bolt until the tachometer shows a speed of 3200-3400 rpm.
7. Now use a screwdriver to rotate the starter adjustment bolt, having previously loosened its locknut with an 8 key, until the speed drops to 2800-3000 rpm.
8. In this position, holding the bolt with a screwdriver, tighten the locknut.
The adjustment process can be seen in this video
Preparing tools and devices
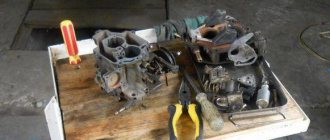
If you intend to thoroughly clean the carburetor of your V8, then you will not be able to do it without a compressor. To blow out accumulated dirt from the channels, it is necessary to supply air at a pressure of at least 6 bar. The remaining tools are common ones found in every garage:
- 2 screwdrivers - Phillips and thin with a narrow flat slot;
- a set of small open-end wrenches - 8, 10, 13 mm;
- round nose pliers;
- rubber bulb (syringe);
- 2-3 wooden toothpicks;
- rags.
Compressor for carburetor purging
Note. It would be nice to have a tester or multimeter on hand to check the voltage. But if necessary, you can do without it.
Liquids for cleaning carburetor channels
A special product sold in aerosol cans (for example, from the ABRO brand) is excellent for cleaning channels. Do not use acetone or inorganic solvents, which corrode plastic parts, for cleaning. Buy new paper gaskets for DAAZ 2108 carburetors in advance (they will also fit the “nine”). You cannot buy or change jets, since the standard ones are designed for the entire service life of the machine, and fakes with large holes for fuel are often sold in repair kits.
This material will help you repair the carburetor mechanisms of VAZ 2106/2107 cars:
Solex carburetor design
The Solex carburetor has several models, namely:
The main modification of this brand of carburetors is SOLEX 21083. This model has the smallest diffuser cross-section. In terms of structure, all Solex models are the same, there are only some differences (different brands and models of cars have their own modification). Therefore, the Solex settings for all models are the same.
The Solex carburetor type is emulsion. It is installed only on cars with engines with contactless ignition.
Solex device:
- two chambers with throttle valves;
- chamber dosing system;
- transition systems for both chambers;
- idle speed system only for the first chamber.
Classification of Solex carburetors by configuration:
- Semi-automatic starting system.
- Carburetor accelerator pump.
- Power mode economizer.
Have you heard about a car device that can reduce fuel consumption, the FuelFree fuel saver?
Let's sum it up
The steps described above for setting up and adjusting a Solex carburetor are basic. In other words, if you wish, you can adjust the carburetor yourself, based on this information. Note that the accuracy of the settings can be further checked on a gas analyzer, after which you can make the necessary adjustments yourself instead of constantly contacting specialists. Finally, we add that a dosing device of this type lends itself to various types of tuning, all kinds of modifications and improvements. For this reason, when choosing a carburetor for a VAZ, it is not for nothing that many car enthusiasts prefer Solex.
How to set up a Solex carburetor
The best carburetor is SOLEKS. Therefore, many drivers replace their standard carburetors with devices of this type. Solex works clearly even if there was a strong overflow of fuel. As it turned out, many people have difficulties in correctly setting up the Solex carburetor. It must be configured so that fuel consumption is minimal and power is maximum, so you need to look for the “golden mean”. Therefore, those who do not want to learn the subtleties and nuances of setting up give this job to a professional.
But, for those who want to learn how to adjust and configure a Solex carburetor, we will describe the correct procedure:
- It is necessary to set the level in the float chambers. The manual (instructions) states that the level can be set using a special template. This is difficult if there is no factory setting. If there is no factory setting, you need to do it yourself. How to do it? To do this, start the internal combustion engine and warm it up for about 10 minutes. Next, turn off the engine and disconnect the fuel supply hose. When the hose is disconnected, gasoline flows out normally, but fuel must not be poured into the chamber, otherwise the readings will be spoiled. Next, unscrew the carburetor cover bolts and remove the choke cable. After disconnecting the cable, you must very carefully and horizontally remove the Solex carburetor cover. If you do this carelessly, the floats may be damaged. Now you need to measure the distance from the Solex cap to the surface of the gasoline. It is necessary to measure in each chamber; the fuel level in them may be different. To determine whether the level is normal or not, you need to add the two resulting distances and divide by 2, that is (distance of camera 1 + distance of camera 2)/2. If the measured distance is between 25 and 35 mm, then everything is normal. If the level goes beyond the limits up or down, then you need to adjust the level. To do this, bend the float in the desired direction and drain some of the fuel.
- We adjust the idle speed of the internal combustion engine. It often happens that when you press the clutch pedal, the engine speed immediately drops - this indicates that the idle speed has disappeared. To do this, warm up the car engine to normal operating temperature. Next, turn off the engine. In the hole in the Solex sole we look for the mixture quality screw and turn it to the right until it stops. Now you need to start the internal combustion engine and push in (remove) the choke. This screw is used to set the permissible minimum speed. This number of revolutions should ensure stable, stable operation of the motor, while the vacuum should be minimal. A well-tuned Solex carburetor should allow the engine to idle at speeds from 500 to 1200 rpm. After the engine begins to operate stably, we continue to rotate the mixture quality screw until the internal combustion engine begins to operate unstably, after which we turn it back 1-2 turns. Next, we proceed to setting the engine speed to normal; we need to make sure that the speed is in the range from 800 to 900 rpm. Turn the screw until the engine starts running stably.
- When adjusting the idle speed, beginners often have difficulties. It happens when you turn the quality screw, the engine operation does not change, but the quality of the internal combustion engine must change. When the engine is unstable, the mixture quality screw can be adjusted. If the engine does not respond to changes in the adjustment of this screw, then fuel continues to flow into the idle channel, the screw cannot close it. This may be due to an enlarged nozzle (hole for metered fuel supply) or due to a poorly screwed plug, as well as a deformed nozzle. This can be done by carrying out a simple diagnostic procedure: with the engine running, you need to unscrew the valve - here the engine should stall. If the problem is in the enlarged nozzle, then the internal combustion engine will suddenly turn off, and if the internal combustion engine does not stall at all, then gasoline is not supplied through the nozzle. In this case, when the engine does not stall with the carburetor valve removed, then we check the stopper screw of the second chamber. The locking screw is used to smoothly open the throttle valve.
Basic faults
Any malfunctions of the 2109 carburetor affect the performance of the engine: the engine may stall when the speed is reduced, run intermittently, not develop power, and consume gasoline beyond the norm. There are many reasons for problems with this unit, but the most typical of them are:
- clogging of the HDS and idle jets, both air and fuel, and in the solenoid valve (EMV);
- rupture (defect) of the accelerator pump diaphragm;
- failure of the EMG itself;
- loose fit of the locking mechanism needle to the seat;
- air leakage through the junction of the body and the cover;
- leakage of the float in the float chamber;
- clogging of the accelerator pump nozzle with dirt;
- misadjustment of screws XX.
Of course, various types of malfunctions can occur not only due to the carburetor, the engine itself is often faulty, and the ignition may also be set incorrectly, especially if the installation was carried out by an inexperienced technician without a strobe light. Problems with idle speed can occur due to a lack of power to the solenoid valve, so before disassembling the HRV, you should first check for voltage on this wiring.
How to check Solex
To ensure high-quality work on adjusting and tuning the carburetor, you should ensure that sand particles, etc. do not get on the throttle valves. If solid particles get into the carburetor, this can lead to an expensive overhaul of the internal combustion engine (due to some small thing).
After you have adjusted the carburetor correctly, you need to check the accelerator pump. When the throttle valve is opened slightly, the nozzle should spray gasoline. Here is the answer to the question: why does the car jerk when driving? If a stream of gasoline from the sprayer appears late, then this precisely leads to braking when you press on the gas and the car jerking.
To clean the carburetor, it must be disassembled. First, we unscrew the fuel and air jets, as well as the emulsion tubes. If it is difficult to remember what is where in the carburetor device, then it is most convenient to photograph each step.
To determine whether the diaphragm is intact, unscrew the cap of the power mode economizer.
Signs of a broken carburetor diaphragm:
- The internal combustion engine does not stall when the screw is tightened.
- If you turn off the ignition, the engine continues to run for some time, that is, self-ignition occurs.
- Unstable operation of the internal combustion engine.
- Increased gas mileage during normal, moderate driving.
ECTO or EURO? What brand of fuel is best to fill in? ECTO fuel is not recommended for use in cars with high mileage.
After checking the integrity of the diaphragm, we clean the SOLEKS. For cleaning we use air pressure (a compressor or pump is needed). If the dirt is hard and does not fly off with a stream of air, then carefully clean the stuck dirt with copper wire. I use air pressure cleaning without damaging the surfaces of carburetor parts. After this, close the lid and now you need to lubricate all the rubbing surfaces of the carburetor parts. It should be lubricated after washing the outer part.
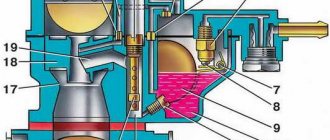
Scheme, principle of operation
When a cold power unit starts up, the starting device starts working first, which is controlled by the driver from inside the car. If the choke handle is fully extended, the air damper in the PC closes completely, and the air damper opens slightly within the set starting gap. This gap can be changed within small limits using an adjusting screw.
The PU is a cavity connected to the intake manifold by a special channel, to a diaphragm, and also through a rod to the air damper. When the driver starts the engine, a vacuum is formed in the intake manifold, which is transmitted to the diaphragm. As a result, the rod pushes the PC air damper, opening it slightly by the amount of the starting gap adjusted by the PU screw.
Solex carburetor tuning
Tuning, that is, improvement, modification of the carburetor is carried out to increase engine power and improve driving dynamics.
Important! In order to achieve maximum power, there must be a minimum of resistance at the carburetor inlet. With high resistance, the quality of the mixture is not always “at its best” (sometimes “poor”, sometimes “rich”).
If you sharply open the throttle valve with the Solex carburetor set at the factory, the air flow speed decreases, as a result of which less gasoline is supplied to the carburetor. Because of this, power drops significantly at low speeds.
The procedure for increasing engine power by tuning the Solex carburetor:
- We carefully disassemble the carburetor.
- We wash and blow, and divide into two halves.
- Pay attention to the air damper axis. There are protruding screws on this axis, which creates additional resistance while the car is moving. Any little things are important when tuning, so these protruding screws need to be smoothed out.
- Remove the axle and air damper from the top. The axle needs to be sharpened.
- From the lower part you need to pull out the throttle valves with their axles. At this stage, using a file we make the flaps larger. We hide the screw caps inside the axle. There are screws with conical heads, you can use them. The throttle valve needs to be assembled.
- Now we are tuning the diffusers. To improve the aerodynamics of the diffusers, it is necessary to make the legs in the shape of wings. We also check the protrusions of the factory casting; if there are any, they need to be ground off.
- The accelerator pump must have 2 tubes installed in one chamber. There is an opinion among some that when I use two tubes for each camera, “dips” may appear, that is, you press on the gas, but the car does not move.
In general, the basis of tuning is smoothing, erasing protrusions and irregularities. Any unevenness in the fuel and air mixing chamber creates resistance.
Reasons for increased consumption
Increased fuel consumption on the VAZ 2109 carburetor is the most important reason for car enthusiasts who ask questions about adjusting and repairing carburetors. So:
- Moreover, they all want to know how to make a carburetor economical in a VAZ 2109. While walking, many have no idea how to correctly determine fuel consumption
- Their mistake is that they take the operating gasoline consumption as the reference
- This is a big mistake
- The reasons for increased fuel consumption are:
- Inaccuracies in the readings of the device that monitors the fuel level in the tank, as well as errors in the speedometer and driving style (increasing consumption), which is typical for most young motorists
- They pour 10 liters into the tank and set the daily counter to zero, drive with engine warm-ups, stops, both on city roads and on the highway, while they want to drive 120 kilometers, which you will agree is stupid
- If any of you have ever installed a measuring cup (measuring container) when warming up the engine, especially during suction in the winter cold, then you know that the liter measuring cup is emptying before your eyes
- You can find out the fuel consumption of your car from the documentation; it is indicated, as a rule, for three main operating conditions - this is 90 kilometers per hour, then 120 kilometers per hour and city driving
- At the same time, the most economical mode is driving on a relatively flat road, the speed does not exceed 90 kilometers per hour, and using fifth gear, this is driving with the first chamber of the carburetor open
- If you increase the speed to 120 kilometers per hour, then the second chamber opens and fuel consumption naturally increases by 1-2 liters on average per 100 kilometers.
Checking the pump's functionality
To check, you will need to perform several preliminary steps:
- Pump fuel into the carburetor.
- Remove the air filter housing.
- Remove the carburetor cover so that you can see the operation of the mechanisms inside.
After this we perform a fairly simple test:
- Turn the throttle lever. At the same time, the pump mechanism should turn on. We look carefully at the system from above.
- Straight streams of gasoline should appear from the pump nozzle, which then enter the inlet well without problems. The streams should be continuous, even and strong for several seconds.
This is normal operation of the mechanism. If the accelerator pump malfunctions, you may observe the following defects:
- Weak oblique jets of fuel that do not even reach the intake well. The channels may be clogged, then it is necessary to clean the jets.
- If gasoline flows into the walls of the mixing chambers, you need to check the direction of the nozzles and correct it. Pliers will help here; you will have to use them to slightly bend the nozzles. This work must be done carefully, otherwise parts may break.
Important points
- Before adjusting the carburetor, it is recommended to self-clean it. To do this, a special liquid for cleaning carburetors is poured into the gas tank, the engine starts and runs (the volume of liquid poured and the engine operating time are always indicated on the container with the cleaning liquid and depend on the specific brand). Sometimes this measure is enough to get rid of the above signs of carburetor malfunction and do without fine adjustments.
- If self-cleaning does not help, there is only one way out: you need to remove and wash the carburetor. For washing, both special liquids and ordinary kerosene are used. It is strictly not recommended to use brushes or fluffy rags to remove dirt. Hairs and lint remaining in the small holes of the carburetor can negate all efforts to clean it. The best option: thorough rinsing in a special liquid, and then blowing out all small holes with compressed air.
- Before removing the carburetor and cleaning the inside, it is recommended that the outside be thoroughly cleaned. Moreover, it is necessary to clean not only the carburetor itself, but also all the parts located next to it. Please be aware that any dirt left on adjacent parts may find its way into the clean carburetor when it is installed back into the engine. And if this happens, the entire cleaning procedure will have to start again.
In order for the carburetor to work correctly, attention should be paid not only to its adjustment, but also to cleaning. If any of these procedures are neglected, the carburetor will soon fail again. In addition, attention should be paid not only to the quality of gasoline, but also to the condition of the car’s air filter, since in some cases it is a worn filter that causes rapid contamination of the carburetor.
This is interesting: An elderly driver is driving
Copywriter with five years of experience. (1 vote, average: 5 out of 5)
Replacing the accelerator pump diaphragm on VAZ 2108, VAZ 2109, VAZ 21099
Welcome! Today in this article you will learn how to properly replace the diaphragm, which is located inside the accelerator pump. The diaphragm will be replaced on front-wheel drive vehicles of the Samara family.
Video
This video shows how to clean a Solex carburetor
This video is about tuning the small diffuser of a Solex carburetor
This is a general video on improving the SOLEX carburetor.
The VAZ accelerator pump is one of the important elements of the fuel supply system. The main function of this part is to supply fuel to the engine as soon as the carburetor throttle valves open. There are several types of problems associated with this part that all VAZ drivers should know about.