Published:
29.11.2016
There are a large number of varieties of Solex carburetors on the market. The carburetor is one of the most important parts in the fuel supply process, ensuring the quality of the car.
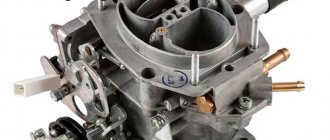
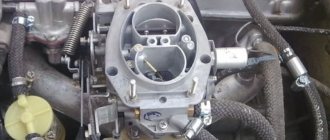
The Solex 21083 carburetor is a very popular model that can be found on a large number of domestic cars
The Solex 21083 carburetor is a basic version, equipped with diffusers of a minimum cross-section, thanks to which this series has gained immense popularity, as it allows for various types of modifications, such as grooving.
Where to begin
You should start setting up the Solex 21083 carburetor by adjusting the fuel level in the float chamber. This involves directly starting the engine and warming it up for five minutes. Then the motor is turned off and the following steps are performed:
- The fuel supply hose is carefully separated to prevent gasoline from entering the chamber during further operation.
- The five screws securing the cover are removed.
- The choke system cable is removed.
- The lid is lifted horizontally with extreme caution so that the floats are not damaged.
- In the chamber itself, the fuel level is measured using a ruler or caliper.
The distance from the top level of gasoline to the edge of the sealing surface of the lid should be from twenty-three to twenty-five millimeters. It is necessary to select an average value, since the fuel level is not able to be in a constant state due to the manifold, which itself does not have the ability to be in a horizontal position all the time. If there is a deviation from the norm in the parameters set earlier, then it is enough to bend the float holders to correct the situation.
Some gasoline is then removed and the reverse carburetor assembly process begins. The key word here is reverse, which means performing the same process, but starting from the end.
At the stage of the engine control check, it is necessary, of course, to start it, and then for about thirty seconds observe the flow of fuel into the chambers from the small diffusers, using a small flashlight for a better view. If gasoline arrives, then there is an overflow and another adjustment of the fuel level is required. To carry it out, you need to turn off the engine and re-carry out fuel measurements in the chambers.
- Attention!
If the parameters are within the permitted standards, then the adjustment of the Solex carburetor ends here. Then the transition to the next stage occurs.
Setting up the launcher
Tools:
- open-end wrench 7;
- open-end wrench 8;
- flat screwdriver;
- electronic tachometer or multimeter with its function.
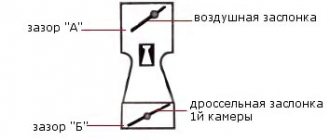
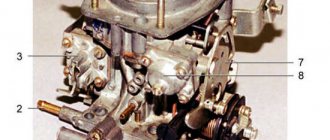
1. Remove the air filter from the carburetor. Pull the “suction” towards you as far as it will go. Next, you will need an assistant to start the engine. At this time, you are watching the starter flap, which should open slightly after starting.
2. If this does not happen, it means that the starter is not adjusted.
3. We begin the adjustment. Warm up the engine, turn it off and connect the tachometer as follows.
4. Pull out the choke and start the engine. The suction valve must be completely closed.
5. Next, use a screwdriver to press on the edge of the damper, opening it 300.
6. Using a 7 key, rotate the throttle position adjustment bolt until the tachometer shows a speed of 3200-3400 rpm.
7. Now use a screwdriver to rotate the starter adjustment bolt, having previously loosened its locknut with an 8 key, until the speed drops to 2800-3000 rpm.
8. In this position, holding the bolt with a screwdriver, tighten the locknut.
The adjustment process can be seen in this video
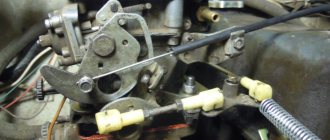
Idle mode - second stage
Having completed adjusting the fuel level in the float chambers, the engine again warms up, coming into working condition. Further work proceeds as follows:
- The mixture quality screw is located in the recess of the lower part of the carburetor, and then screwed in counterclockwise all the way.
- When tightening this part, it is very important to control your own strength, since excessive persistence can lead to thread failure.
- Make five or six turns clockwise to remove the screw.
- The engine starts again and the choke is removed.
- The quantity screw allows you to set the minimum frequency for the motor to operate without interference.
- If the device is working properly, then the revolutions are made in an amount from five hundred per minute to one thousand two hundred.
- The quality screw is turned at a fairly slow pace until unstable motor operation begins.
- Then, in one or one and a half turns, it turns back again for stable frequency activity.
- The idle speed is regulated by a quantity screw ranging from eight hundred and fifty to nine hundred pieces per minute; if it is not possible to establish the process, then the quality screw comes to the rescue.
- Attention!
The result of adjusting the idle speed is a competent ratio, where the engine operates extremely steadily and with a minimum vacuum.
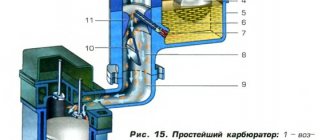
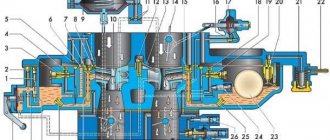
What are jets in a carburetor?
Carburetor jets are calibrated holes inside the carburetor. Such elements can be made of various materials and differ in the diameter of the working hole.
Jets can be installed inside the carburetor cavity in various ways. Some elements are pressed inside a hole of a larger diameter. Thanks to this arrangement, it is possible to ensure greater resistance of products to increased levels of vibration. The disadvantage of this type of element is the more complex maintenance and repair process.
The jets may have threads on the outer surface, which allows these parts to be easily screwed into the carburetor body. The advantage of this design is that it simplifies repairs, including replacing faulty elements with new products.
What are the jets responsible for?
Jets are needed to supply fuel in a certain ratio. The carburetor has a large number of micro-channels through which air can also be supplied, which is necessary to fill various cavities when the fuel level in them decreases, as well as when preparing the fuel mixture.
Several jets are installed in the carburetor. The idle jet most often needs cleaning if low-quality gasoline is used or the fuel filter is not changed on time. The fuel consumption and engine response will depend on the correct adjustment of the jets, and if the jets are incorrectly selected with the wrong hole diameter, the engine may not start due to flooded spark plugs.
Given the importance of these elements, replacement products should be selected only taking into account the catalog number of the main part. For example, if Solex jets are needed for replacement, then you should buy and install only products for this type of carburetor. It is also necessary to take into account the designations from the set of numbers following the name of the dosing system (Solex 21073, Solex 21083, etc.).
Which jets are better
If it is possible to purchase products made of brass, then you should give preference to products made from this copper alloy. Brass is resistant to aggressive environments, so products made from it do not rust in the carburetor throughout its entire service life. Automotive fuel may contain a large number of additives that can have a negative effect on other types of materials. For this reason, you should not use homemade jets or try to replace these parts with any tubes that match the outer diameter.
Original carburetor jets are better than those purchased for replacement in various repair kits. For this reason, if it becomes necessary to replace one part, you should not install all elements of this type.
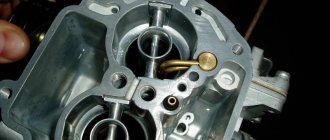
Problems that occur when adjusting the idle speed
Under the right circumstances, the engine should reduce the number of revolutions, and eventually stall completely. But if the quantity screw does not cause any kickback in the engine, then this directly indicates a problem. And it lies in the excessive flow of fuel into the idle channel, which does not allow the quality screw to block it.
Factors that caused the problem:
- The installed idle jet is larger than necessary.
- The plug is not screwed in well enough or the solenoid valve is not securely fastened, which causes gasoline to leak past the fuel metering hole.
- The jet itself or the place for it is deformed.
To find the problem, you need to disconnect the wire from the valve while the engine is running and look at the result. If the engine stalls, then the real problem lies in the incorrectly selected nozzle size. When the engine is running, the defect lies in the fuel bypassing the idle system.
To overcome these difficulties, we get rid of the valve with a plug and look at the condition of the jet, as well as the place where it should sit, to find various local distortions.
The carburetor cover must be replaced if it is possible to detect places of deformation in the area of the seat. If damage cannot be detected, the jet is placed on the valve and the O-ring is coated with oil.
After this, the nozzle is screwed in with a wrench without using force.
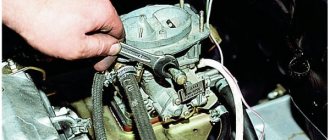
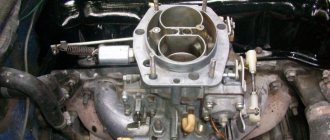
How to remove a Solex carburetor
To remove the carburetor from the car for the purpose of repair, maintenance or replacement, it is necessary to disconnect the mechanical, pneumatic, electrical and fuel fittings from it, and then unscrew the nuts securing it to the manifold flange:
- Remove the air filter housing by unscrewing the center cover nut and the four flange nuts on the carburetor top studs.
- Disconnect the electrical connectors of the limit switch and solenoid valve.
- Remove the return spring and disconnect the throttle cable.
- Disconnect the choke actuator.
- Loosen the clamps and remove the fuel supply and return hoses.
- Disconnect the hoses of the distributor vacuum regulator, crankcase ventilation and throttle heating unit.
- After unscrewing the four nuts of the intake manifold studs, remove the carburetor.
When reinstalling, special attention must be paid to the tightening of these nuts, since the lower plate of the housing is very easily deformed from excessive force, after which air begins to leak into the manifold.
Correct jet for Solex 21083
The selection of the appropriate jet for adjusting the Solex 21083 carburetor is influenced by the volume of the engine itself. For the primary chamber, fuel samples should be purchased, only then the necessary air analogue is selected for the found model. And finally, it is recommended to start looking for a device for the secondary camera.
The jets that come with the original carburetor are considered exemplary models for further purchases. Experienced craftsmen advise taking them with you in search of new parts.
It is necessary to take into account the fact that to lean the mixture, a nozzle of a larger diameter is taken by one position, and to enrich it, by the same position less.
To control the composition of the fuel mixture in relation to engine speed, emulsion hoses are used. There are three types:
- 23;
- ZC;
- ZD.
It should be noted that such a mechanism is not installed on engines with volumes of 1.5 liters or more. This causes malfunctions at excessive speeds.
Theory
The engine sucks air through the diffuser, and a certain amount of gasoline through the fuel nozzle. The volume of air and fuel sucked in depends on the volume of the engine. Therefore, the trend is to install a small jet for a larger engine volume. And if you have to install a similar Solex 21073 carburetor on a small engine (for example, 1.5), then the standard jets are poor (that is, they give an unsaturated mixture).
Therefore, we can say that it all starts with the fuel nozzle - its selection and settings. Afterwards, for the second time, you need to pick up an air one for it. Start strictly with the first camera until you have set it up; it is not recommended to work on the second one under any circumstances.
Rule:
We select the jets according to the engine volume. And before starting the setup, it’s best to find a factory Solex that matches the volume of the unit on your car, and rearrange (or install the same) jets from it.
Problems with the accelerator pump
The accelerator pump serves to consistently and timely supply a fuel stream through an uncovered carburetor valve. A weak flow or dripping is not considered normal. Spreading fuel along the walls of the diffuser is also taken as a deviation.
The acceleration pump nozzles are inserted into different chamber compartments. However, for speed, they can only be installed in the primary, which in exceptional cases will result in excessive overflow.
Let's sum it up
The steps described above for setting up and adjusting a Solex carburetor are basic. In other words, if you wish, you can adjust the carburetor yourself, based on this information. Note that the accuracy of the settings can be further checked on a gas analyzer, after which you can make the necessary adjustments yourself instead of constantly contacting specialists. Finally, we add that a dosing device of this type lends itself to various types of tuning, all kinds of modifications and improvements. For this reason, when choosing a carburetor for a VAZ, it is not for nothing that many car enthusiasts prefer Solex.
Problems in applying the transition regime
Under special conditions, an area of high vacuum forms under the closed carburetor flaps. When they open sharply, the vacuum can instantly decrease, which causes disturbances in the operation of the primary chamber, forming a failure, since at idle speed gasoline was sucked out of the channel through the nozzles.
To eliminate the consequences, the idle jet or pump nozzles are adjusted, changing in order of rotation, in order to eliminate the resulting difficulties with dips and delays when pressing the gas pedal quickly and abruptly.
It is always worth remembering that this kind of manipulation is carried out exclusively with a preheated engine.
Preparing tools and devices
If you intend to thoroughly clean the carburetor of your V8, then you will not be able to do it without a compressor. To blow out accumulated dirt from the channels, it is necessary to supply air at a pressure of at least 6 bar. The remaining tools are common ones found in every garage:
- 2 screwdrivers - Phillips and thin with a narrow flat slot;
- a set of small open-end wrenches - 8, 10, 13 mm;
- round nose pliers;
- rubber bulb (syringe);
- 2-3 wooden toothpicks;
- rags.
Compressor for carburetor purging
Liquids for cleaning carburetor channels
A special product sold in aerosol cans (for example, from the ABRO brand) is excellent for cleaning channels. Do not use acetone or inorganic solvents, which corrode plastic parts, for cleaning. Buy new paper gaskets for DAAZ 2108 carburetors in advance (they will also fit the “nine”). You cannot buy or change jets, since the standard ones are designed for the entire service life of the machine, and fakes with large holes for fuel are often sold in repair kits.
What troubles can happen with the second camera?
The secondary chamber system cannot be regulated due to the original jets produced at the factory, as well as the econostat located in its planes, since it is this that supplies additional fuel to enrich the mixture when a vacuum forms in the carburetor caused by high speeds.
The acceleration pump nozzle is perhaps the only element that can undergo slight changes in cases where the flow of gasoline does not reach its intended place.
Replacing carburetor jets
If earlier during operation of the machine the rules for cleaning the jets were grossly violated, then the parts will need to be replaced. For example, if the owner of a car used metal wire or needles to clear calibrated holes from contamination, the diameter of the product could increase. If such a problem occurs on the fuel nozzle, then the engine will be filled with gasoline, and on the air nozzle, the car will run on a lean mixture. Both situations will not allow you to comfortably operate the vehicle, so you will have to replace damaged parts.
Sometimes, installation of a new carburetor jet is required as a result of the loss of an element during cleaning. For example, if a powerful compressor unit was used to blow through the product, the part may fly out a considerable distance if it was not properly fixed during the work.
To replace the jets you will need to buy a new repair kit. Then you should disassemble the carburetor, as when performing a thorough cleaning, unscrew the old ones and install new elements.
Options for modification and selection of jets on Solex carburetors
The Solex 21083 carburetor jets can be modified to change the dynamic and economic performance of the engine. A feature of such work is the need to change only fuel or only air dosing elements. If you need to increase power, then it is enough to slightly increase the diameter of the fuel elements; to increase engine efficiency, a similar operation is carried out with air jets.
Increasing the diameter by drilling is possible, but given the large error when performing such an operation, it is recommended to select a part with the required size from the jet table.
Further maintenance of the carburetor
To prevent the carburetor from seriously malfunctioning in the future, it is necessary to carefully monitor its operation and not run it to a critical state, which precludes independent repairs.
It would be appropriate to purchase the necessary parts of a similar carburetor model, disassembled into parts specifically for these purposes.
For better engine performance, it is recommended to get rid of the forced idle economizer. And timely prevention and precisely selected jets will ensure the most reliable operation of the unit.
The article fully reflects the main goal of adjusting the Solex carburetor starting device, based on many years of practice and consisting in a stable start of the engine at idle, which ensures standard operation of the starting system.
Basic faults of Solex 21083
There are malfunctions that are most typical for Solex carburetors:
- clogging of the fuel jet of the GDS;
- the entry of debris into the idle system; the XX jet in the solenoid valve is especially often clogged;
- deformation of the lower surface of the main body due to overheating;
- failure of the accelerator pump diaphragm;
- solenoid valve defect;
- loose fit of diffusers in the housing.
If the body is deformed, air is sucked between the carburetor and the intake manifold, and the engine begins to operate intermittently, as the air-fuel mixture becomes leaner. The idle speed is difficult to adjust, and to correct the defect it is necessary to grind the surface on an emery wheel. If the surface warping is significant, grinding will no longer help; the housing must be replaced.
Over time, the accelerator pump diaphragm can crack, lose elasticity, and ruptures appear in it.
Checking the condition of the diaphragm is quite simple; it does not require removing the carburetor. To get to the diaphragm, you need to unscrew the 4 screws of the accelerator pump cover and remove the part. The condition of the diaphragm is checked by external inspection.
Related articles:
- Features of Gazelle generators In any car, the generator performs two important functions - it provides all consumers with the necessary electricity and recharges the battery. The Gazelle generator produces […]
- Tuning the Audi 100 C4 with your own hands: tuning the body, headlights, interior Often, car owners do tuning of the Audi 100 C4 with their own hands: tuning the body, headlights, interior. Aesthetic design makes a car attractive and more valuable to people around [...]
- How to check a car by VIN code The easiest way to find out the history of a car is by identification number (VIN), the data is stored in the traffic police database. Many motorists are interested in how to get a car’s VIN number for free; this topic […]