01/25/2022 1,457 Alarms
Author: Victor
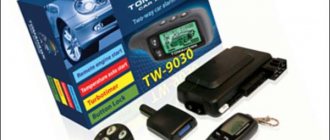
According to the Tomahawk TZ 9020 instructions, the alarm feature is the engine relay blocking function - in the event of theft, the driver can remotely turn off the engine, which will prevent unauthorized access. Also, the advantages of the complex include feedback and auto-start, for the implementation of which a separate connector is provided in the design of the anti-theft system.
[Hide]
Keychain TZ 9020
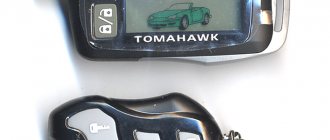
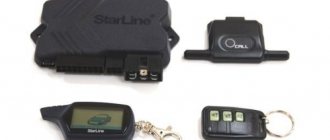
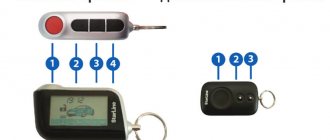
The kit comes with two control panels: a main one and a spare one. The first is equipped with five keys responsible for primary and secondary options. The additional key fob has less functionality, but this does not interfere with the control of the security system.
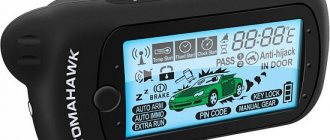
On the head module, the indication is made in the form of an LCD display, which displays system status icons, possible errors, the current time and indicators of the vehicle’s temperature sensors. The spare key has only a two-color diode.
On this page you can download or view the complete operating manual for key fobs in Russian.
The technical error
The car may not be deactivated due to serious technical reasons, which can only be resolved by a specialized service center. It can be:
problems with the alarm control unit itself, associated with the disappearance of software from the main unit. It will need to be taken to an alarm installer for reprogramming; failure of the main alarm control unit leads to the need to change the entire system completely. You can determine that the main unit stops functioning by the following signs: the siren turns on spontaneously, the alarm system does not respond correctly to commands from the key fob, not all functions work. This is the most costly problem; it can only be solved by completely replacing the old security system with a new one; The car may not respond to the alarm when the engine relay is blocked. To eliminate the malfunction and unlock it, you should contact service specialists. problems in the peripheral devices of the security system. There is no contact in the door and hood switches. Contacts in these parts of the car are susceptible to frequent environmental influences - humidity, pollution. The problem is solved by purchasing new ones and replacing them. Some motorists clean the limit switch contacts.
Tomahawk TZ 9020: instructions for use
The manual is included in the standard kit and contains descriptions of the main points regarding the use of the alarm:
- factory installation requirements;
- preparatory work;
- procedure;
- setup order;
- method and correct sequence of calibration of shock sensors;
- correct electrical wiring connection;
- possibility of pairing with different types of gearboxes;
- decoding the key fob display;
- recommended location for installing the emergency shutdown button.
The complete user manual (manual) can be downloaded from us.
How to set the warm-up time: every 1, 2, 4, 24 hours
The hourly start of the engine on an automatic transmission is activated in exactly the same way as on a manual transmission.
- At the same time, hold down the “Open lock/key” key until the key fob signal appears.
- Press the "Lock/zZ" button.
- The system LED will blink twice.
You can set the hourly start interval like this:
- Go to the programming settings (the procedure is described above).
- Press the Override key seven times.
- “Close the car / zZ” - 1 hour.
- “Open door/key” – 2 hours.
- “Trunk opening” - 4 hours.
- “Crossed out siren” – 24 hours.
The following combination of buttons will help you change the warm-up time:
- Enter the settings menu (the steps are described above).
- Press Override six times.
- Next, press “Closed car / zZ” - warm-up time is 5 minutes.
- "Open door/key" key - 10 min.
- "Trunk" - 15 minutes.
- “Crossed out speaker” – 20 min.
Tomahawk TZ 9020: instructions for programming functions
The supplied key fobs have the ability to install three auxiliary functions:
- watch;
- timer;
- alarm.
The remote controls are supplied with the main unit without initial calibrations. Therefore, they will require preliminary configuration, performed as follows.
- On the main pager, press the “F” button until the clock cursor starts blinking.
- Next you need to establish the necessary readings.
- The minutes, alarm clock and timer time are set in the same way.
Deeper calibration of basic functions requires a careful approach and study of the sequence of actions. The programming table contains the necessary information about the process.
Tomahawk tw-9020, Manual, Operation i. main functions of the system
I. Basic functions of the system.
3. Non-volatile memory (allows the system to save its state in case of
temporary power outage).
Automatic re-arming. Remote engine start. Automatic hourly engine start with intervals of 1, 2, 4 and 24 hours. Turbo timer.
Possibility of installation on vehicles with gasoline or diesel engines.
11. Valet mode. 12. Bypass the faulty zone.
Protection against delays.
Programmable key fobs. Car search. Low battery indication. Programmable additional control channel. Security mode with the engine running.
Disabling the siren from the key fob.
Programmable impulse of the central locking.
21. Two-step disabling the security mode.22. Temporarily disabling the damage sensor and/or main zone of the shock sensor.23. Interior lighting delay accounting function.24. Remote status polling.25. Remote trunk opening (optional).26. Engine blocking.27. Built-in parking light relay (two channels).28. Built-in central locking.29. Central locking control when the engine is running.
30. Built-in immobilizer.
Graphic indication of all triggers and system status on the key fob
with LCD. Courteous backlight function (optional).
Anti-Hijack mode - protection against robbery. Individual PiN code. Memory of system activation.
Warning function when a door is not closed while driving.
37. Increased range of LCD key fob up to 1200m. (depends on external conditions).38. Possibility of connecting a standard horn (programmed)
Ability to control the comfort system. Built-in starter blocking relay. Information about programmed key fobs.
Displays system status changes on all programmed LCD key fobs.
Built-in clock (LCD key fob).Built-in timer (LCD key fob).Built-in alarm clock (LCD key fob).
LCD key fob button lock function.
How to connect the Tomahawk TZ 9020 alarm system: installation instructions
An instruction manual is included. The document contains all the information for the possibility of installing a security system with your own hands, without the involvement of outside specialists.
- Preferred mounting location for head and auxiliary units.
- Electrical wiring pinout - wiring diagram for chips and wires.
- Recommendations for placing the emergency lock key.
- Connection of additional equipment is allowed.
- Programming sequence.
- Registering and setting up keys.
- Possibility of attaching new keychains.
- Possible malfunctions and ways to eliminate them.
Some users buy used alarm systems or lose the service documentation, which makes it impossible to configure it. You can view detailed instructions online.
Override button
The “Override” key of the Tomahawk TZ 9020 is designed to control the security complex. With its help, new keys are linked, software glitches are eliminated, and basic alarm functions are calibrated.
What stands out in particular is the ability to turn on and off the security function without the presence of key fobs - critically necessary when remote controls are lost or broken.
Due to the importance of the device, users try to hide it in a place that is extremely difficult to access. Usually the element is mounted in the indicated niches.
- Inside the glove box. Placed under the trim or behind the back wall.
- Under the dashboard. The location may vary depending on the user's imagination. Some hide the key near the pedals, others on the passenger side.
- In some cases, the element is hidden in the wiring harnesses under the instrument panel.
- In the niche of the doors.
Thus, you can find out where “Overide” is located on a certain machine from the specialists or by installing it yourself.
Why is the keychain not registered?
When setting up the TW 90 10 remote control yourself, questions may arise. The key fob is not programmed and is not recognized by the alarm. This problem appears not only on domestically produced cars (Prior, Kalina), but also on foreign cars. The issue is not the make of the car, but a problem caused by the setup and use of the security system.
What to do in this case?
- Open the instructions for your car alarm. Find a detailed guide to programming remotes.
- If there is none, then try setting up the key fob using the methods discussed earlier.
- Did not help. Look for other reasons. Some mechanical damage is possible. Examine all components of the security system. Carefully inspect the contacts on the control and primo transmission connectors. Test the electrical circuits with a tester. If you find damaged wires, replace them. Clean oxidized contacts thoroughly.
- Remotes still not working? Carry out diagnostics on the control unit. Its reflashing is not excluded. This work can only be done by qualified electronics engineers.
- 1904 views
The feedback key fobs for the tomahawk 9010 TZ and 9010 TW are identical, the only difference is in the key fob body, the functions are one to one. Therefore, the recording of key fobs in the alarm memory is the same.
Instructions taken from the manufacturer's website
Turn on the ignition but do not start the engine
Press the “Override” button and operate for about 6 seconds; in other alarm systems it is called “Valet”. If you don’t know where it is, the length of the wire with the button is 0.5 meters from the unit, you need to look under the steering wheel or in the fuse box.
the siren will emit 4 chirps and “crack”
Release the Override button and you have a “window” of about 5 seconds for recording the first key fob. Press and hold buttons 1 and 2 on the top of the key fob until you hear the siren “crack” once. This means that you have registered 1 key fob.
To record a second or additional key fob, you again have a window of 5 seconds, press 2 buttons and the siren will grunt 2 times, confirming the recording of the second key fob.
You wait 5-10 seconds, the system itself exits the key fob “recording” programming mode.
What to do if the system emits 4 chirps, but the key fob is not registered
Sometimes the window for recording a key fob in a place of 5 seconds appears for only 0.5 seconds. In this case, after 4 chirps, you need not hesitate, but press 2 key fob buttons at once.
What to do if the system emits 5 chirps
Perhaps the installers screwed up and connected the alarm incorrectly and after pressing the Override button, the alarm system “does not see” the ignition key.
In this case, you need to place a jumper between the red and yellow wires ign 1
And then try to write according to the standard scheme
Several recording schemes when the key fob is drunk after 5 chirps
1 diagram
Turn on the ignition ACC, one turn back
Briefly press Override
Turn on the ignition (do not start the engine). Press the “Override” button and hold it for about 6 seconds, wait for 4 chirps and then continue according to the standard.
2 scheme
Turn on the ignition (do not start the engine) We press and hold 2 buttons on the key fob for recording, with the other hand we press the Override button and wait for 5 chirps. Release Override and the key fob buttons, then press the key fob buttons again. The turn signals should blink to confirm the entry of the key fob.
Linking a new key fob and flashing the old one
Programming problems and their solutions
Video “How to program a key fob?”
Comments and Reviews
Comparison of Tomahawk TZ 9020 with 9030 and 7010: differences
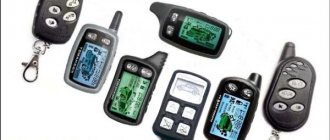
The three generations of Tomahawk car alarms differ slightly. However, there is a difference; the list of modifications includes a change in the appearance of the key fobs and functionality. Let's take a look at the advanced options.
| Function | Alarm type | |
| 9020 | 9030 | 7010 |
| Antiscanner | Present | |
| Automatic engine start | Eat | Absent |
| Turbo timer | ||
| Finding a car in the parking lot | ||
| Possibility of remote opening of the cargo compartment lock | ||
| Pairing with central locking | ||
| Warning about door lock opening while driving | ||
| Comfort system control | ||
| Independent determination of the number of key fobs |
Key Features
List of Tomahawk 9020 alarm capabilities:
- The presence of feedback provides the ability to monitor the state of the system. All data regarding the operation of the anti-theft complex is displayed on the display of the main key fob in the form of indicators and inscriptions. Using the screen symbols, you can decipher the activation of the alarm mode in the absence of the driver, as well as the operation of the alarm options.
- Protection of the vehicle along the perimeter of the body. To protect the car, limit switches, power inputs of the ignition system, engine blocking, etc. are used. In addition, this model uses an additional immobilizer to prevent unauthorized start of the power unit.
- Ability to control the alarm without using a key fob. If the device breaks down or its battery fails, a personal password can be used to enable or disable protection modes. The code should only be known to the car owner.
- Auto return to security mode. If the protection is accidentally disabled, the system will automatically activate it after 30 seconds. The alarm system can determine this based on sensor signals. If no door has opened within 30 seconds after disabling the security mode, this will be regarded by the system as accidental deactivation.
- Possibility of silent activation of protection, as well as car protection without alarm signals. In the first case, the function is activated without confirmation sounds. In the second, when the security system is activated, the siren does not turn on, but information about this is transmitted to the communicator with a display.
- Remote setup of the kick controller. The sensor sensitivity parameters can be adjusted independently using the key fob. The user can change the settings for the warning and alarm zones.
- Ability to control the vehicle's standard central locking system.
- The presence of display backlight makes the procedure for controlling and setting up the alarm more simplified in the dark.
- Possibility of controlling door locks when activating and switching off the ignition.
- Indication of the temperature level in the vehicle interior. The data is displayed on the main pager screen.
- Availability of non-volatile system memory. If the power supply to the control unit is turned off, when it is further activated, the alarm will return to its previous state. When you try to dismantle the security system, the power unit will be blocked, so even in the event of a break-in, it will not be possible to steal the car.
- Availability of “Panic” and “Anti-robbery” modes. In the first case, by command from the pager, alarm signals and external lighting devices are activated. This allows you to designate the vehicle as protected and scare potential car thieves away from it. The “Anti-robbery” option is used to block the engine at the user’s command in the event of a forcible seizure of the car.
- The “Search” function allows you to temporarily turn on external lighting devices, which allows the user to find a car parked in a large parking lot.
- Availability of “Turbo timer” mode. Its essence lies in the fact that after the ignition system is turned off, the power unit of the car runs for several minutes at idle speed. The motor operating time is user adjustable. This allows you to prevent rapid wear of the structural components of the motor.
Price
The cost of a complete alarm system varies in different cities of Russia. This is based on shipping costs and local economic conditions. As of today, the modification is out of production, which makes it difficult to establish actual price tags. Therefore, the table shows an indicative figure.
| Region | What is the price? |
| Rostov | 2500 |
| Moscow | 2600 |
| Chita | 1900 |
| Samara | 1790 |
| Murmansk | 2400 |
| Saint Petersburg | 2500 |
Alarm Tomahawk TZ 9020: malfunctions
The Tomahawk TZ 9020 system does not offer improved reliability. Build quality problems appear quite often here and can appear unexpectedly in an unforeseen form. However, the reasons that the device is buggy are 90% identical:
- mechanical damage to the key fob or one of the alarm units;
- Short circuit of the on-board network;
- violation of the tightness of the modules - water has entered;
- oxidation or damage to wiring/contacts;
- low battery or remote control battery;
- natural wear and tear of the assembly;
- The firmware has crashed (software glitch).
If the security system on your car does not work, you can fix the problem yourself.
- Check the battery charge.
- Examine the parts for loose terminals, oxidation of contacts or mechanical damage. Separately, you need to carefully check the key itself.
- Try to reboot the alarm by disconnecting it from the battery.
- Perform a full factory reset.
Advantages and disadvantages
Advantages of the alarm:
- Great functionality at a relatively low price. Based on the set of options, the system can be classified as an anti-theft system.
- Uninterrupted alarm operation under any conditions, including extreme cold.
- Availability of a built-in system for polling the status of all elements of the anti-theft complex.
- A simple and understandable setup menu for the average user.
Disadvantages characteristic of this model:
- There may be malfunctions in the engine autostart system. This problem is usually associated with incorrect installation of the alarm system and a conflict between the system and the standard immobilizer. To eliminate this, you will need to additionally install a blocker bypass module.
- Low quality of protection of transmitted signals. A professional thief will be able to hack the system electronically and disable the alarm.
- Malfunctions of communicators. Over time, the device may not respond to user commands. To fix the problem, you need to turn off the power to the key fob.
- At low negative temperatures, the alarm may turn on the alarm mode for no reason. It is not always possible to turn it off in cold weather using the key fob, so you will need to disconnect the terminals from the battery.
- Fragile pager body. The device may fail after being dropped several times.
The starter does not turn
The starter may not receive power from the Tomahawk TZ 9020 alarm system in several cases. The simple design of the units makes troubleshooting easier.
- An internal failure of the head unit has occurred - the part is completely replaced. You can also try a factory reset.
- There is a defect in the power supply of the security system itself - you need to check the on-board wiring and fuses.
- Abnormal operation of the engine blocking relay. The element itself is diagnosed for burning or shorting.
- Incorrect installation setup. All calibrations need to be checked.
- The battery is dead - to remotely start the engine, a larger amperage is required than when starting with a regular key. It can be treated by simply charging or changing the battery. This also applies to the pager.
Functions
Functions implemented in the alarm:
- saving settings when power is turned off;
- automatic activation of security when the button is accidentally pressed;
- remote engine start;
- automatic start by time;
- turbo timer;
- built-in protection against false positives;
- parking search mode;
- the siren can be turned off by a signal from the remote control;
- ability to control the trunk lock.
Advantages and disadvantages
Signaling benefits:
- low cost;
- Remote engine start is supported;
- feedback is provided;
- large range of action.
Equipment disadvantages noted in reviews:
- the control signal is picked up by scanners;
- influence of interference on the transmitted signal;
- no start based on air temperature.
The key fob works independently
Some customer reviews indicate that the Tomahawk TZ 9020 remote control can “live its own life.” Software failures of a similar nature do not happen spontaneously - they require a reason. The basis for the “independence” of the transmitter is 90% external influences:
- water entering the structure;
- mechanical damage – the key fob was crushed, hit or strongly shaken;
- prolonged overheating;
- natural wear and tear.
If this is detected, the driver must immediately buy a new key and dispose of the old one. The devices cannot be repaired or restored. If the key fob is broken, the only thing that can save you is replacing it with a new, known-good device.
Specialized product sales
Today, the largest catalog of Tomahawk brand alarm products helps users purchase a product according to the required parameters. A convenient web portal allows you to go to the official website of an electronics store in the corresponding region and buy a product, having previously specified the configuration, appearance and properties of the product from a sales consultant.
All alarm products are certified. Technical data of the devices, their descriptions and images shown on the Internet resource are prepared on the basis of open, reliable sources from the manufacturer. Customer impressions and reviews of the car alarm prove its convenience and reliability.
Nikolay: During the period of use, it never let me down. The installation process is quite simple compared to others, I was pleased with my choice. In terms of price and quality, the alarm system is excellent. There was never a glitch, she just didn’t scream or blink.
Ivan: I’ve been using the alarm system for more than 3 years, I installed it myself. Only now it started to work in cold weather and complains about the pedal. During all this time there were no shortcomings or breakdowns. I'm going to change the car, I'll install the same alarm system.
Setting up the turbo timer
This option is critical for vehicles with a forced air induction system. After a sudden stop of the power unit, the turbine does not have time to cool down, which leads to its rapid wear.
The expansion extends the operation of the motor, which gives the bearings the necessary time to cool. Thus, a gradual decrease in temperature before stopping extends the life of the unit. Also for diesel engines it is possible to heat the spark plugs, which makes cold starts of the unit easier in winter.
In the alarm menu you can set the relay response time to 1.6 and 10 minutes.
Entering car alarm settings
To get to the Tomahawk 9010 settings menu, follow the instructions.
- Turn off the ignition.
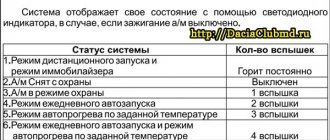
- To select a mode, press the Overide key several times. Three times – emergency mode “Jack”. Four times – daily autostart of the engine. Five times – automatic engine warm-up based on interior temperature.
- Turn on the ignition. Sirens will sound. Their number corresponds to the selected function. Emergency mode – the siren and side lights will sound three times. Daily autostart of the engine - the siren and turn signals beep four times.
- To activate or deactivate the function, press the service button.
- A siren and LED signal will follow. One CHIRP – option activation. Two sounds - the function is disabled.
- Turn off the ignition. The lights will flash five times.
Key fob repair: photo of board
Remote controls of the Tomahawk TZ 9020 generation are capricious in terms of care. The thin plastic of the case is quickly wiped off without a cover, and the fragile frame is easily damaged by a slight impact. This encourages motorists to use the remote control carefully. The internal part of the remote unit is a monolithic circuit with soldered elements. If the board is burned out or mechanically damaged, repair does not make sense.
The unit can be restored only if there are external defects. There are a sufficient number of suppliers on the market who sell assembled housings for a reasonable price (200-300 rubles). If there is a more serious breakdown - the antenna has broken off, the screen has cracked or the key has fallen off. It is recommended to buy the entire keychain. The price of the device starts from 1000 rubles.
The following are photographs of the internal parts.
Car alarm Tomahawk TZ 9020: reviews
Comments from car enthusiasts about the security system.
Artem:
I bought it in a specialized store with a guarantee, but installed it myself according to the manual. Three months later, the signal from the main remote control disappeared; I replaced the batteries. But a week later everything happened again, I took it to the store and exchanged it for the same one. In the end, everything happened again, I paid extra money and got a normal signaling system.
Nikolay:
I got the alarm along with the car. I found an instruction manual for the key fob on the Internet and found it very useful. When I washed the car, I shorted out her brain, and I had to reconfigure everything. Otherwise there are no complaints - it works fine.
Remote engine start from key fob
The Tomahawk 9020 anti-theft system allows you to use both the main key fob and an additional one for autostart. We'll look at how to turn on a car's engine using the key fob below.
- Hold down the "Open lock/key" key.
- If you are using the main remote control, wait for the sound signal. The LED of the additional key fob will light up green.
- Complete the following action within three seconds. Briefly press "Open lock/key".
- The car engine should start.
- Stopping the engine follows the same procedure.
Video
New cars > Car alarms >
Did you like the material? Share with your friends:
Have questions about car repairs? Ask them in the consultation section, to do this, click on the link below.
auto mechanic
The Tomahawk tz 9020 alarm system is equipped with a separate connector that allows you to connect with autostart. A similar connector is provided in all systems manufactured under the Tomahawk brand and belonging to the “90XX” family. The connector connection diagram depends on the model. Let's look at what this circuit looks like for one signaling device - tz 9020.
Preparation for automatic and manual transmission
Before using autostart without a driver, you must prevent the car from starting to move. On a car with an automatic transmission, this condition is met by moving the lever to the parking position (without switching the lever, it will not be possible to remove the key from the ignition).
If the car has a manual transmission, then neutral must be set manually before each auto start and the hand brake must be applied.
Set the arming mode to lock the doors.
- Press the Override key eight times.
- Key "Closed lock" - the function is disabled. “Open door”, “Trunk”, “Crossed out siren” - on.
Turn on the parking lights mode when autostarting.
- Press the Override button nine times.
- “Close the car” is the first option.
- “Open lock” is the second method.
- “Trunk”, “Crossed-out speaker” - off.
The function of closing the doors after turning off the engine remotely is set as follows.
- Press "Override" ten times.
- “Locked” key is disabled.
- “Open lock”, “Trunk”, “Crossed out siren” - the function is enabled.
Ignition switch contacts
In a simple version, the ignition switch contains three different contacts. They are designated as follows: “30”, “50”, “15”. At the 30th voltage comes from the battery, from the 15th the current goes to the ignition line, well, the 50th terminal is the starter contact. The list can be expanded further. At contact “15/2”, for example, there is no voltage when the starter is running, which distinguishes it from terminal “15”. Foreign cars also have an “ACC” line that supplies accessories.
4 lines switched by lock
To start the engine by autostart, the alarm must “emulate” the lines passing through the contacts of the lock. In many cars, however, it is possible not to connect the “ACC” line, as well as the “second” ignition line.
Some cars have two starter lines. The developers of your car alarm have provided this option. The “blue” cord coming out of the power connector is connected to the second line of the starter. But this connection method requires configuration. This will be discussed in more detail below.
why is it needed, how to enable or disable
Modern car security systems have a huge number of functions, and understanding them all is not very easy, especially for a novice driver. The main task of any security system is to protect the car from intruders, but in addition, the alarm key fob often allows you to remotely start or turn off the engine, warm up the interior and perform various other actions
Another important option in all modern security systems is the Valet mode, which is often called “service”. In this article we will look at why Valet mode is needed in an alarm system, how to enable and disable it if necessary
What is Valet mode in alarm systems?
Valet mode is a service mode in security systems of various levels. When the alarm switches to Valet mode, the main protective functions are disabled. The use of Valet mode is intended in situations, for example, when the car is in a service center and active security options may interfere with the work of car service specialists.
It is worth noting that in some older security systems, the Valet mode is used not only to remove security measures when leaving a car in a service center or other place without a key fob. Also, previously it was necessary to go into it to make alarm settings.
The Valet button is most often hidden in the cabin from prying eyes, since it can be used by attackers to deactivate the car's security system.
How to activate Valet mode
Valet mode can be activated on modern alarm systems through a push-button switch installed in the cabin, or using the alarm key fob. Let's consider both options.
Using a push button switch
- You need to get into the car and insert the key into the ignition, then turn the ignition on and off;
- Next, you will need to wait 10 seconds, then turn the Valet switch to “On” mode. If the cabin has a button to activate the Valet mode, and not a switch, it must be pressed for 2 seconds;
- In response to the driver’s actions, the security system will emit one beep and the control signal indicator will be activated, which informs that the security system has switched to Valet mode;
Various scheme options
The power terminal block of the Tomahawk tz 9020 signaling contains 6 contacts. The basic diagram for these is shown below:
Auto start and power connector
The arrows here indicate T-shaped connections. According to the instructions, it is better to connect the “red” wire to the “30th” contact. The pre-flask shown in the diagram is then not installed.
The “blue” cord can be connected not to the “ACC” line, but to the lineman relay, which is what is usually done in practice. Your car alarm can also be configured additionally, and then the specified wire will emulate one of two lines: “IGN 1”, an additional starter line.
In any case, the “yellow” cord is connected to pin “15”. The “black and yellow” wires will go into the gap in the starter cable. The “thin” wire, moreover, is connected to the lock terminal. If the “black and yellow” cables are mixed up, it will be impossible to start the engine even with the key.
Let's say there are two starter lines in the standard wiring. The alarm is then connected like this:
Option with two starter lines
Some cars have a feature - current must be supplied to one of the two lines earlier than to the other. Then you need to “break” the second circuit, and connect to the first “T-shape”. The setting for the considered case is performed as follows: option “1” associated with autostart receives the value 4. If the lines are triggered simultaneously, use the value 3.
The Tomahawk car alarm of the model in question does not allow connection to locks that have two 30 terminals. Or rather, you can connect everything, but then you won’t be able to use autorun.
About installing alarms with auto start
Automatic starting of the car engine is a new option in modern anti-theft systems. Autostart Tomahawk 9020 is activated by pressing buttons on the remote control. This significantly increases the level of operating comfort of the car in the cold season or in the heat. To enter the autorun function programming mode, complete the following steps.
- Turn off the ignition.
- Press the “Override” service key six times.
- Activate the ignition. 6 siren signals will follow.
Download the official instructions for Tomahawk TW 9020.
In the autorun menu you can configure certain parameters:
- operating time of the car engine and its starter;
- IGN 3 output operation option – turns off when the starter is turned on, does not work when the starter is activated, turns on for the entire duration of the starter operation, is activated before the starter is turned on;
- gearbox type - automatic or manual transmission;
- engine type - gasoline or diesel;
- turbo timer mode;
- car engine warm-up time;
- periodic automatic engine start interval;
- arming during auto start;
- options for side lights;
- closing the doors after warming up.
Autostart functions are programmed using the “Override” key. Be sure to read the instructions before setting up.
Software system setup
The instructions for the Tomahawk model “9020” alarm contain two different tables. The first contains security functions. Now we are interested in another table (second). Its options can be accessed like this:
- Turn off the ignition;
- Press the Override service button 6 times;
- The ignition is turned on;
- After 6 beeps, press the service button to select the option number.
The desired value is set by pressing the key fob. The time period between steps should not exceed 7 seconds.
Autorun options table
So, the programming mode has been activated. Set up the functions in order:
All auto start settings
Shown here is "Table 2" copied from the instructions. It contains options related to autorun.
Function 4 is a delay before starting the starter. Let us list the options provided for the first function. The choice depends on how the “blue” cord is connected:
- ACC line emulation (default);
- Duplicate wire "IGN 1" (but not "IGN 2");
- Duplicating the starter wire;
- The “blue” cord is the starter wire that engages first.
The car alarm should monitor whether the engine is running. The “gray-black” control cord coming out of the main terminal block is connected to a tachometer or to a pressure lamp. And “option 2” is then configured like this:
- Use the first option if connected to a lamp. The starter operating period will be 0.8 seconds.
- Same as option 1, but the period will be 1.2 seconds.
- Equivalent to option 1, but the period is increased to 2 seconds.
- Use “Option 4” if you use tachometer control.
We wish you success.
Amendment for cars with manual transmission
Option 3, indicated in the third line, allows you to select the type of transmission: “automatic” or “mechanical”.
Manual transmission in a car
Having installed the alarm on a car with a manual transmission, the third option is assigned the value 2. Then they try the following:
- The handbrake is activated when the engine is started;
- Turn off the ignition with the key (the engine continues to run);
- All doors are closed;
- If you engage the security, the engine will stall.
The owner will perform all these actions during operation. The sequence is called "preparing to launch."
Let's say that in “step 2” the engine stops as soon as the ignition is turned off. Then you need to try this: when setting up, set the value to 3 or 4. And in the sequence indicated above, then another step will appear - before “step 2” you will need to press the “Disarm” button. Pressing is carried out in two stages: for a long time, that is, until a sound signal is heard, then briefly. The additional remote control does not produce any signals, but it changes the color of the LED.
In order for the signaling system to read the state of the handbrake, the orange-violet cord is connected to the corresponding microbutton. The manufacturer has provided what is discussed in this chapter for one purpose - to increase operational safety.
Characteristic
Review of the main technical parameters of Tomahawk alarms:
- current consumption in standby mode of the anti-theft system is no more than 16 mA;
- signal transmission between the microprocessor and the transceiver is carried out over a secure radio channel with a frequency of 434 MHz;
- Pulse encoding falls into the category of FM frequency modulation;
- the maximum range of the communicator in the mode of sending messages or receiving data is no more than 1.2 km;
- operating range of the additional pager - 30 meters;
- The duration of the central locking control signals is user-configurable and can be 0.8, 3.6 or 30 seconds.
The range of the key fob is specified by the manufacturer, taking into account ideal terrain conditions, in the absence of interference and dense buildings. In the city, the range of the remote control will be at least two times less.
About connecting the engine control wire
It was said above that the control “gray-black” cable is connected in one of two ways: to the oil pressure lamp, to the tachometer.
Main connector connection diagram
In the first case, everything is clear, although control using the indicator is not reliable. Using the output of the tachometer, you can get acceptable results, but you only need to connect to the high-voltage terminal. With this method of control, “training” is usually carried out to teach the system to recognize idle speed. But for Tomahawk signals, starting from the “9020” family, a similar procedure is not provided.
The instructions do not say that when connecting to the tachometer, it is better to install a capacitor (1 µF and 63 Volts) in the wire gap. Electrolytic capacitors are not suitable here. Happy installation.
How to install?
Installation Guide for Basic System Elements:
- The microprocessor is placed behind the instrument panel or in another dry and protected place in the cabin. Installation is carried out on a flat surface using self-tapping screws or plastic clamps. There should be no moving levers or mechanisms at the location of the block.
- The transceiver with antenna is installed in the upper part of the windshield. It is important that there are no metal objects or products near the device within 5 cm. The wire from the transceiver is laid under the decorative cladding.
- The siren is installed in the engine compartment of the car. It should be placed with the horn facing down to prevent moisture from accumulating inside. The wires from the device are routed into the car interior through a shield that separates it from the engine compartment. If an autonomous siren is used, then during installation it is necessary to ensure free access to the keyhole of the device.
- Limit switches are installed on the doors, trunk and hood. Their installation is not allowed on drains.
- The shock sensor is fixed in the central part of the body, in the car interior. Double-sided tape or self-tapping screws are used for fastening.
- The LED light bulb is installed on the instrument panel, in the most visible place in the cabin.
- The button to enter the service maintenance mode is located under the control combination. It must be installed so that the car owner has access to the device when he is in the driver's seat.
Connection diagram
Diagrams for connecting the main elements of the system:
General module connection map
Main connector wiring diagram
Trunk lock contact connection map
Lock control circuit
Connection procedure
The 6-pin connector and the 14-pin block must be connected in a certain sequence.
Table: order of connecting a 6-pin connector
| Wire color | Description |
| Red | The positive alarm power output must be connected directly to the battery. The electrical circuit is protected by a 30 amp fuse device. |
| Black-yellow (thick wire) | Positive contact connecting to the starter relay |
| Yellow | Connects to the ignition switch. To connect, you need to select a contact that receives 12-volt voltage when the ignition is turned on and the starter is cranked. |
| Blue | Engine auto start contact |
| Green | Connects to the ignition switch. To connect, you need to select a wire on which 12-volt voltage appears when the ignition is activated. When the lock is moved to the “Starter” position, the power on the line should disappear. |
| Black-yellow (thin) | Positive contact for locking the starter mechanism in autostart mode |
Table: connecting a 14-pin block
| Wire color | Description |
| Black-gray | The electrical circuit for monitoring the operation of the power unit, it must be connected to a controller for measuring engine fluid pressure or a tachometer |
| Black-green | Input for controlling external lighting devices |
| Black | Negative power signal. The contact is connected to any standard bolt screwed into the car body. |
| Yellow-green | Another input for controlling external lighting devices |
| Blue | Contact for controlling the courtesy light circuit or power windows |
| Red-black | Bypass circuit for standard central locking |
| Yellow-black | Negative contact for connecting the blocking relay |
| Grey | Positive signal for siren |
| Purple-orange | Connects to a sensor installed on the brake pedal or handbrake |
| Black and yellow | Negative output of an additional channel, activated from the key fob |
| Red-blue and black-blue | Positive and negative contacts for connecting triggers installed in doors |
| White-orange | Negative signal for connection to luggage compartment limit switch |
| Gray-orange | Negative input for connecting hood trigger |