On Priora, the electrical circuit differs from the usual electrical equipment of AvtoVAZ. Let's take a closer look at it. The Priora electrical circuit has a single-wire electrical circuit. The negative terminals of consumers and power supplies are connected to ground. The car body carries the function of the second wire.
As for the electrical circuits of the engine control system, they have a multi-wire system. They are connected to ground through a special control unit.
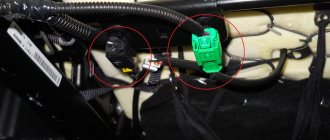
The electrical circuit on the Priora has four main harnesses: the instrument panel harness, the engine control harness, the front and rear harnesses. All of them are connected to each other using plug connectors, which are located under the dashboard on the left side near the fuses.
The rear harness and the dashboard harness are connected to the control unit using a plug. In addition to the above described tourniquets, other tourniquets can also be used. They connect additional equipment. Below is a more detailed description of the electrical circuit.
Connection diagram for the VAZ-2101 generator
Structurally, generator 2101 consists of the following main elements:
- The rotor is a moving part that rotates from the engine crankshaft. Has an excitation winding.
- The stator is the stationary part of the generator and also has a winding.
- Front and rear covers , inside of which bearings are installed. They have eyelets for attaching to the internal combustion engine. The back cover contains a capacitor necessary to cut off the alternating current component.
- Semiconductor bridge - called a “horseshoe” for its similarity. Three pairs of semiconductor power diodes are mounted on a horseshoe-shaped base.
- A pulley on which the VAZ-2101 generator belt is placed. The belt is V-shaped (on modern cars a multi-ribbed belt is used).
- The voltage regulator is installed in the engine compartment, away from the generator. But still it must be considered part of the structure.
- The brushes are mounted inside the generator and transmit the supply voltage to the field winding (on the rotor).
Action of auxiliary elements
The list of equipment included in the auxiliary electrical circuit of the VAZ is wider than that discussed above. This:
- light and sound elements, lamps, signal, etc.;
- glass cleaning and washing system;
- interior ventilation unit;
- engine cooling fan;
- rear window heating unit;
- dashboard;
- electric booster;
- electric mirror drives;
- anti-theft system.
Connection diagram for the VAZ-2107 generator
1 - battery; 2 - negative diode; 3 - additional diode; 4 - generator; 5 - positive diode; 6 - stator winding; 7 - voltage regulator; 8 — rotor winding; 9 — capacitor for suppressing radio interference; 10 — mounting block; 11 — battery charge indicator lamp in the instrument cluster; 12 - voltmeter; 13 — ignition relay; 14 - ignition switch.
Connection diagram for the VAZ-2108 generator
The VAZ-2108 generator has a rather massive stator winding, since it uses a large cross-section wire. It is with its help that electricity is generated. The wire is wound evenly over the entire inner surface of the stator into recesses specially provided for this purpose in the magnetic core. It’s worth talking about the latter separately. The middle part, the generator stator, consists of a series of thin metal plates pressed tightly together. They are often boiled on the outside to prevent separation.
One thought on “Electrical diagram of Lada Priora in detail”
These materials present in an extremely simple and accessible form a description of the maintenance and repair of VAZ Lada Priora cars in a step-by-step manner using ready-made spare parts in a garage workshop. Possible malfunctions have been studied and methods for eliminating them have been considered.
Schematic electrical diagrams, connecting devices and pinouts of connectors
The generator in cars is designed to generate electricity and charge the battery. If the normal operation of a car electric generator is disrupted, the battery begins to discharge and soon the car will stop starting completely - there is not enough battery charge. This device consists of a three-phase diode bridge, which, in turn, has 6 silicon diodes. Electrical voltage is created by the excitation of the rectifier at the moment when the rotor poles change under the stator windings. When the rotor rotates inside the machine stator, the poles of the rotor change. To increase the value of magnetic fluxes, the stator contains an electromagnetic exciting winding in the area of the magnetic cores. Marking and designation of wires:
- P - pink.
- F - purple.
- O - orange.
- B&W - black and white.
- KB - brown and white.
- CHG - black and blue.
- K - brown.
- H - black.
- B - white.
Connection diagram for the VAZ-2109 generator
- Alternator. The 37.3701 or 94.3701 series can be installed.
- Negative diode.
- Additional diode.
- Positive diode.
- Alternator warning lamp, also known as battery discharge lamp.
- Instrument cluster.
- Voltmeter.
- Relay and fuse box located in the engine compartment in the compartment between the engine and the vehicle interior.
- Additional resistors built into the fuse mounting block.
- Ignition relay.
- Egnition lock.
- Accumulator battery.
- Capacitor.
- Rotor winding.
- The voltage relay is located in the engine compartment.
Replacing generator brushes with removing the converter on the Lada Grant (engine 11183, 21116, 11186)
Tools and materials are similar to previous repairs.
- The car is placed within the perimeter of the repair area, basic safety measures are taken, and the parking brake is released.
- Open the hood and remove the terminals from the battery to avoid a short circuit.
- Unscrew the six bolts around the perimeter and remove the engine protection.
- Disconnect the wire block from the converter.
- Remove the protective cap for securing the power cable.
- Unscrew the bolt of the lower mounting of the generator.
- Use the mounting tool to move the converter forward towards the radiator and remove the bolt.
- Remove the belt from the pulley.
- We remove the generator from under the car.
We carry out troubleshooting, inspect the physical condition of adjacent mechanisms and parts. We replace with new ones as necessary.
Connection diagram for the VAZ-2110 generator
On VAZ-2110, 2111 and 2112 cars, a 94.3701 generator was installed with a maximum output current of 80 Amperes and a voltage = 13.2–14.7 Volts.
Here is a breakdown of the connection diagram for the generator on the ten :
- Battery 12V;
- generator 94.3701;
- mounting block;
- egnition lock;
- battery charge indicator lamp in the instrument cluster
Checking with a tester
The easiest way to check the generator voltage regulator with a multimeter on the Priora is to measure the voltage on the battery.
To do this, you need to perform the following sequence of actions:
- set the multimeter to measure DC voltage with a limit of at least 20 V;
- start the engine;
- at idle speed (1000-1500 rpm) the tester should show 13.2-14 V;
- when the number of revolutions increases to 2000-2500, the voltage should increase to 14.2 V;
- at maximum speed the tester should show no more than 14.5 V.
If the voltage differs greatly from the specified one, drops below 13.5 V or rises above 14.5 V, we can conclude that the unit is faulty.
We assemble a simple circuit: connect the light bulb to the brushes, the negative terminal of the power source to the ground terminal, the positive terminal to terminal “B” of the regulator. When 12.7 V is supplied, the light should light. When raised to 14-14.5 V, the control should go out. If the light goes out earlier or does not go out at all, the control device is faulty.
How to check the generator yourself
How to check a VAZ generator using the example of model 2109. Generator type 94.3701 alternating current, three-phase, with a built-in rectifier unit and an electronic voltage regulator, right-hand rotation.
Generator connection diagram . The voltage to excite the generator when the ignition is turned on is supplied to terminal “D+” of the regulator (terminal “D” of the generator) through indicator lamp 4 located in the instrument cluster. After starting the engine, the excitation winding is powered by three additional diodes installed on the generator rectifier block. The operation of the generator is controlled by a warning lamp in the instrument cluster. When the ignition is turned on, the lamp should be on, and after starting the engine, it should go out if the generator is working. If the lamp is brightly lit or glows half-lit, it indicates a malfunction.
The “minus” of the battery should always be connected to ground, and the “plus” should always be connected to the “B+” terminal of the generator. Failure to turn the battery back on will immediately cause increased current through the generator valves and damage them.
It is not allowed to operate the generator with the battery disconnected. This will cause short-term overvoltages to occur at the “B+” terminal of the generator, which can damage the generator voltage regulator and electronic devices in the vehicle’s on-board network.
Signs of faulty generator brushes
The following signs indicate node failure:
- weak headlights in the dark, their frequent blinking;
- interruptions in the supply of current to the on-board network;
- unexpected shutdowns of the radio and other consumers;
- poor charging of the car battery, electrical work begins to quickly drain it;
- indication of problems with the generator on the panel.
These symptoms do not always indicate a malfunction of the voltage regulator itself. For reliable diagnostics, it is worth analyzing the serviceability of other components: test the circuits with a multimeter, check the fuses, read the errors recorded in the ECU memory.
Sometimes the block does not need replacement, but simply cleaning or turning so that the brushes can move freely again. But if the inspection reveals wear to less than 5 mm in length, it is strictly necessary to change them. The same applies to uneven wear.
Replacement and removal of the electric generator
The generator on a VAZ car is removed either for complete replacement in case of failure or to carry out repair work to replace faulty parts. To perform dismantling, prepare a standard set of tools; it is advisable to drive the car into the inspection hole.
- Disconnect the battery.
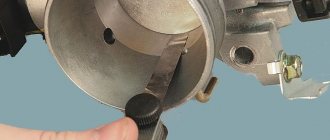
- Remove the protective rubber cap from terminal “30” and unscrew the nut and remove it from the wire stud.
- Disconnect the block with wires from the generator connector.
- We loosen the tightening of the generator to the adjusting bar, then lift it all the way up to the cylinder block and remove the belt from the pulleys.
- Completely unscrew the bolt securing the adjusting bar to the cylinder block, then from the bottom of the car unscrew the 2 bolts securing the lower bracket to the block and remove the generator, pulling it out of the engine compartment.
The generator on any vehicle, including the Lada Priora, is designed to power electrical equipment while driving. Much depends on the performance of this unit, and its breakdown will lead to the fact that the equipment will not be able to work correctly. Learn more about the design, malfunctions, and installation of the mechanism from this article.
Replacing the voltage regulator on a Priora
How to repair a voltage regulator? On modern cars - no way. It is simply irreparable and a failed part is simply replaced with a new one. Theoretically, even an electronic non-contact voltage regulator can be repaired - but few people do this - there is no point.
So, how is the voltage regulator replaced on a Priora? First, you should turn off the ignition and disconnect the negative terminal from the battery for reasons of electrical equipment and your safety.
Be careful not to mix up the wires going to the voltage regulator of the Priora generator - otherwise you can ruin both the relay-regulator and the generator itself.
On a Lada Priora car, the voltage regulator is installed separately from the generator. To remove the relay-regulator, you need to unscrew the nuts that secure the device to the body. Before this, you need to mark with electrical tape, tape or a marker the relative positions of the wires leading to the contacts of the regulator, and the contacts themselves.
Now you can install a new voltage regulator on the Priora to replace the old one. It is imperative to check the contacts where the relay-regulator is connected to the generator, as well as the tension of the generator belt. That's it, connect the battery, tighten the terminals and check the operation. And, of course, we make sure that on the Lada Priora the on-board voltage does not jump, but is even.
If the relay-regulator is installed in the same housing with the generator, then the algorithm is slightly different. After removing the negative terminal from the battery, disconnect the wires going to the generator (there is no need to remove it itself).
We open the plugs or unscrew the fastenings of the relay-regulator, depending on the design of the unit. We remove the plastic casing of the generator and find the relay regulator. We unscrew the fastening nuts and disconnect the screw fastening to the tire. Let's extract it. All that remains is to install a new relay-regulator - we perform this procedure in the reverse order of removal.
To check the operation of a new device, in this case, you need to fully charge the battery, connect it as expected, and start the engine at about 2500-3000 rpm. Using a universal tester or a special voltmeter, you need to measure the voltage at the battery terminals.
If you replaced the relay regulator correctly, the number on the display will be equal to that indicated in the vehicle’s operating instructions. If not, the relay regulator should be replaced again. It is forbidden to check the serviceability of the relay-regulator by short-circuiting its terminals - this can lead to the “death” of the rectifier unit.
Which generator is better to install?
Regardless of which generator is installed on the Priora, the owners of these cars often replace the unit due to the fact that not all devices allow connecting various equipment to the on-board network. Which manufacturer is good and which device is better to install on the Lada Priora?
You can supply generators of the following brands:
- BATE 90 ampere;
- KZATE 115a;
- BOSCH 120 amp;
- devices manufactured by VAZ for 120 or 115a.
Generator unit for Priora
In principle, other models of generator devices for domestic cars can be found on sale. When purchasing, the main thing is to check the integrity of the unit so that there are no signs of damage on the body. It is better to use high power so that there is a power reserve, thereby the device will last longer. In addition, it should be taken into account that it is not recommended to install less powerful generators, especially if many devices are connected to the vehicle’s on-board network.
Window lifters
As for the power windows, the electrical circuit on the Priora differs from other models. Control is carried out using a controller. Raising and lowering the windows is done by briefly pressing the button.
In Lada Priora hatchback cars, the electrical circuit has the peculiarity of supplying power directly to the electric window drive. The wire supplies power to the mirror control, heating, and also to the solenoid designed to lock the doors. The control is carried out by the controller.
Possible malfunctions and ways to eliminate them
The operation of Lada Priora generating devices may occasionally fail.
For what reasons may a generator from Priora not work correctly:
- Elements F12 have burned out on the fuse diagram. In this case, the devices on the dashboard will stop working, and the lamp will not light up when the ignition is turned on. Replacing the part will solve the problem.
- There has been a break in the power supply circuit of the instrument devices; the symptoms will be similar to those described above. To fix the problem, you need to check the connections, as well as the contacts from the orange wiring.
- The ignition switch refuses to function. Regardless of what kind of lock it may be, it needs to be changed.
- Souring or wear of the mechanism brushes, oxidation of slip rings. Symptoms of malfunction will be the same. To solve the problem, you need to change the voltage regulator on the Lada Priora, and also clean the contacts. Many priority drivers today use a three-level voltage regulator - three levels allow you to always control the voltage level in the network.
- The excitation winding leads have broken. The problem can only be solved by replacing the rotor of the unit.
- If the drive belt slips, the battery discharge lamp will indicate this - adjusting the tension will solve the problem.
- Another reason why the Priora Lux generator may be faulty is damage to the valves of the rectifier device. The block itself will have to be replaced.
- The battery discharge lamp may appear when the diode batteries of the excitation winding are damaged. In this case, the rectifier unit will also have to be changed.
- A short circuit or break may occur in the stator winding - it will be necessary to repair the latter or install a new one instead. Also, the stator needs to be changed in case of an interturn short circuit or a short circuit to ground.
- The bearing elements have worn out - the car owner will be informed about this by third-party sounds when the generator unit is operating. In the video below you can familiarize yourself with the procedure for repairing a mechanism at home (the author of the video is Repair and Tuning).
Anchor malfunction.
Another common malfunction of a modern generator is wear of the armature slip rings. This is due to their small diameter and high armature speeds. On old-style generators, the rings had a larger diameter, and the armature rotated at a lower speed and therefore were less subject to wear, but the wires of the armature winding could fall off in them, which also leads to malfunction. To check, you can connect a test lamp in series with the power source and slip rings, or measure the resistance between them. The lamp should be lit when connected, and the resistance value should be about 0.5 - 2 Ohms. Upon visual inspection, the slip rings should not be worn.
All these recommendations are just a small part of the malfunctions that most often occur in operation. If the check fails to determine the malfunction, you must contact the service for a complete, professional diagnosis and repair of the generator.
“If you notice an error in the text, please highlight this place with the mouse and press CTRL+ENTER” “If the article was useful to you, share the link to it on social networks”
Removal and installation instructions
As practice shows, the main reason why a unit fails is the connection of various electronic devices to the car’s on-board network. Many energy consumers need high voltage generators. Therefore, when purchasing a node, you need to consider how many devices will connect to it. If you take a 115A or 120A mechanism, this will be the most reasonable choice for cars “stuffed” with electronics.
Find out more about dismantling and installation below:
- To perform the work, you will need a 13 key. First of all, you need to disconnect the battery.
- In accordance with the operating instructions, dismantle the mechanism drive belt. After this, you can disconnect the wiring block from the D+ connector on the device.
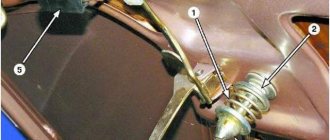
- Then you will need to move the rubber boot and unscrew the nut. Having done this, you can disconnect the wiring from the terminal pin.
- After these steps, unscrew the nut of the screw of the lower clamp of the assembly to the special bracket. The nut itself can be removed with a spacer sleeve.
- Next, remove the retaining screw. After this, the nut securing the assembly to the upper mount can be completely unscrewed. The adjusting screw also needs to be completely unscrewed, then remove the tension bar.
- After completing all these steps, you can remove the mechanism from the machine. The unit is being repaired with the replacement of all necessary elements. After the repair is completed, the generator can be put back in place; the installation procedure looks identical to dismantling, only all steps are repeated in reverse order. After installation, it is necessary to adjust the strap tension. If the belt is not adjusted, this may cause the mechanism to malfunction. After all the actions completing the repair procedure, the tension bar fixation nut must be tightened to a torque of 20 Nm.
Regulator replacement
If the diagnostics confirm that the relay is “replaceable,” you can install a working one yourself. For this you will need:
- New launch vehicle with brush assembly. Good samples are made in Russia, their price is low and they are highly reliable;
- Set of tools: keys for 13 and 8, a head with a knob for 10, a slotted screwdriver.
“Priors” 2012-2013 and younger are often equipped with a new type of multifunctional voltage regulator, for example, 844.3702, with a smooth response function to the connected load. On older machines there are components of the old one, but in their case it is also possible to install the updated one. The specific type depends on the model of the generator on board, its power (115A, 90A, etc.), the version of the car (sedan, hatchback) and year of manufacture.
Progress
There are two replacement methods:
- with removal of the generator;
- without removal.
The first method simplifies the process, but on Priors with air conditioning, access to the required areas can be difficult. Actions after dismantling the device:
- Remove the plastic cover of the Lada Priora regulator.
- Remove the power plug.
- Unscrew a couple of fasteners.
- Use a wrench to remove the retaining bolt.
- Remove the old LV, install the new one, connect and reassemble everything in reverse order.
https://youtube.com/watch?v=bIYBtxKdhgI%3F
There is a way without removal - you can get to the block through the headlight or bypass the air filter by sliding it by hand. There are many video reviews dedicated to this operation on YouTube and thematic forums.
Video “How to repair a Priora generator with your own hands?”
Detailed information and recommendations regarding the repair of the generator unit from the Lada Priora car are given in the video below (the author of the video is the Do-It-Yourself channel).
If the generator is seriously damaged, it does not have to be repaired, but completely replaced. Parts necessary for repair may be missing, or the breakdown may not be repairable at all. Meanwhile, the on-board voltage and the quality of battery charging depend on the good operation of the power unit. It's a shame when, despite a good motor, electrical equipment does not work properly.
And if we are talking about VAZ cars, then sometimes a replacement is in demand due to the lack of power of standard devices. Modern automakers offer many additional devices that increase the level of comfort when traveling, but they also consume a large amount of electricity, and old devices cannot cope, so they have to be replaced with more powerful ones.
Many people are interested: which generator to buy if they have a VAZ? Here you need to consider them separately by model, so before you go shopping, read the recommendations of specialists and compare them with your wishes and capabilities.
Generators for VAZ 2106 and 2107
The generator on the VAZ 2106-2107 costs the same as on the VAZ 2101 - G221. If you install additional external current consumers that operate constantly, this will lead to undercharging and insufficient current will be supplied from the relay regulator. These additional devices include:
- powerful audio systems;
- fog lights;
- TV;
- preheater;
- additional heater;
- fridge.
Any similar device will lead to greater power consumption and, consequently, to premature battery discharge, even when the engine is running at high speeds. Standard devices for 2106 were developed a long time ago and are not designed for modern energy-consuming add-ons.
In this case, it is recommended to replace the standard generator with a more powerful unit.
What to install?
G 222
If you need to increase the current power, then, when deciding which generator is better to install on the VAZ 2106 or 2107, instead of the standard one, take the G 222, which was installed on the VAZ 2105, Nivakh. It would seem that it itself is no better than the standard one on the “six”, but you can take an upgraded version that will be more powerful. Unlike the 221, this unit is designed with a built-in regulator relay, assembled into one unit with brushes. The G 221 gives an output of 42 A, and the 222nd - 50 A. Increasing the cross-section on the rotor winding increases the power, although the design is completely similar to the G 221. However, to install it on the 2106 you will need minor modifications. The easiest way is to install brushes from G 221. They fit perfectly in place of the relay. This modification is quite feasible even for car enthusiasts who do not have the skill.
It can be installed on a VAZ 2106 G222 with a standard regulator, but then it is necessary to change the connection diagram of the electrical machine.
On 2107 everything is installed without problems.
Check the voltage at medium engine speeds at the battery terminals, if it is 14 V at 2500 rpm, then everything is fine. You can drive with a more powerful unit by connecting additional options.
Generator 2108
This installation has greater efficiency, delivering a current of 55 A. It is installed on both 2106 and 2107.
The mount is identical to the standard ones, there are no problems during installation. Just remember to remove the battery terminal. You'll have to tinker with the connection to 2106. There are 4 wires going to the standard device. On the “eight” - three, since the voltage relay is built-in. To get a good result, insulate the black wire, connect the rest according to the standard system. The light bulb - the discharge indicator will light up when the generator is running, and will go out if there is no charging.
It is useful to make some more minor modifications. Instead of the old relay, install a regular power one. Then the light comes on only when the engine starts and at low speeds.
On 2107 you only need to add a power relay.
2107-3701010
An even more powerful installation is from the VAZ 2107i, producing 80 A, which can also be installed on the VAZ 2106–2107. With such equipment it is possible to install any electrical systems. For VAZ 2106 only 2107-3701010 is suitable; You can use any generator of this series for the carburetor “seven”.
What signs will indicate that the generator brushes are faulty?
The following external signs will help you understand that the generator brushes have become unusable on a Priora with power steering or air conditioning:
- length of the element being inspected;
- if upon inspection it is discovered that the length of the brushes is less than 5 mm, they must be replaced;
- Replacement will also be required if the appearance of the brushes indicates uneven wear, that is, one element is heavily worn out, and the second is brand new. Uneven wear of these elements will certainly negatively affect the operation of the generator, so experts recommend replacing them without fail.
Once high-quality brushes have been purchased (it is advisable to give your choice to well-known manufacturers), you can begin assembling the entire element and installing the generator in its original place. But as was said earlier, such a process can be carried out without removing it, which, of course, must be decided by each car owner independently. These operations, as many understand, are performed in reverse order, and after the final stage it is necessary to check whether the entire generator is working efficiently.
If the replacement of worn brushes is carried out correctly, and the problem with charging the battery was precisely the wear of these components, then the car owner will solve this issue, and without the help of service station employees, which will save a lot of his own money. The replacement process itself is quite simple, but if difficulties arise during the work, you can watch the training video on the Internet resource at any time, which is provided by professionals, choosing the most suitable time for viewing.
How to repair a voltage regulator? On modern cars - no way. It is simply irreparable and a failed part is simply replaced with a new one. Theoretically, even an electronic non-contact voltage regulator can be repaired - but few people do this - there is no point.
So, how is the voltage regulator replaced on a Priora? First, you should turn off the ignition and disconnect the negative terminal from the battery for reasons of electrical equipment and your safety.
Be careful not to mix up the wires going to the voltage regulator of the Priora generator - otherwise you can ruin both the relay-regulator and the generator itself.
On a Lada Priora car, the voltage regulator is installed separately from the generator. To remove the relay-regulator, you need to unscrew the nuts that secure the device to the body. Before this, you need to mark with electrical tape, tape or a marker the relative positions of the wires leading to the contacts of the regulator, and the contacts themselves.
Now you can install a new voltage regulator on the Priora to replace the old one. It is imperative to check the contacts where the relay-regulator is connected to the generator, as well as the tension of the generator belt. That's it, connect the battery, tighten the terminals and check the operation. And, of course, we make sure that on the Lada Priora the on-board voltage does not jump, but is even.
If the relay-regulator is installed in the same housing with the generator, then the algorithm is slightly different. After removing the negative terminal from the battery, disconnect the wires going to the generator (there is no need to remove it itself).
We open the plugs or unscrew the fastenings of the relay-regulator, depending on the design of the unit. We remove the plastic casing of the generator and find the relay regulator. We unscrew the fastening nuts and disconnect the screw fastening to the tire. Let's extract it. All that remains is to install a new relay-regulator - we perform this procedure in the reverse order of removal.
To check the operation of a new device, in this case, you need to fully charge the battery, connect it as expected, and start the engine at about 2500-3000 rpm. Using a universal tester or a special voltmeter, you need to measure the voltage at the battery terminals.
Lada Priora - generator replacement
The Priora requires a powerful generator; the car has a lot of electronics and a weak installation cannot cope with it.
A generator labeled 5102.3771 is recommended for the Priora, providing a power of 80 A; on luxury versions with even more electronics, a 115 A device is installed. Then which generator is better to install on the Priora?
Car owners recommend a unit produced by KZATEtm Samara plant under number 9402.3701-14, producing 115 A.
There is no need to modify it during installation, you just need to find the connector, because there are differences from the standard one. You can use a plug from a VAZ-2108 from the limit switch for turning on the reversing lights, which costs only 20 rubles.
Next, you will have to make a little modification when connecting to the “B+” power terminal in order to fit it to the desired size.
The cost, of course, of domestic units is higher than that of Chinese or Bulgarian ones, sold for 2200 and 3000, respectively. For Russian ones they ask for about 4000. But if you need repairs with Russian-made components, you can easily find spare parts.
Which generator is better to put on a VAZ 2110
VAZ 2110 factories install KATEK generators with a current of 80 A. The service life is 140,000 km, which is approximately 10 years of vehicle operation. Answering the question of which generator is better to install on the VAZ 2110, experts recommend products from Russian manufacturers.
What to consider when choosing
- Russian manufacturer or foreign? Of course, first of all, Russian manufacturers are preferable. If only because it is easier to find spare parts in the event of a minor breakdown. If you purchase a generator for a VAZ 2010 from a not so popular company, it may be difficult to find spare parts, and they will not cost you so much.
- Current strength. Factory models for VAZ 2010 - 3771 or 94.3701 - are designed for 80 A, this current is enough, even if there are additional devices that consume it. More powerful ones - 120 A - are installed in the presence of powerful acoustics, no harm is done to the battery, and you will provide all energy consumers with uninterrupted current.
- It is better to purchase a generator if there is a warranty on it. There may well be a defective product, and the warranty will provide the opportunity to replace it with a new one.
Generator Manufacturers
It is best for 2010 to purchase a standard generator from KATEK or KZATEtm Samara plant, and about 50% of owners do just that, according to statistics. They are reliable, cope perfectly with their functions, creating the necessary tension.
Among the foreign-made generators, we can recommend Bosch, Delphi and Denso, which are also reliable and popular.
Generators for VAZ 2114
The generator initially built into the 2114 is low-power, and if it also breaks down and you decide to purchase a new one, the question arises: which generator is better to install on the VAZ 2114? It is important here that the unit is more powerful, but there is no need to change the fastenings.
- The most successful replacement option for a VAZ 2014 is a generator from a Priora or Kalina with air conditioning. This installation has a power of 115 A, which is 35 A more than the characteristics of the units.
Installing these generators for 2014 usually does not cause problems, however, it will be necessary to replace the pulley, but it only costs about a hundred rubles and is not difficult to find.
- The Eldix brand generator also has a power of 115 A and works well. The disadvantage is that it is almost impossible to find spare parts, and even if there is a minor breakdown, you will have to replace the entire generator instead of repairing it.
Please note that a lack of charging voltage can occur simply due to oxidation of the battery terminals; keep an eye on them by cleaning them regularly.
How to tension a belt and check its tension
For Priora, in addition to the original ones, similar belts from foreign brands such as Contitech, Dayco, Gates, and Flennor are recommended.
- Loosen the roller nut; you will have to hold the cage with a wrench. By then rotating this key, the clip can be turned.
- Tighten the nut against the roller. Check the quality of tension only on the long section between the pulleys. If, when pressing on the belt in this place, it bends no more than 10 millimeters, the tension is appropriate.
- If your Lada has a hydraulic booster, you should tighten it a little more. If you don't pull it tight enough, it will whistle obviously, a defect that can be easily detected by ear. Then pull it a little tighter. If you hear not a whistle, but a hum, the belt, on the contrary, needs to be lowered.
On a Priora, in a regular service, changing just the belt can cost from 300 rubles (not counting consumables). If the generator is with rollers or mounted, then the price will increase significantly to one and a half thousand rubles. Do not forget the receipt for the services provided; the warranty for the work performed must be at least six months; if the belt deteriorates due to poor installation or tension, you must demand a replacement at the expense of the service.
Generators for VAZ 2115
VAZ 2115, created on the basis of the “nine”, adopted the main components and assemblies from it. Accordingly, there are also many problems with equipment. If the car has a carburetor engine, it can be equipped with a 55 A generator 37.3701, which differs from the above in the mounting method. However, this voltage is not enough for the constant use of modern audio systems, fog lights and other energy-consuming options. Which generator is better to install on a VAZ 2115 - car owners definitely recommend installing it with a power of at least 80 A. Now on the VAZ 2115, as well as on 2113-2114, three-phase 94.3701 with an output of 80 A are installed.
For more power, you can install a 90 A Priorov generator KZATE 9402.3701 in 2015, which is suitable for the mounting and pulley. A reliable unit will provide you with the necessary energy for any number of energy-consuming devices.
Summarizing the above, it can be noted that when buying a generator at a VAZ to replace a broken one or to increase power, it is better to choose Russian models, since they are most suitable in design and you will not have to carry out expensive modifications. In addition, you will always find the necessary
The best prices and conditions for the purchase of new cars
Generator KZATE 115A From Priora “Lux” To Samara
The topic will be of interest to those who do not have enough power in their car.
Recently I started having problems with nutrition, and I thought for a long time what I should do wrong. Because everything was very strange and funny)) The old gene from 2112 80A KZATE In general, the problem was revealed by the EO Generator. The decision was made in favor of the new Genady from Priora. Since I’m building music, I’ll need food =)
In general, we go to the Altais store and start shopping: A generator from Priora Lux, with a plug for it. Then I went to the Nagorny car market and picked up KG-25 Wire (3m), Corrugation for KG, Thermal Tubes, Terminator Insulating Tape, Terminals, and small things. And also “Multimeter”.
Next we head to the garage. We put the battery on charge. and start breaking the car. I suggest breaking first from below and then from above. Loosen the lower fastening bolt and remove the upper fastening. Remove the belt. Remove the lower mount.