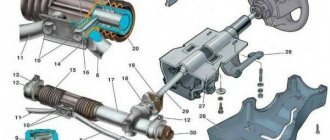
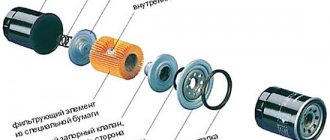
Device, principle of operation
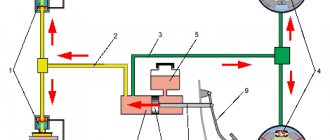
So, the driver stops the car by pressing the brake pedal. The latter affects the brake force booster, and the latter acts on the GTZ, which compresses the fluid in the lines.
Under the influence of the GTZ force, the liquid is compressed and passes into a zone with minimal pressure. These are tubes, and then - working mechanisms. The brake fluid presses on the drive and the caliper compresses the pads. When the pedal pressure is released, the pressure in the brake booster decreases. Springs in the mechanism release the pads. The liquid moves back into the expansion tank - into the area where the pressure is minimal.
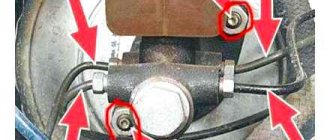
The movement of brake fluid is carried out through copper tubes. The latter are connected to the main brake cylinder and laid along the bottom of the car to the brake mechanisms. The connections of the tubes to the mechanisms and to the GTZ are made in the form of threads - this ensures maximum reliability. After all, the pressure in the line can be quite high.
To increase the reliability of the systems, the tubes are connected to the GTZ diagonally. This makes it possible to use the brake if the latter fails. For example, from the GTZ one of the tubes connects the front left brake mechanism and the rear right one. Another tube directs fluid to the front right and rear left wheels. To ensure that the pressure in the system does not exceed the permissible value, a pressure regulator is installed at the places where all the tubes are connected. In common parlance he is called a “sorcerer”.
Signs that replacement is needed
Anyone, even an inexperienced motorist, can independently and without much effort determine whether it is worth changing the brake lines. Usually a complete replacement is necessary if there is fluid leakage from the system or if the drums have overheated. It is also advisable to replace the tube if the pedal free play or braking distance has increased. Replacing the brake pipe is also recommended if the pads have uneven wear. This means that they work under different pressures.
Do-it-yourself repair of a rotten brake pipe.
There is one nuance here, the whole point is that you may not have a steel ball at hand; in this situation, you can make a lead ball (if you are a fisherman, you probably carry fishing accessories). You can create something like a ball from cigarette foil. In general, how you will make this same ball is up to everyone, but it will need to be tightly hammered into the vacated hole in the master brake cylinder. Once the ball is hammered into the brake cylinder, you can tighten the brake pipe.
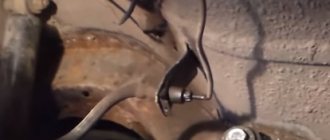
In this video I will tell you in detail how to easily repair a rotten brake pipe. As usual, the pipes rot in the rear of the car and previously it was necessary to replace the entire length of the brake pipe. But I will tell and show, using the example of my car, a 1997 Ford Mondeo 1.8 petrol hatchback, how you can fix a problem like a brake fluid leak for two euros and fifty cents (2.50 euro.). I think everyone can handle this after watching this video. Enjoy watching.
Reasons for tube failure
As a rule, on most cars, the brake line becomes unusable due to corrosion. It is not uncommon for old pipes to develop cracks. Brake fluid then slowly leaks out of these cracks. The tubes are made of copper and, it would seem, should not corrode, but this is not the case. Corrosion eats up highways, and we also need to add to this the negative influences of the external environment. The environment has a particularly negative impact on the metal of pipes in winter, when utility services spray roads with caustic reagents.
Also, one of the reasons for failure is poor fastening of the line to the body. Often the line is fixed to the bottom of the car and is not protected by anything. In winter, the bottom of the car can catch various obstacles and as a result the tube cracks or breaks. Also, if the element constantly moves along with the body, then over time a kink appears at the place where the line bends. The part is easily damaged.
How to get home if the brake pipe bursts. manipulator Nissan diesel
I started to put everything together when the brake pipe burst. Well, nothing, it was lying somewhere in stock, I began to slowly unscrew it when the brake line burst a little further on.
On the road, the brake pipe burst, and every time the brake pedal was pressed, the fluid leaked out... It was decided to plug the brake pipe - but alas, in vain! Because the pressure is too high, and the tube is rusty..! Another solution turned out to be more practical. Having removed the brake fluid supply hose from the reservoir to the pg, we turn off the rubber hose by inserting a 10mm bolt into it. and tighten it with a clamp so that the bolt does not fly out. And that’s it, you can drive, but carefully, keeping your distance because... The rear brakes don't hold up. PS God forbid that you don’t need this... but maybe it will help someone..!
How is the replacement performed?
The process of replacing a brake pipe will require the car owner to have plumbing skills and abilities. You will have to use traditional and special tools. Tube repair is performed when it is impossible to replace the line with a new one.
To replace, unscrew the tube from the brake cylinder, and the opposite end is unscrewed from the master brake cylinder. Then a new product is purchased. The tube can be purchased at auto parts stores, but it is important to remember the thread pitch. For foreign cars, this is a 10 thread with a pitch of 1. This spare part already has two nuts and is flared. The length of the tubes on sale may vary, but it must be selected based on the vehicle. So, on some car models the part may be laid with a reserve, but on another model there is no such reserve. Replacing a brake pipe involves unscrewing the old one and screwing a new one in its place.
How to change front tubes?
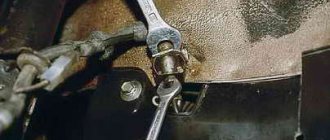
To operate you will need a special key. It is a tool with a bolt for tightening. The key resembles a spanner, but there is no need to purchase a cheap product in stores. Such keys are made of soft alloys that cannot withstand heavy loads. The nut on the tube is made of steel - the key easily fails, and the edges on the nut get licked off. Then unscrewing and tightening such a part can be a big problem. The nuts are tightened tightly enough that you can water them with WD-40, but you shouldn’t heat them. When heated, the brake fluid boils; due to the high pressure in the system, the hoses can rupture, especially if they are old.
Read more about tube and flaring machine manufacturers
First and foremost, never use welded copper tubing on your vehicle to repair brake lines. Sometimes these are found in markets, less often in stores. With large pressure drops that occur in the system during sudden braking, such tubes burst. Optimal choice: seamless copper tubes. When purchasing stainless steel pipes, there is nothing particularly to worry about, since there are practically no unscrupulous manufacturers of such pipes.
The most popular among domestic car enthusiasts are pipes from a company (Poland). The company offers tubes, fluids, fittings, tees, repair kits and tips. The quality of the products is high, and the prices are very affordable. As for tube flaring kits, it is worth paying attention to the companies Biltema (Sweden), VAG (Germany), Jonnesway (Taiwan), Rothenberger (Germany). Rothenberger instruments are especially good . They are quite expensive, but they are made of very high quality and are quite suitable even for particularly complex work.
Instructions
Here's how to replace brake pipes on a VAZ 2110. First of all, you need to remove the wheel on the side where the pipe will be replaced. Next you need to find the brake hose. It is connected at one end to the caliper, and at the other end to the tube. Using a special wrench, carefully unscrew the nut on the tube, holding the hose with another wrench. The second end of the tube is connected to the GTZ. In the same way, unscrew the tube nut from the brake cylinder.
Then a new one is screwed in place of the old line. First, tightly wrap the tube to the GTZ, and then to the brake hose on the caliper. Before connecting the line to the system, you should lay the pipe along the body the way it was installed. At this point, the replacement of brake pipe 2110 can be considered complete. But since the system has been depressurized for some time, the brakes should be bled. It is not necessary to fully bleed the brakes. This is done only where there has been a replacement. Remember that the tubes are connected diagonally.
For example, if the right brake pipe at the front was replaced, then you should start bleeding the system from the rear left wheel and vice versa if the left front pipe was changed.
Using cold welding to repair a car
The article will tell you about cold welding for a car, how with the help of such an easy-to-use tool you can carry out high-quality repairs of your iron friend.
During the operation of the vehicle, there may be a need for emergency body repairs. For example, while driving along the highway, a car’s gas tank or radiator may break.
It is clear that in this situation you will not be able to carry out a full-fledged car repair and you will most likely not carry a welding machine with you. In addition, it is not always possible to rely on the help of a tow truck, that is, it may seem that in these cases you will find yourself in a very difficult situation.
But, if your car’s repair kit includes cold welding, then you can deal with all the troubles yourself and in a short period of time. In this regard, let's look at what cold welding is and how to use it.
What is cold welding
Cold welding is a special repair kit with which you can do the same work as using traditional welding. That is, seal the holes, restore the strength of the seams, and attach the metal parts to each other.
You can buy such a product at an auto store or hardware store. There is a special cold welding for the car, which is an epoxy resin-based glue. And with its help you can repair any damage to the radiator, gas tank, engine crankcase and much more with your own hands.
Today, there are many manufacturers of this product and all of them are of high quality, so there will be no problems with the choice of cold welding.
How to use cold welding when repairing a car
So, what exactly tools are needed for this: cold welding, sandpaper (fine-grained), acetone or pure gasoline.
1. First of all, you need to prepare the surface for repair. For example, if we are talking about repairing a broken gas tank, then the repair site should be cleaned with sandpaper. It will be good if you make irregularities on the prepared surface, for example, make scratches or other roughness - this is necessary for better adhesion of the weld to the surface.
2. Next, degrease with gasoline or acetone; this procedure is also important.
3. Now the time has come to prepare the glue: take cold welding to repair the car, carefully read the instructions.
Using damp hands (you need to moisten them), you need to cut off or squeeze out (depending on the type of product purchased) the recommended part of the glue and knead it until the required homogeneity and plasticity. The resulting mixture will even warm up a little, you will feel it through your hands.
4. Now we apply the composition to the prepared area; all actions must be performed quickly, because there are adhesives that polymerize very quickly. We sit and smoke, waiting for the welding to set - this can happen from 40 minutes to a day. Such a difference in time occurs from many factors: the manufacturer of the product, street temperature, thickness of application, and more.
Thus, you get a strong and tight connection that will serve you for a long time. But, after the repair, the appearance of the gluing is not attractive.
It is clear that if we are talking about repairing the bottom of the gas tank, then this is not important, but if you are repairing the body, then after welding the following work should be done. After welding is completed, the surface is cleaned with sandpaper, then primer and paint are applied. Of course, if you look closely, traces of repairs will be noticeable, but this is better than driving with holes in the body.
Here you can watch a video where a man went to relax in nature and punctured the engine crankcase, but thanks to cold welding, he rested and got home in his car.
Video: engine crankcase repair using cold welding.
So the conclusion is simple, always carry with you such a useful and sometimes necessary thing as epoxy resin glue.
source
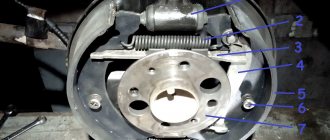
Rear end
There is nothing complicated here, except that the line is longer and it is connected as follows - the longer part of the tube is connected to the GTZ and screwed to the “sorcerer”. Then the “sorcerer” is connected with a short tube to the brake mechanism on the wheel.
Replacement of the rear brake pipe is carried out as follows. If there is an overpass or hole, then you will not need to remove the wheel. First, apply liquid wrench to all threaded connections, then wait a little. After this, use a Phillips screwdriver or other suitable tool to unscrew the screws securing the tubes to the car body. After this, use a suitable wrench to unscrew the two fittings securing the tube to the brake hose and to the regulator. The element is removed and a new one is installed in its place. If the long line to the “sorcerer” is damaged, then the actions are similar, only unscrew the fitting from the GTZ and from the regulator.
After the replacement, you must remember to add brake fluid to the expansion tank to the required level and be sure to bleed the system, since it has taken in air and the braking process will be ineffective. If the front brake pipes on the left were replaced, then there is no need to bleed another line.
Estima, Emina, Luc >(automatic transmission, manual transmission, transfer case, cardans, gearboxes, axle shafts, CV joint)
Post by Dariy » 18 Sep 2012, 20:48
Post by brembist » Sep 18, 2012, 8:56 pm
Post by Dariy » 18 Sep 2012, 21:30
Is it unacceptable even temporarily? I plugged it with a toothpick, covered it with superglue and liquid nails and went to the city to look for the pipe.. I rode around for half a day and seemed to be alive))) And then you write that it’s not acceptable. and to Moscow 120 km. After all, I at least need to get to Moscow!
Where to look for these refrigerators? Then you will probably have to remove it because it will burst into flames when sealed?
Post by brembist » Sep 18, 2012, 9:34 pm
Can you imagine what pressure is in the brake system? Master, I wouldn’t do that to myself.
Added after 1 minute 15 seconds: If the clamp was wide and made of tin, this would be at least something, but a sharp braking would cause the whole thing to fall off.
Post by Andrys2 » 18 Sep 2012, 21:40
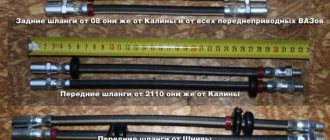
for a long time now in almost any car market, there is a place where brake pipes are made, they are made right on the spot, there are catalogs of fittings and lengths, but you can bring an unscrewed fitting and name the approximate length, the price is 20-30 rubles per fitting and 120-250 rubles per meter of tube together with work, depends on the greed of the seller, I recently replaced the two longest lines that go back above the tank + I replaced several short ones on the rear beam. It burst when leaving the garage. I also changed one front pipe on the car in winter, no problems.
Instead of covering it up, to get there, it’s better to bend the end of the tube several times and flatten it with a hammer, plugging it and changing it when the opportunity arises.
Post by Dariy » 18 Sep 2012, 21:46
brembist: Can you imagine what pressure is in the brake system? Master, I wouldn’t do that to myself.
Added after 1 minute 15 seconds: If the clamp was wide and made of tin, this would be at least something, but a sharp braking would cause the whole thing to fall off.
source