If the expression “the main thing is to stop on time” in everyday communication concerns moral principles, then in the context of motor transport this expression can affect the material aspect of the life and health of the motorist.
There are no secondary units in the car, but the braking system should be a priority in car maintenance and repair. In the operation scheme of hydraulic brakes, the main ones are both the main and the working brake cylinders. Let's look at the operating principle, design, diagnostics, repair and replacement of this unit using the example of a common VAZ car.
Principle of operation
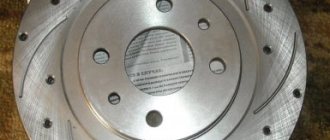
The brake fluid coming from the main one under pressure acts on both pistons in the working cylinder, which, in turn, compress or expand the brake pads, which leads to braking. The front brake circuit is disc, while the rear brake circuit in many cars is drum type.
- Front calipers.
- Pipe supplying hydraulic fluid to the front wheels.
- Rear pipeline.
- Rear wheel rollers.
- Tank.
- Main roller
- One of the pistons.
- Stock.
- Pedal.
V-brake brakes: characteristics, how to set up and change
Rear v-brake is a rim brake mounted on the bike stays through special mounts. Pads are attached to the levers, which act on the wheel rim during braking. To stop the bike using the rear v-brake, press the handle on the handlebar on the right. Through a cable (stretched along the frame), the levers are compressed, the pads touch the wheel.
This is how a new or newly adjusted system works. Over time, the following happens to vector brakes:
- brake pad wear;
- loosening of the cable;
- loose attachment of the levers to the frame;
- cracks in the shirt, cable rupture.
This has two consequences - either the quality of braking deteriorates greatly even in dry weather (and rim brakes, even if they are 100% serviceable, behave worse in the rain), or they do not work at all.
If you suspect a brake problem, you need to check it first:
- Lift and spin the rear wheel.
- Squeeze the brake lever. Worn pads will be indicated by whistling and spinning of the wheel even at maximum clamping force.
- On a weakened cable and a damaged jacket, the pads will not respond instantly when pressed and will bounce when the handle is released.
- Proceed with adjustments or repairs.
Adjusting v-brake brakes is a simple and home procedure, it can be done in 10-15 minutes: 1. Adjust the brake lever: loosen the fastening bolt on the steering wheel and turn the fastening so that the hand is in a comfortable position. This is the first step towards using your braking system safely.
2. Tighten the fastenings of the arches on the feathers. Over time, the connections can become loose, resulting in uneven pressing of the pads and rapid wear.
3. Remove the linings and inspect them for wear. Strongly cut corners on products indicate significant wear and tear; we replace them.
4. Install and adjust the brake pads. It is very important to set them in the correct position. Using washers, which form something like a hinge, you can bring one edge of the pad closer to the rim and move the other away. For pads without cartridges, it is correct to install the entire surface parallel to the rim. In the case of cartridge pads, the front part in the direction of the axis of rotation should be closer to the rear:
5. Tighten or loosen the cable on the levers. Be careful not to overtighten the cable! Why is this necessary? The fact is that the arcs with pads must fire immediately when pressed and released.
6. Set the distance between the pads and the rim. Zooming in and out is done using this simple nut:
7. Synchronize the pads - when you press the handle, they should simultaneously touch the rim. This can be done using spring tensioner screws (located at the lower ends of the arms). By increasing or decreasing the tension of the pads, we achieve equal contact on both sides.
The setup is similar on any speed bike that has rim vector brakes.
Device
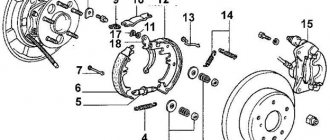
The design of the front caliper and the rear brake cylinder of a VAZ car differ in the appearance of the body and main parts. The disc brake device consists of the following main parts:
1 - Piston. 2 - Boot. 3 - Sealing collar. 4 - Caliper body. 6 - Air fitting. 7 - Springs that press the pads. 12 - Pads.
The drum brake uses the following parts:
2 - Bleeding fitting. 3, 11 - Anther. 4, 10 - Piston. 6, 9 — Piston seal. 7 - Housing.
Are there any advantages to a drum mechanism over a disk mechanism?
It would seem that this is simply impossible. How can an archaic system be better than a more modern one? But there are several undeniable advantages of drum brakes that cannot be taken away from them:
1. Because the contact patch extends around the entire circumference of the drum, the braking force transmitted to drum brakes is greater than that of a brake disc of the same size.
2. Don’t take it as a joke, but we read on specialized websites that using drum brakes saves weight, money for the production of an element for a car company and, ultimately, money in the wallets of car owners.
If we knew about the last two points for a long time - indeed, it is difficult to find a simpler and cheaper design, then we didn’t even know about the weight. Somehow the cast iron bass drum did not inspire too much confidence in this. However, if you consider that in a disc brake, in addition to brake hydraulics, there is also a huge disk (also cast iron), then that’s what it looks like. With the same weight, the drum brake will be more powerful due to the larger contact patch of the pads in it. But with the same power, it will be lighter than its modern counterpart.
Sources
- https://skolkogramm.ru/info/zamena-zadnego-tormoznogo-czilindra-vaz-2106-svoimi-rukami-foto-remont-vaz-2106
- https://prometey96.ru/modeli/ustrojstvo-zadnego-tormoznogo-cilindra.html
- https://avto-lover.ru/drugoe/zadnij-tormoznoj-cilindr-2108.html
- https://alfcars.ru/brake-system-diagram-and-repair/how-to-disassemble-the-brake-cylinder-vaz-2106-replacement-of-rear-brake-cylinders-vaz.html
- https://bumper.guru/klassicheskie-modeli-vaz/tormoza/tormoznaya-sistema-vaz-2106.html
- https://AutoManya.ru/lada-drugoe/remont-zadnego-tormoznogo-cilindra.html
- https://otdelka-remont.ru/remont-zadnego-tormoznogo-tsilindra-vaz-2106/
[collapse]
Diagnostics
The following signs will tell the motorist that repair of the brake wheel cylinder is approaching:
- Uneven operation of the wheels when braking, which can result in the car skidding. This is a sign of a stuck piston, which can cause the use of low-quality fluid or air entering the system.
- The indicator light is triggered when the fluid in the tank is critically low, or this is detected during a visual inspection, which indicates a possible leak of hydraulic fluid from worn cuffs or leaky pipes.
- The pedal is pressed with great effort, this can happen for all the reasons described above.
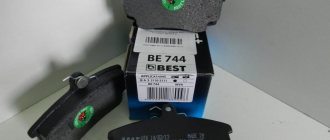
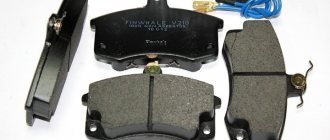
A stuck piston and a stiff pedal are not yet indicators for repairing and replacing working cylinders. You should pay attention to the thickness of the pads; if their wear has reached its maximum, this can cause the pistons to jam, since they practically do not work.
Initially, completely replacing the hydraulic fluid or bleeding the brake system may also help correct these problems. If these actions do not lead to a positive result, it is necessary to repair the working brake cylinder; fortunately, there is a repair kit for the working brake cylinder on sale, the set of which, depending on the make of the car, includes: cuffs, piston, boot and other components.
FAULTS
Symptoms of a malfunctioning TTS:
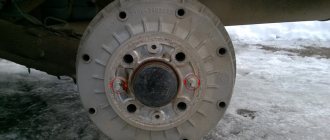
- The brake fluid leaves the reservoir;
- The rear drum is wet, fluid leakage is noticeable;
- The braking efficiency has disappeared, the pedal “takes” at the very end of the stroke, sometimes not from the first stroke.
Reasons for inoperability:
- Natural wear and tear;
- The cuffs are corroded due to mixing different types of brake fluid;
- Poor quality of the part;
- The pistons were squeezed out due to severe wear on the pads.
It happens that the pistons inside the housing become jammed. If this happens with the pistons spread apart, the car begins to constantly slow down and the drum overheats. You cannot drive with such a defect; the car must be urgently repaired.
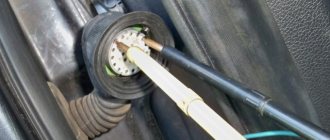
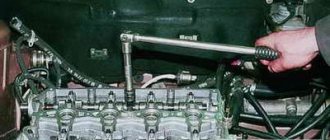
There is one nuance that is worth focusing on. Often, when bleeding the brakes, technicians try to unscrew the bleeder fitting on the cylinder and break off. Even WD-40 doesn't help. This happens due to the fact that over time, the “pumping” begins to boil in the ZTC body. Therefore, before bleeding the brakes, you should have a supply of new replacement parts.
There is also a tricky way that will help you avoid breaking off the fitting. Before unscrewing, you must carefully (do not break the fitting with a hammer!), but thoroughly tap the housing around the bleeder fitting and try to move it out of place.
After this, without using much effort, we try to weaken the “pumping”. Doesn't work? Then tap again. Most likely, patience will be rewarded, and problems associated with unscheduled cylinder replacement will not arise.
Repair work
Disassembling, repairing and replacing the brake cylinder of a VAZ car is not particularly difficult. Having purchased the necessary repair kit for the working brake cylinder, unscrew the wheel and, having disconnected the pipes, remove the faulty cylinder (the dismantling diagram will be described in more detail below).
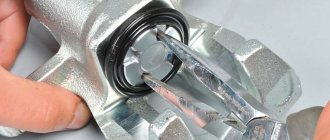
For convenience, by holding the body in a vice and removing the boot, we gain access to the retaining ring that secures the piston, after removing which we remove all the working parts.
After disassembling the housing, you need to rinse everything with brake fluid and inspect the housing mirror for mechanical damage.
If no damage is found, then open the repair kit for the working brake cylinder and replace the faulty parts.
A prerequisite, regardless of their condition, is the replacement of all rubber parts included in the repair kit for the working brake cylinder. This list includes: boot, cuff, etc.
Replacing a faulty brake cylinder
The replacement scheme in the VAZ family is almost the same for cylinders of both circuits with minor differences.
Initially, you need to prepare the necessary keys and plugs suitable for the size of the pipes. After removing the wheel and unscrewing the pipes, we put plugs on them to prevent fluid leakage. Having unscrewed the corresponding nuts, we dismantle the old cylinder and put a new one in its place, reassembling it in the reverse order. If, after replacement, wheel assembly is hindered by pads that are too far apart, you can file the ends of the pads, just don’t overdo it, as this may affect the operation of the handbrake.
After any manipulations with the brake system, it must be bled according to the diagram.
Adviсe
After this work, it is necessary to check the serviceability of the new element. To do this, press the brake pedal and lock it in this position (it is advisable to have an assistant). Next you need to spin the wheel. It must be in hanging condition. The drum should not rotate. If this happens, or when you press the pedal, liquid flows out of the fittings, check that the part is installed correctly.
It would be a good idea to check the serviceability on the go. Do this at low speed, because after bleeding the pressure in the system drops, and the first time you press the pedal, usually nothing happens. The car should brake well and hold the handbrake.