Repair / From Vladimir
- Signs that replacement is needed
- Required Tools
- Replacing the rear brake pads of a VAZ 2109
Tips for working on video
- How experienced car owners do it (video)
The braking system is your safety on the road. If the engine breaks down, then you simply won’t go any further, but if the brakes break down, on the contrary, you won’t be able to stop and the consequences can be different (hardly good). The cost of the pads is low and anyone can replace them, so you should not save on the vital “organs” of the car when replacing pads on a VAZ 2109 and other similar car models.
When and why to change
Why, of course, is a rhetorical question. No motorist wants to be left without brakes. Possible complications will only lead to higher repair costs:
- one of the wheels will jam while driving;
- due to extreme wear, brake fluid will leak;
- the caliper will break.
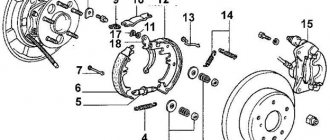
Rear wheel brake mechanism: 1 - brake shield, 2 - wheel cylinder, 3 - upper tension spring of the pads, 4 - brake pad, 5 - pad lining, 6 - brake drum, 7 - dowel pin, 8 - guide spring, 9 - lower tension spring
The question of “when” is directly affected by driving style and the quality of the pads. There are average indicators: for the front axle - 15-20 thousand km, for the rear axle (drum) - up to 100 thousand km. But this does not exempt you from regular checks.
Front wheel brake mechanism: 1 - brake disc, 2 - pad guide, 3 - caliper, 4 - brake pads, 5 - cylinder, 6 - piston, 7 - pad wear indicator (inspection window), 8 - o-ring, 9 - protective guide pin cover, 10 - guide pin, 11 - protective cover
Replacing the front brake pads of a VAZ-2109
To unscrew the caliper, you need to flare the lock washer that secures the bolt. Using an ordinary flat screwdriver, bend it in the appropriate direction; you can tap it with a hammer.
Then unscrew the top bolt. We only need to completely unscrew it, because we will not remove the caliper one hundred percent, but only fold it back.
And just loosen the bottom bolt a couple of turns and that’s it, the caliper will open. Do not use open-end wrenches.
Now, in order to discard the caliper, you need to release the brake hose by sticking it out from the landing site.
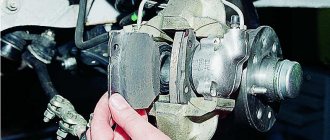
That's it, now the caliper will open up freely and we will have open access to the pads. You can take a closer look at everything.
READ Replacing brake discs without replacing pads
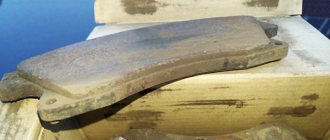
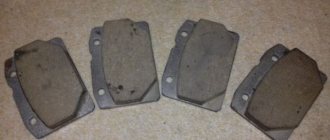
We take out the pads. The photo shows that they were still fine, practically unused, but they made an outrageous noise, they had to be replaced, most likely, some kind of fake was caught.
Before installing new pads, clean the guide along which the pad ; you can use a metal brush, sandpaper, or an ordinary screwdriver to remove dirt and oxides. Later you can lubricate it with grease to prevent it from oxidizing, or you don’t have to lubricate it.
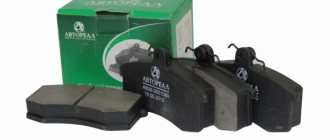
Now we are installing new pads. It’s better to take something ordinary, an original or a proven manufacturer like Ferodo. Chinese crafts tend to creak and are not as effective.
Now you need to press the caliper cylinder, otherwise the caliper will not fit onto the pads, because the thickness of the new pads is greater than the old ones.
When he presses in, he dresses normally.
Now we screw everything back, lock the bolts and secure the brake hose in its place.
Replacing brake pads VAZ- 2109 video summary
Required Tools
You will need radically different tool sets for the front and rear axles. Let's start with something simple. To replace the front disc brake pads you will need:
- flat screwdriver;
- open-end wrenches for 13 and 17;
- metal brush.
If you don't have WD-40, you can use kerosene.
Spray it from a disposable spray bottle The following list for replacing the rear linings of a VAZ 2109 (21099) may not be all you need, but you need to be prepared for difficulties. Full recommended list:
- hammer (preferably a larger one);
- pliers;
- flat screwdriver and metal brush;
- WD-40 lubricant;
- wooden block or board;
- two open-end wrenches for 13;
- 13mm head with extensions.
We put on gloves and get to work.
How experienced car owners do it (video)
When replacement is required
It should be said right away that the plant manufacturing the above-mentioned vehicle did not indicate the frequency of replacing brake pads. The thing is that their service life depends on a number of objective factors, including:
- driving style;
- Terms of Use;
- the quality of the friction linings and the material from which they were made.
The strongest indication of pad wear is when the car skids during heavy braking. However, this symptom is observed not only in the case of uneven abrasion, but also in the incorrect operation of the entire system.
Preparing for replacement
The vehicle is first placed on level ground. Its front wheels must be secured with chocks, since the rear part will need to be jacked up.
An additional danger for the owner is the fact that all work is carried out with the handbrake released.
Don't forget to also be sure to set the first gear before starting the replacement.
In order not to waste time looking for a tool, prepare it in advance. You will need:
- pliers;
- a set of regular spanners;
- wooden block;
- wheel wrench;
- 6-point sockets with extension.
Since replacing the brake pads requires removing the wheels, the bolts on them are loosened before lifting the car with a jack. Under no circumstances should they be torn from their place in a suspended state.
The guide pins are removed directly from the hubs (there are two of them on each). To do this, use a 12 mm socket wrench.
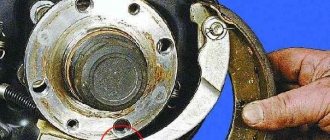
As a rule, removing the brake drum is not difficult, but sometimes it does not work. In this situation, a blank is used. Wood cannot, in principle, damage the above part, but a metal hammer will do this easily. From an impact, the drum, in particular, can crack or, for example, become deformed.
If you cannot remove it in any way, then you need to screw the previously removed pins into the threaded holes. They will then rest against the hub and press out the drum. It is important to tighten them as evenly as possible, otherwise, due to misalignment, the spare part being removed will jam tightly.
Required Tools
You will need radically different tool sets for the front and rear axles. Let's start with something simple. To replace the front disc brake pads you will need:
- flat screwdriver;
- open-end wrenches for 13 and 17;
- metal brush.
The following list for replacing the rear linings of a VAZ 2109 (21099) may not be all you need, but you need to be prepared for difficulties. Full recommended list:
- hammer (preferably a larger one);
- pliers;
- flat screwdriver and metal brush;
- WD-40 lubricant;
- wooden block or board;
- two open-end wrenches for 13;
- 13mm head with extensions.
We put on gloves and get to work.
Removing the pads
After all the above operations, it is possible to gain direct access to the pads. Before you remove them:
- loosen the handbrake drive cables;
- dismantle the resonator to get to the compensator;
- disassemble the muffler or use an extension with a 13 mm socket (use a ratcheting wrench - if there is not enough space, it is easier for them to work);
- Having unscrewed the lock nut, loosen the tension cable at the handbrake as much as possible.
Now it's time to completely remove the handbrake drive. To do this, use pliers to pull out the cotter pin from the pin holding it and recess the latter, after which the above-mentioned element is disconnected.
The middle spring coupler is unhooked with pliers, and behind it the lower limiting spiral is removed from the front block.
After:
- dismantle the spacer bar and pull out the lever that drives the brake device, freeing it from the cable;
- We disconnect the rear block, freeing it from the limiter that prevents it from moving in the transverse direction.
- If you have tightened the handbrake cable at least once, you will have to loosen the tension before replacing it. This is not as easy to do as we would like. We need an inspection hole or lift because we need to gain access to the center of the car's underbody. This “cunning” design is located behind the muffler (work with a cold car to avoid getting burned). In extreme cases, you will have to dismantle it, but usually keys with an extension cord are enough.
Use a pair of keys to work
When you get to the mechanism, completely unscrew the lock nut and loosen the main nut as much as possible.
Extended heads are more convenient to work with
- Remove the wheel and place it under the bottom of the car (for peace of mind). First, the most difficult part awaits us - removing the brake drum. When braking, it constantly heats up and cools down (sometimes sharply if you drive hot into a puddle), so the drum “sticks” very tightly. By standard means, dismantling is provided using two M8 bolts. You immediately need to unscrew the two guides (photo below) and screw the bolts in their place.
Remove the guides and replace them with bolts
Then slowly and one by one screw them in further (do not allow skewing) until the drum leaves its “home” place.
Continue dismantling the drum
- If the threads in the holes are torn and the disc does not give in, then move on to another option. Spray WD-40 on all contact points (especially in the hub area) and begin to firmly but carefully tap the drum with a hammer. Be sure to use a block of wood or board as a spacer to avoid damaging the disc.
- After the victory, we move on to directly replacing the rear pads. Using a flathead screwdriver or pliers, remove the mounting springs. Start with the top, then the bottom and middle.
- Now you can remove one block and spacer plate without much effort.
Carefully remove the partsWe take out the parts one by one
- To release the second block, disconnect the spring in the middle and the handbrake cable clamp.
Use pliers for safetyRemove the handbrake cable clamp
- Pad manufacturers rarely supply them with a drive lever, so you have to use the old one. To do this, pull out the locking pin, remove the washer and move the lever to the new block.
How to change the front ones yourself
Compared to the previous procedure, replacing the front pads will seem very easy. The wheel, of course, will also have to be removed. After which you can verify the need for repairs through a special “window”. The thickness of the friction material should not be less than 2 mm, otherwise you risk being left without brakes at any time.
Measure the thickness with a ruler; it’s better not to do such calculations by eye.
- There is a single bolt at the top of the caliper, held in place by a lock washer. It is necessary to straighten it using a flat screwdriver.
Use a long, thin, flat-blade screwdriver. If there is resistance, use a hammer. The bolt should be unscrewed while holding the guide with another wrench.
Secure the mechanism with the second anti-rotation key - The brake hose must be released from its mounting.
Remove the Brake Hose You can now “open” the caliper by moving it to the side. Remove the old pads.
Remove worn pads - To ensure that the new linings fit neatly into place, it is better to thoroughly clean all points of contact.
This is where a metal brush comes in handy. - Naturally, the new clutches are thicker than the old ones and it will not be possible to put the caliper back. Therefore, it is necessary to depress the brake cylinder. To do this you will need a large screwdriver. Close the brake mechanism without pads and press the screwdriver, like a lever, against the cylinder. It will take some effort, so be careful not to let the screwdriver come off. Then install new linings, close the caliper and tighten the mounting bolt.
Step 3
Step 2
Step 1 - Reassembly will be quick. Tighten the bolt, holding the guide with a second wrench, and bend the washer stopper into place. Don't forget to secure the brake hose and you can screw the wheel into place.
Complete the installation by snapping the washer stop and securing the brake hose.
How experienced car owners do it (video)
Replacing front brake pads on VAZ 2108, VAZ 2109, VAZ 21099
Note! In order to replace the front pads in a car, stock up on: 2 wrenches and a screwdriver, and we also advise you to take any rags with you, since the brake mechanism can be very dirty and needs to be cleaned of dirt!
A short :
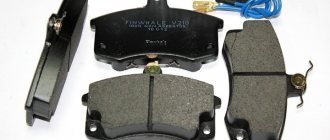
Where are the front brake pads located? The pads can only be seen if you remove the wheel from the car, but if you want to see them in full, then you will need to unscrew the top bolt of the brake caliper bracket, then discard the staples and you can easily pull them out and look at the pads (we remove the pads We’ll teach you a little below), but why take them out if you can look at them (specifically their thickness) only by removing the wheel from the car, for this, accordingly, first remove the wheel you need from the car and then through the long rectangular hole in the bracket (Indicated by a reddish arrow) you can examine the pads (Indicated by blue arrows) and the thickness that remains on the friction linings.
Note! Friction linings are one of the parts of the block itself, as the block consists of two parts, namely the body, which is made of metal (the body is indicated by 2 reddish arrows) and the friction lining, which is indicated by blue arrows, which is also carried out by this lining braking a car, what else, you understand that the brake pad must be inspected for its thickness and if the thickness is less than 1.5 mm, such a pad will need to be changed immediately, so the hardening should only be done on the friction lining and the body of the pad itself is not involved counts, so keep this in mind!
READ Replacing rear brake pads on a Chevrolet Niva
When is it necessary to change brake pads? The pads must be replaced, as was said a little earlier, if the thickness of the friction lining has become less than 1.5 mm, and also if the lining has become deformed (for example, cracks or deep chips have appeared on it), has moved away from the body of the pad itself, or if marks have appeared on the linings oil, then such a pad also needs to be changed and in no case should you mess around with it, turning on the brakes is the most important thing in a car!
Additional recommendations
- If you cannot depress the brake cylinders, open the cap of the brake fluid reservoir to reduce the pressure.
- If the pads wear unevenly, pay attention to the caliper. Most likely it will need repairs.
- When replacing the rear pads, change all the springs as well. They are inexpensive, but they will protect you from possible failures until the next replacement.
- The front caliper guides can be lubricated with graphite grease for smoother operation.
Replacing the pads on the front axle will not cause problems even for “dummies” of automotive repair. But from the back it’s not so simple. Assess your strengths and capabilities in advance: can you reach the handbrake cable and cope with a stuck brake drum? If yes, then everything will definitely work out.
Replacing the VAZ 2114 heater tap with your own hands
Do-it-yourself repair and replacement of the gas tank cap
How to replace brake pads on a VAZ 2108-VAZ 21099?
Note! Remember once and for all, if you want to change the pads in the brake mechanism of, for example, the front wheels, then be sure to change them on both wheels (the same with the rear wheels), because if you change the pads only on one side, you will still have the pads on the other side If you have old pads, then when braking sharply the car will pull to the side 100%, so you will put yourself and other people at risk, so if you decide to replace the pads, be sure to do it on both sides of the car!
VAZ 2109, 2115, 2108, 2114: detailed video on replacing rear pads
Removal: 1) First of all, hang up the wheel you need and remove it, after which you only need to hang up the wheel on which the brake pads will be replaced. (For information on how to remove a wheel, see the article entitled: “Properly replacing wheels on a car”)
2) Then open the hood of the car and see how much brake fluid you have in the reservoir (the reservoir is indicated by an arrow), if there is a lot of fluid and it reaches the MAX mark, then you will need to pump it out of this reservoir using honey a syringe or a rubber bulb, but only pump out a very small amount, almost a little, and pump out only if there is a lot of liquid at first.
Note! This is done so that when you press the piston into the brake cylinder, brake fluid does not start pouring out of this reservoir, because when you press the piston, the fluid will return accordingly, and the volume of liquid in the reservoir will increase slightly!
3) We will not further explain to you how to remove and install the brake pads specifically in this article, since if you take the entire family of VAZ cars, then in fact they all have a similar brake system, so for the upcoming removal of brake pads and their installation, see the article under title: “Replacing front pads on Priora”, paragraphs 3-6 and also in the article to which the link is given, also read the “Installation” section.
Installation: Installation, as noted earlier, is done according to the article the link to which is given a little higher.
Note! When you install new pads, for some time it will seem to you that your car will slow down as if the pads were purchased defective or simply very bad, because stopping the car will be bad and therefore you need to drive as carefully as possible the first time, but this is all that happens due to the fact that new pads need time to get used to, and only after they get used to (after about 50-100 km they will already get used to, and if you brake constantly, they will get used to even faster) the car will start to brake normally!
Additional video clip: For more information on how to replace pads on cars of the Samara family, watch a video clip that explains and clearly shows the process of replacing them.
When replacement is required
It should be said right away that the plant manufacturing the above-mentioned vehicle did not indicate the frequency of replacing brake pads. The thing is that their service life depends on a number of objective factors, including:
- driving style;
- Terms of Use;
- the quality of the friction linings and the material from which they were made.
The strongest indication of pad wear is when the car skids during heavy braking. However, this symptom is observed not only in the case of uneven abrasion, but also in the incorrect operation of the entire system.
Rules for operating vehicles in the nine
When operating the “nine”, it is necessary to strictly observe the scheduled maintenance periods not only for the engine, but also for the vehicle, and also to carry out repairs of the master brake cylinder (MBC) of the VAZ 2109. This applies to the friction linings of the front disc and rear drum brakes. Complete wear of the friction linings threatens unexpected vehicle failure in an extreme situation.
Periodically it is necessary to check the condition of the linings, monitor their level of wear and replace if necessary. It is necessary to carefully monitor the brakes of the VAZ 2109 in terms of fluid leakage through worn gaskets and seals.
Excessive wear of sealing elements is accompanied by:
- the risk of insufficient effort in the shopping center;
- pedal failure when driving;
- increasing braking distance.
All of the above creates very serious risks. A vehicle is one of the critical systems for ensuring the safety of the driver, passengers and other road users.
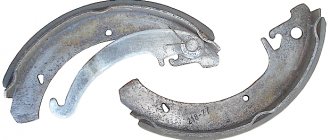
Replacement of rear brake pads of VAZ-2109
The nines have drum brakes at the rear, which is another hemorrhoid. Firstly, you will never know how old the pads are without removing the drum, and secondly, removing the drum is the biggest problem on all cars. We unscrew the bolts that secure the drum and then the fun begins.
The drum will not come off just like that; the pads make indentations in it, to which it later clings when you tighten it. This is true on all cars, not just on VAZ. To remove it, knock it down, take a heavier hammer and knock on the drum from the back side through the spacer so that the edge of the drum does not break off. Yes, this is a problem with all drums; the longer you don’t change the pads, the more pieces of the edge are missing.
If you are lucky and the drum comes off, then your eyes will reveal the blocks, tightened by some kind of springs. We remove the springs, and the pads will come out without any problems.
There is an expansion plate installed between the pads in the upper part, which can fall out if the pads are removed at once.
And the handbrake cable is attached to one of the blocks, but the block can simply be removed from the groove and it will simply come out.
Now we install new pads in the same way. It is best to tighten the springs with a screwdriver; they glide over it perfectly and simply fit into the mounting holes.
Features associated with replacing a brake drum
Some of them (relating to annual prevention and the use of proper lubrication) have already been mentioned. Another important point is that if one of the drums wears out and is replaced, the second drum must be replaced (even if it has less wear). This rule is strictly mandatory and has no exceptions.
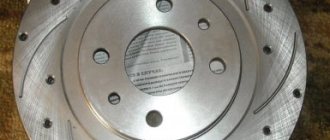
Brake drum installation
In addition, in case of almost all damage - cracks, chips, grooves, and others - the drum should be replaced; it cannot be repaired. The only case when the situation can be corrected is if there are small bevels (in this case, you can turn the part on a lathe until you get an even round shape). True, after this operation you should check its diameter - if after grooving it exceeds 201.5 mm, then such a drum can no longer be used.