The life and health of the driver and passengers depend on the condition of the braking system. Owners of “sevens” often independently monitor the condition and replace the brake pads of the car. This is a simple operation that does not require special tools or high qualifications. It is enough to have basic plumbing skills and know how to change brake pads on a VAZ 2107 .
↑ Front brake design of VAZ 2107
1 — fitting for bleeding the front brake drive; 2 — connecting tube of working cylinders; 3 — brake pad wear indicator wire; 4 — wheel cylinder piston; 5 — wheel cylinder clamp; 6 — brake pad lining; 7 - sealing ring; 8 — dust cap; 9 — pins for securing the pads; 10 — bolt securing the caliper to the bracket; 11 — steering knuckle; 12 — caliper mounting bracket; 13 — caliper; 14 — protective casing; 15 — cotter pin; 16 — pad pressure spring; 17 — brake pads; 18 — wheel cylinder; 19 — brake disc.
- Having disconnected the wires of the 3 front pad wear indicators from the plug connections of the wires, remove the cotter pins 15, and then the pins 9 with the springs, remove the springs 16 and the brake pads 17. Mark the pads so that during reassembly you can install them in their original places.
- Having straightened the locking plates, unscrew the two bolts 10 that secure the caliper to the bracket, and remove the caliper.
NOTE! It is possible to remove the front brake (without brake disc) complete with brake pads. In this case, it is enough to disconnect the plug connections of the brake pad wear indicator wires, disconnect the caliper hose and unscrew the caliper mounting bolts 10.
↑ Installation of front brakes
Installation of the front brake caliper is carried out in the reverse order of removal.
After installation, restore the brake fluid level in the reservoir and bleed the system to remove air.
What is needed to replace brake pads
To change the brake pads of a VAZ 2107, you will need the following tools and accessories:
- jack;
- wheel wrench;
- set of wrenches;
- hammer;
- bit or thin screwdriver;
- metal brush;
- rag (rags);
- a powerful flat-head screwdriver or pry bar;
- pliers;
- screwdriver;
- WD-40;
- new pads.
Important: VAZ 2107 pads must be changed only as a set: both left and right at the same time.
The front brakes of the “seven” are disc type, the rear brakes are drum. Accordingly, the design of the pads and the procedure for replacing them are different.
↑ Front brake caliper parts
1 - piston; 2 — dust cap; 3 - sealing ring; 4 — caliper with cylinders; 5 — connecting tube of wheel cylinders; 6 — air release fitting; 7 — pad pressure springs; 8 — brake pad mounting pins; 9 — cotter pins; 10 — springs; 11 — lining wear indicator wire; 12 — brake pads.
We install new ones
Before installing new pads, it is necessary to release the parking brake cable, as it may not allow the drum to fit onto the new pads. Assembly occurs in reverse order. The springs can cause difficulties, but if you act slowly, everything should work out. This is where the file mentioned earlier comes in very handy. Thanks to the pointed shank, you can easily hook the spring loops into the mounting holes.
During the assembly process, it may turn out that, despite the parking brake cable being completely released and the working brake cylinder being fully compressed, it is not possible to put the drum on the newly installed pads. The reason for this phenomenon may be the thickness of the linings, which often slightly exceeds the permissible limit. In this case, it is recommended to change them one at a time - first replace the more worn one with a new one, after a while we replace the second one.
↑ Disassembly and assembly of the front brake
- Disconnect tube 5 and remove dust caps 2 from the cylinders.
- Then, pumping a stream of compressed air through the brake fluid inlet, push the pistons 1 out of the cylinders on the caliper 4 and remove the O-rings 3 from the cylinders.
Assemble the front brake in the reverse order of disassembly. Lubricate the sealing rings, pistons and cylinder mirror with brake fluid during assembly.
After installation, restore the brake fluid level and bleed the hydraulic drive system.
Preparing for maintenance
The best place to perform operations of this kind on a VAZ 2107 is a garage box equipped for these purposes. The work is performed with the following tools:
- medium weight hammer;
- flat head screwdriver;
- drifts of the appropriate diameter;
- pliers.
A visual inspection of the discs is carried out to identify deep scratches and significant wear. In the first version, the part is polished on a special machine, and in the second it is simply changed. The condition of the brake disc should not raise any doubts among the driver.
Helpful advice : increased wear of parts is possible due to jamming of the pistons. When inspecting the brake mechanism, it is recommended to carefully check the cylinder boots. If damage is detected and the moving parts of the caliper are jammed, their immediate replacement is required.
Poor condition of discs and worn brake pads can cause an accident.
How often should you change front pads?
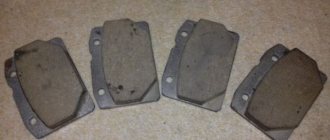
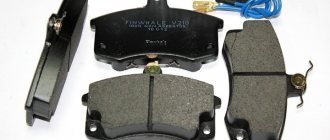
Let's start with the fact that on the VAZ 2107 the front brakes are represented by a disc system, which in some ways is much better than a drum one, but that’s not about that now. There are 2 pads on each caliper at the front, which are responsible for effective braking of the car. The front brake pads of the VAZ 2107 have the following appearance, shown in the photo above.
Essentially, the products are a steel plate onto which a special friction layer is applied. It is this friction layer that is the basis for car braking. When this layer wears off, which depends not only on the frequency of use of the brake pedal, but also on the nature of driving, then the car owner urgently needs to replace the brake pads on the VAZ 2107. If this is not done in a timely manner, then you understand what the outcome may be.
How often it is necessary to change the parts in question depends on the following factors:
- condition of the brake system;
- character and driving habits;
- product manufacturer;
- regular maintenance.
But our mentality is such that we don’t pay attention to how often we need to change the pads, and we do it when it’s pressing. The reasons that indicate that the car requires repair work on the brake system are due to the following symptoms:
- the appearance of extraneous sounds when you press the brake pedal: creaking or grinding;
- to brake, you need to apply force;
- When braking, the car begins to skid.
Approximately, it is necessary to replace the front pads on a car every 25-30 thousand km. But this range is average, since someone can travel 50 thousand km without replacing products, but they can only do 10. Let’s look at what it is to replace the front brake pads of a VAZ 2107 in more detail.
Detailed description of replacing front pads on a VAZ 2107
Replacing pads on a VAZ 2107 is a simple process that needs to be taken seriously. First you need to purchase new products. You need to buy them as a set, and replacement should be done on both wheels at once. After this, make sure that you have a basic list of tools:
- screwdriver;
- hammer and chisel;
- pliers;
- standard set of wrenches;
- WD-40 lubricant;
- Brake Cleaner (optional).
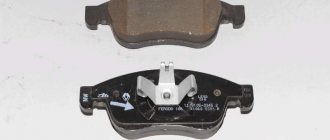
Required spare parts
On the Russian market, rear pads for “classics” are offered in a wide range. But practice shows that you should not purchase Chinese parts. They are of low quality: ferodo has a low coefficient of friction, and the linings come off quickly. It is advisable to purchase parts with the following article numbers: 2101-3502090-55, 21010350209055, 2101-3502090, VR311, BS-T 1001 N, 13.0460-2966.2, 602966, 2101-3501089, 2101-3 501800-82, 21010350180082, 2101-3501089. These are Russian and European products, the price varies from 500 to 1100 rubles, but you will put really high-quality parts on the car that will last a long time.
Removing and installing the drum
If during the diagnostic process you decide that it is necessary to remove the drum, you should figure out how to do it correctly. In fact, this work is not difficult, but it requires a certain skill. Or rather, you just need to understand what to do and why. First, prepare the necessary tools. You need to understand that having everything you need on hand will greatly simplify the repair procedure.
You will need:
- Jack;
- Balloon wrench for wheel removal;
- Car stand;
- A 13 socket wrench for cars starting from 1997, and a 15 socket wrench for cars of an earlier release;
- Hammer;
- Wooden die;
- Mount.
It will also be convenient to carry out work if there is an inspection hole. But this is optional. You can do without it.
Withdrawal occurs in the following order:
- Loosen the wheel screws of the wheel chosen to replace the drum;
- We jack up the car on this side. We install the stand and lower the jack a little. Our task is to ensure that the bottom lies tightly on the stand. In this case, the car will definitely not fall during further actions;
- Remove the wheel completely;
- Fill the guides with liquid key and wait a little;
- We unscrew the guides, for this you will need a key 13 for new cars, and 15 for older cars;
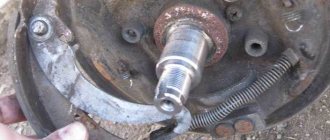
- Having unscrewed the guides, you can proceed to removing the drum. It can only be dismantled by knocking it off the bridge. But, do not forget that it is made of cast iron, so you cannot hit it with a hammer. You need to do the following. We take a wooden block, place it on the edge of the drum, and hit it with a hammer several times. We repeat the action on the opposite side. As a result, the drum will be removed from the support disk.
Separately, it is worth considering the process of installing the drum. This is not always an easy task. This is usually hampered by the pads, which are wider than the drum. Therefore, they need to be brought together. To do this, open the bleeder fitting slightly and use a pry bar to compress the pads together with the cylinder. As a result, you will be able to put the drum in place without much difficulty.
When product replacement is required
Both the front and rear wheels are characterized by the use of 4 brake pads to ensure effective braking. These products differ only in design, although the principle of operation is similar.
The rear pads of the VAZ 2107 are presented in the form of an arched steel structure, on the outer part of which a friction layer is applied. It is due to the friction of this layer against the inside of the drum that the car stops. If you do not replace the brake elements in a timely manner, this will be fraught with the development of unpredictable consequences, because the most important thing for any car is the serviceability of the braking system.
It is necessary to change the rear brake pads on a VAZ-2107 when the friction lining wears down to a thickness of less than 1.5 mm. It will not be possible to determine this fact without removing the wheel and dismantling the drum. But this is one of the main ways to determine whether the brake system is faulty. There is a second option, which is more convenient and does not require dismantling the rear wheel. To do this, you need to listen for signs of squeaking of the rear wheels, as well as grinding and lack of braking effect, but this can lead to damage to the drum itself. You can squeeze the handbrake while standing on a slope and check that it is working correctly. Of course, the cable on the handbrake may become loose, but if you tighten it and still have no effect, then it’s time to start replacing the pads. If the rear brakes are not functioning, then it is time to change the pads. It is recommended to change them as a set on both rear wheels, since they are often worn out at the same time. What is the process of replacing rear brake pads on a VAZ-2107 will be determined further.
Features of replacing rear pads
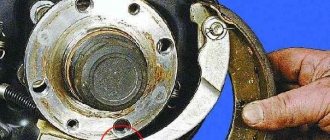
At the beginning of the work, it should be noted that the handbrake must initially be lowered to its lowest position. This will allow you to dismantle the brake drum and thereby get to the worn parts. To begin replacing the brake pads of a VAZ 2107, it is necessary to remove the rear wheel:
- There is a drum behind the wheel, which also needs to be removed. There are no problems with this, so we move on.
- After removing the drum, it is necessary to inspect the worn pads. If the thickness of the friction lining exceeds 1.5 mm, then there is no need to replace the products. Before carrying out further work, it is necessary to clean the mechanism from dirt and dust. To do this, you can use a brush or cloth.
- If the products need to be replaced, then you need to take a screwdriver and then remove first the upper, then the lower connecting springs. If you can’t dismantle it with a screwdriver, then you should use pliers. The photo below shows the springs that should be removed.
- Next, you need to remove the clamps, which consist of a rod, a washer and a spring. These washers must be rotated 90 degrees to remove them through the slots. This is what the washers that hold the pads look like.
- Similar procedures are carried out with the second block.
- After removing the springs and clamps, the pads are removed independently.
- The parking brake locking pin is straightened. The photo below shows the location of the locking pin. Now you need to unscrew the parking brake lever. This can be done using pliers. After this, the washer is removed, then the lever.
- During the dismantling process, you will have a question, what to do with the parking brake tip? It must be disconnected from the product and then left hanging.
- If necessary, it is recommended to replace all parking brake parts that were removed from the old product with new ones.
The rear brake pads on the VAZ 2107 should be installed in the reverse order of removal. Before installation, remember to bring the brake cylinder pistons as close as possible. Despite their simple design, installing them is much more difficult than the front ones. But having completed the procedure once, all subsequent repairs will be much easier for you.
The cost of new pads starts from 800 rubles per set, but it is important to purchase high-quality products, and not Chinese “consumer goods”. Not only the service life of the products, but also the braking of the car will depend on this
This completes the replacement procedure; if you have any questions, be sure to ask them.