An important condition for the safe operation of a vehicle is the possibility of identification. It should not depend on the weather or time of day. To do this, you need high-quality license plate illumination, providing good visibility in any conditions. The light bulbs used for this must be changed periodically. As a rule, owners use the services of a car service, and only the most experienced ones perform this procedure themselves. This allows you to save time and solve the problem immediately when it appears.
What lamps are used
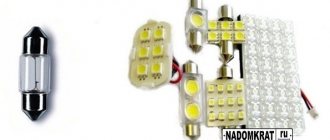
The Priora license plate is illuminated by two W5W (T10) lamps with a power of 5 W. They are located in a niche on the trunk lid (hatchback) or on its rear wall (sedan). The sign is illuminated from above, which makes the position of the devices more convenient. They become less dirty and do not experience mechanical stress. By default, incandescent lamps are installed, but many owners install LED analogues. They have noticeable advantages:
- consume less energy;
- have a long service life;
- give high brightness of light;
- are produced in a wide range.
The peculiarity of the license plate illumination on the Priora is the ability to replace only the burnt-out element. Unlike head lighting, there is no need to change a couple of devices at once. This simplifies the procedure and allows you to save a little.
The best manufacturers
License plate lights for Priora W5W with T10 base are produced by almost all well-known lighting manufacturers. Among the most famous and reliable companies are:
- a German company whose products are considered a model of quality and durability;
- Bosh. A world-famous brand, which is also home to Germany. Today it is a powerful concern whose enterprises are located in many countries;
- Philips. A famous company from the Netherlands, whose history goes back almost 130 years of successful work;
- MTF. A transnational company with factories located in Taiwan. Produces a wide range of lighting products;
- Narva. Another German company, which is more than 70 years old. Demonstrates the country's traditional quality and care in the manufacture of automobile lamps;
- Neolux. A European brand that will soon celebrate its 100th anniversary. It originally appeared in Switzerland, but then changed its home country several times. Today Neolux is a subsidiary of OSRAM;
- Koito. Japanese manufacturer producing all types of automotive lamps. It is distinguished by the high quality of its products.
The above list cannot be called exhaustive. There are many manufacturers, they all produce high-quality lighting devices.
How to replace it yourself
Replacing the Priora license plate light bulbs is done using a minimum number of tools and materials. The process is not very difficult. All you need is accuracy and caution, especially if the work is being done for the first time. You need to stock up on new lamps and you can get to work. Procedure:
Required Tools
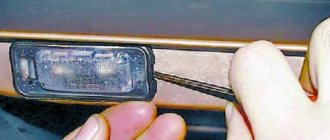
The easiest way to get to the license plate lights on a Priora is from the back of the trunk (or its door) by temporarily removing the trim. The only tool you need is a flathead screwdriver. It's better if it's long enough. This will allow you to remove the trim from the trunk door or rear compartment wall more cleanly and without damage.
Important! For a complete guarantee, you can prepare several spare pistons that secure the casing - sometimes they break, and it would be correct to immediately replace the defective elements.
Step-by-step instruction
First you need to turn off the car lights. Then they start replacing. Procedure:
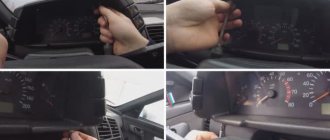
- Carefully remove the trim from the inside of the compartment or trunk door;
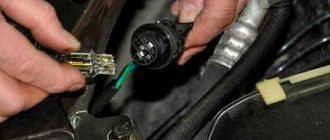
- use a screwdriver to pick up the license plate light, move it to the side and remove it from the socket;
- disconnect the block with wires. You can skip this point, but it is more convenient to work with the backlight completely disconnected;
- remove the socket together with the lamp from the lampshade. To do this, you need to turn it counterclockwise;
- remove the burnt out element and install a new one;
- assemble everything in reverse order.
Before installing the casing, it is recommended to check the functionality of the backlight and eliminate errors if any are found. This will avoid repeated removal of the compartment upholstery and unnecessary waste of time.
How to make light at a VAZ
Before we start looking at the various instructions for restoring lighting, one important note. The new light bulb must be removed from the packaging and installed, holding it with your fingers exclusively by the metal part. The glass bulb must not be touched, otherwise the new light will not last long!
However, if it is not possible to grasp the base, if there is no other way to insert the lighting element, then it is better to put rubber gloves on your hands before grasping the glass part.
Now let's talk about Ladas. First of all, let's see how to fix the sign lighting on a VAZ 2114. We will only need a flat-head screwdriver. Also read about replacing the windshield washer pump and replacing the rear window of a VAZ 2110.
- First of all, turn off the lighting and open the trunk. Using a screwdriver, we pull out the lampshade towards us.
- Disconnect the wiring plug.
- Having pulled out the rubber seal, we replace the lighting element.
- We collect everything on the way back.
As you can see, this is a fairly simple operation. It is much more difficult to do, for example, replacing the backlight of the VAZ 2114 stove controls - there you will have to dismantle the plastic panel.
Next, let's turn to Kalina. To change a burnt-out lamp from Kalina, we will also take a flat-head screwdriver.
Let's get started.
- We use a screwdriver to pry the lamp off from one side, and then pry that side out.
- We also snap out the second side.
- Having taken out the lampshade, disconnect the electrical wiring from it.
- We are reinstalling the lighting element.
- We do the assembly in reverse order.
It turns out that this process also does not cause problems. Here, by the way, it would also be much more difficult to replace the extinguished light bulb of Kalina’s instrument lighting. There it is also necessary to first completely dismantle the instrument panel.
Well, let's discuss the procedure on the Priora hatchback. On a sedan, you just need to open the trunk and pull out the dome light. To replace the license plate light on a Priora hatchback, take the same screwdriver.
- By snapping off the pistons, we dismantle the fifth door trim.
- Carefully disconnect the wiring terminal.
- Turning the base 90 degrees, we take out the lighting element.
- After installing the new part, we assemble everything as it was.
Well, obviously, this operation is not much more complicated than the procedures that were given above.
How to make lights on foreign cars
Next we will figure out how the procedure under study is done on popular foreign cars. For example, let’s look at the technology for changing a light bulb in a Hyundai Solaris. For work we will need gloves.
Replacing the license plate lamp
Timely replacement of the license plate light bulb from a burnt-out one to a new working one will avoid a fine of 500 rubles. This is exactly the amount of administrative punishment that awaits a motorist for such a violation, according to Article 12.2 Part 1 of the Code of Administrative Offenses of the Russian Federation. There are certain rules about this type of lighting that must be followed.
Light control
All cars that come off the assembly line have light bulbs installed to help you see the license plate from the rear. Typically, a pair of instruments is located in the lower trunk saber. Traditionally, problems do not arise for the first few years, but over time the lamp may burn out, so it is necessary to periodically monitor the condition of the backlight on cars with high mileage.
It is important to know that the driver can receive punishment not only for the lack of lighting of the license plate, but also for improper installation of the lights.
Almost every motorist can cope with the replacement. You don't even need special equipment for this.
The license plate light bulb can be replaced in the following sequence:
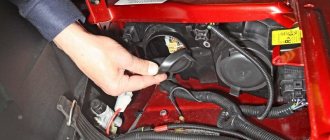
- disconnect the battery from the on-board power supply to prevent possible contact shorting;
- Using a screwdriver with a thin tip, we disassemble the lamp shade;
- We show maximum care when unscrewing the lamp, since many people damage the socket due to carelessness;
- in place of the burnt out lamp we install a similar lighting device with LEDs or a classic incandescent lamp;
- The next step is to install the lampshade, but we recommend degreasing it first.
After all the manipulations, we check the functionality of the node. To do this, we connect the battery to the network. Each car model has its own procedure.
Hyundai Solaris
Minor repairs on one of the most popular car models in Russia are not difficult. Before you replace the license plate light bulb in this car, you need to know that there are two lights there. They are located on the trunk lid under the trim.
Examples of replacing light bulbs on certain car models
Lada Kalina"
If the license plate on the Kalina becomes poorly illuminated, this means that it is time to replace the lamps. This is not difficult to do. If you follow the algorithm below:
- To begin with, on the right side you will need to press on the flashlight itself, slightly moving it to the left. It should simply come out even with light pressure.
- Next, the lampshade is pulled out simultaneously with the power wires. It is this step that greatly simplifies the process of replacing power lamps on a Lada Kalina car.
- Then you need to slightly lift the plastic clamp up, and then remove the plug that provides power.
- The lamp housing must be unscrewed by rotating carefully. This way you can easily pull out the lamp base.
- The next step is to pull out the lamp, slightly pulling it to the side. Then the lampshade will be very easy to remove from the base.
- In place of the burnt out light bulb, another one is immediately put in place.
- Next you need to repeat all the steps in reverse order.
That's all, all that remains is to check whether the light is on after changing the bulb.
Hyundai "Solaris"
Changing the license plate lamp in a Hyundai Solaris is also easy if you do everything in the right order. In this model, 2 lights are installed for illumination, located under the trim on the trunk lid itself. These lights are closely related to each other. To change light bulbs in Solaris, you need to follow the algorithm below:
- The first step is to remove the upholstery from the trunk lid. For this purpose, you need to use a reliable screwdriver to pry up the cover; it can be easily found in the trunk handle.
- Next, when using a Phillips screwdriver, remove the screws securing the handle, and then remove it.
- Using the same screwdriver, unscrew all the pistons that secure the trim to the trunk lid itself. First, the pistons are removed, and then the upholstery is completely removed.
- The lamp socket is turned clockwise only until it stops, and after that it is important to press it and unscrew it together with the bulbs from the housing. You need to pull the socket exactly to the length at which it will be easier for you to change the lamp.
- The lamp is removed from the socket very easily. Simply pull it out by the flask.
When the lamp is replaced, it is important to install all the necessary elements in the reverse order. This rule must always be observed, regardless of the make of the car in which the light bulb is changed. If all requirements and replacement procedures are met, the lamps illuminating the sign should operate without failure. Only then can we assume that the replacement was carried out correctly.
Nissan Qashqai"
The process of replacing light bulbs on a Nissan Qashqai is practically no different from the same procedure in other cars. But there are still some nuances that should be taken into account in order to make the replacement correctly:
- In a Nissan Qashqai, before replacing the backlight bulb, you need to remove the negative cable from the car battery
- Then you need to remove the lampshade. A regular screwdriver is suitable for these purposes. To simplify this process, you need to lightly press the lampshade, swing it left, right, and then pull it out.
- When the lamp cover is removed, you need to unfasten the connector. This will make it easier to pull out the light bulb.
- Then a new light bulb is installed. The assembly process is carried out strictly in reverse order to avoid errors during assembly.
- When the negative cable is installed in place, all that remains is to check the functioning of the backlight.
Lada Priora"
How to replace a license plate light bulb on a modern Russian car? Replacing the license plate light bulb on a Lada Priora car has virtually no differences from the procedure for replacing this element in Kalina.
This is quite simple to do, it is important to follow the instructions.
- To change the light bulb, you will need special socket wrenches. With their help, you will need to remove the plastic elements secured with special fasteners
- The rear chrome frame is removed by unscrewing all the nuts that hold it in place.
- The light bulbs are installed in a frame. It will take a little effort to get them out of the lampshades. The problem is that they are quite difficult to understand.
- When the lampshade is disassembled, it is important to ensure that the rubber seals are not lost.
- Replacing the license plate light bulb on a Priora takes a minimum of time. All parts are assembled only in reverse order. However, before reassembling it is worth checking whether the replaced bulbs work. If you do not do this right away, then if they are installed incorrectly, you will have to disassemble the entire structure again.
- The reassembly process is as follows: after changing the lamps, the shades are put in their places, and after them the frame. It must be securely fixed at all attachment points. Lastly, the plastic is installed in its place.
In this case, changing the room lighting bulbs on the Priora is complete.
Toyota Corolla"
If there is a need to replace the license plate lamps in a Toyota Corolla car, then you need to proceed in this sequence:
- To begin with, it is important to lower the lens of the flashlight for the easiest access to the lamps. This is done by pressing on the tongue, as a result of which the diffuser easily falls down.
- The light bulb socket rotates counterclockwise, this is done to make it easier to remove.
- The next step is to unscrew the screws, they hold the lighting elements, after which you can lower the flashlight.
- Then the paw holder is removed. To do this, it is important to rotate it counterclockwise as well.
- All that remains is to remove the lamp from the socket.
- After changing the number bulb on the Corolla, the entire process of assembling parts is carried out exclusively in the reverse order.
All the steps listed above are so simple that even a novice driver can easily perform them.
How to change the license plate light bulb on a Renault Logan
In order to change the license plate light bulb on a car, you need to remember some of the rules. First of all, you can install it yourself only for the license plate light, which is located at the back.
To do this, it is recommended to use LEDs with lenses, as they illuminate the license plate better and, according to the law, make it possible to see the license plate more clearly.
Although lamps of a wide variety of colors are commercially available, the law does not allow many of them to be used in practice.
Independent work for drivers
Replacing license plate light bulbs is carried out in the following sequence:
- Using a thin screwdriver, you need to disassemble the lampshade in half, starting from the middle.
- Carefully unscrew the standard lamps, as the holder on the body can be damaged quite easily.
- The next step is to install LED or incandescent lamps.
- Before installing it in its place, the lampshade should be degreased.
- After installing the lamp, you should check the operation; if the replacement of the rear license plate light bulb was carried out accurately, the license plate will be brightly illuminated.
When replacing the backlight on different car models, there are small nuances that differ during installation. To ensure the job is done correctly, these differences must be taken into account.
LED license plate illumination for Lada Vesta
| Dmitry July 28, 2022 at 12:02 pm | Very expensiveReply |
| / Administrator / July 28, 2022 at 10:54 pm | We adhere to the recommended retail. We’ll explain to you where the manufacturer sets such a price; they are now made on boards in small batches by hand. If the manufacturer raises enough money to launch these boards in China, they will cost less Reply |
| Vladimir December 16, 2022 at 07:23 | Good afternoon, I ordered diodes from you for license plate illumination (analogue from China), installed and turned off the rear lights and license plate illumination, why do you assure me that everything will be fine. Reply |
| / Administrator / December 17, 2022 at 1:08 pm | Hello, write to us by email. We'll look into the configuration of your car. The testers installed these kits, everything worked for them. Reply |
| Yuri December 21, 2022 at 10:17 pm | The same nonsense! I put it in the license plate light and it stopped lighting completely! So where to dig? Luxury package. The rest of the lights work. Moreover, I installed the same LED in the trunk lighting and it shines brilliantly. Reply |
| Kirill July 31, 2022 at 02:54 pm | it’s very expensive to change the light block after experiments =) Reply |
| Kirill August 1, 2022 at 10:48 am | I’m aware of that =) excellent boards, worth the money) this was my answer to the phrase “very expensive” Reply |
| Nikita August 19, 2022 at 02:18 pm | Price for a set of two pieces or for 1 piece? Reply |
| / Administrator / August 19, 2022 at 17:00 | For a set of two Reply |
| Gennady August 25, 2022 at 09:27 | No decoy (additional load resistor) is needed. The socket has a plus at the bottom and a minus at the top, and if they are connected at the lamp, then the key burns out in the additional body electronics unit. Reply |
| Yakovlev Ruslan Nikolaevich August 28, 2022 at 21:38 | Tell me, if the equipment is not Luxury, then you can put diode bulbs in the license plate lighting? I ordered diode bulbs with blende from Ali and installed them in the trunk and glove compartment lighting. Everything lights up, the flight is normal for a week. There are no signs of malfunction. Reply |
| Yakovlev Ruslan Nikolaevich August 29, 2022 at 19:55 | Explain to me, I don’t understand. I installed diode bulbs from Ali with fakes in the trunk and glove compartment lighting. Everything is on fire. I got around to putting the same bulbs in the license plate illumination. And the license plate illumination and the rear left marker stopped burning. At first I thought the BKE had burned out. It turned out okay, it burned out fuse.Comfort package.Reply |
| Efendiev Boris Elshanovich October 6, 2022 at 12:51 | Good afternoon! Tell me, I ordered from you the Vesta comfort equipment, diode license plate illumination. Will there be any problems with the electronics? Reply |
| / Administrator / October 8, 2022 at 02:13 pm | Good afternoon No, it won’t Reply |
| / Administrator / December 11, 2022 at 12:55 pm | yes, 2 bulbs included. Price varies by manufacturer. Chinese ones are cheaper due to more mass production. The Russian version is produced semi-manually. Reply |
| Ruslan December 11, 2022 at 01:11 pm | I ordered similar lamps from Ali, only with 6 LEDs. There were also deceptions, but they still did not want to light up in the license plate illumination, the fuse had blown Reply |
| Vladimir December 27, 2022 at 08:40 | Because of your boards, my license plate lights and window lights stopped working. Lada Vesta (luxury) the fuses are all intact, and what should I do now in this case?Reply |
| / Administrator / December 30, 2022 at 07:29 pm | Hello, please write to us by email. You purchased an analogue, right? Reply |
| Petrov Yuri Nikolaevich February 28, 2022 at 10:06 | I bought these. Moreover, the sellers assured me that everything would be fine. The result is that the fuses for the side lights were taken out, the lamps were returned and fuses were purchased. I think these lamps should be removed from the assortment out of harm’s way. Reply |
| / Administrator / February 28, 2022 at 14:30 | Did you take the Chinese equivalent? if so, then it has already been taken out of stock. But the original development did not cause any problems for anyone. Reply |
| Petrov Yuri Nikolaevich March 2, 2022 at 12:53 | I took exactly what is indicated here. I took it from Belorusskaya. I blew the fuse. But I don’t know what your sellers gave me - a Chinese counterfeit or not. What they gave out and those that look similar in the photo here. Reply |
| Anton July 4, 2022 at 09:32 | I changed the trunk light, glove compartment light and footwell lights in the doors. I installed LED modules and there were no problems with the BKE or fuses. It is not clear where such problems come from. Maybe you are confusing the polarity? Reply |
| / Administrator / July 5, 2022 at 04:49 pm | Good afternoon There are no problems with this LED backlight. Its manufacturer immediately makes sure that no problems arise. At one time there was a problem with analogueReply |
Ceiling lamp
All illumination of the room is carried out by the lampshade into which the lamp is directly installed. It is the lampshade that scatters the light and fully illuminates the license plate of the car. It happens that when dismantling or in the process of replacing lamps, the lampshade may break. If this happens to you, then do not panic, lampshades are sold at any auto parts store.
Catalog number of the Priora lamp: 2170-03717010-00;
Its price is: from 100 to 200 rubles;
You should also not forget about the lampshade gasket; it is necessary to protect against moisture getting into the interior.
Gasket catalog number: 2170-03717012-00;
Cost of laying: from 20 rubles;
The lampshade is the same for all Lada Priora models.
Lamps
Lamps installed from the manufacturer's factory have a filament. After the first replacement, many install brighter LED lamps in place of the standard ones, which can illuminate the number much more efficiently and prettierly, giving the car a more beautiful look.
Standard lamps have the number W5W. The incandescent lamp has a power of 5W, which is quite enough to illuminate the room.
Cost of W5W lamp: from 20 rubles;
You can also install LED analogues instead of the standard lamp. LEDs consume less electricity and have a higher luminous flux.
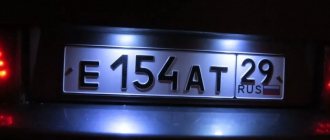
It should be noted that according to the law on the safe operation of cars, the consecration of the license plate must allow one to see letters and numbers from a distance of at least 20 meters.
What kind of lamps are in the lampshade?
Priora state sign illumination lamp - W5W. The standard part received the “E” conformity mark. These lamps comply with international safety requirements. They are standard, replaced by new LEDs with different shades of color.
When replacing the lamps of the state sign illumination device, consider the advantages of the new lampshade: LEDs are brighter, will last longer and can produce light of different shades. Therefore, every time we change a lighting fixture, we can finally decide to replace them with LEDs. The main thing is that the light must be bright enough so as not to violate the adopted Law.
- Numbers and letters must be visible at a distance of 20 meters.
- Diodes for license plate lighting.
What is needed for work and what kind of lamp is there?
Almost every Priora owner has everything needed to replace license plate light bulbs:
And, of course, you will need new light bulbs. Therefore, before we begin the replacement, let’s find out what the light sources are for the Priora license plate illumination. The manufacturer uses two W5W incandescent lamps with a power of 5 W each for these purposes.
Standard W5W light bulb for room lighting in Priora
If desired, the standard incandescent license plate lamps in the Priora can be replaced with LED ones. The easiest way to buy such lamps is because the industry produces W5W LED lamps, but craftsmen make them from ordinary super-bright LEDs. Since the light output of LEDs is approximately 6-8 times higher (depending on the design and manufacturer) than that of incandescent lamps, it is enough to take the 1 W option.
LED room lamp W5W
Replacing the Priora License Plate Light Lamp
Preliminary license plate replacement
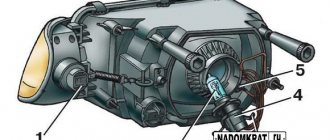
Replacing headlights Lada Priorat
Depending on the manufacturer, Lada Priore uses two types of block headlights. To change the bulb on the left headlight, you must first remove the battery.
The lamp replacement procedure is closed:
- remove cover 2;
- disconnect wire block 7 from the faulty lamp;
- remove antennas 6 of the spring clip from the grooves;
- remove the lamp;
- replace the lamp and replace it in reverse order. In this case, keep the work lamp close to the base and never touch the glass part.
How to change the position of the lamp in the headlights:
- remove cover 1;
- disconnect the wires from the chair in the reflector 5 from the lamp holder holding the lamp;
- remove the lamp from the holder;
- Replace the lamp and replace it with the lamp holder in the socket, applying force to the socket body.
Replacing license plate lamps
After six months of using the car, I noticed that one of the license plate lights began to shine poorly. Upon closer examination, it was discovered that water had entered it; the metal diffuser had rusted and stained the water.
The lampshade contains a regular 5 W incandescent lamp. When the backlight is used for a long time, the reflector and the lamp itself overheat greatly, which subsequently leads to melting of the lamp socket. To solve this issue, it was decided to replace incandescent lamps with LED lamps with a color temperature of 3200K. And since the lamp housing does not contain a reflector, it is advisable to use directional LED lamps.
Upon closer examination of the base of the standard lamp, it turned out that the arrangement of the contacts in the socket is not quite usual. Installing an LED lamp in such a lamp would only lead to a short circuit in the circuit and failure of fuse F14.
Later, lampshades manufactured by SEMZ were purchased - 1118-3717010-02, pictured with a black socket. The lampshades are more airtight than standard ones, which means they are more durable.
The main difference from the standard lamp is the location of the contacts in the socket.
With such a lampshade, there is no need to think about the location of the lamp base contacts.
This modification made it possible to increase the reliability of the backlight, increase the illumination of the license plate area and the opening of the 5th door while reducing energy consumption.
Replacement of license plate lamps for VAZ Lada Priora in auto repair shops in Moscow
18 car repair companies
- TTS Motors
- Pyatnitskoe highway, 2
- +7 (495) 24… show all
- The site of the company
- Lexus on the market
- Motorway
- Bers-auto
- Lorant
- Auto-rad
- Technical center gm east
- Auto complex
- Ddcar
- Nivus
- Garimotors
- Master MB
Popular companies
Replacing rear license plate lamps
Hi all! The light bulb in the right rear license plate light stopped shining. Having bought some light bulbs, I started to make some. We remove the lining of the fifth door, for which we first pull it in the area of the corner, which is above the head, until the clip snaps off, and then we begin to carefully snap them all off along the width. Then the far side. Disconnect the connector from the lampshade and turn the lamp base 90 degrees. We change the lamp and put everything back in place. Please note that the lamp base has two protrusions of different widths, and there are two corresponding cutouts in the lampshade, so it can only be inserted in one position, and when you insert it into a lampshade installed on a car, this is not visible.
In my case, the rear saber was removed (unscrew the 4 nuts to check the absence of rust underneath. The lampshades were removed from the car. And this is where the release clamp often breaks, which is what happened to me.
I had to think about how to secure it. I took a washer with a rubber gasket from a roofing screw, a self-tapping screw about 1 cm long, and twisted it into the bottom of the lampshade. And this combination pressed the lampshade to the body very well, while the structure remained collapsible, which will allow you to change the light bulb if necessary.
There is a rubber gasket between the bottom of the lampshade and the body, which is pressed well, so I think that water will not get into the lampshade through the self-tapping screw with the gasket. We assemble in the reverse order, not forgetting to connect the connectors to the lampshades. Let's check. Everything is working.
Rear number plate illumination
Rear license plate illumination is a mandatory attribute of every car.
For keeping this external light device in a faulty condition or in a condition that does not comply with the law, several types of administrative penalties are provided: warning, fine, deprivation of rights.
This article will tell you what a rear license plate light should be like, how to modernize it and what rules should be followed.
Legal aspects
In accordance with the regulations of the Road Traffic Rules (SDR), each car must have a rear license plate light, activated when the side lights are turned on.
This external light device must be turned on while the vehicle is moving at night. In this case, the brightness of the lamps must be sufficient for the inspector to be able to identify the state. car number from a distance of 20 meters.
The absence of illumination or an unreadable car number for any reason is regarded as a violation and, in accordance with Article 12.2 Part 1 of the Code of Administrative Offenses of the Russian Federation, entails a warning or a fine of 500 rubles.
The situation can be corrected and thereby improve the illumination of the registration plate by upgrading the standard lights. The most common way is to install LED light sources: modules, rulers, strips. However, this innovation can be regarded as a change in the design of the car with all the ensuing consequences.
Firstly, if the car is not involved in road traffic (not in use), then the violation cannot be detected.
Secondly, if the changes made have been certified by the traffic police and have documentary evidence, then the modernization was carried out according to the law.
GOST 8769-75 (updated on August 1, 2013) in paragraph 2.8.2 states that the rear registration plate of a car must be illuminated by a stream of white light.
According to this clause, a ban is automatically established on illuminating the license plate with any other light, with the exception of shades of white.
It turns out that the bright and rich colors of LEDs (blue, red, green) according to the law cannot be used in organizing rear license plate illumination. They can add ambiguity and confuse drivers of vehicles following behind.
This violation is interpreted by the inspector under Article 12.5 Part 1 of the Code of Administrative Offenses of the Russian Federation with a warning or an administrative fine of 500 rubles. Another thing is the backlighting of the front license plate. According to all regulatory documents, it should be absent.
Penalty for installing state lighting. numbers in front will be more strict - deprivation of rights for 6–12 months. with confiscation of lighting fixtures (Article 12.5 Part 3).
Taking into account the current standards and rules, we come to the conclusion that it is possible to convert the rear license plate illumination to LED with your own hands, but without unnecessary fanaticism
The main thing is not to attract the attention of officials with too bright a light, illuminating not only the sign, but also part of the roadway, and not to make a multi-colored decoration out of the car license plate illumination
Instructions: replacing the license plate light bulbs of a Priora car
The illumination of the Priora GRZ can be considered an insignificant element. VAZ-2170 cars have many light bulbs: they help you navigate inside the cabin or trunk in the dark. The license plate light must illuminate the license plate of the Priora car, otherwise the traffic police will have questions. If the lighting does not work, it would be more advisable to replace the light bulb in a timely manner; its price starts from 200 rubles. The process itself is quite simple. The Priora license plate lamp can be standard or LED. On hatchback, sedan and station wagon cars, the replacement procedure is identical.
The electric illumination of the Priora's license plate does not help the driver - it serves the traffic police officers to identify license plates on cars. But it will not be possible to refuse such assistance, because the need for the correct operation of small lamps over the gas protection zone is justified by legal requirements.
Replacing license plate light bulbs for Lada Priora, Kalina and Vesta
To illuminate the license plate of Lada cars, two lights are installed in the trunk lid. During vehicle operation, the lamps inside may burn out. To replace them as quickly and simply as possible, we recommend using these instructions.
Before starting work, make sure that the vehicle lighting is turned off. On Lada Priora, Kalina and Vesta cars, the rear license plate light is located in the socket of the trunk lid lining. Screws are not used to hold it in place; clamps are used instead. To remove the lampshade :
- pry off the lamp on the left side (Fig. 13-1, No. 1) using a flat-head screwdriver;
- move it to the right, disengage the latch and remove the light from the socket in the trim (No. 2) of the trunk lid.
How to change the license plate light:
- disconnect the block with wires as desired;
- remove the socket together with the lamp (Fig. 13-2, No. 2), turning it counterclockwise;
- remove the lamp (No. 3) from the socket by pulling it towards you;
- Installing a new lamp in the license plate light is performed in the reverse order.
In practice, owners of Lada cars may have difficulties. For example, the length of the wires is not enough to remove the lamp from its seat. In this case, you will have to remove the trunk lid trim and unscrew several screws securing the rear trim (popularly “saber”). This process is shown in the video:
Priora state sign illumination lamp - W5W. The standard part received the “E” conformity mark. These lamps comply with international safety requirements. They are standard, replaced by new LEDs with different shades of color.
When replacing the lamps of the state sign illumination device, consider the advantages of the new lampshade: LEDs are brighter, will last longer and can produce light of different shades. Therefore, every time we change a lighting fixture, we can finally decide to replace them with LEDs. The main thing is that the light must be bright enough so as not to violate the adopted Law.
- Numbers and letters must be visible at a distance of 20 meters.
- Diodes for license plate lighting.
Hello. Today we will show you the process of replacing license plate lamps on a Lada Priora, and also list the tools for the job.
Replacement process
- Open the trunk and use a slotted screwdriver to unclip the clips securing the plastic trim of the trunk lid. It is better to wrap the screwdriver with masking tape so as not to damage the paintwork on the trunk lid.
- After removing the plastic cover, unscrew the four nuts securing the saber. Eight nuts for the head, location in the photo below.
- Squeeze the clamps on the sides and disconnect the power connectors for the license plate light bulbs.
- We pull towards ourselves and take out the saber.
- We grab the lampshade and pull it towards ourselves. It's on the latch.
- We take the lamp socket and turn it 90 degrees. After turning, remove the lamp socket.
- We remove the burnt out lamp and install a new one. There are no tricks, I took it out and inserted a new one.
- We insert the socket with the lamp into the lampshade and turn it 90 degrees to fix it.
Next we reassemble:
- We install the lampshades in the saber.
- We install the saber and connect the power connectors.
- We secure the saber with four nuts.
- Snap on the decorative plastic trim.
Video lesson
Step-by-step replacement instructions
Having scoured the Internet, I found a bunch of “useful” recommendations for replacing the Priora license plate light bulbs. Some people rip the lights out of the rear trim, which almost always results in broken latches. Others pull out the lights, but before that they also remove the upholstery and this very rear trim (“saber”).
The result of such a replacement is a lot of work and again broken latches. There is no need to unscrew or tear out anything except the upholstery!
If you have purchased the license plate light bulbs and have a screwdriver at hand, then you can probably start. First of all, you need to remove the trim from the trunk lid (door), which is attached to regular clips. Open the lid, insert a screwdriver between it and the upholstery in any of the corners. Lightly press the upholstery, snapping off the corner piston.
We look for the next piston in the resulting gap and, driving a screwdriver into this place, tear it off too. Go ahead and completely remove the trim from the trunk lid.
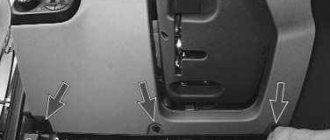
Final removal of the tailgate trim of Lada Priora
At the level of the rear trim we see two license plate illumination sockets.
Now you know how to quickly, safely and without unnecessary work replace the light bulbs in the sign lights in the Lada Priora Hatchback (Station wagon). I hope the information provided will be useful.
Source
Main conclusions
Replacing the license plate light on a Lada Priora car is not difficult, but requires some preparation. Most of the time is spent dismantling and reinstalling the door trim or trunk compartment. The rest of the procedure is simple:
- removing the lampshade with the light bulb:
- disconnecting the burnt out element and installing a new one;
- reassembly and installation of the lampshade.
The procedure is performed with only one flat screwdriver; no special tools are required. Explain your methods for replacing the license plate illumination on a Priora in the comments.
Types of lamps used in Priora
- H7 – long-distance;
- H15 – long-distance + daytime running gear;
- PY 21W – rotary;
- P21 W – reverse;
- P21 and 5W – brake lights and side lights;
- H11 – fog lights;
- C10 W and C5 W – interior and luggage lamps;
- W5W – front dimensions;
- H1 – long-range without daytime running lights (installed on cars until 2013).
Installation Tips
- When buying new elements, it is worth paying attention to the fact that in addition to sizes 36 mm, which are suitable, there are also sizes 41 and 38 mm, which are not suitable.
- They have polarity, so before replacing elements on the Chevrolet Niva, you should turn on the backlight and only then carry out the installation.
- If, when examining the light bulb, the bulb turns black, but continues to shine, it should also be replaced as it will soon fail.
- Try to avoid moisture, as the device will quickly fail if water gets in.
How to do everything yourself
The backlight bulbs need to be changed in this order.
- To begin with, the lamp shade itself is disassembled, this is done starting from the middle, using a thin screwdriver.
- The standard lamps must be unscrewed very carefully, as it is quite easy to damage the place where the lamp is attached to the car body.
- The next step is to install a new LED or incandescent bulb.
- After the new lamp is screwed in, you can reinstall the lampshade. Before installation, it must be thoroughly degreased.
- When the installation process is completed, you need to check whether the license plate light is working. If everything is done correctly, then the license plate will have bright lighting.
Important Features
According to traffic regulations, with the onset of darkness, and even under conditions of limited visibility, the license plate must be illuminated in white or yellowish colors.
This is necessary not only so that other road users can see the license plate number of the car, but also to determine the direction of movement of the car.
Why, in this case, is it prohibited to illuminate license plates in other colors? So, if blue and red lamps are used as lighting, this may well cause an emergency on the road. This happens due to the fact that in the dark the driver’s perception of colors changes.
Do I need to contact specialists?
Not all car owners are in a hurry to change the license plate light bulbs if they malfunction. In some car models, the driver is simply unable to cope with the replacement on his own: the wires are too short, it is impossible to get the backlight bulb or disassemble the ceiling lamp. In such situations, it is advisable to seek help from specialists at the service station. They know the nuances of replacing license plate lights in most car brands, and therefore will solve this problem almost instantly.
Why do you need license plate illumination on a Priora?
The legislation of the Russian Federation strictly regulates the rules that relate to the cleanliness and readability of state registration plate symbols on citizens' cars. You cannot operate a car with unreadable license plates, much less pollute them. At night, a similar rule applies so that the car can be recognized.
According to the Law, all symbols on license plates must be readable from twenty meters - this is checked by a traffic police inspector. At night, it will be physically impossible to see the numbers and letters even at a closer distance and with good lighting of the route. Therefore, the lighting must work at night as soon as the driver moves the switch behind the wheel.
If it does not work, the driver will be fined 500 rubles and it will be cheaper to replace the light bulb. It is understood that in this way a person is hiding from receiving fines from traffic cameras and can confuse police officers during a chase. The lights above the license plate are a safety measure that applies equally to all road users.
License plate lights on a Priora: how to choose the best bulb and replace it yourself
An important condition for the safe operation of a vehicle is the possibility of identification. It should not depend on the weather or time of day. To do this, you need high-quality license plate illumination, providing good visibility in any conditions. The light bulbs used for this must be changed periodically. As a rule, owners use the services of a car service, and only the most experienced ones perform this procedure themselves. This allows you to save time and solve the problem immediately when it appears.